2001 BMW 325Ci CONVERTIBLE Index
[x] Cancel search: IndexPage 41 of 215
41n
IndexDataTechnologyRepairsCar careControlsOverview
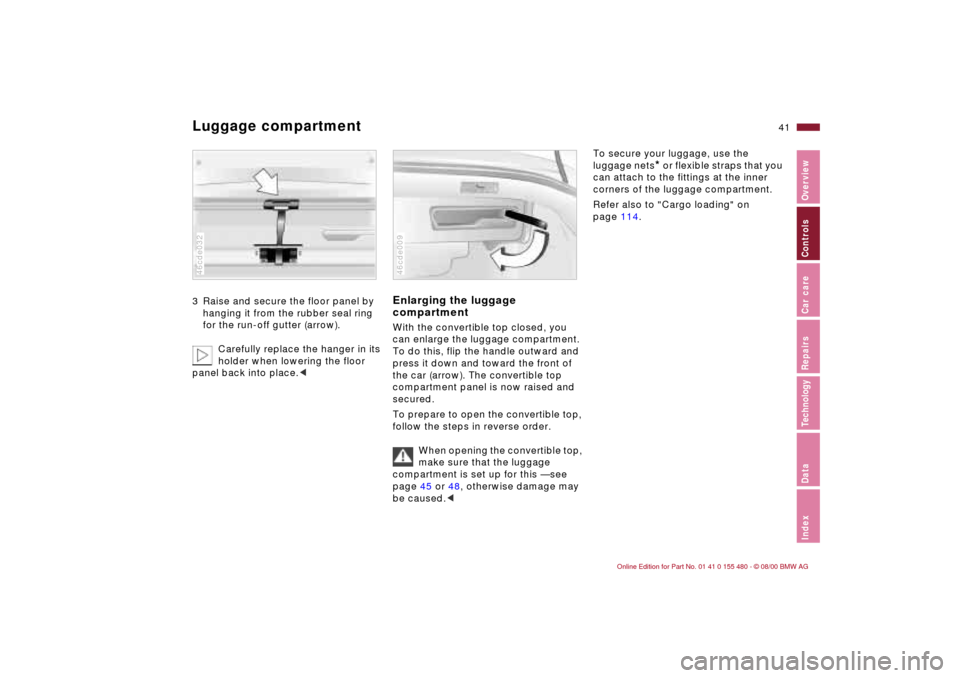
Luggage compartment3 Raise and secure the floor panel by
hanging it from the rubber seal ring
for the run-off gutter (arrow).
Carefully replace the hanger in its
holder when lowering the floor
panel back into place.<46cde032
Enlarging the luggage
compartmentWith the convertible top closed, you
can enlarge the luggage compartment.
To do this, flip the handle outward and
press it down and toward the front of
the car (arrow). The convertible top
compartment panel is now raised and
secured.
To prepare to open the convertible top,
follow the steps in reverse order.
When opening the convertible top,
make sure that the luggage
compartment is set up for this Ñ see
page 45 or 48, otherwise damage may
be caused.<46cde009
To secure your luggage, use the
luggage nets
* or flexible straps that you
can attach to the fittings at the inner
corners of the luggage compartment.
Refer also to "Cargo loading" on
page 114.
Page 43 of 215

43n
IndexDataTechnologyRepairsCar careControlsOverview
Alarm system
*
>The indicator lamp flashes for
10 seconds when the system is
disarmed: an attempted entry has
been detected in the period since the
system was armed.
Following triggering of an alarm, the
indicator lamp will flash continuously.Avoiding unintentional alarms The tilt alarm sensor and interior motion
sensor may be switched off at the same
time. You can do this to prevent a false
alarm from being triggered (in garages
with elevator ramps, for instance, or
when the vehicle is transported by
trailer or train):
Lock the vehicle (= arm the system)
twice. Press button 2 on the remote
control twice in succession or lock the
vehicle twice with the key. Refer to
page 34.
The indicator lamp lights up briefly and
then flashes continuously. The tilt alarm
sensor and the interior motion sensor
are deactivated as long as the system is
armed.
Reset the alarm to reactivate the tilt
alarm sensor and the interior motion
sensor.
Interior motion sensor Transmitter and receiver for the interior
motion sensor are located in the front
area of the center console, invisible to
the driver, and in the back area of the
center console under a rack.
However, be sure to deactivate the
interior motion sensor (see previous
column) if children or animals are to
remain in the vehicle.
For US owners onlyThe transmitter and receiver units
comply with part 15 of the FCC (Federal
Communication Commission) regula-
tions. Operation is governed by the
following:
FCC ID: LTQSDR2G5
Compliance statement:
This device complies with part 15 of the
FCC Rules. Operation is subject to the
following two conditions:
>This device may not cause harmful
interference, and
>this device must accept any interfer-
ence received, including interference
that may cause undesired operation.
Any unauthorized modifications to
these devices could void the
user's authority to operate the equip-
ment.<
Page 45 of 215
45n
IndexDataTechnologyRepairsCar careControlsOverview
The manual convertible top The fabric top offers perfect protection
against weather and one person can
open and close it easily and simply.
So that you will get the most out of your
convertible, here are a few tips: it is
advisable to close the convertible top
when the vehicle is parked. The closed
convertible top not only protects the
passenger compartment from unfore-
seeable damage from the weather, it
also provides a certain degree of theft
protection.
In addition, keep valuables only in the
locked luggage compartment, even
with the convertible top closed.
Never mount a roof-mounted luggage
rack on the convertible top.
To close the electric power
windows while driving: always be
sure to close either the rear wondow
first or all 4 windows at the same time,
otherwise, at high speeds, the windows
may not close completely.<
Open the convertible top
Operate the convertible top only
when the vehicle is stationary.
With the luggage compartment lid
open, you will not be able to unlock the
convertible top compartment lid to
avoid any possible damage.<
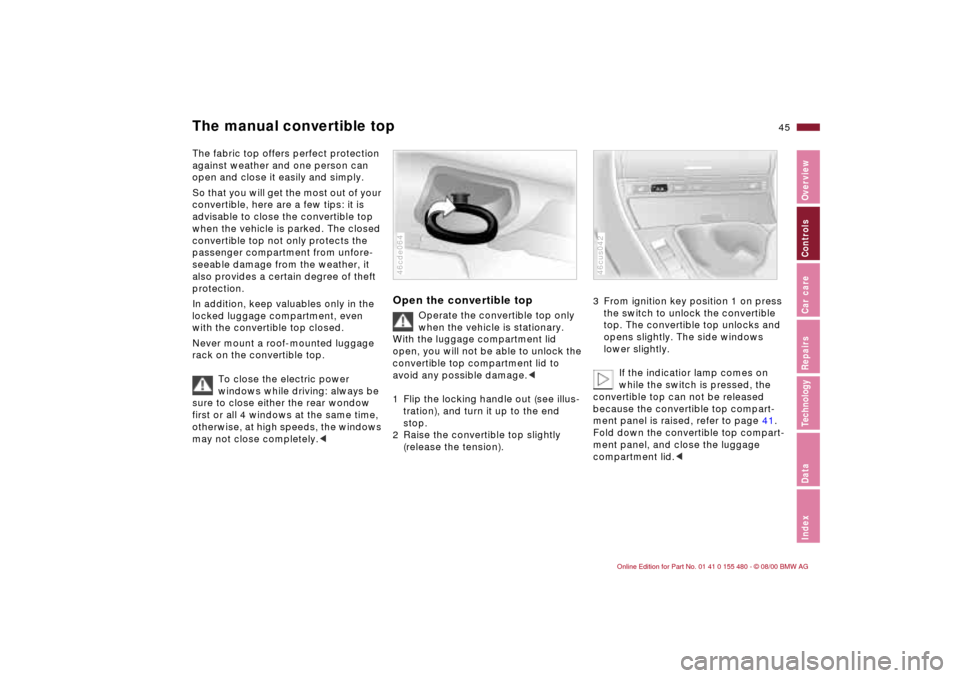
1 Flip the locking handle out (see illus-
tration), and turn it up to the end
stop.
2 Raise the convertible top slightly
(release the tension).
46cde064
3 From ignition key position 1 on press
the switch to unlock the convertible
top. The convertible top unlocks and
opens slightly. The side windows
lower slightly.
If the indicatior lamp comes on
while the switch is pressed, the
convertible top can not be released
because the convertible top compart-
ment panel is raised, refer to page 41.
Fold down the convertible top compart-
ment panel, and close the luggage
compartment lid.<46cus042
Page 47 of 215
47n
IndexDataTechnologyRepairsCar careControlsOverview
The manual convertible topCentral locking will unlock automati-
cally after the convertible top compart-
ment lid has been closed, i.e., the
luggage compartment lid is no longer
locked and can be opened again.
To avoid permanent damage from
moisture, never store the convert-
ible top when it is wet. Refer to the
chapter "Care," starting on page 156).<
Closing the convertible top.1 Put the ignition key in position 1.
2 Press the switch to unlock it.
The convertible top compartment lid
will be unlocked and the side
windows will lower slightly.
3 Open the convertible top compart-
ment lid completely by hand.
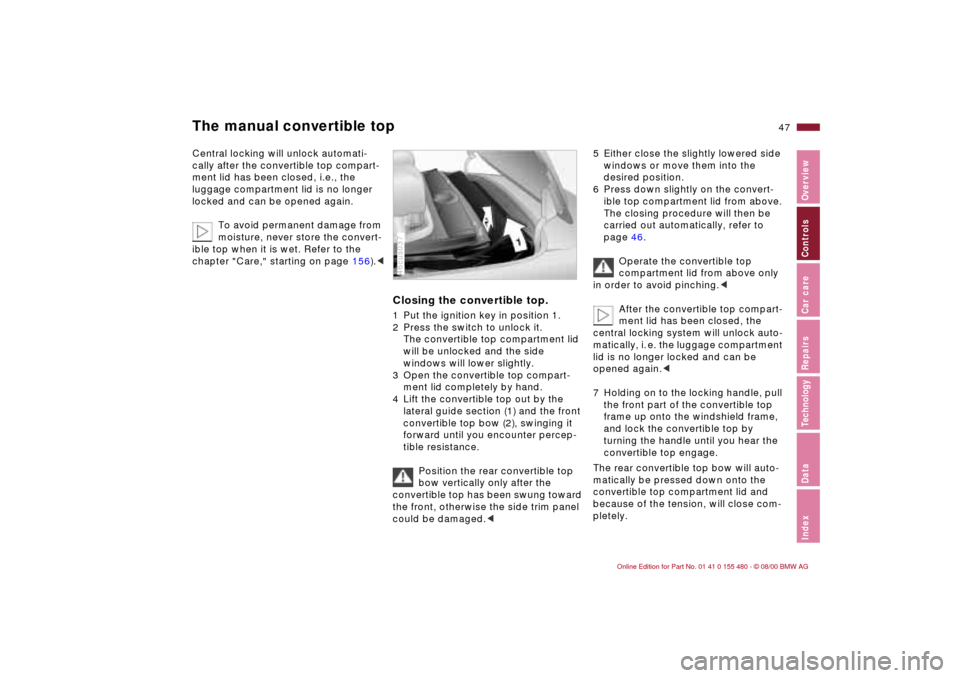
4 Lift the convertible top out by the
lateral guide section (1) and the front
convertible top bow (2), swinging it
forward until you encounter percep-
tible resistance.
Position the rear convertible top
bow vertically only after the
convertible top has been swung toward
the front, otherwise the side trim panel
could be damaged.<46cus037
5 Either close the slightly lowered side
windows or move them into the
desired position.
6 Press down slightly on the convert-
ible top compartment lid from above.
The closing procedure will then be
carried out automatically, refer to
page 46.
Operate the convertible top
compartment lid from above only
in order to avoid pinching.<
After the convertible top compart-
ment lid has been closed, the
central locking system will unlock auto-
matically, i. e. the luggage compartment
lid is no longer locked and can be
opened again.<
7 Holding on to the locking handle, pull
the front part of the convertible top
frame up onto the windshield frame,
and lock the convertible top by
turning the handle until you hear the
convertible top engage.
The rear convertible top bow will auto-
matically be pressed down onto the
convertible top compartment lid and
because of the tension, will close com-
pletely.
Page 49 of 215
49n
IndexDataTechnologyRepairsCar careControlsOverview
The fully automatic convertible top
*
Do not reach into the convertible top
mechanism during opening and closing.
Keep children away from the moving
parts of the convertible top during oper-
ation.
The automatic sequence will be inter-
rupted immediately if you release the
button that operates the top. The
sequence can be continued in the
desired direction by pressing this
button.<
After having been stored for an
extended period of time in the
convertible top compartment Ñ e. g.
during the winter months because the
hardtop
* was being used Ñ you may
have to support the convertible top by
hand when closing it for the first time:
If the convertible top should halt just
before the closing phase is completed,
press against the front section of the
convertible top frame from the outside to
help the closing process along. Continue
pressing the switch while doing so until
the top starts up again on its own.<
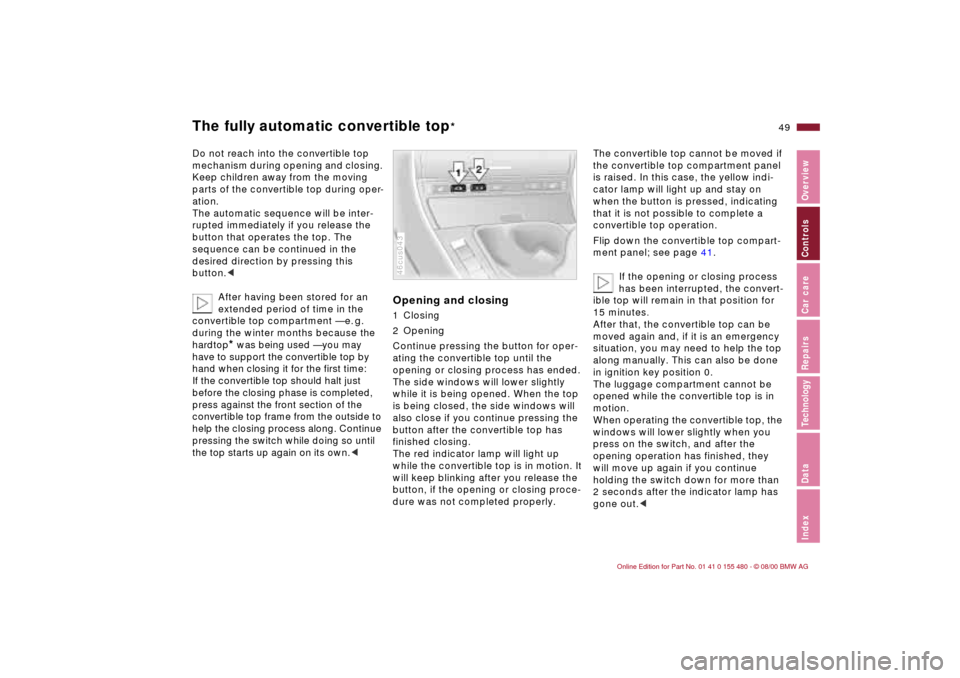
Opening and closing1 Closing
2 Opening
Continue pressing the button for oper-
ating the convertible top until the
opening or closing process has ended.
The side windows will lower slightly
while it is being opened. When the top
is being closed, the side windows will
also close if you continue pressing the
button after the convertible top has
finished closing.
The red indicator lamp will light up
while the convertible top is in motion. It
will keep blinking after you release the
button, if the opening or closing proce-
dure was not completed properly.46cus043
The convertible top cannot be moved if
the convertible top compartment panel
is raised. In this case, the yellow indi-
cator lamp will light up and stay on
when the button is pressed, indicating
that it is not possible to complete a
convertible top operation.
Flip down the convertible top compart-
ment panel; see page 41.
If the opening or closing process
has been interrupted, the convert-
ible top will remain in that position for
15 minutes
.
After that, the convertible top can be
moved again and, if it is an emergency
situation, you may need to help the top
along manually. This can also be done
in ignition key position 0.
The luggage compartment cannot be
opened while the convertible top is in
motion.
When operating the convertible top, the
windows will lower slightly when you
press on the switch, and after the
opening operation has finished, they
will move up again if you continue
holding the switch down for more than
2 seconds after the indicator lamp has
gone out.<
Page 51 of 215
51n
IndexDataTechnologyRepairsCar careControlsOverview
Wind deflector
*
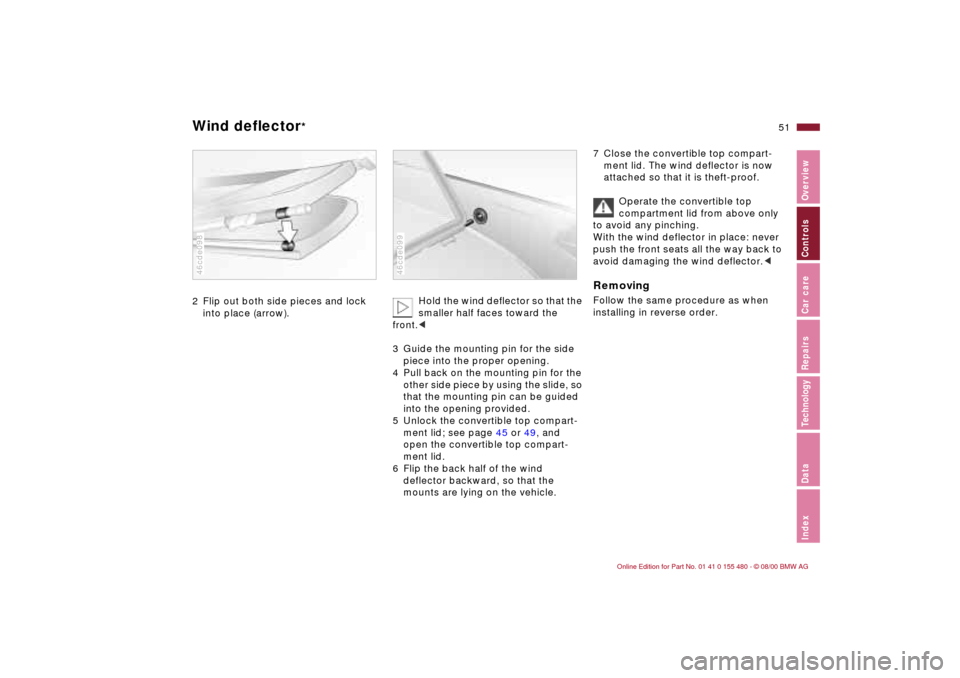
2 Flip out both side pieces and lock
into place (arrow).46cde098
Hold the wind deflector so that the
smaller half faces toward the
front.<
3 Guide the mounting pin for the side
piece into the proper opening.
4 Pull back on the mounting pin for the
other side piece by using the slide, so
that the mounting pin can be guided
into the opening provided.
5 Unlock the convertible top compart-
ment lid; see page 45 or 49, and
open the convertible top compart-
ment lid.
6 Flip the back half of the wind
deflector backward, so that the
mounts are lying on the vehicle.
46cde099
7 Close the convertible top compart-
ment lid. The wind deflector is now
attached so that it is theft-proof.
Operate the convertible top
compartment lid from above only
to avoid any pinching.
With the wind deflector in place: never
push the front seats all the way back to
avoid damaging the wind deflector.
Page 53 of 215

53n
IndexDataTechnologyRepairsCar careControlsOverview
Head restraints Front headrests1 Height
Head restraints reduce the risk of
injury to the cervical vertebra in
the event of an accident.
Adjust the head restraint so that its
center is approximately at the height of
your ears.
When moving the headrests up or
down, do not reach between the head-
rest and the upper edge of the backrest
to avoid the possibility of injury.<46cde029
2 Tilt angle
Position the headrest in the preferred
position. 46cde087
Rear headrests
The rear headrests are to be
lowered only if there are no
passengers riding in the back. Raise the
rear headrests before taking on any
passengers in the back.<
To completely lower the headrests in
the back:
1 Press the button (arrow) and hold it
down.
2 Push the headrest down from above.
46cde100
Page 55 of 215

55n
IndexDataTechnologyRepairsCar careControlsOverview
Entering the rear Lumbar support
*
The seat-integrated safety belt allows
easy access to the rear. You do not
need to adjust the safety belts. They
automatically adapt to various body
sizes.
1 Lift the lever (1) up and tilt the back-
rest forward.
2 Press the switch (2) toward the front
of the car and hold it there until the
seat moves to the desired position.
You can lock a backrest that has
been tilted forward. This makes
sense when, for instance, someone is
climbing into the rear on an incline. To
do this, press against the backrest until
you hear it click into place. To move it
back into place, you do not need to
unlock it by moving the lever (1).<46cus029
If you tilt the backrest back and hold the
switch (2) pressed toward the back of
the vehicle, the seat will return to its
former position.
If you let go of the switch (2)
before the seat has returned to its
former position, it will remain in the
position where you leave it. To move it
back into place, you do not need to
unlock it by moving the lever (1).<
Lock both backrests while driving,
as otherwise there is danger of an
unexpected movement causing an
accident. The indicator lamp in the
instrument cluster flashes if the back-
rest is not locked, refer to page 21.
Then the indicator lamp comes on until
the safety belt is fastened.<
You can adjust the backrest's contour
for additional support in the curvature
of your spine's lumbar region.
The upper hips and spinal column
receive supplementary support to help
you maintain a relaxed, upright posture.
>Press front/rear of switch:
Increase/decrease curvature.
>Press the upper/lower end of the
switch:
Increase the upper/lower curvature.46cde011