Page 55 of 107
YOUR 106 IN DETAIL55
Key position There are four positions of the ignition key in the lock: "S" Stop: ignition is off.
"A" Accessories: ignition is off but
accessories can operate. The battery charge warning lamp lights. "M" Run: ignition on. The following
warning lamps light:- low engine oil pressure,
- coolant temperature,
- battery charge,
- pre-heater (DIESEL),
- handbrake, low brake ßuid,
- engine diagnostics*, -
ABS* (lights for 3 seconds, the warning lamp should always goout when the vehicle speed isover 8 m.p.h. [12 km/h]),
- Airbag*, the warning lamp lightsfor six seconds, then goes out.
"D" Starter: starts the engine.
The following warning lamps go out: - low engine oil pressure,
- battery charge,
- engine diagnostics*. Starting Unlock the steering T
urn the steering wheel gently
while turning the key. Before starting it is advisable to: Press the clutch pedal while opera- ting the starter to aid starting of theengine. * According to speciÞcation
06-05-2002
Page 56 of 107

YOUR 106 IN DETAIL56
Starting a petrol engine* Do not press the accelerator pedal. Operate the starter without relea- sing the key until the engine starts. * According to speciÞcationStarting a diesel engine Engine cold: Do not press the accelerator pedal. T
urn the key to position “M”, the
pre-heat warning lamp lights.W ait until the warning lamp goes
out, then operate the starter in posi- tion “D” until the engine runs
smoothly.
Engine hot: Do not press the accelerator pedal.
Operate the starter.If the engine stops or does not start
immediately, always wait a fewseconds before trying again using
the pre-heater.Never race a cold engi- ne.
Never run the engine inan enclosed space. If the engine cannot be
stopped using the ignition key, press the brake pedal, engage agear and release the clutch inorder to stall the engine. Do not modify the steering
lock in any way.
NOTE: according to speci fica-
tion, the pre-heat warning lamp does not light if the engi-ne is suf ficiently hot.
06-05-2002
Page 57 of 107
YOUR 106 IN DETAIL58
Confidential card
This shows the identiÞcation code which is required if any work is carried out on
the system by a PEUGEOT dealer. This code is hidden by a strip which must notbe removed unless required. Keep your card in a safe place, never in your vehicle.
When buying a second- hand car:
- Make sure that you are giventhe conÞdential card.
- It is advisable to have the keycodes memorised by yourPEUGEOT dealer to ensurethat the keys in your posses-sion are the only ones whichwill permit starting of thevehicle.
- Do not make any modiÞca-tions to the engine immobi-
liser.
06-05-2002
Page 59 of 107
YOUR 106 IN DETAIL57
Engine immobiliser This locks the engine control sys- tem and therefore prevents startingof the vehicle by anyone who has
not got the key.Operation The keys which were given to you on delivery of your vehicle have anelectronic chip in the plastic part of
the key. Each key therefore has a special code. When the ignition is switched on, the key code is recognised by theengine immobiliser system andstarting is possible. If the key does not have a code or
has a different code from those sto-
red in the system memory, thevehicle will not start. The engine immobiliser automati- cally locks the engine control sys-tem a few moments after the igni-
tion has been switched off.Additional key Y
ou can store up to 5 keys.
If you require an additional key or
wish to replace a faulty key, you
must visit a PEUGEOT dealer.
06-05-2002
Page 62 of 107
YOUR 106 IN DETAIL61
Closing the tailgate
To close the tailgate, pull either of
the interior grab handles. THE BONNET Unlocking from the inside Pull the handle. Opening from the outside
To
open:
Press the hook 1and slowly raise
the bonnet. The struts will open and keep the bonnet open.
To close:
Lower the bonnet most of the way and let it drop when it is almostclosed. Check that it is locked
securely. Filling with fuel Fuel tank cap -
Insert the key, then turn it to the left.
- Remove the cap.
T ank capacity: approximately 10
gallons (45 litres).
1
Only Þll up with fuel with
the engine switched
off .
06-05-2002
Page 64 of 107
YOUR 106 IN DETAIL61
Closing the tailgate
To close the tailgate, pull either of
the interior grab handles. THE BONNET Unlocking from the inside Pull the handle. Opening from the outside
To
open:
Press the hook 1and slowly raise
the bonnet. The struts will open and keep the bonnet open.
To close:
Lower the bonnet most of the way and let it drop when it is almostclosed. Check that it is locked
securely. Filling with fuel Fuel tank cap -
Insert the key, then turn it to the left.
- Remove the cap.
T ank capacity: approximately 10
gallons (45 litres).
1
Only Þll up with fuel with
the engine switched
off .
06-05-2002
Page 65 of 107

Light off. Rear fog lamp lit.
Lights off. Front fog lamps.Front and rear fog lamps.
These operate with the side lights, dipped and main beam headlamps.
Lights off.
Side light on.
Dipped/main beam.
YOUR 106 IN DETAIL62
In both clear and rainy
weather, in daylight andat night, the rear foglamp dazzles and is the-refore prohibited.
Do not forget to switch it off assoon as it is no longer needed.
A
B
A
B
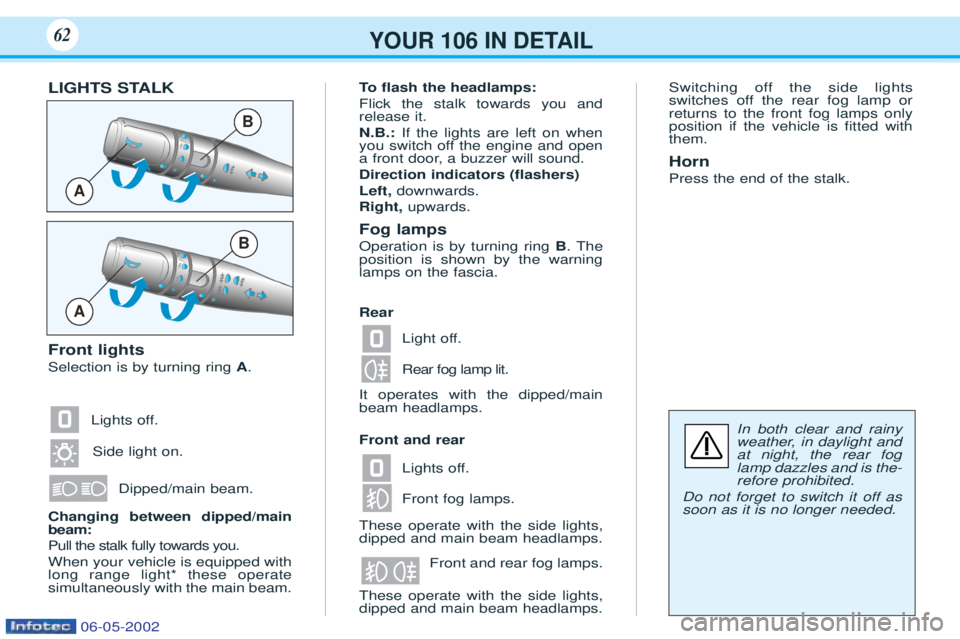
LIGHTS STALK Front lights Selection is by turning ring A.
Changing between dipped/main beam: Pull the stalk fully towards you.When your vehicle is equipped with long range light* these operatesimultaneously with the main beam. To
flash the headlamps:
Flick the stalk towards you andrelease it. N.B.: If the lights are left on when
you switch off the engine and open
a front door, a buzzer will sound. Direction indicators ( flashers)
Left, downwards.
Right, upwards.
Fog lamps Operation is by turning ring B. The
position is shown by the warning lamps on the fascia. It operates with the dipped/main beam headlamps. These operate with the side lights, dipped and main beam headlamps. Switching off the side lights
switches off the rear fog lamp orreturns to the front fog lamps onlyposition if the vehicle is Þtted withthem. Horn Press the end of the stalk.
Rear Front and rear
06-05-2002
Page 66 of 107

YOUR 106 IN DETAIL63
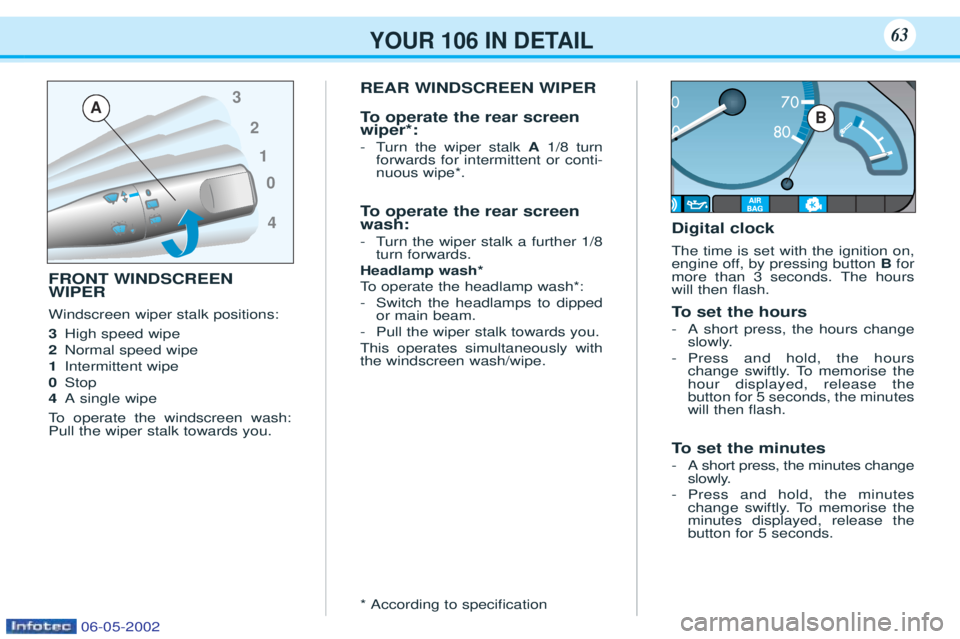
FRONT WINDSCREEN WIPER Windscreen wiper stalk positions: 3High speed wipe
2 Normal speed wipe
1 Intermittent wipe
0 Stop
4 A single wipe
To operate the windscreen wash:
Pull the wiper stalk towards you. REAR WINDSCREEN WIPER
To
operate the rear screen
wiper*: -T urn the wiper stalk A1/8 turn
forwards for intermittent or conti- nuous wipe*.
To operate the rear screen
wash: -T urn the wiper stalk a further 1/8
turn forwards.
Headlamp wash*
To operate the headlamp wash*:
- Switch the headlamps to dipped or main beam.
- Pull the wiper stalk towards you.
This operates simultaneously withthe windscreen wash/wipe. * According to speciÞcation Digital clock The time is set with the ignition on,
engine off, by pressing button
Bfor
more than 3 seconds. The hourswill then ßash.
To set the hours
-A short press, the hours change
slowly.
- Press and hold, the hours
change swiftly. To memorise thehour displayed, release thebutton for 5 seconds, the minuteswill then ßash.
To set the minutes
-A short press, the minutes change
slowly.
- Press and hold, the minutes
change swiftly. To memorise theminutes displayed, release thebutton for 5 seconds.
0
4
1
2
3
AB
06-05-2002