Page 40 of 109
PRE-OPERATION CHECKS
4-2
4
NOTE:Pre-operation checks should be made each time the motorcycle is used. Such an inspection can be thoroughly accom-
plished in a very short time; and the added safety it assures is more than worth the time involved.
WARNING
If any item in the PRE-OPERATION CHECK is not working properly, have it inspected and repaired before operating
the motorcycle.Chassis fasteners• Make sure that all nuts, bolts and screws are properly tightened.
• Tighten if necessary.—
Fuel• Check fuel level.
• Fill with fuel if necessary.3-11 ~ 3-13
Lights, signals and
switches• Check for proper operation. 6-33 ~ 6-35
Air intake duct• Check that the screen is not clogged.
• Clean if necessary.— ITEM CHECKS PAGE
E_4tv_Preop.fm Page 2 Wednesday, September 1, 1999 11:11 AM
Page 72 of 109

PERIODIC MAINTENANCE AND MINOR REPAIR
6-22
6
EAU00684
WARNING
@ This motorcycle is fitted with super
high-speed running tires. The fol-
lowing points must be observed in
order for you to make fully effective
use of these tires.l
Never fail to use the specified
tires in tire replacement. Other
tires may have a danger of
bursting at super high-speeds.
l
New tires have a relatively low
grip on the road surface until
they have been slightly worn.
Therefore, approximately 100 km
should be traveled at normal
speed before any high-speed
riding is done.
l
Before any high-speed runs, the
tires should be warmed-up suf-
ficiently.
l
Always inflate to the correct tire
pressure according to the oper-
ating conditions.
@
EAU00687
WheelsTo ensure maximum performance,
long service, and safe operation, note
the following:l
Always inspect the wheels before
a ride. Check for cracks, bends, or
warpage of the wheels. If any ab-
normal condition exists in a wheel,
consult a Yamaha dealer. Do not
attempt even small repairs to the
wheel. If a wheel is deformed or
cracked, it must be replaced.
l
Tires and wheels should be bal-
anced whenever either one is
changed or replaced. Failure to
have a wheel balanced can result
in poor performance, adverse han-
dling characteristics, and short-
ened tire life.
l
Ride at moderate speeds after
changing a tire since the tire sur-
face must first be broken in for it to
develop its optimal characteristics.
E_4tv_Periodic.fm Page 22 Wednesday, September 1, 1999 11:12 AM
Page 74 of 109

PERIODIC MAINTENANCE AND MINOR REPAIR
6-24
6
EW000109
WARNING
@ A soft or spongy feeling in the brake
pedal can indicate the presence of
air in the brake system. This air
must be removed by bleeding the
brake system before the motorcycle
is operated. Air in the system will
cause greatly diminished braking
capability and can result in loss of
control and an accident. Have a
Yamaha dealer inspect and bleed
the system if necessary. @
EAU00713
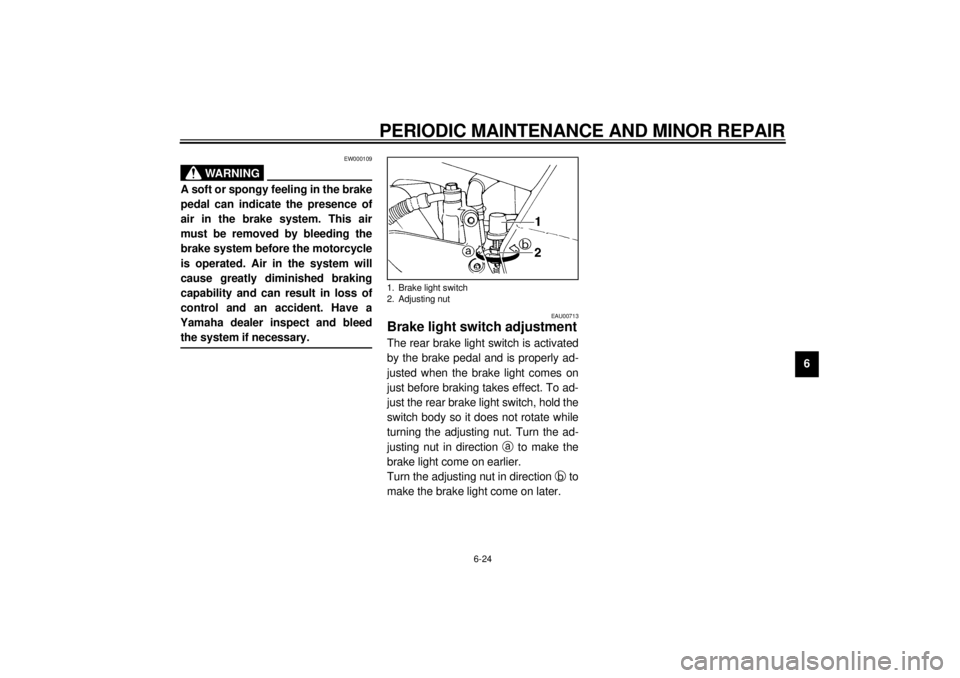
Brake light switch adjustmentThe rear brake light switch is activated
by the brake pedal and is properly ad-
justed when the brake light comes on
just before braking takes effect. To ad-
just the rear brake light switch, hold the
switch body so it does not rotate while
turning the adjusting nut. Turn the ad-
justing nut in direction a
to make the
brake light come on earlier.
Turn the adjusting nut in direction b
to
make the brake light come on later.1. Brake light switch
2. Adjusting nut
E_4tv_Periodic.fm Page 24 Wednesday, September 1, 1999 11:12 AM
Page 84 of 109

PERIODIC MAINTENANCE AND MINOR REPAIR
6-34
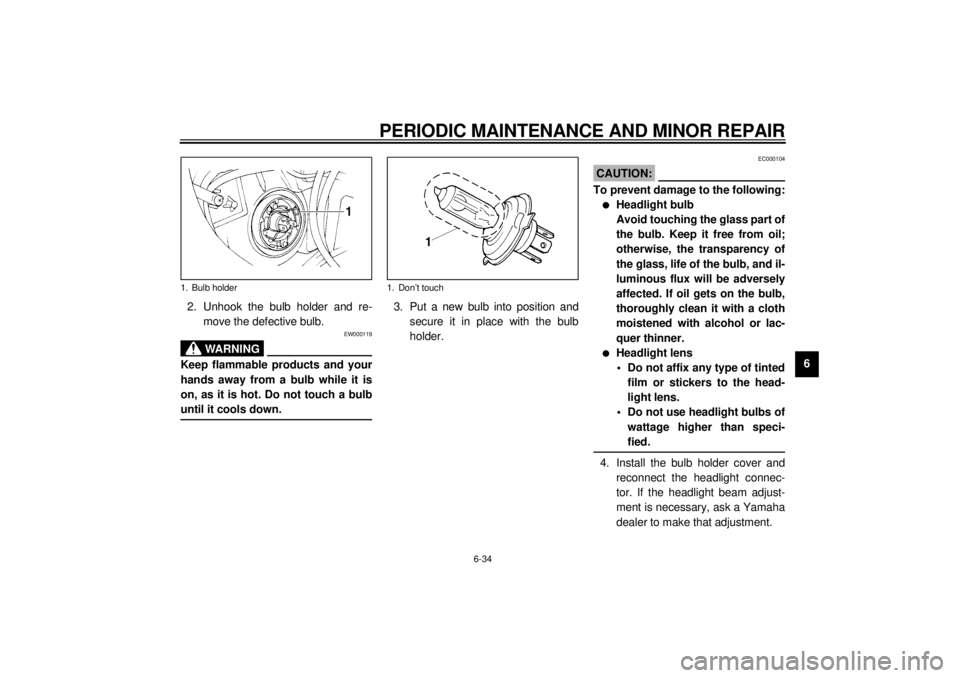
6 2. Unhook the bulb holder and re-
move the defective bulb.
EW000119
WARNING
@ Keep flammable products and your
hands away from a bulb while it is
on, as it is hot. Do not touch a bulb
until it cools down. @
3. Put a new bulb into position and
secure it in place with the bulb
holder.
EC000104
CAUTION:@ To prevent damage to the following:l
Headlight bulb
Avoid touching the glass part of
the bulb. Keep it free from oil;
otherwise, the transparency of
the glass, life of the bulb, and il-
luminous flux will be adversely
affected. If oil gets on the bulb,
thoroughly clean it with a cloth
moistened with alcohol or lac-
quer thinner.
l
Headlight lens
• Do not affix any type of tinted
film or stickers to the head-
light lens.
• Do not use headlight bulbs of
wattage higher than speci-
fied.
@4. Install the bulb holder cover and
reconnect the headlight connec-
tor. If the headlight beam adjust-
ment is necessary, ask a Yamaha
dealer to make that adjustment.
1. Bulb holder
1. Don’t touch
E_4tv_Periodic.fm Page 34 Wednesday, September 1, 1999 11:12 AM