2000 YAMAHA XV1600A belt
[x] Cancel search: beltPage 8 of 95
GIVE SAFETY THE RIGHT OF WAY
1
GIVE SAFETY THE RIGHT OF WAY................................................. 1-1
E_5ja_LabelTOC.fm Page 1 Saturday, October 16, 1999 10:09 AM
Page 9 of 95

1
1-1
1-GIVE SAFETY THE RIGHT OF WAY
EAU00021
Motorcycles are fascinating vehicles, which can give you an unsurpassed feeling of power and
freedom. However, they also impose certain limits, which you must accept; even the best motorcycle
does not ignore the laws of physics.
Regular care and maintenance are essential for preserving your motorcycle’s value and operating
condition. Moreover, what is true for the motorcycle is also true for the rider: good performance
depends on being in good shape. Riding under the influence of medication, drugs and alcohol is, of
course, out of the question. Motorcycle riders - more than car drivers - must always be at their mental
and physical best. Under the influence of even small amounts of alcohol, there is a tendency to take
dangerous risks.
Protective clothing is as essential for the motorcycle rider as seat belts are for car drivers and
passengers. Always wear a complete motorcycle suit (whether made of leather or tear-resistant
synthetic materials with protectors), sturdy boots, motorcycle gloves and a properly fitting helmet.
Optimum protective wear, however, should not encourage carelessness. Though full-coverage
helmets and suits, in particular, create an illusion of total safety and protection, motorcyclists will
always be vulnerable. Riders who lack critical self-control run the risk of going too fast and are apt to
take chances. This is even more dangerous in wet weather. The good motorcyclist rides safely,
predictably and defensively - avoiding all dangers, including those caused by others.
Enjoy your ride!
Give safety the right of way
E_5ja_Label.fm Page 1 Saturday, October 16, 1999 10:09 AM
Page 44 of 95

6
PERIODIC MAINTENANCE AND MINOR REPAIR
Tool kit................................................................... 6-1
Periodic maintenance and lubrication ................... 6-3
Spark plug inspection ........................................... 6-6
Engine oil .............................................................. 6-7
Transfer case oil .................................................. 6-10
Air filter ............................................................... 6-11
Carburetor adjustment ........................................ 6-13
Idle speed adjustment ........................................ 6-13
Throttle cable free play inspection ...................... 6-14
Valve clearance adjustment ................................ 6-14
Tires .................................................................... 6-15
Wheels ................................................................ 6-17
Clutch lever free play adjustment........................ 6-17
Front brake lever free play adjustment ................ 6-18
Rear brake pedal height adjustment ................... 6-19
Brake light switch adjustment ............................. 6-19
Checking the front and rear brake pads.............. 6-20Inspecting the brake fluid level ........................... 6-21
Brake fluid replacement ..................................... 6-22
Drive belt slack check ........................................ 6-22
Drive belt slack adjustment ................................ 6-23
Brake and shift pedal lubrication ........................ 6-24
Brake and clutch lever lubrication ...................... 6-25
Sidestand lubrication.......................................... 6-25
Front fork inspection ........................................... 6-26
Steering inspection ............................................ 6-26
Wheel bearings .................................................. 6-27
Battery................................................................ 6-27
Fuse replacement .............................................. 6-28
Headlight bulb replacement ............................... 6-29
Turn signal and tail/brake light bulb
replacement ..................................................... 6-31
Troubleshooting .................................................. 6-31
Troubleshooting chart ......................................... 6-32
E_5ja_PeriodicTOC.fm Page 1 Saturday, October 16, 1999 10:12 AM
Page 48 of 95

PERIODIC MAINTENANCE AND MINOR REPAIR
6-4
6
11
*Wheel bearings• Check bearing for looseness or damage.
• Replace if necessary. ÖÖ
12*Swingarm• Check swingarm pivoting point for play.
• Correct if necessary.
• Lubricate with molybdenum disulfide grease every 24,000 km or
24 months (whichever comes first).ÖÖ
13*Drive belt• Check belt tension.
• Adjust if necessary. Make sure that the rear wheel is properly
aligned.ÖEvery 4,000 km
14*Steering bearings• Check bearing play and steering for roughness.
• Correct accordingly.
• Lubricate with lithium soap base grease every 24,000 km
or 24 months (whichever comes first).ÖÖ
15*Chassis fasteners• Make sure that all nuts, bolts and screws are properly tightened.
• Tighten if necessary.ÖÖ
16 Sidestand• Check operation.
• Lubricate and repair if necessary.ÖÖ
17*Sidestand switch• Check operation.
• Replace if necessary.ÖÖÖ
18*Front fork• Check operation and for oil leakage.
• Correct accordingly.ÖÖ
19*Rear shock absorber
assembly• Check operation and shock absorber for oil leakage.
• Replace shock absorber assembly if necessary. ÖÖ
20*Rear suspension relay
arm and connecting arm
pivoting points• Check operation.
• Lubricate with molybdenum disulfide grease every 24,000 km or
24 months (whichever comes first).ÖÖ
21*Carburetor• Check engine idling speed and starter operation.
• Adjust if necessary.ÖÖÖ NO. ITEM CHECKS AND MAINTENANCE JOBSINITIAL
(1,000 km)EVERY
6,000 km
or
6 months
(whichever
comes first)12,000 km
or
12 months
(whichever
comes first)
E_5ja_Periodic.fm Page 4 Saturday, October 16, 1999 10:12 AM
Page 66 of 95
PERIODIC MAINTENANCE AND MINOR REPAIR
6-22
6
EAU00742
Brake fluid replacementThe brake fluid should be replaced only
by trained Yamaha service personnel.
Have the Yamaha dealer replace the
following components during periodic
maintenance or when they are dam-
aged or leaking:l
oil seals (every two years)
l
brake hoses (every four years)
EAU01830
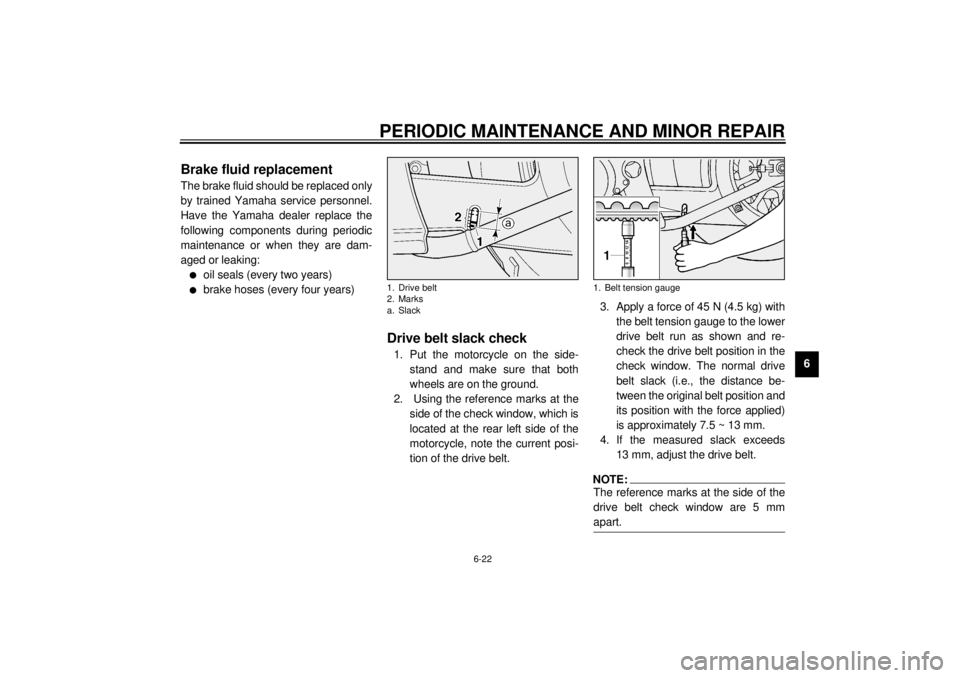
Drive belt slack check1. Put the motorcycle on the side-
stand and make sure that both
wheels are on the ground.
2. Using the reference marks at the
side of the check window, which is
located at the rear left side of the
motorcycle, note the current posi-
tion of the drive belt.3. Apply a force of 45 N (4.5 kg) with
the belt tension gauge to the lower
drive belt run as shown and re-
check the drive belt position in the
check window. The normal drive
belt slack (i.e., the distance be-
tween the original belt position and
its position with the force applied)
is approximately 7.5 ~ 13 mm.
4. If the measured slack exceeds
13 mm, adjust the drive belt.
NOTE:@ The reference marks at the side of the
drive belt check window are 5 mm
apart. @
1. Drive belt
2. Marks
a. Slack
1. Belt tension gauge
E_5ja_Periodic.fm Page 22 Saturday, October 16, 1999 10:12 AM
Page 67 of 95
PERIODIC MAINTENANCE AND MINOR REPAIR
6-23
6
EAU01748
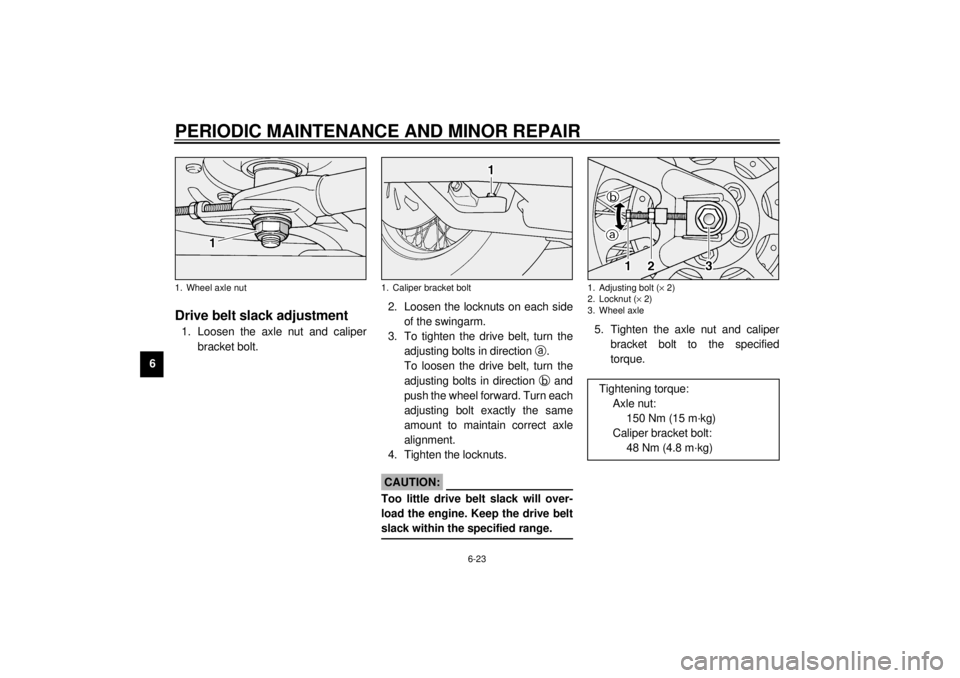
Drive belt slack adjustment1. Loosen the axle nut and caliper
bracket bolt.2. Loosen the locknuts on each side
of the swingarm.
3. To tighten the drive belt, turn the
adjusting bolts in direction
a.
To loosen the drive belt, turn the
adjusting bolts in direction
b and
push the wheel forward. Turn each
adjusting bolt exactly the same
amount to maintain correct axle
alignment.
4. Tighten the locknuts.
ECA00025
CAUTION:@ Too little drive belt slack will over-
load the engine. Keep the drive belt
slack within the specified range. @
5. Tighten the axle nut and caliper
bracket bolt to the specified
torque.
1. Wheel axle nut
1. Caliper bracket bolt
1. Adjusting bolt (´ 2)
2. Locknut (´ 2)
3. Wheel axle
Tightening torque:
Axle nut:
150 Nm (15 m·kg)
Caliper bracket bolt:
48 Nm (4.8 m·kg)
E_5ja_Periodic.fm Page 23 Saturday, October 16, 1999 10:12 AM
Page 79 of 95
7-1
7
EAU01820
7-MOTORCYCLE CARE AND STORAGECareThe exposure of its technology makes
a motorcycle charming but also vulner-
able. Although high-quality compo-
nents are used, they are not all rust-
resistant. While a rusty exhaust pipe
may remain unnoticed on a car, it does
look unattractive on a motorcycle. Fre-
quent and proper care, however, will
keep your motorcycle looking good, ex-
tend its life and maintain its perfor-
mance. Moreover, the warranty states
that the vehicle must be properly taken
care of. For all these reasons, it is rec-
ommended that you observe the fol-
lowing cleaning and storing
precautions.Before cleaning
1. Cover up the muffler outlets with
plastic bags.
2. Make sure that all caps and covers
as well as all electrical couplers
and connectors, including the
spark plug caps, are tightly in-
stalled.
3. Remove extremely stubborn dirt,
like oil burnt onto the crankcase,
with a degreasing agent and a
brush, but never apply such prod-
ucts onto seals, gaskets, the drive
belt and wheel axles. Always rinse
the dirt and degreaser off with wa-
ter.Cleaning
After normal use
Remove dirt with warm water, a neutral
detergent and a soft clean sponge,
then rinse with plenty of clean water.
Use a tooth or bottle brush for hard-to-
reach parts. Tougher dirt and insects
will come off more easily if the area is
covered with a wet cloth for a few min-
utes before cleaning.
E_5ja_Cleaning.fm Page 1 Monday, October 18, 1999 5:04 PM
Page 82 of 95
MOTORCYCLE CARE AND STORAGE
7-4
7
ECA00033
CAUTION:@ l
Apply spray oil and wax spar-
ingly and wipe off any excess.
l
Never apply oil or wax on the
drive belt.
l
Never apply oil or wax on rub-
ber and plastic parts, but treat
them with a suitable care prod-
uct.
l
Avoid using abrasive polishing
compounds as they wear away
the paint.
@NOTE:@ Consult a Yamaha dealer for advice on
what products to use. @
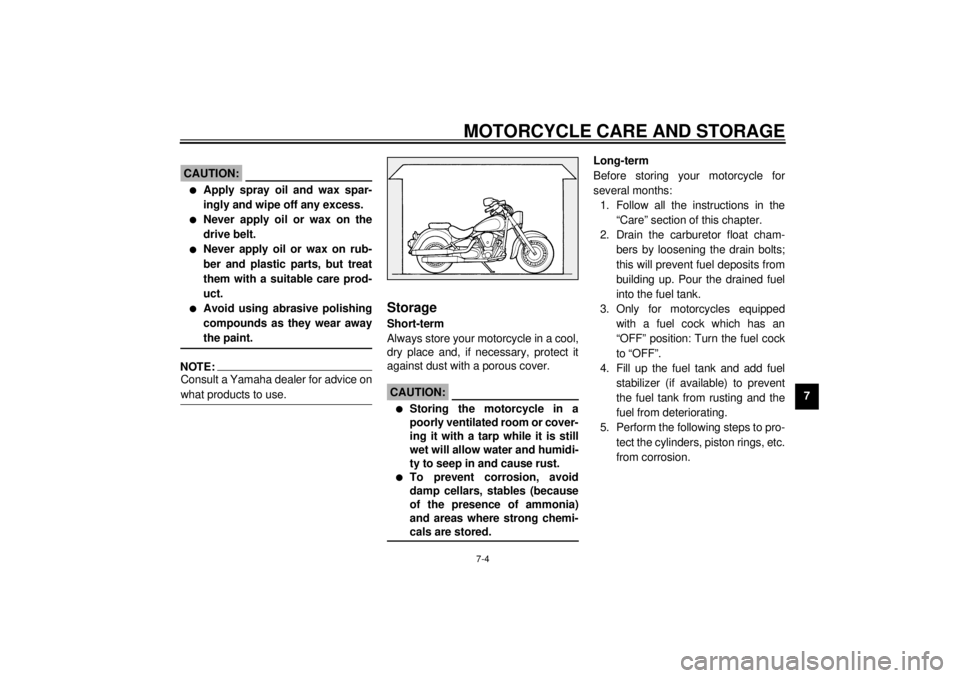
StorageShort-term
Always store your motorcycle in a cool,
dry place and, if necessary, protect it
against dust with a porous cover.
ECA00014
CAUTION:@ l
Storing the motorcycle in a
poorly ventilated room or cover-
ing it with a tarp while it is still
wet will allow water and humidi-
ty to seep in and cause rust.
l
To prevent corrosion, avoid
damp cellars, stables (because
of the presence of ammonia)
and areas where strong chemi-
cals are stored.
@
Long-term
Before storing your motorcycle for
several months:
1. Follow all the instructions in the
“Care” section of this chapter.
2. Drain the carburetor float cham-
bers by loosening the drain bolts;
this will prevent fuel deposits from
building up. Pour the drained fuel
into the fuel tank.
3. Only for motorcycles equipped
with a fuel cock which has an
“OFF” position: Turn the fuel cock
to “OFF”.
4. Fill up the fuel tank and add fuel
stabilizer (if available) to prevent
the fuel tank from rusting and the
fuel from deteriorating.
5. Perform the following steps to pro-
tect the cylinders, piston rings, etc.
from corrosion.
E_5ja_Cleaning.fm Page 4 Monday, October 18, 1999 5:04 PM