2000 YAMAHA XV1600A check engine light
[x] Cancel search: check engine lightPage 16 of 95
INSTRUMENT AND CONTROL FUNCTIONS
3-2
3
EAU01590
(Parking)
The steering is locked in this position,
and the taillight and auxiliary light come
on but all other circuits are off. The key
can be removed in this position.
To use the parking position, first lock
the steering, then turn the key to “ ”.
Do not use this position for an extend-
ed length of time as the battery may
discharge.
EAU00056
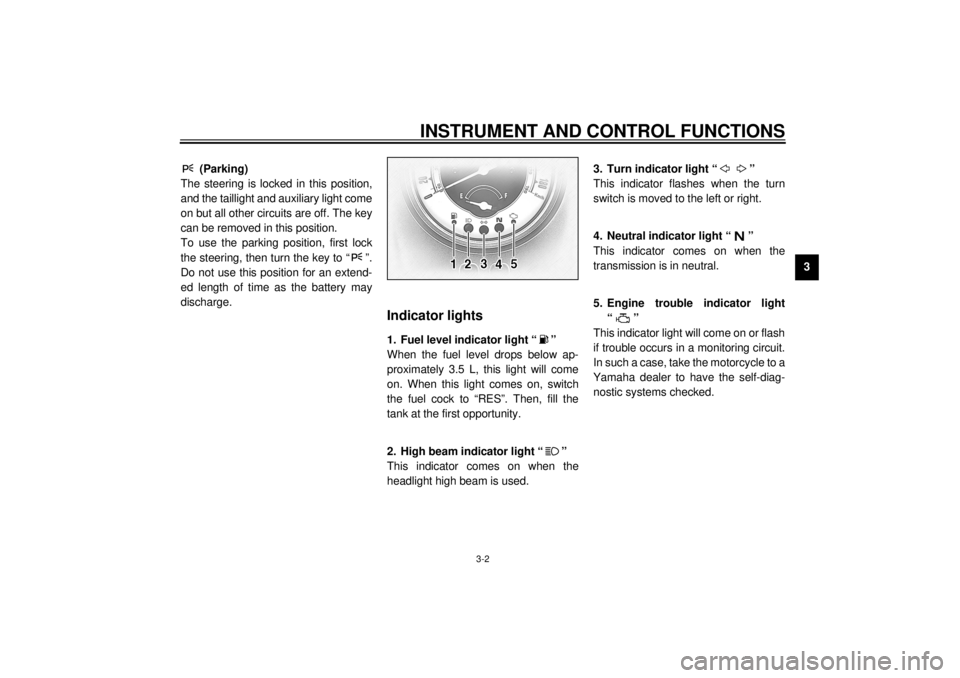
Indicator lights
EAU00079
1. Fuel level indicator light “ ”
When the fuel level drops below ap-
proximately 3.5 L, this light will come
on. When this light comes on, switch
the fuel cock to “RES”. Then, fill the
tank at the first opportunity.
EAU00063
2. High beam indicator light “ ”
This indicator comes on when the
headlight high beam is used.
EAU00057
3. Turn indicator light “ ”
This indicator flashes when the turn
switch is moved to the left or right.
EAU00061
4. Neutral indicator light “ ”
This indicator comes on when the
transmission is in neutral.
EAU00091
5. Engine trouble indicator light
“”
This indicator light will come on or flash
if trouble occurs in a monitoring circuit.
In such a case, take the motorcycle to a
Yamaha dealer to have the self-diag-
nostic systems checked.
E_5ja_Functions.fm Page 2 Saturday, October 16, 1999 10:10 AM
Page 44 of 95

6
PERIODIC MAINTENANCE AND MINOR REPAIR
Tool kit................................................................... 6-1
Periodic maintenance and lubrication ................... 6-3
Spark plug inspection ........................................... 6-6
Engine oil .............................................................. 6-7
Transfer case oil .................................................. 6-10
Air filter ............................................................... 6-11
Carburetor adjustment ........................................ 6-13
Idle speed adjustment ........................................ 6-13
Throttle cable free play inspection ...................... 6-14
Valve clearance adjustment ................................ 6-14
Tires .................................................................... 6-15
Wheels ................................................................ 6-17
Clutch lever free play adjustment........................ 6-17
Front brake lever free play adjustment ................ 6-18
Rear brake pedal height adjustment ................... 6-19
Brake light switch adjustment ............................. 6-19
Checking the front and rear brake pads.............. 6-20Inspecting the brake fluid level ........................... 6-21
Brake fluid replacement ..................................... 6-22
Drive belt slack check ........................................ 6-22
Drive belt slack adjustment ................................ 6-23
Brake and shift pedal lubrication ........................ 6-24
Brake and clutch lever lubrication ...................... 6-25
Sidestand lubrication.......................................... 6-25
Front fork inspection ........................................... 6-26
Steering inspection ............................................ 6-26
Wheel bearings .................................................. 6-27
Battery................................................................ 6-27
Fuse replacement .............................................. 6-28
Headlight bulb replacement ............................... 6-29
Turn signal and tail/brake light bulb
replacement ..................................................... 6-31
Troubleshooting .................................................. 6-31
Troubleshooting chart ......................................... 6-32
E_5ja_PeriodicTOC.fm Page 1 Saturday, October 16, 1999 10:12 AM
Page 52 of 95
PERIODIC MAINTENANCE AND MINOR REPAIR
6-8
6
NOTE:@ l
Be sure the motorcycle is posi-
tioned straight up when checking
the oil level. A slight tilt toward the
side can result in false readings.
l
When adding oil, be careful not to
overfill the engine; the oil level ris-
es faster starting from the half lev-
el portion on the dipstick.
@6. Insert the dipstick into the oil filler
hole and tighten the oil filler cap,
then install the rider seat.
ECA00027
CAUTION:@ Be sure the oil filler cap is securely
tightened as the oil may seep out
when the engine is running. @
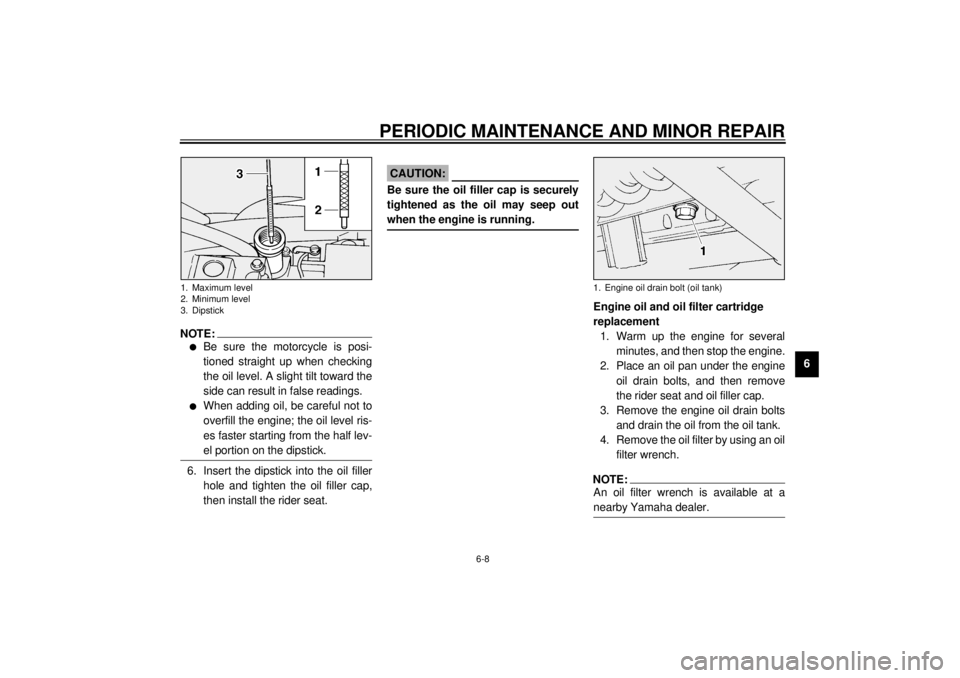
Engine oil and oil filter cartridge
replacement
1. Warm up the engine for several
minutes, and then stop the engine.
2. Place an oil pan under the engine
oil drain bolts, and then remove
the rider seat and oil filler cap.
3. Remove the engine oil drain bolts
and drain the oil from the oil tank.
4. Remove the oil filter by using an oil
filter wrench.NOTE:@ An oil filter wrench is available at a
nearby Yamaha dealer. @
1. Maximum level
2. Minimum level
3. Dipstick
1. Engine oil drain bolt (oil tank)
E_5ja_Periodic.fm Page 8 Saturday, October 16, 1999 10:12 AM
Page 53 of 95
PERIODIC MAINTENANCE AND MINOR REPAIR
6-9
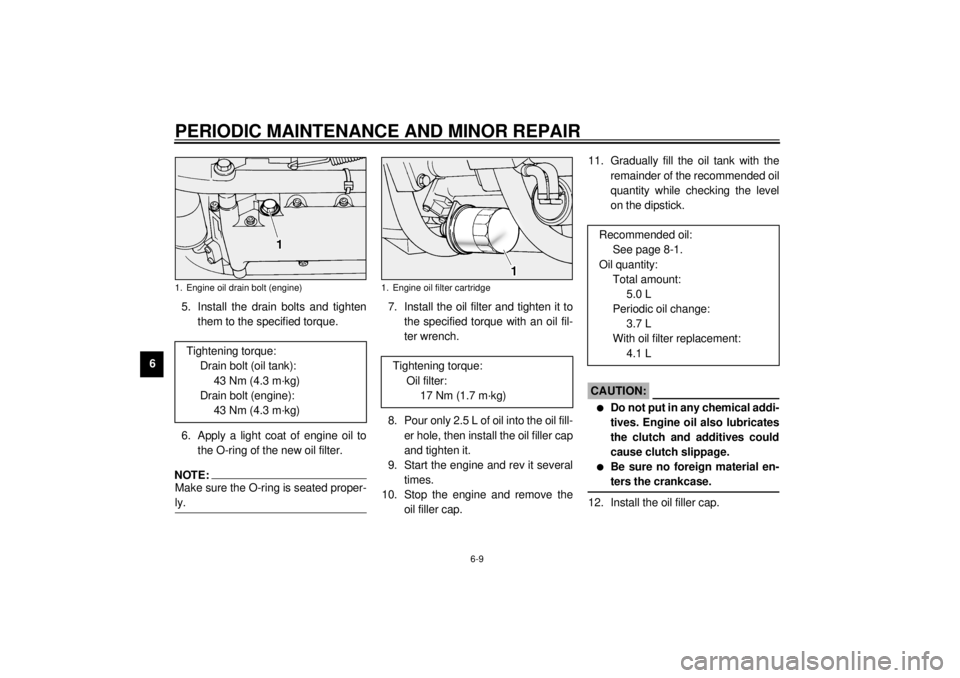
65. Install the drain bolts and tighten
them to the specified torque.
6. Apply a light coat of engine oil to
the O-ring of the new oil filter.
NOTE:@ Make sure the O-ring is seated proper-
ly. @
7. Install the oil filter and tighten it to
the specified torque with an oil fil-
ter wrench.
8. Pour only 2.5 L of oil into the oil fill-
er hole, then install the oil filler cap
and tighten it.
9. Start the engine and rev it several
times.
10. Stop the engine and remove the
oil filler cap.11. Gradually fill the oil tank with the
remainder of the recommended oil
quantity while checking the level
on the dipstick.
EC000066
CAUTION:@ l
Do not put in any chemical addi-
tives. Engine oil also lubricates
the clutch and additives could
cause clutch slippage.
l
Be sure no foreign material en-
ters the crankcase.
@12. Install the oil filler cap.
1. Engine oil drain bolt (engine)Tightening torque:
Drain bolt (oil tank):
43 Nm (4.3 m·kg)
Drain bolt (engine):
43 Nm (4.3 m·kg)
1. Engine oil filter cartridge
Tightening torque:
Oil filter:
17 Nm (1.7 m·kg)
Recommended oil:
See page 8-1.
Oil quantity:
Total amount:
5.0 L
Periodic oil change:
3.7 L
With oil filter replacement:
4.1 L
E_5ja_Periodic.fm Page 9 Saturday, October 16, 1999 10:12 AM
Page 93 of 95
10-INDEXAAdjusting rear shock absorber
preload ................................................ 3-14
Air filter .................................................. 6-11
Antitheft alarm (optional) ..........................3-4BBattery ................................................... 6-27
Brake and clutch lever lubrication........... 6-25
Brake and shift pedal lubrication ............ 6-24
Brake fluid replacement ......................... 6-22
Brake light switch adjustment ................. 6-19CCarburetor adjustment ........................... 6-13
Care.........................................................7-1
Checking the front and rear brake
pads .................................................... 6-20
Clutch lever ..............................................3-7
Clutch lever free play adjustment ........... 6-17
Controls/Instruments ................................2-3DDiagnosis device......................................3-4
Digital clock..............................................3-5
Dimmer switch .........................................3-6
Drive belt slack adjustment .................... 6-23
Drive belt slack check ............................ 6-22EEngine break-in........................................5-5
Engine oil .................................................6-7
Engine stop switch ...................................3-6
Engine trouble indicator light ....................3-2
FFront brake lever ..................................... 3-8
Front brake lever free play
adjustment .......................................... 6-18
Front fork inspection .............................. 6-26
Fuel ......................................................... 3-9
Fuel cock ............................................... 3-11
Fuel gauge .............................................. 3-4
Fuel level indicator light ........................... 3-2
Fuel tank breather hose ......................... 3-10
Fuel tank cap ........................................... 3-9
Fuse replacement.................................. 6-28GGive safety the right of way ..................... 1-1HHandlebar switches ................................. 3-6
Dimmer switch ................................... 3-6
Engine stop switch ............................. 3-6
Horn switch ........................................ 3-6
Lights switch ...................................... 3-6
Pass switch ........................................ 3-6
Start switch ........................................ 3-7
Turn signal switch .............................. 3-6
Headlight bulb replacement ................... 6-29
Helmet holder ........................................ 3-13
High beam indicator light ......................... 3-2
Horn switch ............................................. 3-6IIdentification number records................... 9-1
Idle speed adjustment ........................... 6-13
Indicator lights ..........................................3-2
Engine trouble indicator light ...............3-2
Fuel level indicator light ......................3-2
High beam indicator light ....................3-2
Neutral indicator light ..........................3-2
Turn indicator light ..............................3-2
Inspecting the brake fluid level ...............6-21KKey identification number .........................9-1LLeft view...................................................2-1
Lights switch ............................................3-6MMain switch/steering lock .........................3-1
Model label ..............................................9-2NNeutral indicator light ...............................3-2PParking.....................................................5-6
Pass switch ..............................................3-6
Periodic maintenance and lubrication .......6-3
Pre-operation check list ............................4-1RRear brake pedal .....................................3-8
Rear brake pedal height adjustment.......6-19
Recommended shift points
(for Switzerland only) .............................5-5
Rider seat ..............................................3-13
Right view ................................................2-2
E_5jaIX.fm Page 1 Saturday, October 16, 1999 10:19 AM
Page 94 of 95
INDEX
SShifting .................................................... 5-4
Shift pedal ............................................... 3-7
Sidestand .............................................. 3-15
Sidestand/clutch switch operation
check .................................................. 3-16
Sidestand lubrication ............................. 6-25
Spark plug inspection .............................. 6-6
Specifications .......................................... 8-1
Speedometer ........................................... 3-3
Starter (choke) knob .............................. 3-12
Starting a warm engine ............................ 5-4
Starting the engine .................................. 5-1
Start switch .............................................. 3-7
Steering inspection ................................ 6-26
Steering lock.......................................... 3-12
Storage.................................................... 7-4TThrottle cable free play inspection ......... 6-14
Tips for reducing fuel consumption .......... 5-5
Tires ...................................................... 6-15
Tool kit..................................................... 6-1
Transfer case oil .................................... 6-10
Troubleshooting..................................... 6-31
Troubleshooting chart ............................ 6-32
Turn indicator light ................................... 3-2
Turn signal and tail/brake light bulb
replacement ........................................ 6-31
Turn signal switch .................................... 3-6VValve clearance adjustment................... 6-14
Vehicle identification number ................... 9-1
WWheel bearings ..................................... 6-27
Wheels .................................................. 6-17
E_5jaIX.fm Page 2 Saturday, October 16, 1999 10:19 AM