Page 32 of 97
INSTRUMENT AND CONTROL FUNCTIONS
3-18
3
EAU00330
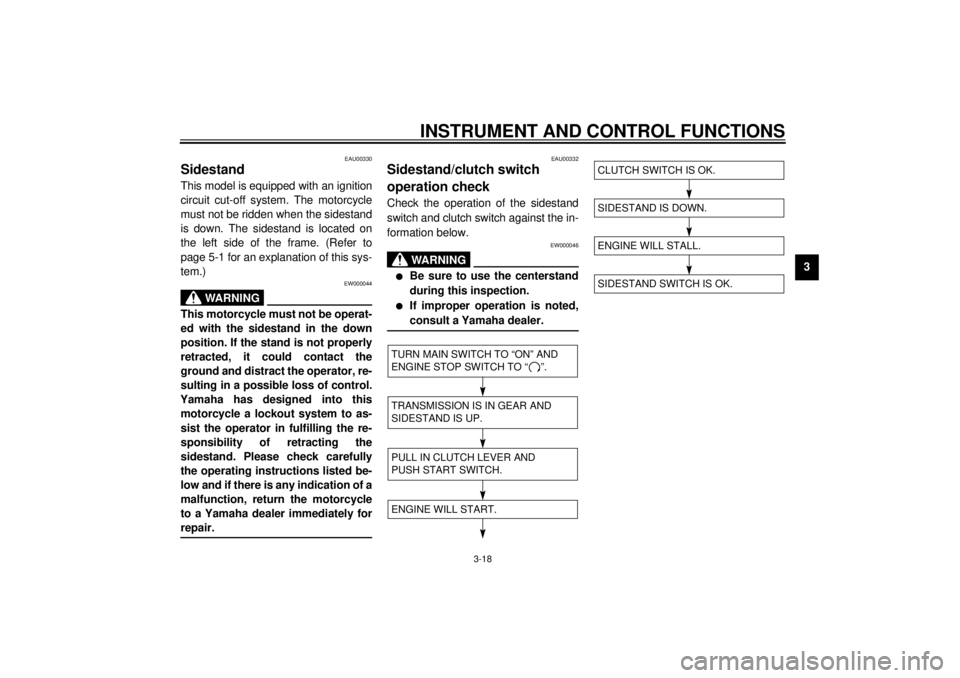
SidestandThis model is equipped with an ignition
circuit cut-off system. The motorcycle
must not be ridden when the sidestand
is down. The sidestand is located on
the left side of the frame. (Refer to
page 5-1 for an explanation of this sys-
tem.)
EW000044
WARNING
@ This motorcycle must not be operat-
ed with the sidestand in the down
position. If the stand is not properly
retracted, it could contact the
ground and distract the operator, re-
sulting in a possible loss of control.
Yamaha has designed into this
motorcycle a lockout system to as-
sist the operator in fulfilling the re-
sponsibility of retracting the
sidestand. Please check carefully
the operating instructions listed be-
low and if there is any indication of a
malfunction, return the motorcycle
to a Yamaha dealer immediately for
repair. @
EAU00332
Sidestand/clutch switch
operation checkCheck the operation of the sidestand
switch and clutch switch against the in-
formation below.
EW000046
WARNING
@ l
Be sure to use the centerstand
during this inspection.
l
If improper operation is noted,
consult a Yamaha dealer.
@CD-08E
CD-08E
TURN MAIN SWITCH TO “ON” AND
ENGINE STOP SWITCH TO “ ”.TRANSMISSION IS IN GEAR AND
SIDESTAND IS UP.PULL IN CLUTCH LEVER AND
PUSH START SWITCH.ENGINE WILL START.
SIDESTAND IS DOWN.ENGINE WILL STALL.SIDESTAND SWITCH IS OK.CLUTCH SWITCH IS OK.
Page 36 of 97
PRE-OPERATION CHECKS
4-2
4
NOTE:Pre-operation checks should be made each time the motorcycle is used. Such an inspection can be thoroughly accom-
plished in a very short time; and the added safety it assures is more than worth the time involved.
WARNING
If any item in the PRE-OPERATION CHECK is not working properly, have it inspected and repaired before operating
the motorcycle.Chassis fasteners• Make sure that all nuts, bolts and screws are properly tightened.
• Tighten if necessary.—
Fuel• Check fuel level.
• Fill with fuel if necessary.3-13
Lights, signals and
switches• Check for proper operation. 6-26 ~ 6-27 ITEM CHECKS PAGE
Page 39 of 97
5-1
5
EAU00372
5-OPERATION AND IMPORTANT RIDING POINTS
EAU00373
WARNING
@ l
Before riding this motorcycle,
become thoroughly familiar
with all operating controls and
their functions. Consult a
Yamaha dealer regarding any
control or function that you do
not thoroughly understand.
l
Never start your engine or let it
run for any length of time in a
closed area. The exhaust fumes
are poisonous and can cause
loss of consciousness and
death within a short time. Al-
ways operate your motorcycle
in an area with adequate ventila-
tion.
l
Before starting out, always be
sure the sidestand is up. Failure
to retract the sidestand com-
pletely can result in a serious
accident when you try to turn a
corner.
@
EAU01627
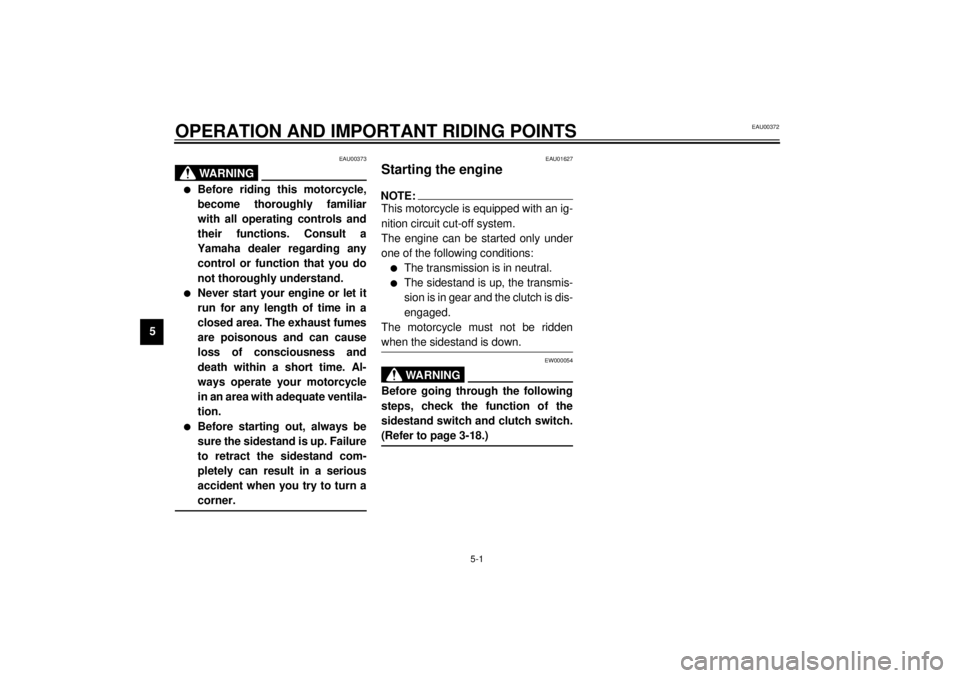
Starting the engineNOTE:@ This motorcycle is equipped with an ig-
nition circuit cut-off system.
The engine can be started only under
one of the following conditions:l
The transmission is in neutral.
l
The sidestand is up, the transmis-
sion is in gear and the clutch is dis-
engaged.
The motorcycle must not be ridden
when the sidestand is down.
@
EW000054
WARNING
@ Before going through the following
steps, check the function of the
sidestand switch and clutch switch.
(Refer to page 3-18.) @
Page 44 of 97

OPERATION AND IMPORTANT RIDING POINTS
5-6
5
EAU00448
0 ~ 500 km
Avoid operation above 4,000 r/min.
Stop the engine and let it cool for 5 to
10 minutes after every hour of opera-
tion. Vary the speed of the motorcycle
from time to time. Do not operate it at
one set throttle position.
500 ~ 1,000 km
Avoid prolonged operation above
5,000 r/min. Rev the motorcycle freely
through the gears, but do not use full
throttle at any time.
EC000056
CAUTION:@ After 1,000 km of operation, be sure
to replace the engine oil, oil filter
and final gear oil. @1,000 km and beyond
Full throttle can be used.
EC000053
CAUTION:@ l
Never let engine speeds enter
the red zone.
l
If any engine trouble should oc-
cur during the break-in period,
consult a Yamaha dealer imme-
diately.
@
EAU00460
ParkingWhen parking the motorcycle, stop the
engine and remove the ignition key.
EW000058
WARNING
@ The exhaust system is hot. Park the
motorcycle in a place where pedes-
trians or children are not likely to
touch the motorcycle. Do not park
the motorcycle on a slope or soft
ground; the motorcycle may over-
turn. @
Page 47 of 97

6-1
6
EAU00462
6-PERIODIC MAINTENANCE AND MINOR REPAIR
EAU00464
Periodic inspection, adjustment and lu-
brication will keep your motorcycle in
the safest and most efficient condition
possible. Safety is an obligation of the
motorcycle owner. The maintenance
and lubrication schedule chart should
be considered strictly as a guide to
general maintenance and lubrication
intervals. YOU MUST TAKE INTO
CONSIDERATION THAT WEATHER,
TERRAIN, GEOGRAPHICAL LOCA-
TIONS, AND A VARIETY OF INDIVID-
UAL USES ALL TEND TO DEMAND
THAT EACH OWNER ALTER THIS
TIME SCHEDULE TO SHORTER IN-
TERVALS TO MATCH THE ENVI-
RONMENT. The most important points
of motorcycle inspection, adjustment,
and lubrication are explained in the fol-
lowing pages.
EW000060
WARNING
@ If you are not familiar with motor-
cycle service, this work should be
done by a Yamaha dealer. @
EAU00469
Tool kitThe service information included in this
manual is intended to provide you, the
owner, with the necessary information
for completing some of your own pre-
ventive maintenance and minor re-
pairs. The tools provided in the owner’s
tool kit are to assist you in the perfor-
mance of periodic maintenance. How-
ever, some other tools such as a torque
wrench are also necessary to perform
the maintenance correctly.
NOTE:@ If you do not have necessary tools re-
quired during a service operation, take
your motorcycle to a Yamaha dealer for
service. @
EW000063
WARNING
@ Modifications to this motorcycle not
approved by Yamaha may cause
loss of performance, and render it
unsafe for use. Consult a Yamaha
dealer before attempting any chang-
es. @
1. Tool kit
Page 57 of 97
PERIODIC MAINTENANCE AND MINOR REPAIR
6-11
6
EAU02975
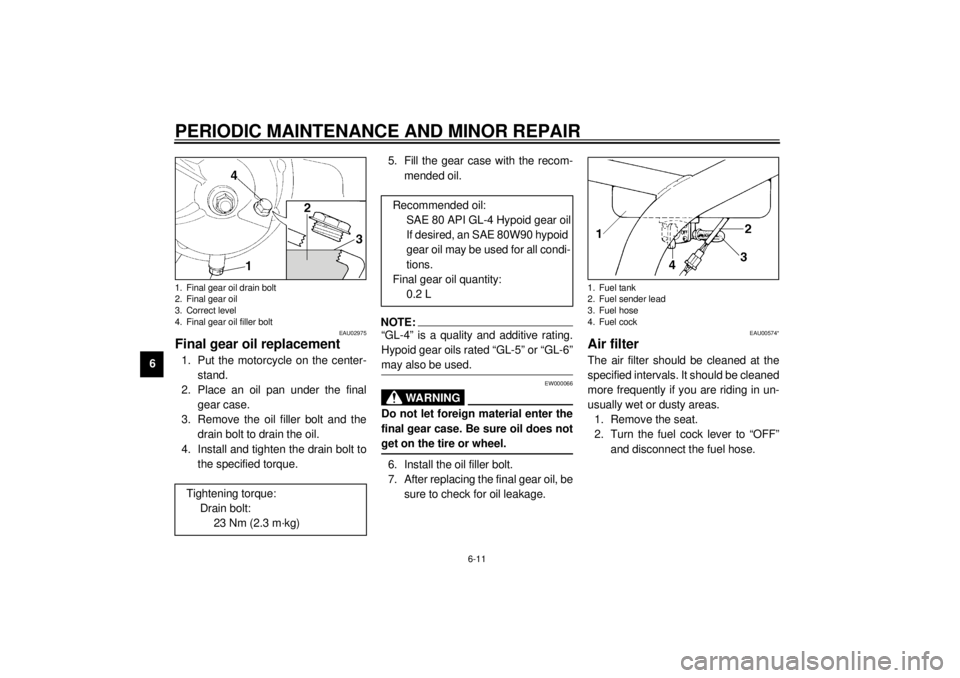
Final gear oil replacement1. Put the motorcycle on the center-
stand.
2. Place an oil pan under the final
gear case.
3. Remove the oil filler bolt and the
drain bolt to drain the oil.
4. Install and tighten the drain bolt to
the specified torque.5. Fill the gear case with the recom-
mended oil.
NOTE:@ “GL-4” is a quality and additive rating.
Hypoid gear oils rated “GL-5” or “GL-6”
may also be used. @
EW000066
WARNING
@ Do not let foreign material enter the
final gear case. Be sure oil does not
get on the tire or wheel. @6. Install the oil filler bolt.
7. After replacing the final gear oil, be
sure to check for oil leakage.
EAU00574*
Air filterThe air filter should be cleaned at the
specified intervals. It should be cleaned
more frequently if you are riding in un-
usually wet or dusty areas.
1. Remove the seat.
2. Turn the fuel cock lever to “OFF”
and disconnect the fuel hose.
1. Final gear oil drain bolt
2. Final gear oil
3. Correct level
4. Final gear oil filler boltTightening torque:
Drain bolt:
23 Nm (2.3 m·kg)
Recommended oil:
SAE 80 API GL-4 Hypoid gear oil
If desired, an SAE 80W90 hypoid
gear oil may be used for all condi-
tions.
Final gear oil quantity:
0.2 L
1. Fuel tank
2. Fuel sender lead
3. Fuel hose
4. Fuel cock
Page 61 of 97
PERIODIC MAINTENANCE AND MINOR REPAIR
6-15
6
EAU00658
TiresTo ensure maximum performance,
long service and safe operation, note
the following:
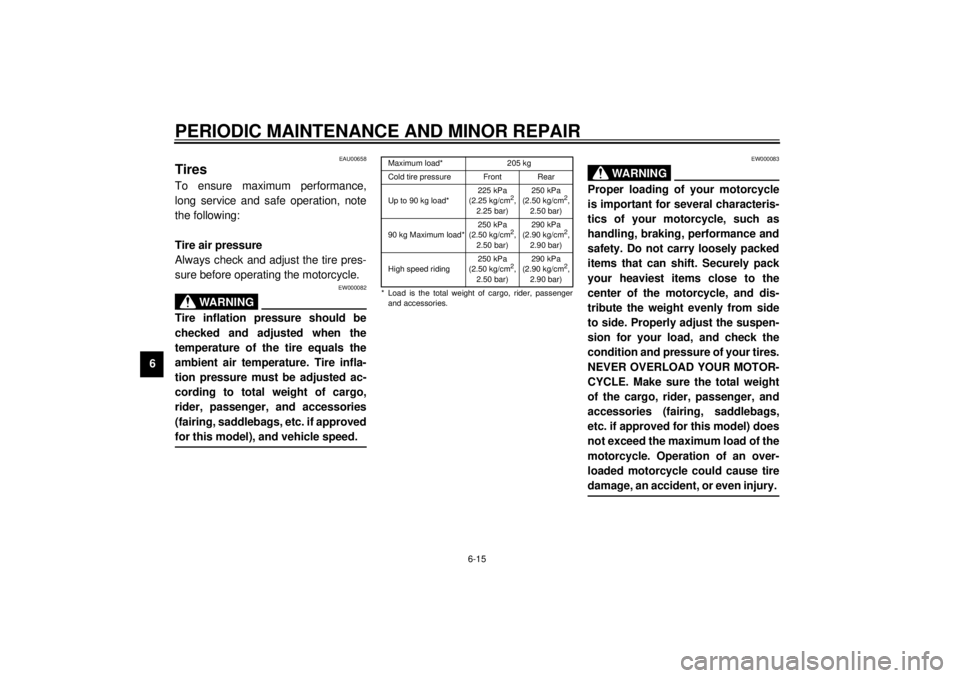
Tire air pressure
Always check and adjust the tire pres-
sure before operating the motorcycle.
EW000082
WARNING
@ Tire inflation pressure should be
checked and adjusted when the
temperature of the tire equals the
ambient air temperature. Tire infla-
tion pressure must be adjusted ac-
cording to total weight of cargo,
rider, passenger, and accessories
(fairing, saddlebags, etc. if approved
for this model), and vehicle speed. @
CE-33EEW000083
WARNING
@ Proper loading of your motorcycle
is important for several characteris-
tics of your motorcycle, such as
handling, braking, performance and
safety. Do not carry loosely packed
items that can shift. Securely pack
your heaviest items close to the
center of the motorcycle, and dis-
tribute the weight evenly from side
to side. Properly adjust the suspen-
sion for your load, and check the
condition and pressure of your tires.
NEVER OVERLOAD YOUR MOTOR-
CYCLE. Make sure the total weight
of the cargo, rider, passenger, and
accessories (fairing, saddlebags,
etc. if approved for this model) does
not exceed the maximum load of the
motorcycle. Operation of an over-
loaded motorcycle could cause tire
damage, an accident, or even injury. @
Maximum load* 205 kg
Cold tire pressure Front Rear
Up to 90 kg load*225 kPa
(2.25 kg/cm
2,
2.25 bar)250 kPa
(2.50 kg/cm
2,
2.50 bar)
90 kg Maximum load*250 kPa
(2.50 kg/cm
2,
2.50 bar)290 kPa
(2.90 kg/cm
2,
2.90 bar)
High speed riding250 kPa
(2.50 kg/cm
2,
2.50 bar)290 kPa
(2.90 kg/cm
2,
2.90 bar)
* Load is the total weight of cargo, rider, passenger
and accessories.
Page 62 of 97
PERIODIC MAINTENANCE AND MINOR REPAIR
6-16
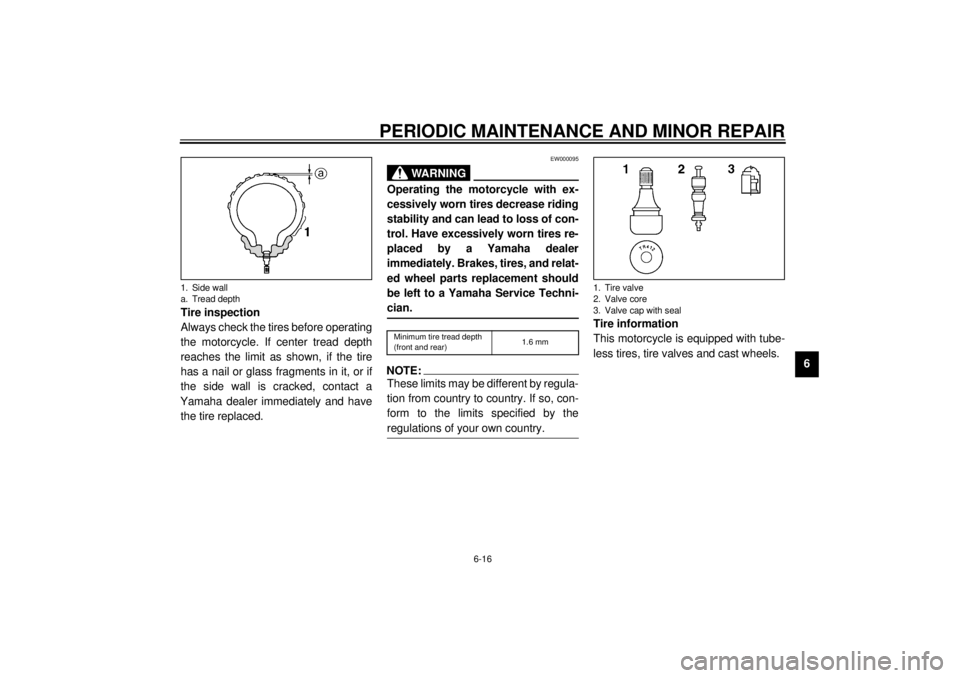
6 Tire inspection
Always check the tires before operating
the motorcycle. If center tread depth
reaches the limit as shown, if the tire
has a nail or glass fragments in it, or if
the side wall is cracked, contact a
Yamaha dealer immediately and have
the tire replaced.
EW000095
WARNING
@ Operating the motorcycle with ex-
cessively worn tires decrease riding
stability and can lead to loss of con-
trol. Have excessively worn tires re-
placed by a Yamaha dealer
immediately. Brakes, tires, and relat-
ed wheel parts replacement should
be left to a Yamaha Service Techni-
cian. @CE-26ENOTE:@ These limits may be different by regula-
tion from country to country. If so, con-
form to the limits specified by the
regulations of your own country. @
Tire information
This motorcycle is equipped with tube-
less tires, tire valves and cast wheels.
1. Side wall
a. Tread depth
Minimum tire tread depth
(front and rear)1.6 mm
1. Tire valve
2. Valve core
3. Valve cap with seal