2000 YAMAHA TDR 125 cooling
[x] Cancel search: coolingPage 45 of 104
PERIODIC MAINTENANCE AND MINOR REPAIR
Tool kit ...................................................................6-1
Periodic maintenance and lubrication ....................6-3
Cowling and panel removal and installation...........6-6
Cowling A, B ..........................................................6-7
Panel A ..................................................................6-7
Spark plug inspection.............................................6-8
Transmission oil .....................................................6-9
Cooling system ....................................................6-10
Changing the coolant ...........................................6-11
Air filter .................................................................6-13
Carburetor adjustment .........................................6-15
Idle speed adjustment ..........................................6-15
Throttle cable free play adjustment ......................6-16
Tires .....................................................................6-17
Wheels .................................................................6-19
Clutch lever free play adjustment.........................6-19
Front brake lever free play adjustment ................6-20
Rear brake pedal height adjustment ....................6-20
Brake light switch adjustment ..............................6-21
Checking the front and rear brake pads...............6-21
Inspecting the brake fluid level.............................6-22
Brake fluid replacement .......................................6-23
Drive chain slack check .......................................6-23
Drive chain slack adjustment ...............................6-24Drive chain lubrication............................................6-25
Cable inspection and lubrication ............................6-25
Throttle cable and grip lubrication ..........................6-26
Autolube pump adjustment ....................................6-26
Brake and shift pedal lubrication ............................6-26
Brake and clutch lever lubrication ..........................6-27
Sidestand lubrication..............................................6-27
Rear suspension lubrication...................................6-27
Front fork inspection ..............................................6-28
Steering inspection ................................................6-28
Wheel bearings ......................................................6-29
Battery....................................................................6-29
Fuse replacement ..................................................6-30
Headlight bulb replacement ...................................6-31
Taillight bulb replacement ......................................6-32
Turn signal light bulb replacement .........................6-32
Front wheel removal ..............................................6-33
Front wheel installation ..........................................6-34
Rear wheel removal ...............................................6-34
Rear wheel installation ...........................................6-35
Troubleshooting .....................................................6-36
Troubleshooting chart ............................................6-37
6
5AE-9-E3 (ENG) 4/11/0 11:06 AM Page 43
Page 50 of 104

6-5
PERIODIC MAINTENANCE AND MINOR REPAIR
6
7
8
9
EVERY
6,000 km 12,000 km
No.
ITEM CHECKS AND MAINTENANCE JOBS
Initialor or
(1,000 km)6 months 12 months
(Whichever (Whichever
comes first) comes first)
9Check operation.
20 * Autolube pump9Correct if necessary.ÖÖÖ
9Bleed if necessary.
9Check oil level and vehicle for oil leakage.
21 Transmission oil9Correct accordingly.
ÖÖÖ
9Change oil at initial 1,000 km and thereafter every
24,000 km or 24 months (whichever comes first).
9Check coolant level and vehicle for coolant leakage.
22 * Cooling system9Correct if necessary.
ÖÖ
9Change coolant every 24,000 km or 24 months (whichever
comes first).
* Since these items require special tools, data and technical skills, they should be serviced by a Yamaha dealer.EAU02970
NOTE
8The air filter needs more frequent service if you are riding in unusually wet or dusty areas.
8Hydraulic brake system
9When disassembling the master cylinder or caliper, always replace the brake fluid. Check the brake fluid level
regularly and fill as required.
9Replace the oil seals on the inner parts of the master cylinder and caliper every two years.
9Replace the brake hoses every four years or if cracked or damaged.
5AE-9-E3 (ENG) 4/11/0 11:06 AM Page 48
Page 55 of 104
6-10
1
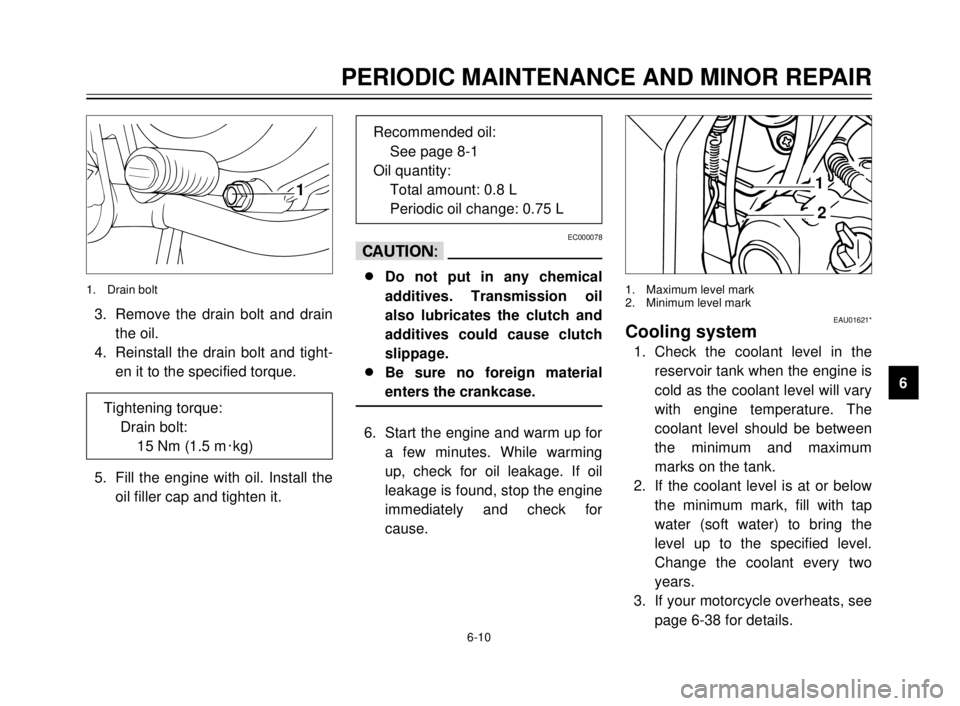
3. Remove the drain bolt and drain
the oil.
4. Reinstall the drain bolt and tight-
en it to the specified torque.
5. Fill the engine with oil. Install the
oil filler cap and tighten it.
EC000078
cC
8
8
Do not put in any chemical
additives. Transmission oil
also lubricates the clutch and
additives could cause clutch
slippage.
8 8
Be sure no foreign material
enters the crankcase.
6. Start the engine and warm up for
a few minutes. While warming
up, check for oil leakage. If oil
leakage is found, stop the engine
immediately and check for
cause.
1. Drain bolt
PERIODIC MAINTENANCE AND MINOR REPAIR
1
2
3
4
5
6
7
8
9 Tightening torque:
Drain bolt:
15 Nm (1.5 m0kg)
Recommended oil:
See page 8-1
Oil quantity:
Total amount: 0.8 L
Periodic oil change: 0.75 L
1
2
1. Maximum level mark
2. Minimum level mark
EAU01621*Cooling system
1. Check the coolant level in the
reservoir tank when the engine is
cold as the coolant level will vary
with engine temperature. The
coolant level should be between
the minimum and maximum
marks on the tank.
2. If the coolant level is at or below
the minimum mark, fill with tap
water (soft water) to bring the
level up to the specified level.
Change the coolant every two
years.
3. If your motorcycle overheats, see
page 6-38 for details.
5AE-9-E3 (ENG) 4/11/0 11:06 AM Page 53
Page 57 of 104
6-12
PERIODIC MAINTENANCE AND MINOR REPAIR
1
2
3
4
5
6
7
8
9
1
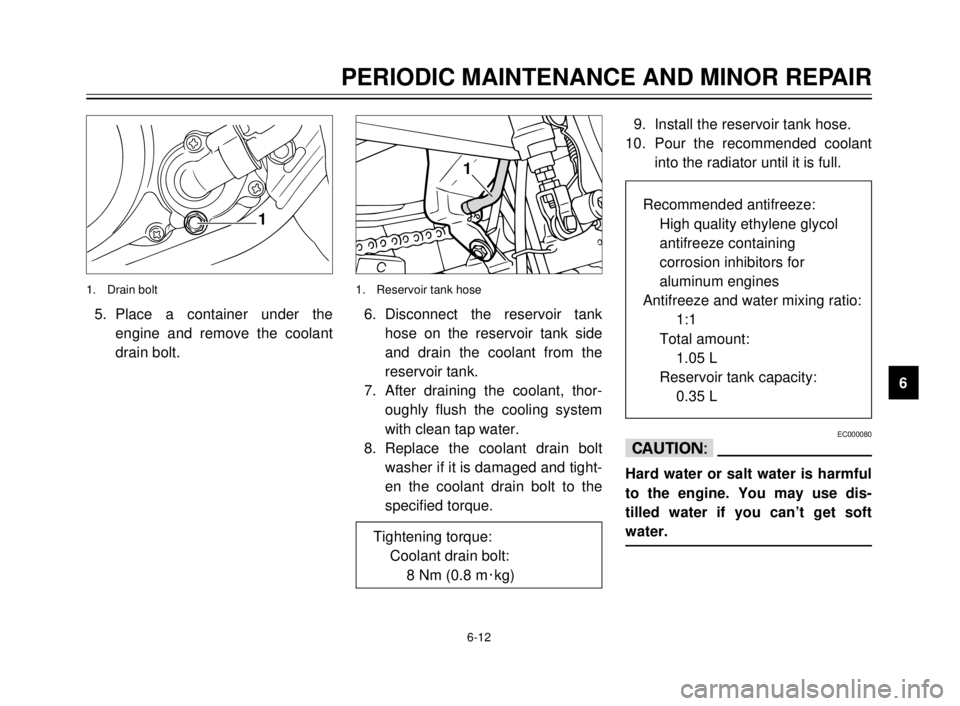
5. Place a container under the
engine and remove the coolant
drain bolt.
1. Drain bolt
1
6. Disconnect the reservoir tank
hose on the reservoir tank side
and drain the coolant from the
reservoir tank.
7. After draining the coolant, thor-
oughly flush the cooling system
with clean tap water.
8. Replace the coolant drain bolt
washer if it is damaged and tight-
en the coolant drain bolt to the
specified torque.
1. Reservoir tank hose
Tightening torque:
Coolant drain bolt:
8 Nm (0.8 m0kg)
9. Install the reservoir tank hose.
10. Pour the recommended coolant
into the radiator until it is full.
EC000080
cC
Hard water or salt water is harmful
to the engine. You may use dis-
tilled water if you can’t get soft
water.
Recommended antifreeze:
High quality ethylene glycol
antifreeze containing
corrosion inhibitors for
aluminum engines
Antifreeze and water mixing ratio:
1:1
Total amount:
1.05 L
Reservoir tank capacity:
0.35 L
5AE-9-E3 (ENG) 4/11/0 11:06 AM Page 55
Page 58 of 104
6-13
PERIODIC MAINTENANCE AND MINOR REPAIR
1
2
3
4
5
6
7
8
9
2
1
4
5
3
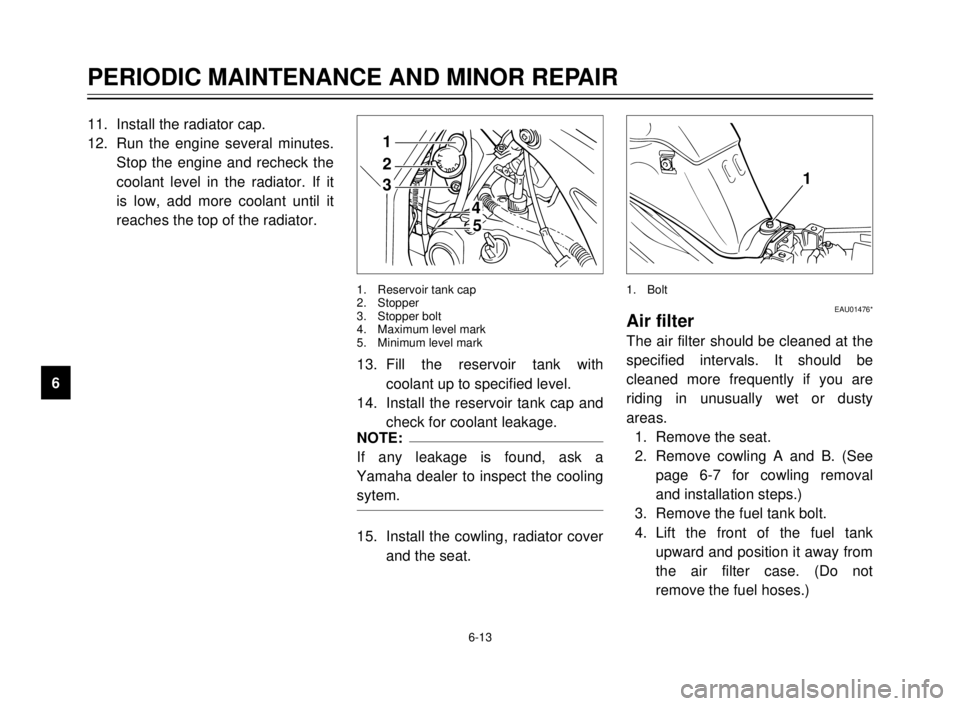
1. Reservoir tank cap
2. Stopper
3. Stopper bolt
4. Maximum level mark
5. Minimum level mark
11. Install the radiator cap.
12. Run the engine several minutes.
Stop the engine and recheck the
coolant level in the radiator. If it
is low, add more coolant until it
reaches the top of the radiator.
13. Fill the reservoir tank with
coolant up to specified level.
14. Install the reservoir tank cap and
check for coolant leakage.
NOTE:
If any leakage is found, ask a
Yamaha dealer to inspect the cooling
sytem.
15. Install the cowling, radiator cover
and the seat.
1
EAU01476*Air filter
The air filter should be cleaned at the
specified intervals. It should be
cleaned more frequently if you are
riding in unusually wet or dusty
areas.
1. Remove the seat.
2. Remove cowling A and B. (See
page 6-7 for cowling removal
and installation steps.)
3. Remove the fuel tank bolt.
4. Lift the front of the fuel tank
upward and position it away from
the air filter case. (Do not
remove the fuel hoses.)
1. Bolt
5AE-9-E3 (ENG) 4/11/0 11:06 AM Page 56
Page 83 of 104
6-38
PERIODIC MAINTENANCE AND MINOR REPAIR
1
2
3
4
5
6
7
8
9
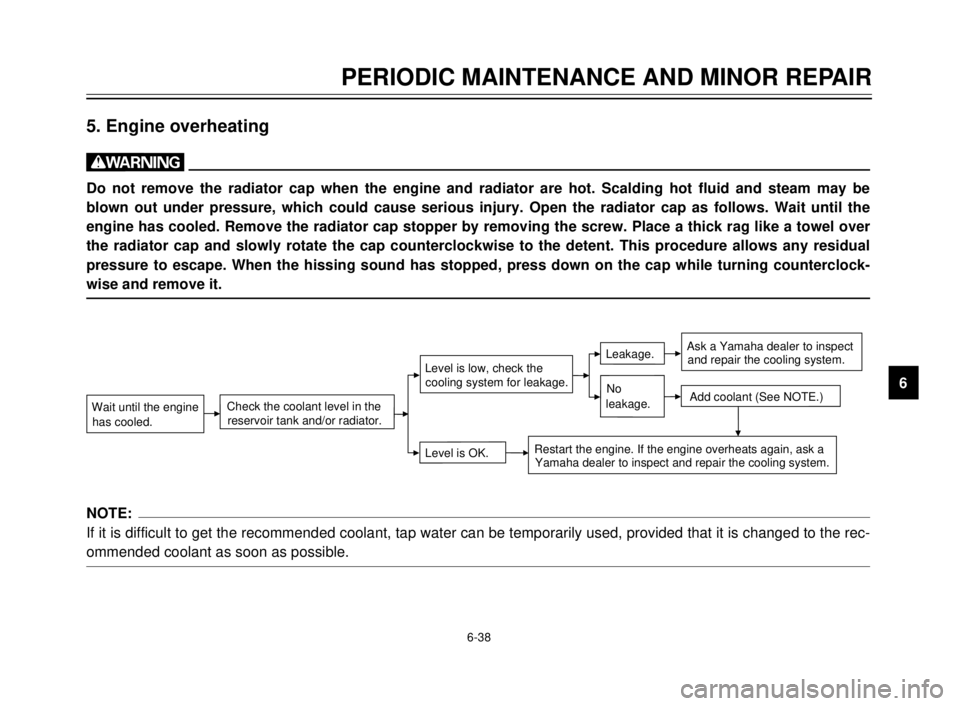
5. Engine overheating
w
Do not remove the radiator cap when the engine and radiator are hot. Scalding hot fluid and steam may be
blown out under pressure, which could cause serious injury. Open the radiator cap as follows. Wait until the
engine has cooled. Remove the radiator cap stopper by removing the screw. Place a thick rag like a towel over
the radiator cap and slowly rotate the cap counterclockwise to the detent. This procedure allows any residual
pressure to escape. When the hissing sound has stopped, press down on the cap while turning counterclock-
wise and remove it.
NOTE:
If it is difficult to get the recommended coolant, tap water can be temporarily used, provided that it is changed to the rec-
ommended coolant as soon as possible.
Level is OK.
Wait until the engine
has cooled.
Restart the engine. If the engine overheats again, ask a
Yamaha dealer to inspect and repair the cooling system. Check the coolant level in the
reservoir tank and/or radiator.
Add coolant (See NOTE.)
Level is low, check thecooling system for leakage.Leakage.No
leakage.Ask a Yamaha dealer to inspect
and repair the cooling system.
5AE-9-E3 (ENG) 4/11/0 11:06 AM Page 81
Page 100 of 104
INDEX
Engine stop switch ..................................3-7
Engine temperature gauge ......................3-5
F
Front brake lever .....................................3-8
Front brake lever free play
adjustment ..........................................6-20
Front fork inspection ..............................6-28
Front wheel installation..........................6-34
Front wheel removal ..............................6-33
Fuel .......................................................3-10
Fuel cock ...............................................3-12
Fuel tank cap ...........................................3-9
Fuse replacement..................................6-30
H
Handlebar switches .................................3-5
Dimmer switch ......................................3-5
Engine stop switch ................................3-7
Headlight beam variation ......................3-6
Horn switch ...........................................3-5
Lights switch .........................................3-5
Start switch ...........................................3-7
Turn signal switch .................................3-5
Headlight beam variation.........................3-6
Headlight bulb replacement...................6-31
Helmet holder ........................................3-14
High beam indicator light .........................3-2
Horn switch..............................................3-5
How to use the conversion table .............8-5
I
Identification number records ..................9-1
Idle speed adjustment ...........................6-15
Indicator lights .........................................3-2
High beam indicator light ......................3-2Neutral indicator light ............................3-2
Oil level indicator light ...........................3-2
Turn indicator light ................................3-2
Inspecting the brake fluid level ..............6-22
K
Key identification number ........................9-1
L
Lights switch ............................................3-5
Left view ..................................................2-1
M
Main switch/Steering lock ........................3-1
Model lavel ..............................................9-2
N
Neutral indicator light...............................3-2
Note on handling of the Yamaha
Energy Induction System (Y.E.I.S.) ....3-15
O
Oil level indicator circuit check ................3-3
Oil level indicator light .............................3-2
P
Panel A ....................................................6-7
Parking ....................................................5-6
Periodic maintenance and
lubrication .............................................6-3
Pre-operation check list ...........................4-1
R
Rear brake pedal .....................................3-9
Rear brake pedal height adjustment .....6-20
Rear shock absorber adjustment ..........3-14
Rear suspension lubrication ..................6-27
Rear wheel installation ..........................6-35
Rear wheel removal ..............................6-34A
Air filter ..................................................6-13
Autolube pump adjustment....................6-26
B
Battery ...................................................6-29
Brake and clutch lever lubrication .........6-27
Brake and shift pedal lubrication ...........6-26
Brake fluid replacement.........................6-23
Brake light switch adjustment ................6-21
C
Cable inspection and lubrication ...........6-25
Carburetor adjustment...........................6-15
Care.........................................................7-1
Catalyzer
(for Switzerland and Austria) ..............3-11
Checking the front and rear brake
pads ....................................................6-21
Clutch lever .............................................3-8
Clutch lever free play adjustment ..........6-19
Controls/Instruments ...............................2-3
Cooling system ......................................6-11
Cowling A, B ............................................6-7
Cowling and panel removal and
installation .............................................6-6
D
Description ..............................................2-1
Dimmer switch .........................................3-5
Drive chain lubrication ...........................6-25
Drive chain slack adjustment.................6-24
Drive chain slack check .........................6-23
E
Engine break-in .......................................5-5
5AE-9-E3 (ENG) 4/11/0 11:06 AM Page 98