Page 17 of 104

3-2
0
0
0100
01000140
180 120 100 80
1 2 3456
7
8
9
10
11
12
~1 000r/minkm/h
CH
12
43
EAU00056Indicator lights
EAU00057Turn indicator light “5 5
”
This indicator flashes when the turn
switch is moved to the left or right.
EAU00061Neutral indicator light “N”
This indicator comes on when the
transmission is in neutral.
EAU00063High beam indicator light “& &
”
This indicator comes on when the
headlight high beam is used.
EAU01313Oil level indicator light “7 7”
This indicator comes on when the oil
level is low. This light circuit can be
checked by the procedure on page
3-3.
EC000000
cC
Do not run the motorcycle until
you know it has sufficient engine
oil.
NOTE:
Even if the oil is filled to the specified
level, the indicator light may flicker
when riding on a slope or during sud-
den acceleration or deceleration, but
this is normal.
1. Turn indicator light “5”
2. High beam indicator light “&”
3. Neutral indicator light “N”
4. Oil level indicator light “
7”
INSTRUMENT AND CONTROL FUNCTIONS
1
2
3
4
5
6
7
8
9
5AE-9-E3 (ENG) 4/11/0 11:06 AM Page 15
Page 20 of 104

3-5
01
140 120 100
3456 CH
1
2
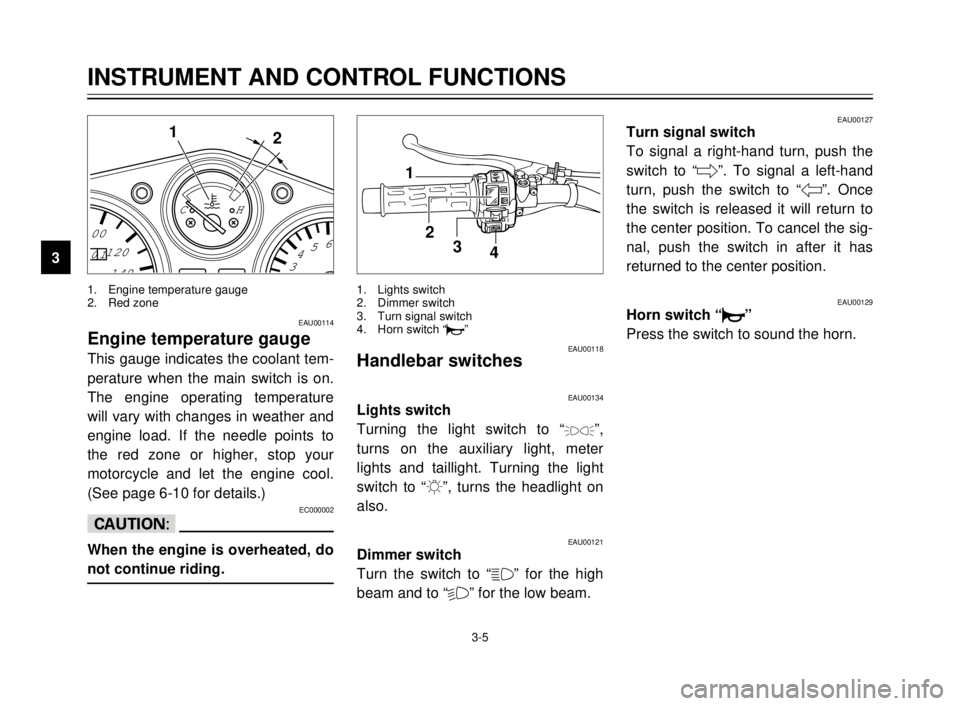
1. Engine temperature gauge
2. Red zone
EAU00114
Engine temperature gauge
This gauge indicates the coolant tem-
perature when the main switch is on.
The engine operating temperature
will vary with changes in weather and
engine load. If the needle points to
the red zone or higher, stop your
motorcycle and let the engine cool.
(See page 6-10 for details.)
EC000002
cC
When the engine is overheated, do
not continue riding.
INSTRUMENT AND CONTROL FUNCTIONS
1
2
3
4
5
6
7
8
9
1
2
3
4
EAU00118Handlebar switches
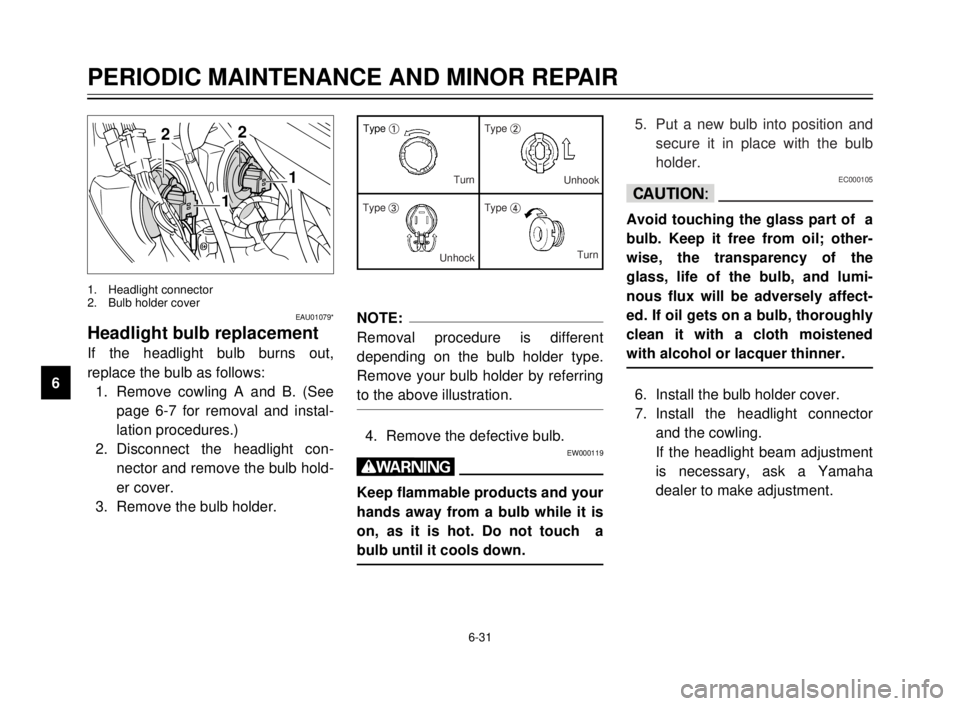
EAU00134Lights switch
Turning the light switch to “
'”,
turns on the auxiliary light, meter
lights and taillight. Turning the light
switch to “:”, turns the headlight on
also.
EAU00121Dimmer switch
Turn the switch to “&” for the high
beam and to “%” for the low beam.
EAU00127Turn signal switch
To signal a right-hand turn, push the
switch to “6”. To signal a left-hand
turn, push the switch to “4”. Once
the switch is released it will return to
the center position. To cancel the sig-
nal, push the switch in after it has
returned to the center position.
EAU00129Horn switch “* *
”
Press the switch to sound the horn.
1. Lights switch
2. Dimmer switch
3. Turn signal switch
4. Horn switch “*”
5AE-9-E3 (ENG) 4/11/0 11:06 AM Page 18
Page 21 of 104
3-6
INSTRUMENT AND CONTROL FUNCTIONS
1
2
3
4
5
6
7
8
9
1
2&
&%
%
Left RightBulb to be used
Destination
3
'
3
2
'
2
3
2
Halogen
bulb
Halogen
bulbFrance Sweden Portugal Spain
Greece Belgium Germany
Switzerland Finland Austria
England
Ireland 3 : High beam light on , 2: Low beam light on
': Auxiliary light on
12V
60/55W12V
60/55W
12V
35/35W12V
35/35W
EAU00136
Headlight beam variation
NOTE:
Right and left directions are those assumed from the position of a person facing the front of the motorcycle.
5AE-9-E3 (ENG) 4/11/0 11:06 AM Page 19
Page 76 of 104

6-31
PERIODIC MAINTENANCE AND MINOR REPAIR
1
2
3
4
5
6
7
8
9
2
1
2
1
1. Headlight connector
2. Bulb holder cover
EAU01079*
Headlight bulb replacement
If the headlight bulb burns out,
replace the bulb as follows:
1. Remove cowling A and B. (See
page 6-7 for removal and instal-
lation procedures.)
2. Disconnect the headlight con-
nector and remove the bulb hold-
er cover.
3. Remove the bulb holder.
NOTE:
Removal procedure is different
depending on the bulb holder type.
Remove your bulb holder by referring
to the above illustration.
4. Remove the defective bulb.EW000119
w
Keep flammable products and your
hands away from a bulb while it is
on, as it is hot. Do not touch a
bulb until it cools down.
Type 1Type 2
Type 3Type 4 Turn
Unhook
UnhockTurn5. Put a new bulb into position and
secure it in place with the bulb
holder.
EC000105
cC
Avoid touching the glass part of a
bulb. Keep it free from oil; other-
wise, the transparency of the
glass, life of the bulb, and lumi-
nous flux will be adversely affect-
ed. If oil gets on a bulb, thoroughly
clean it with a cloth moistened
with alcohol or lacquer thinner.
6. Install the bulb holder cover.
7. Install the headlight connector
and the cowling.
If the headlight beam adjustment
is necessary, ask a Yamaha
dealer to make adjustment.
5AE-9-E3 (ENG) 4/11/0 11:06 AM Page 74