Page 60 of 104

6-15
PERIODIC MAINTENANCE AND MINOR REPAIR
1
2
3
4
5
6
7
8
9
EC000082
cC
8
8
Make sure the air filter is prop-
erly seated in the air filter
case.
8 8
The engine should never be
run without the air filter
installed. Excessive piston
and/or cylinder wear may
result.
EW000131
w
Make sure that the fuel hoses and
vacuum hose are properly con-
nected, in place and not pinched. If
a hose is damaged, be sure to
replace it.
EAU00629Carburetor adjustment
The carburetor is a vital part of the
engine and requires very sophisticat-
ed adjustment. Most adjustments
should be left to a Yamaha dealer
who has the professional knowledge
and experience to do so. However,
the following may be serviced by the
owner as part of routine mainte-
nance.
EC000094
cC
The carburetor was set at the
Yamaha factory after many tests. If
the settings are changed, poor
engine performance and damage
may result.
ba
1
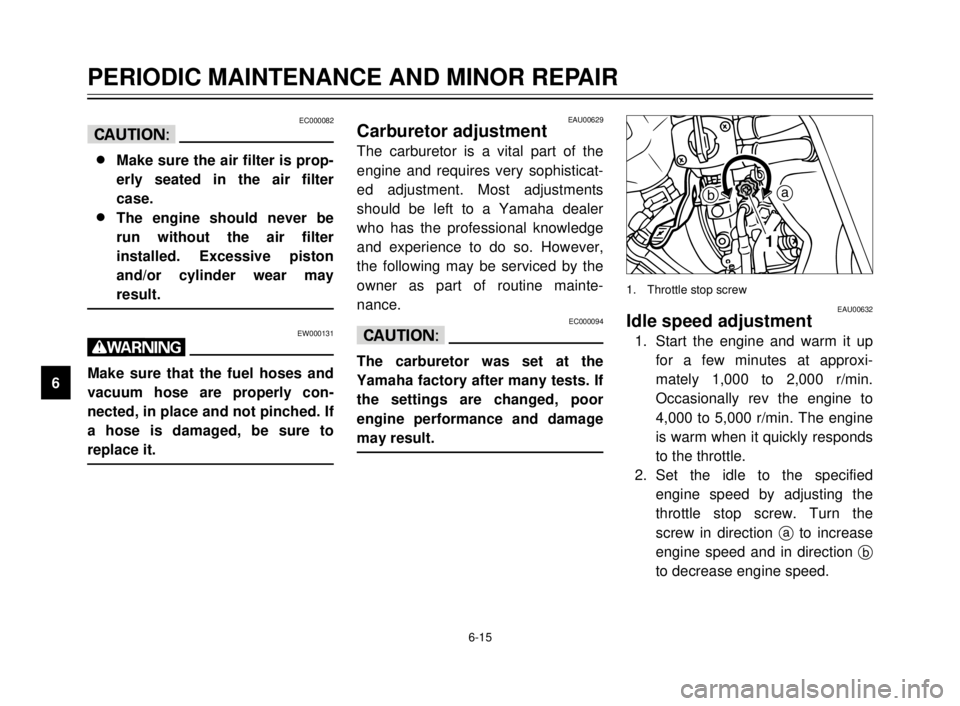
EAU00632Idle speed adjustment
1. Start the engine and warm it up
for a few minutes at approxi-
mately 1,000 to 2,000 r/min.
Occasionally rev the engine to
4,000 to 5,000 r/min. The engine
is warm when it quickly responds
to the throttle.
2. Set the idle to the specified
engine speed by adjusting the
throttle stop screw. Turn the
screw in direction ato increase
engine speed and in direction b
to decrease engine speed.
1. Throttle stop screw
5AE-9-E3 (ENG) 4/11/0 11:06 AM Page 58
Page 61 of 104
6-16
PERIODIC MAINTENANCE AND MINOR REPAIR
1
2
3
4
5
6
7
8
9
NOTE:
If the specified idle speed cannot be
obtained by performing the above
adjustment, consult a Yamaha deal-
er.
Standard idle speed:
1,300 ~ 1,500 r/min
1,400 ~ 1,500 r/min
(A, CH only)
EAU00634
Throttle cable free play
adjustment
NOTE:
Before checking the throttle cable
free play, the engine idling speed
should be adjusted.
Adjust the throttle cable by turning
the adjusting nut so that specified
free play at the throttle grip is
obtained.
a. Free play
a
Free play:
3 ~ 5 mm
2 1
b
a
1. Loosen the locknut.
2. Turn the adjusting nut in direc-
tion ato increase free play and
in direction bto decrease free
play.
3. Tighten the locknut.
1. Locknut
2. Adjusting nut
5AE-9-E3 (ENG) 4/11/0 11:06 AM Page 59
Page 69 of 104

6-24
PERIODIC MAINTENANCE AND MINOR REPAIR
1
2
3
4
5
6
7
8
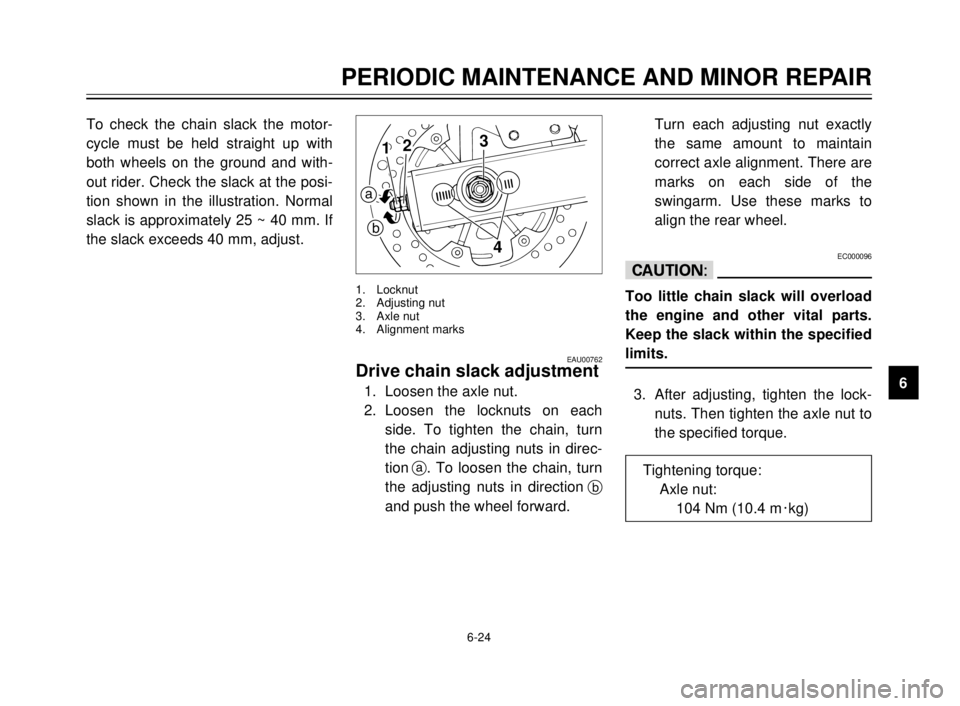
9 To check the chain slack the motor-
cycle must be held straight up with
both wheels on the ground and with-
out rider. Check the slack at the posi-
tion shown in the illustration. Normal
slack is approximately 25 ~ 40 mm. If
the slack exceeds 40 mm, adjust.
EAU00762Drive chain slack adjustment
1. Loosen the axle nut.
2. Loosen the locknuts on each
side. To tighten the chain, turn
the chain adjusting nuts in direc-
tiona. To loosen the chain, turn
the adjusting nuts in directionb
and push the wheel forward.
3
412
a
b
1. Locknut
2. Adjusting nut
3. Axle nut
4. Alignment marks
Turn each adjusting nut exactly
the same amount to maintain
correct axle alignment. There are
marks on each side of the
swingarm. Use these marks to
align the rear wheel.
EC000096
cC
Too little chain slack will overload
the engine and other vital parts.
Keep the slack within the specified
limits.
3. After adjusting, tighten the lock-
nuts. Then tighten the axle nut to
the specified torque.
Tightening torque:
Axle nut:
104 Nm (10.4 m0kg)
5AE-9-E3 (ENG) 4/11/0 11:06 AM Page 67
Page 70 of 104

6-25
PERIODIC MAINTENANCE AND MINOR REPAIR
1
2
3
4
5
6
7
8
9
EAU03006
Drive chain lubrication
The chain consists of many parts
which work with each other. If the
chain is not maintained properly, it
will wear out quickly. Therefore, the
chain must be serviced regularly.
This service is especially necessary
when riding in dusty areas. This
motorcycle is equipped with a sealed
type chain. Steam cleaning, high-
pressure washers, and solvents can
damage the drive chain, so do not
use these for cleaning it. Use only
kerosene to clean the drive chain.
Wipe it dry, and thoroughly lubricate it
with SAE 30 ~ 50W motor oil. Do not
use any other lubricants on the drive
chain. They may contain solvents
that could damage the sealed chain.
EC000097
cC
Be sure to oil the chain after wash-
ing the motorcycle or riding in the
rain.
EAU02962
Cable inspection and
lubrication
EW000112
w
Damage to the outer housing of
cables may lead to internal rusting
and interfere with the cable move-
ment. Replace damaged cables as
soon as possible to prevent unsafe
conditions.
Lubricate the cables and cable ends.
If a cable does not operate smoothly,
ask a Yamaha dealer to replace it.
Recommended lubricant:
Engine oil
EAU00773
Throttle cable and grip
lubrication
The throttle twist grip assembly
should be greased at the time that
the cable is lubricated, since the grip
must be removed to get at the end of
the throttle cable. After removing the
screws, hold the end of the cable up
in the air and put in several drops of
lubricant. With the throttle grip disas-
sembled, coat the metal surface of
the grip assembly with a suitable all-
purpose grease.
5AE-9-E3 (ENG) 4/11/0 11:06 AM Page 68
Page 71 of 104
6-26
PERIODIC MAINTENANCE AND MINOR REPAIR
1
2
3
4
5
6
7
8
9
EAU00774
Autolube pump adjustment
The autolube pump is a vital part of
the engine and requires very sophisti-
cated adjustment.
Adjusting should be left to a Yamaha
dealer who has the professional
knowledge and experience to do so.
EAU02984
Brake and shift pedal
lubrication
Lubricate the pivoting parts.
Recommended lubricant:
Engine oil
EAU02985
Brake and clutch lever
lubrication
Lubricate the pivoting parts.
Recommended lubricant:
Engine oil
5AE-9-E3 (ENG) 4/11/0 11:06 AM Page 69
Page 72 of 104
6-27
PERIODIC MAINTENANCE AND MINOR REPAIR
1
2
3
4
5
6
7
8
9
EAU02986
Sidestand lubrication
Lubricate the sidestand pivoting point
and metal-to-metal contact surfaces.
Check that the sidestand moves up
and down smoothly.
EW000113
w
If the sidestand does not move
smoothly, consult a Yamaha deal-
er.
Recommended lubricant:
Engine oil
EAU00791
Rear suspension lubrication
Lubricate the pivoting parts.
Recommended lubricant:
Lithium soap base grease
EAU02939
Front fork inspection
Visual checkEW000115
w
Securely support the motorcycle
so there is no danger of it falling
over.
Check for scratches or damage on
the inner tube and excessive oil leak-
age from the front fork.
5AE-9-E3 (ENG) 4/11/0 11:06 AM Page 70
Page 73 of 104
6-28
PERIODIC MAINTENANCE AND MINOR REPAIR
1
2
3
4
5
6
7
8
9 Operation check
1. Place the motorcycle on a level
place.
2. Hold the motorcycle in an upright
position and apply the front
brake.
3. Push down hard on the handle-
bars several times and check if
the fork rebounds smoothly.
EC000098
cC
If any damage or unsmooth move-
ment is found with the front fork,
consult a Yamaha dealer.
EAU00794Steering inspection
Periodically inspect the condition of
the steering. Worn out or loose steer-
ing bearings may be dangerous.
Place a stand under the engine to
raise the front wheel off the ground.
Hold the lower end of the front forks
and try to move them forward and
backward. If any free play can be felt,
ask a Yamaha dealer to inspect and
adjust the steering. Inspection is eas-
ier if the front wheel is removed.
EW000115
w
Securely support the motorcycle
so there is no danger of it falling
over.
5AE-9-E3 (ENG) 4/11/0 11:06 AM Page 71
Page 78 of 104
6-33
PERIODIC MAINTENANCE AND MINOR REPAIR
1
2
3
4
5
6
7
8
9
1
1. Speedometer cable
EAU00894Front wheel removalEW000122
w
8 8
It is advisable to have a
Yamaha dealer service the
wheel.
8 8
Securely support the motorcy-
cle so there is no danger of it
falling over.
1. Remove the speedometer cable
from the front wheel side.
2
1
1. Pinch bolt
2. Wheel axle
2. Loosen the pinch bolt and wheel
axle.
3. Elevate the front wheel by plac-
ing a suitable stand under the
engine.
4. Remove the wheel axle and the
front wheel.
NOTE:
Do not depress the brake lever when
the disc and caliper are separated.
1
1. Bulb
3. Install a new bulb by pushing it
inward and turning it clockwise.
4. Install the lens and tighten the
screw.
5AE-9-E3 (ENG) 4/11/0 11:06 AM Page 76