Page 68 of 104

6-23
PERIODIC MAINTENANCE AND MINOR REPAIR
1
2
3
4
5
6
7
8
98Refill with the same type of brake
fluid. Mixing fluids may result in a
harmful chemical reaction and
lead to poor brake performance.
8Be careful that water does not
enter the master cylinder when
refilling. Water will significantly
lower the boiling point of the fluid
and may result in vapor lock.
8Brake fluid may deteriorate paint-
ed surfaces or plastic parts.
Always clean up spilled fluid
immediately.
8Have a Yamaha dealer check
the cause if the brake fluid level
goes down.
EAU00742Brake fluid replacement
The brake fluid should be replaced
only by trained Yamaha service per-
sonnel. Have the Yamaha dealer
replace the following components
during periodic maintenance or when
they are damaged or leaking:
8oil seals (every two years)
8brake hoses (every four years)
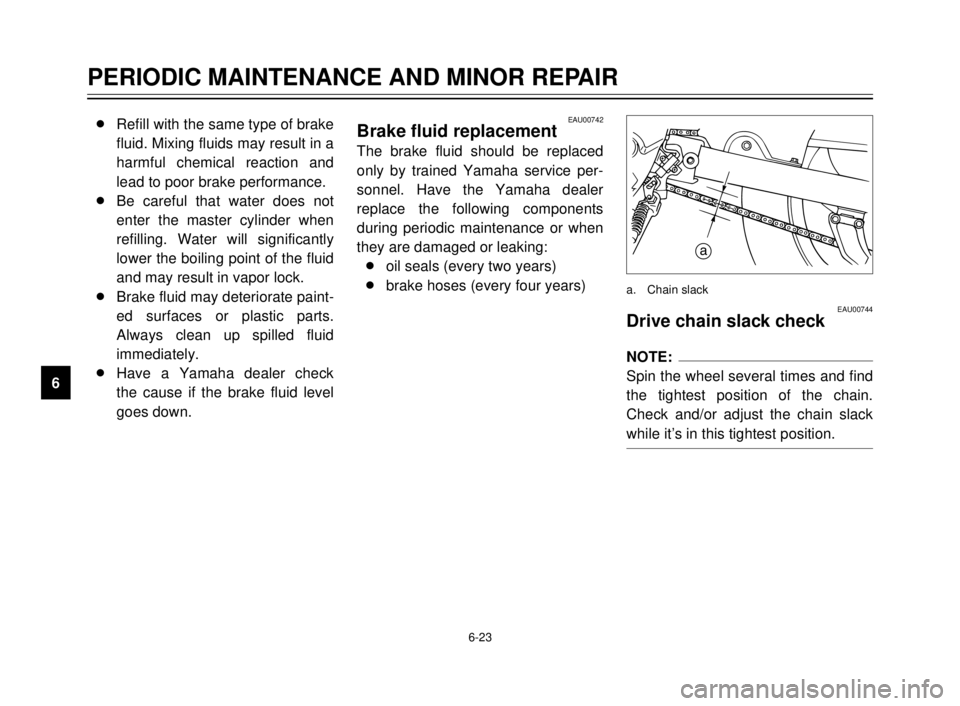
EAU00744Drive chain slack check
NOTE:
Spin the wheel several times and find
the tightest position of the chain.
Check and/or adjust the chain slack
while it’s in this tightest position.
a
a. Chain slack
5AE-9-E3 (ENG) 4/11/0 11:06 AM Page 66
Page 70 of 104

6-25
PERIODIC MAINTENANCE AND MINOR REPAIR
1
2
3
4
5
6
7
8
9
EAU03006
Drive chain lubrication
The chain consists of many parts
which work with each other. If the
chain is not maintained properly, it
will wear out quickly. Therefore, the
chain must be serviced regularly.
This service is especially necessary
when riding in dusty areas. This
motorcycle is equipped with a sealed
type chain. Steam cleaning, high-
pressure washers, and solvents can
damage the drive chain, so do not
use these for cleaning it. Use only
kerosene to clean the drive chain.
Wipe it dry, and thoroughly lubricate it
with SAE 30 ~ 50W motor oil. Do not
use any other lubricants on the drive
chain. They may contain solvents
that could damage the sealed chain.
EC000097
cC
Be sure to oil the chain after wash-
ing the motorcycle or riding in the
rain.
EAU02962
Cable inspection and
lubrication
EW000112
w
Damage to the outer housing of
cables may lead to internal rusting
and interfere with the cable move-
ment. Replace damaged cables as
soon as possible to prevent unsafe
conditions.
Lubricate the cables and cable ends.
If a cable does not operate smoothly,
ask a Yamaha dealer to replace it.
Recommended lubricant:
Engine oil
EAU00773
Throttle cable and grip
lubrication
The throttle twist grip assembly
should be greased at the time that
the cable is lubricated, since the grip
must be removed to get at the end of
the throttle cable. After removing the
screws, hold the end of the cable up
in the air and put in several drops of
lubricant. With the throttle grip disas-
sembled, coat the metal surface of
the grip assembly with a suitable all-
purpose grease.
5AE-9-E3 (ENG) 4/11/0 11:06 AM Page 68
Page 78 of 104
6-33
PERIODIC MAINTENANCE AND MINOR REPAIR
1
2
3
4
5
6
7
8
9
1
1. Speedometer cable
EAU00894Front wheel removalEW000122
w
8 8
It is advisable to have a
Yamaha dealer service the
wheel.
8 8
Securely support the motorcy-
cle so there is no danger of it
falling over.
1. Remove the speedometer cable
from the front wheel side.
2
1
1. Pinch bolt
2. Wheel axle
2. Loosen the pinch bolt and wheel
axle.
3. Elevate the front wheel by plac-
ing a suitable stand under the
engine.
4. Remove the wheel axle and the
front wheel.
NOTE:
Do not depress the brake lever when
the disc and caliper are separated.
1
1. Bulb
3. Install a new bulb by pushing it
inward and turning it clockwise.
4. Install the lens and tighten the
screw.
5AE-9-E3 (ENG) 4/11/0 11:06 AM Page 76
Page 79 of 104

6-34
PERIODIC MAINTENANCE AND MINOR REPAIR
1
2
3
4
5
6
7
8
9
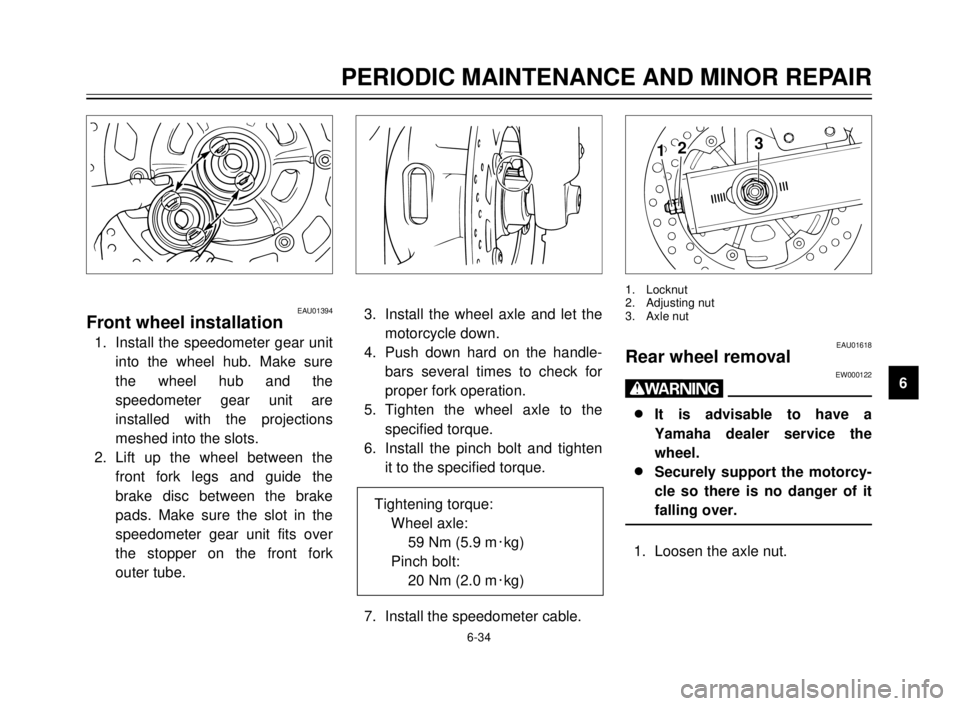
3. Install the wheel axle and let the
motorcycle down.
4. Push down hard on the handle-
bars several times to check for
proper fork operation.
5. Tighten the wheel axle to the
specified torque.
6. Install the pinch bolt and tighten
it to the specified torque.
7. Install the speedometer cable.Tightening torque:
Wheel axle:
59 Nm (5.9 m0kg)
Pinch bolt:
20 Nm (2.0 m0kg)
312
EAU01618Rear wheel removalEW000122
w
8 8
It is advisable to have a
Yamaha dealer service the
wheel.
8 8
Securely support the motorcy-
cle so there is no danger of it
falling over.
1. Loosen the axle nut.
1. Locknut
2. Adjusting nut
3. Axle nut
EAU01394Front wheel installation
1. Install the speedometer gear unit
into the wheel hub. Make sure
the wheel hub and the
speedometer gear unit are
installed with the projections
meshed into the slots.
2. Lift up the wheel between the
front fork legs and guide the
brake disc between the brake
pads. Make sure the slot in the
speedometer gear unit fits over
the stopper on the front fork
outer tube.
5AE-9-E3 (ENG) 4/11/0 11:06 AM Page 77
Page 81 of 104

6-36
PERIODIC MAINTENANCE AND MINOR REPAIR
1
2
3
4
5
6
7
8
9 4. Adjust the drive chain. (See page
6-24 for adjusting the drive chain
slack.)
5. Tighten the axle nut to the speci-
fied torque.
Tightening torque:
Axle nut:
104 Nm (10.4 m0kg)
EAU01008Troubleshooting
Although Yamaha motorcycles
receive a rigid inspection before ship-
ment from the factory, trouble may
occur during operation.
Any problem in the fuel, compres-
sion, or ignition systems can cause
poor starting and loss of power. The
troubleshooting chart describes a
quick, easy procedure for making
checks.
If your motorcycle requires any
repair, bring it to a Yamaha dealer.
The skilled technicians at a Yamaha
dealership have the tools, experi-
ence, and know-how to properly ser-
vice your motorcycle. Use only gen-
uine Yamaha parts on your
motorcycle. Imitation parts may look
like Yamaha parts, but they are often
inferior. Consequently, they have a
shorter service life and can lead to
expensive repair bills.
5AE-9-E3 (ENG) 4/11/0 11:06 AM Page 79