Page 13 of 104
DESCRIPTION
1
2
3
4
5
6
7
8
9
2-2
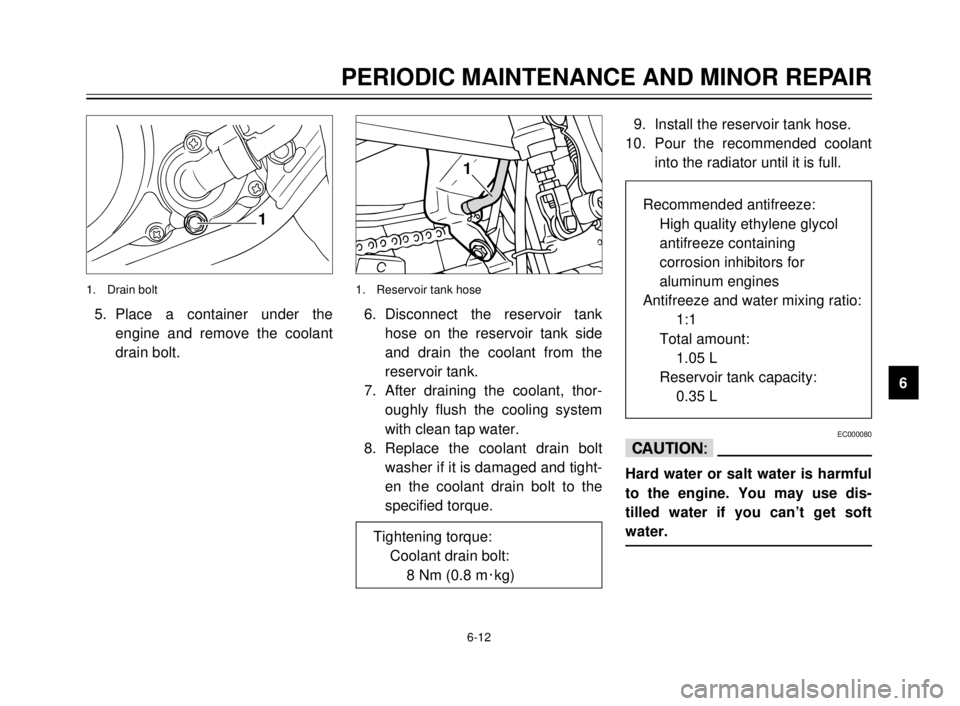
8. Tool kit (page 6-1)
9. Fuse (page 6-32)
10. Air filter (page 6-15)
11. Radiator cap (page 6-11)
12. Rear brake pedal (page 3-9, 6-22)
13. Coolant reservoir tank (page 6-10)14. Rear shock absorber spring
preload adjusting ring (page 3-14)
8 9 10 11
12
13 14
Right view
5AE-9-E3 (ENG) 4/11/0 11:06 AM Page 11
Page 52 of 104
6-7
2
1
1
12
EAU01088Cowling A, B
To remove
1. Remove the seat.
2. Remove the radiator cover
screws and the radiator cover.
1. Radiator cover
2. Screw (´2)1. Screw (´10) 1. Screw (´2)
2. Panel A
3. Remove the screws and pull out-
ward on the areas shown.
To install
1. Place the cowling in the original
position and install the screws.
2. Place the radiator cover in the
original position and install the
screws.
3. Install the seat.EAU01691
Panel A
To remove
1. Remove the seat. (See page
3-13 for removal and installation
procedures.)
2. Remove the screw.
To install
1. Place the panel in the original
position and install the screw.
2. Install the seat.
PERIODIC MAINTENANCE AND MINOR REPAIR
1
2
3
4
5
6
7
8
9
5AE-9-E3 (ENG) 4/11/0 11:06 AM Page 50
Page 56 of 104
EAU01622*Changing the coolant
1. Put the motorcycle on a level
place.
2. Remove the seat (See page
3-13 for seat removal proce-
dures.)
3. Remove cowling B and radiator
cover. (See page 6-7 for removal
and installation procedures.)
6-11
PERIODIC MAINTENANCE AND MINOR REPAIR
1
2
3
4
5
6
7
8
94. Remove the radiator cap.
EW000067
w
Do not remove the radiator cap
when the engine is hot.
EC000080
cC
Hard water or salt water is harmful
to the engine. You may use dis-
tilled water if you can’t get soft
water.
1
1. Radiator cap
5AE-9-E3 (ENG) 4/11/0 11:06 AM Page 54
Page 57 of 104

6-12
PERIODIC MAINTENANCE AND MINOR REPAIR
1
2
3
4
5
6
7
8
9
1
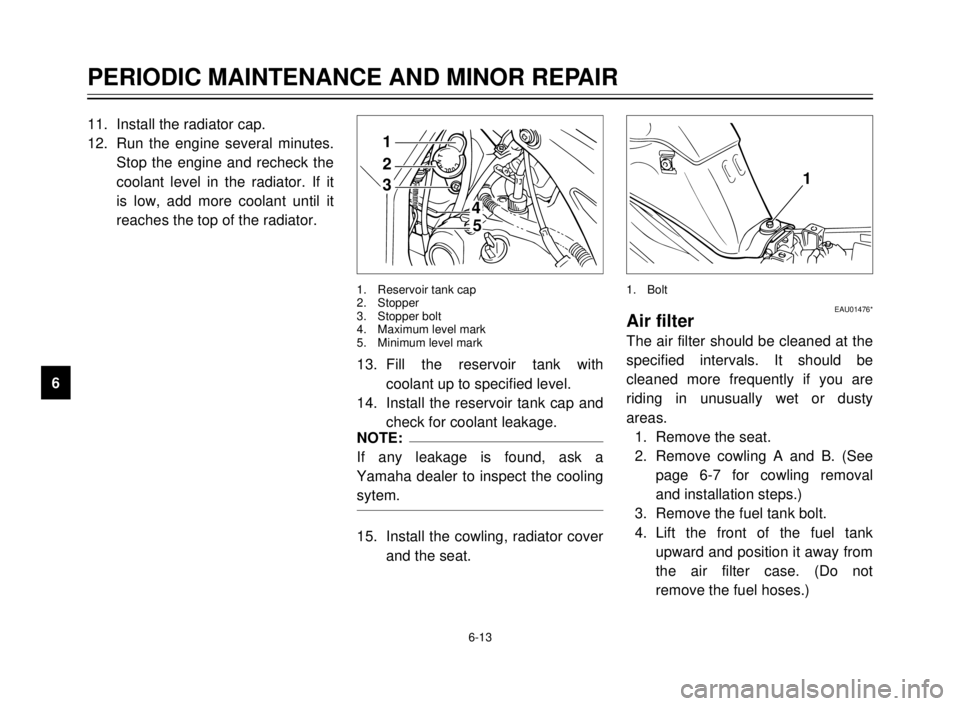
5. Place a container under the
engine and remove the coolant
drain bolt.
1. Drain bolt
1
6. Disconnect the reservoir tank
hose on the reservoir tank side
and drain the coolant from the
reservoir tank.
7. After draining the coolant, thor-
oughly flush the cooling system
with clean tap water.
8. Replace the coolant drain bolt
washer if it is damaged and tight-
en the coolant drain bolt to the
specified torque.
1. Reservoir tank hose
Tightening torque:
Coolant drain bolt:
8 Nm (0.8 m0kg)
9. Install the reservoir tank hose.
10. Pour the recommended coolant
into the radiator until it is full.
EC000080
cC
Hard water or salt water is harmful
to the engine. You may use dis-
tilled water if you can’t get soft
water.
Recommended antifreeze:
High quality ethylene glycol
antifreeze containing
corrosion inhibitors for
aluminum engines
Antifreeze and water mixing ratio:
1:1
Total amount:
1.05 L
Reservoir tank capacity:
0.35 L
5AE-9-E3 (ENG) 4/11/0 11:06 AM Page 55
Page 58 of 104

6-13
PERIODIC MAINTENANCE AND MINOR REPAIR
1
2
3
4
5
6
7
8
9
2
1
4
5
3
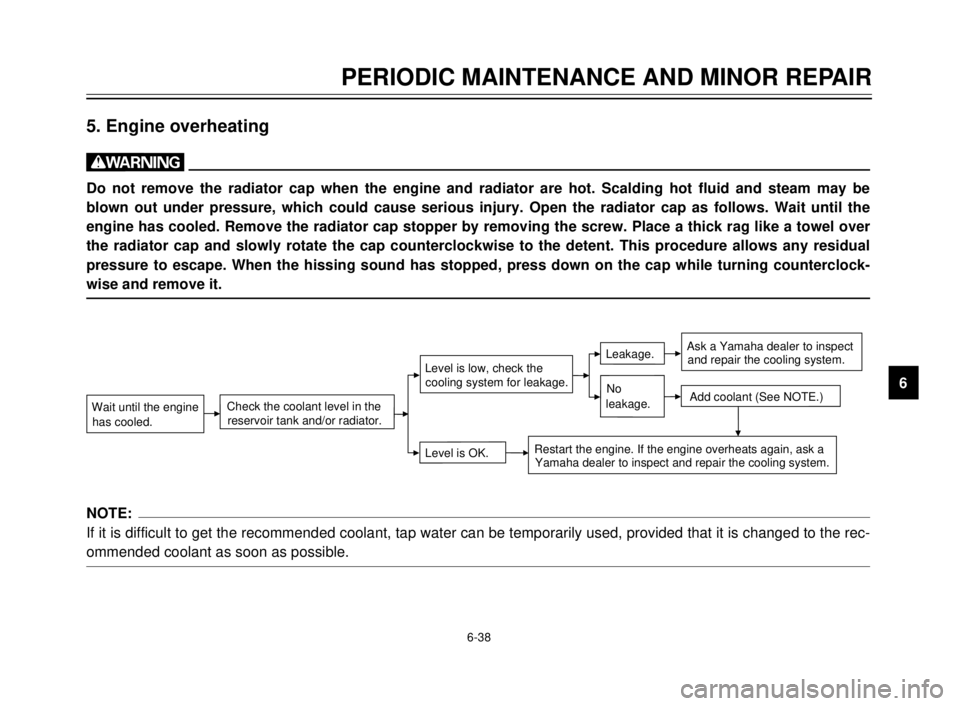
1. Reservoir tank cap
2. Stopper
3. Stopper bolt
4. Maximum level mark
5. Minimum level mark
11. Install the radiator cap.
12. Run the engine several minutes.
Stop the engine and recheck the
coolant level in the radiator. If it
is low, add more coolant until it
reaches the top of the radiator.
13. Fill the reservoir tank with
coolant up to specified level.
14. Install the reservoir tank cap and
check for coolant leakage.
NOTE:
If any leakage is found, ask a
Yamaha dealer to inspect the cooling
sytem.
15. Install the cowling, radiator cover
and the seat.
1
EAU01476*Air filter
The air filter should be cleaned at the
specified intervals. It should be
cleaned more frequently if you are
riding in unusually wet or dusty
areas.
1. Remove the seat.
2. Remove cowling A and B. (See
page 6-7 for cowling removal
and installation steps.)
3. Remove the fuel tank bolt.
4. Lift the front of the fuel tank
upward and position it away from
the air filter case. (Do not
remove the fuel hoses.)
1. Bolt
5AE-9-E3 (ENG) 4/11/0 11:06 AM Page 56
Page 83 of 104

6-38
PERIODIC MAINTENANCE AND MINOR REPAIR
1
2
3
4
5
6
7
8
9
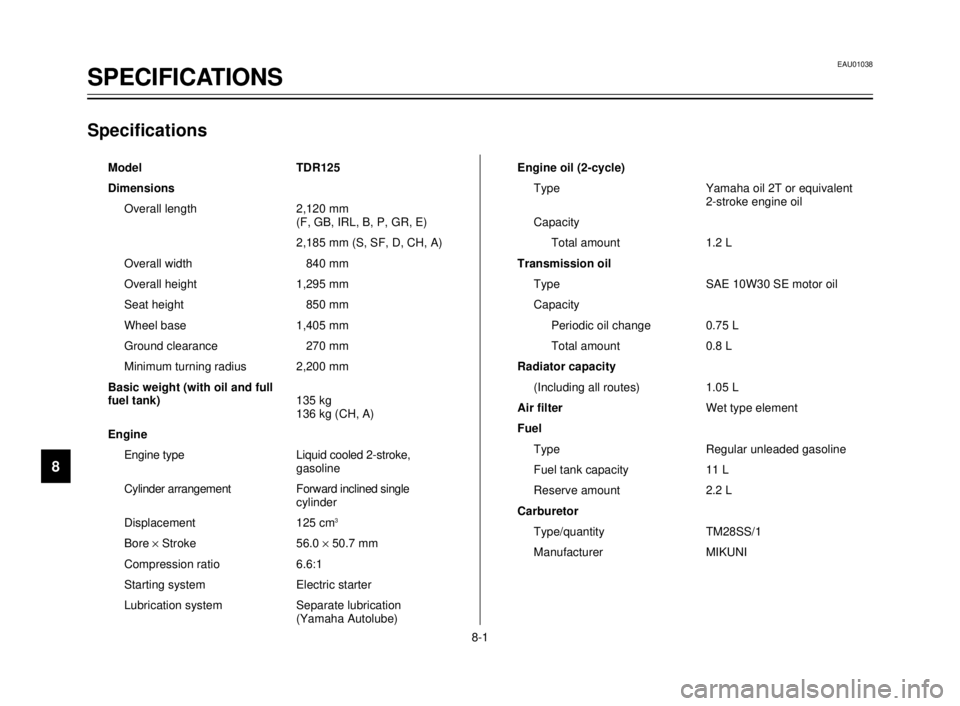
5. Engine overheating
w
Do not remove the radiator cap when the engine and radiator are hot. Scalding hot fluid and steam may be
blown out under pressure, which could cause serious injury. Open the radiator cap as follows. Wait until the
engine has cooled. Remove the radiator cap stopper by removing the screw. Place a thick rag like a towel over
the radiator cap and slowly rotate the cap counterclockwise to the detent. This procedure allows any residual
pressure to escape. When the hissing sound has stopped, press down on the cap while turning counterclock-
wise and remove it.
NOTE:
If it is difficult to get the recommended coolant, tap water can be temporarily used, provided that it is changed to the rec-
ommended coolant as soon as possible.
Level is OK.
Wait until the engine
has cooled.
Restart the engine. If the engine overheats again, ask a
Yamaha dealer to inspect and repair the cooling system. Check the coolant level in the
reservoir tank and/or radiator.
Add coolant (See NOTE.)
Level is low, check thecooling system for leakage.Leakage.No
leakage.Ask a Yamaha dealer to inspect
and repair the cooling system.
5AE-9-E3 (ENG) 4/11/0 11:06 AM Page 81
Page 92 of 104

SPECIFICATIONS
1
2
3
4
5
6
7
8
9
Specifications
Model TDR125
Dimensions
Overall length 2,120 mm
(F, GB, IRL, B, P, GR, E)
2,185 mm (S, SF, D, CH, A)
Overall width 840 mm
Overall height 1,295 mm
Seat height 850 mm
Wheel base 1,405 mm
Ground clearance 270 mm
Minimum turning radius 2,200 mm
Basic weight (with oil and full
fuel tank)135 kg
136 kg (CH, A)
Engine
Engine type Liquid cooled 2-stroke,
gasoline
Cylinder arrangement Forward inclined single
cylinder
Displacement 125 cm
3
Bore ´Stroke 56.0 ´50.7 mm
Compression ratio 6.6:1
Starting system Electric starter
Lubrication system Separate lubrication
(Yamaha Autolube)Engine oil (2-cycle)
Type Yamaha oil 2T or equivalent
2-stroke engine oil
Capacity
Total amount 1.2 L
Transmission oil
Type SAE 10W30 SE motor oil
Capacity
Periodic oil change 0.75 L
Total amount 0.8 L
Radiator capacity
(Including all routes) 1.05 L
Air filterWet type element
Fuel
Type Regular unleaded gasoline
Fuel tank capacity 11 L
Reserve amount 2.2 L
Carburetor
Type/quantity TM28SS/1
Manufacturer MIKUNI
EAU01038
SPECIFICATIONS
8-1
5AE-9-E3 (ENG) 4/11/0 11:06 AM Page 90