Page 49 of 104

6-4
PERIODIC MAINTENANCE AND MINOR REPAIR
6
EVERY
6,000 km 12,000 km
No.
ITEM CHECKS AND MAINTENANCE JOBS
Initialor or
(1,000 km)6 months 12 months
(Whichever (Whichever
comes first) comes first)
9Check swingarm pivoting point for play.
10 * Swingarm9Correct if necessary.
ÖÖ
9Lubricate with lithium soap base grease every
24,000 km or 24 months (whichever comes first).
9Check chain slack.
11 Drive chain9
Adjust if necessary. Make sure that the rear wheel is properly aligned.Every 1,000 km and after washing
9Clean and lubricate.the motorcycle or riding in the rain
9Check bearing play and steering for roughness.
12 * Steering bearings9Correct accordingly.
ÖÖ
9Lubricate with lithium soap base grease every 24,000 km or
24 months (whichever comes first).
13 * Chassis fasteners9
Make sure that all nuts, bolts and screws are properly tightened.ÖÖ9Tighten if necessary.
14 Sidestand9Check operation.
ÖÖ
9Lubricate and repair if necessary.
15 * Sidestand switch9Check operation.
ÖÖÖ
9Replace if necessary.
16 * Front fork9Check operation and for oil leakage.
ÖÖ
9Correct accordingly.
17 *Rear shock absorber9Check operation and shock absorber for oil leakage.
ÖÖ
assembly9Replace shock absorber assembly if necessary.
Rear shock absorber9Check operation.
18 * assembly pivoting9Lubricate with lithium grease every 24,000 km ÖÖ
pointsor 24 months (whichever comes first).
19 * Carburetor9Check engine idling speed and starter operation.
ÖÖÖ
9Adjust if necessary.
5AE-9-E3 (ENG) 4/11/0 11:06 AM Page 47
Page 54 of 104
6-9
1
1. Transmission oil filler cap
2. With the engine stopped, check
the oil level through the level
window located at the right side
crankcase cover.
NOTE:
Wait a few minutes until the oil level
settles before checking.
3. The oil level should be above the
minimum level mark on the level
window. If the level is low, add
sufficient oil to raise it to the
proper level.Transmission oil replacement
1. Warm up the engine for several
minutes.
2. Stop the engine. Place an oil pan
under the engine and remove the
oil filler cap.
PERIODIC MAINTENANCE AND MINOR REPAIR
1
2
3
4
5
6
7
8
9
12
EAU01080Transmission oil
Oil level measurement
1. Place the motorcycle on a level
place and hold it an upright posi-
tion. Warm up the engine for
several minutes.
NOTE:
Be sure the motorcycle is positioned
straight up when checking the oil
level. A slight tilt toward the side can
result in false readings.
1. Level window
2. Minimum level
5AE-9-E3 (ENG) 4/11/0 11:06 AM Page 52
Page 55 of 104

6-10
1
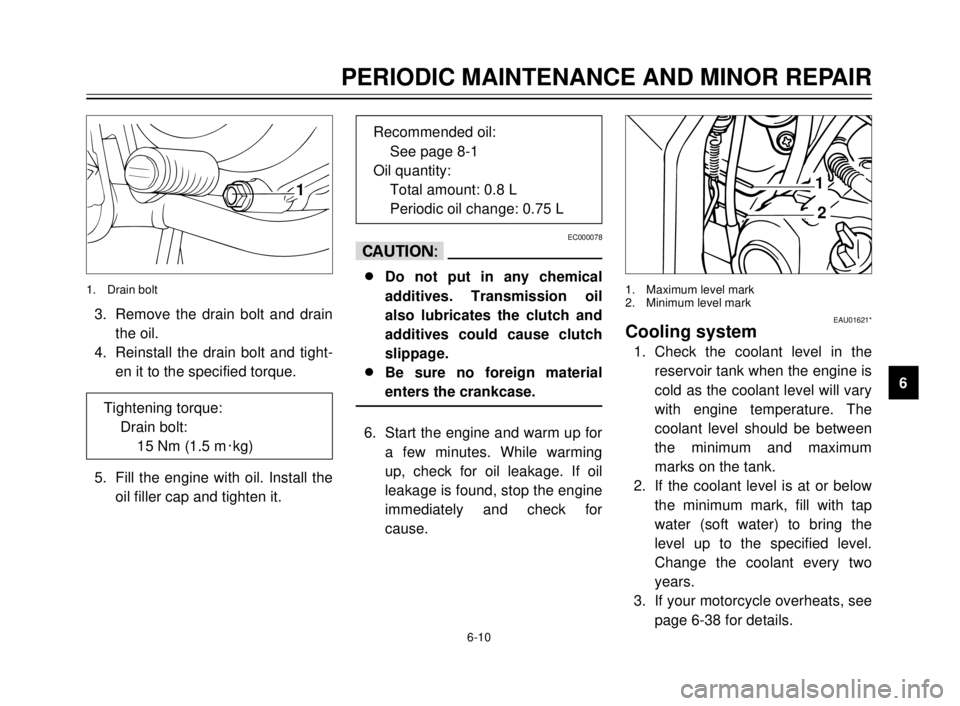
3. Remove the drain bolt and drain
the oil.
4. Reinstall the drain bolt and tight-
en it to the specified torque.
5. Fill the engine with oil. Install the
oil filler cap and tighten it.
EC000078
cC
8
8
Do not put in any chemical
additives. Transmission oil
also lubricates the clutch and
additives could cause clutch
slippage.
8 8
Be sure no foreign material
enters the crankcase.
6. Start the engine and warm up for
a few minutes. While warming
up, check for oil leakage. If oil
leakage is found, stop the engine
immediately and check for
cause.
1. Drain bolt
PERIODIC MAINTENANCE AND MINOR REPAIR
1
2
3
4
5
6
7
8
9 Tightening torque:
Drain bolt:
15 Nm (1.5 m0kg)
Recommended oil:
See page 8-1
Oil quantity:
Total amount: 0.8 L
Periodic oil change: 0.75 L
1
2
1. Maximum level mark
2. Minimum level mark
EAU01621*Cooling system
1. Check the coolant level in the
reservoir tank when the engine is
cold as the coolant level will vary
with engine temperature. The
coolant level should be between
the minimum and maximum
marks on the tank.
2. If the coolant level is at or below
the minimum mark, fill with tap
water (soft water) to bring the
level up to the specified level.
Change the coolant every two
years.
3. If your motorcycle overheats, see
page 6-38 for details.
5AE-9-E3 (ENG) 4/11/0 11:06 AM Page 53
Page 59 of 104
6-14
PERIODIC MAINTENANCE AND MINOR REPAIR
1
2
3
4
5
6
7
8
9
EW000071
w
8 8
Support the fuel tank carefully
during this procedure.
8 8
Do not tilt the fuel tank too
much or pull it too hard
because the fuel hose connec-
tions may become loose caus-
ing fuel leakage.
1
2
2
1. Relay (´2)
2. Screw (´7)
5. Remove the relays and the
screws holding the air filter case
cover.
1
1. Air filter
6. Remove the air filter element
from its case and clean it with
solvent. After cleaning, remove
the remaining solvent by squeez-
ing the air filter.
7. Apply recommended oil to the
entire surface of the air filter and
squeeze out the excess oil. The
air filter should be wet but not
dripping.
8. Install the air filter element in its
case.
9. Reinstall the parts removed for
access. Recommended oil:
2-stroke engine oil
5AE-9-E3 (ENG) 4/11/0 11:06 AM Page 57
Page 70 of 104

6-25
PERIODIC MAINTENANCE AND MINOR REPAIR
1
2
3
4
5
6
7
8
9
EAU03006
Drive chain lubrication
The chain consists of many parts
which work with each other. If the
chain is not maintained properly, it
will wear out quickly. Therefore, the
chain must be serviced regularly.
This service is especially necessary
when riding in dusty areas. This
motorcycle is equipped with a sealed
type chain. Steam cleaning, high-
pressure washers, and solvents can
damage the drive chain, so do not
use these for cleaning it. Use only
kerosene to clean the drive chain.
Wipe it dry, and thoroughly lubricate it
with SAE 30 ~ 50W motor oil. Do not
use any other lubricants on the drive
chain. They may contain solvents
that could damage the sealed chain.
EC000097
cC
Be sure to oil the chain after wash-
ing the motorcycle or riding in the
rain.
EAU02962
Cable inspection and
lubrication
EW000112
w
Damage to the outer housing of
cables may lead to internal rusting
and interfere with the cable move-
ment. Replace damaged cables as
soon as possible to prevent unsafe
conditions.
Lubricate the cables and cable ends.
If a cable does not operate smoothly,
ask a Yamaha dealer to replace it.
Recommended lubricant:
Engine oil
EAU00773
Throttle cable and grip
lubrication
The throttle twist grip assembly
should be greased at the time that
the cable is lubricated, since the grip
must be removed to get at the end of
the throttle cable. After removing the
screws, hold the end of the cable up
in the air and put in several drops of
lubricant. With the throttle grip disas-
sembled, coat the metal surface of
the grip assembly with a suitable all-
purpose grease.
5AE-9-E3 (ENG) 4/11/0 11:06 AM Page 68
Page 71 of 104
6-26
PERIODIC MAINTENANCE AND MINOR REPAIR
1
2
3
4
5
6
7
8
9
EAU00774
Autolube pump adjustment
The autolube pump is a vital part of
the engine and requires very sophisti-
cated adjustment.
Adjusting should be left to a Yamaha
dealer who has the professional
knowledge and experience to do so.
EAU02984
Brake and shift pedal
lubrication
Lubricate the pivoting parts.
Recommended lubricant:
Engine oil
EAU02985
Brake and clutch lever
lubrication
Lubricate the pivoting parts.
Recommended lubricant:
Engine oil
5AE-9-E3 (ENG) 4/11/0 11:06 AM Page 69
Page 72 of 104
6-27
PERIODIC MAINTENANCE AND MINOR REPAIR
1
2
3
4
5
6
7
8
9
EAU02986
Sidestand lubrication
Lubricate the sidestand pivoting point
and metal-to-metal contact surfaces.
Check that the sidestand moves up
and down smoothly.
EW000113
w
If the sidestand does not move
smoothly, consult a Yamaha deal-
er.
Recommended lubricant:
Engine oil
EAU00791
Rear suspension lubrication
Lubricate the pivoting parts.
Recommended lubricant:
Lithium soap base grease
EAU02939
Front fork inspection
Visual checkEW000115
w
Securely support the motorcycle
so there is no danger of it falling
over.
Check for scratches or damage on
the inner tube and excessive oil leak-
age from the front fork.
5AE-9-E3 (ENG) 4/11/0 11:06 AM Page 70
Page 89 of 104

1
2
3
4
5
6
7
8
9
7-4
Storage
Short-term
Always store your motorcycle in a
cool, dry place and, if necessary, pro-
tect it against dust with a porous
cover.
ECA00014
cC
8
8
Storing the motorcycle in a
poorly ventilated room or cov-
ering it with a tarp while it is
still wet will allow water and
humidity to seep in and cause
rust.
8 8
To prevent corrosion, avoid
damp cellars, stables (because
of the presence of ammonia)
and areas where strong chemi-
cals are stored.
Long-term
Before storing your motorcycle for
several months:
1. Follow all the instructions in the
“Care” section of this chapter.
2. Drain the carburetor float cham-
ber by loosening the drain bolt;
this will prevent fuel deposits
from building up. Pour the
drained fuel into the fuel tank.
3. Only for motorcycles equipped
with a fuel cock which has an
“OFF” position: Turn the fuel
cock to “OFF”.
4. Fill up the fuel tank and add fuel
stabilizer (if available) to prevent
the fuel tank from rusting and the
fuel from deteriorating.
5. Perform the following steps to
protect the cylinder, piston rings,
etc. from corrosion.a. Remove the spark plug cap and
spark plug.
b. Pour a teaspoonful of engine oil
into the spark plug bore.
c. Install the spark plug cap onto
the spark plug and place the
spark plug on the cylinder head
so that the electrodes are
grounded. (This will limit spark-
ing during the next step.)
d. Turn the engine over several
times with the starter. (This will
coat the cylinder wall with oil.)
e. Remove the spark plug cap from
the spark plug, install the spark
plug and then the spark plug
cap.
EWA00003
w
When turning the engine over, be
sure to ground the spark plug elec-
trodes to prevent damage or injury
from sparking.
MOTORCYCLE CARE AND STORAGE
7
5AE-9-E3 (ENG) 4/11/0 11:06 AM Page 87