Page 54 of 104
6-9
1
1. Transmission oil filler cap
2. With the engine stopped, check
the oil level through the level
window located at the right side
crankcase cover.
NOTE:
Wait a few minutes until the oil level
settles before checking.
3. The oil level should be above the
minimum level mark on the level
window. If the level is low, add
sufficient oil to raise it to the
proper level.Transmission oil replacement
1. Warm up the engine for several
minutes.
2. Stop the engine. Place an oil pan
under the engine and remove the
oil filler cap.
PERIODIC MAINTENANCE AND MINOR REPAIR
1
2
3
4
5
6
7
8
9
12
EAU01080Transmission oil
Oil level measurement
1. Place the motorcycle on a level
place and hold it an upright posi-
tion. Warm up the engine for
several minutes.
NOTE:
Be sure the motorcycle is positioned
straight up when checking the oil
level. A slight tilt toward the side can
result in false readings.
1. Level window
2. Minimum level
5AE-9-E3 (ENG) 4/11/0 11:06 AM Page 52
Page 55 of 104

6-10
1
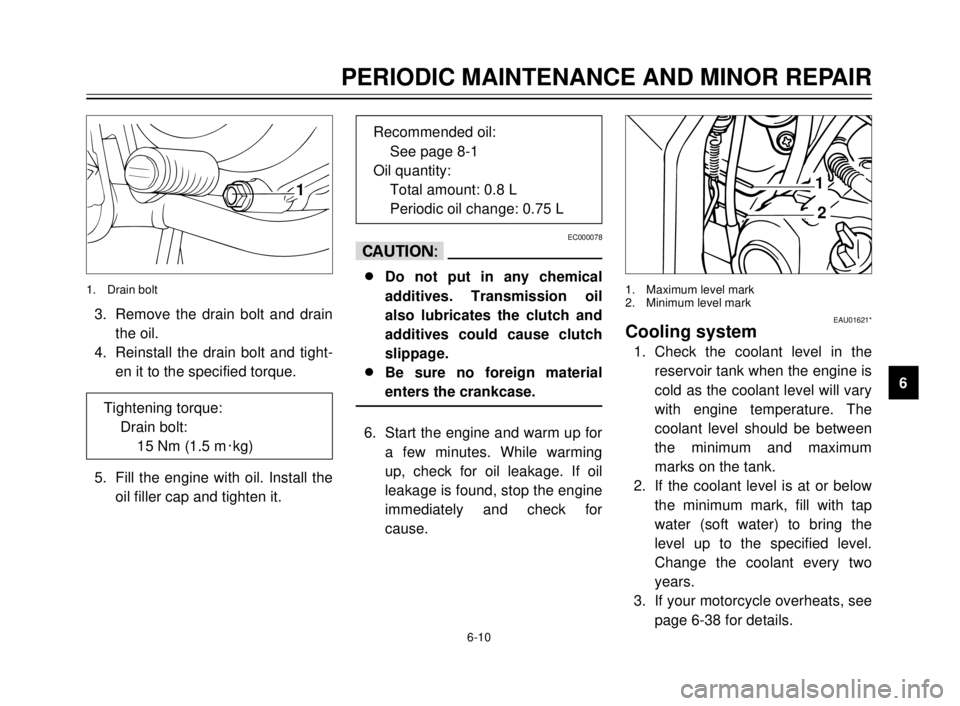
3. Remove the drain bolt and drain
the oil.
4. Reinstall the drain bolt and tight-
en it to the specified torque.
5. Fill the engine with oil. Install the
oil filler cap and tighten it.
EC000078
cC
8
8
Do not put in any chemical
additives. Transmission oil
also lubricates the clutch and
additives could cause clutch
slippage.
8 8
Be sure no foreign material
enters the crankcase.
6. Start the engine and warm up for
a few minutes. While warming
up, check for oil leakage. If oil
leakage is found, stop the engine
immediately and check for
cause.
1. Drain bolt
PERIODIC MAINTENANCE AND MINOR REPAIR
1
2
3
4
5
6
7
8
9 Tightening torque:
Drain bolt:
15 Nm (1.5 m0kg)
Recommended oil:
See page 8-1
Oil quantity:
Total amount: 0.8 L
Periodic oil change: 0.75 L
1
2
1. Maximum level mark
2. Minimum level mark
EAU01621*Cooling system
1. Check the coolant level in the
reservoir tank when the engine is
cold as the coolant level will vary
with engine temperature. The
coolant level should be between
the minimum and maximum
marks on the tank.
2. If the coolant level is at or below
the minimum mark, fill with tap
water (soft water) to bring the
level up to the specified level.
Change the coolant every two
years.
3. If your motorcycle overheats, see
page 6-38 for details.
5AE-9-E3 (ENG) 4/11/0 11:06 AM Page 53
Page 58 of 104

6-13
PERIODIC MAINTENANCE AND MINOR REPAIR
1
2
3
4
5
6
7
8
9
2
1
4
5
3
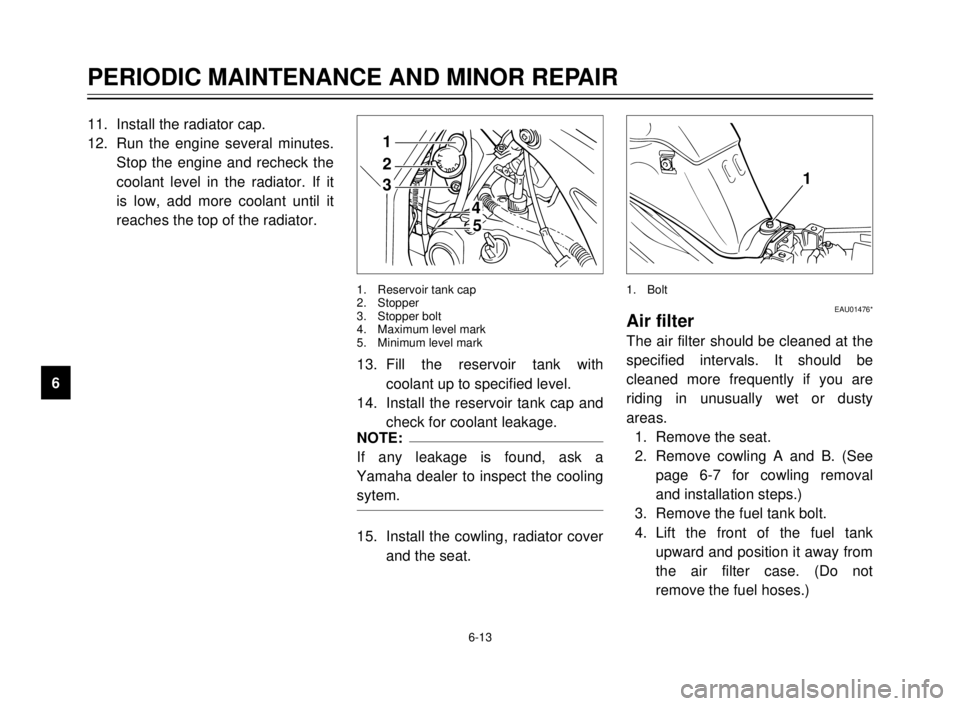
1. Reservoir tank cap
2. Stopper
3. Stopper bolt
4. Maximum level mark
5. Minimum level mark
11. Install the radiator cap.
12. Run the engine several minutes.
Stop the engine and recheck the
coolant level in the radiator. If it
is low, add more coolant until it
reaches the top of the radiator.
13. Fill the reservoir tank with
coolant up to specified level.
14. Install the reservoir tank cap and
check for coolant leakage.
NOTE:
If any leakage is found, ask a
Yamaha dealer to inspect the cooling
sytem.
15. Install the cowling, radiator cover
and the seat.
1
EAU01476*Air filter
The air filter should be cleaned at the
specified intervals. It should be
cleaned more frequently if you are
riding in unusually wet or dusty
areas.
1. Remove the seat.
2. Remove cowling A and B. (See
page 6-7 for cowling removal
and installation steps.)
3. Remove the fuel tank bolt.
4. Lift the front of the fuel tank
upward and position it away from
the air filter case. (Do not
remove the fuel hoses.)
1. Bolt
5AE-9-E3 (ENG) 4/11/0 11:06 AM Page 56
Page 61 of 104
6-16
PERIODIC MAINTENANCE AND MINOR REPAIR
1
2
3
4
5
6
7
8
9
NOTE:
If the specified idle speed cannot be
obtained by performing the above
adjustment, consult a Yamaha deal-
er.
Standard idle speed:
1,300 ~ 1,500 r/min
1,400 ~ 1,500 r/min
(A, CH only)
EAU00634
Throttle cable free play
adjustment
NOTE:
Before checking the throttle cable
free play, the engine idling speed
should be adjusted.
Adjust the throttle cable by turning
the adjusting nut so that specified
free play at the throttle grip is
obtained.
a. Free play
a
Free play:
3 ~ 5 mm
2 1
b
a
1. Loosen the locknut.
2. Turn the adjusting nut in direc-
tion ato increase free play and
in direction bto decrease free
play.
3. Tighten the locknut.
1. Locknut
2. Adjusting nut
5AE-9-E3 (ENG) 4/11/0 11:06 AM Page 59
Page 69 of 104

6-24
PERIODIC MAINTENANCE AND MINOR REPAIR
1
2
3
4
5
6
7
8
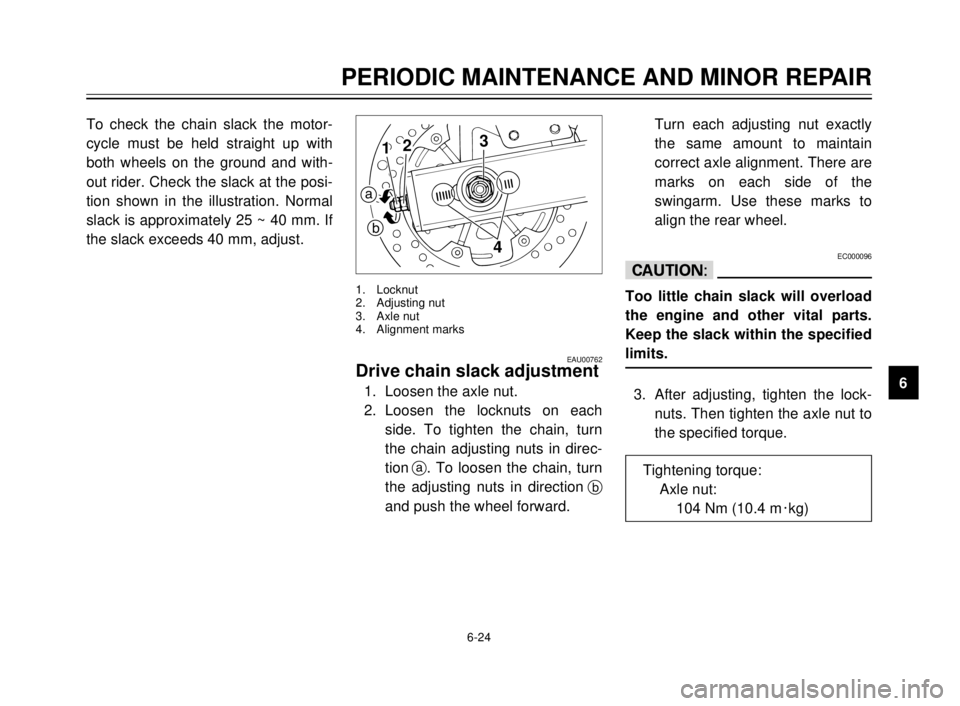
9 To check the chain slack the motor-
cycle must be held straight up with
both wheels on the ground and with-
out rider. Check the slack at the posi-
tion shown in the illustration. Normal
slack is approximately 25 ~ 40 mm. If
the slack exceeds 40 mm, adjust.
EAU00762Drive chain slack adjustment
1. Loosen the axle nut.
2. Loosen the locknuts on each
side. To tighten the chain, turn
the chain adjusting nuts in direc-
tiona. To loosen the chain, turn
the adjusting nuts in directionb
and push the wheel forward.
3
412
a
b
1. Locknut
2. Adjusting nut
3. Axle nut
4. Alignment marks
Turn each adjusting nut exactly
the same amount to maintain
correct axle alignment. There are
marks on each side of the
swingarm. Use these marks to
align the rear wheel.
EC000096
cC
Too little chain slack will overload
the engine and other vital parts.
Keep the slack within the specified
limits.
3. After adjusting, tighten the lock-
nuts. Then tighten the axle nut to
the specified torque.
Tightening torque:
Axle nut:
104 Nm (10.4 m0kg)
5AE-9-E3 (ENG) 4/11/0 11:06 AM Page 67
Page 72 of 104
6-27
PERIODIC MAINTENANCE AND MINOR REPAIR
1
2
3
4
5
6
7
8
9
EAU02986
Sidestand lubrication
Lubricate the sidestand pivoting point
and metal-to-metal contact surfaces.
Check that the sidestand moves up
and down smoothly.
EW000113
w
If the sidestand does not move
smoothly, consult a Yamaha deal-
er.
Recommended lubricant:
Engine oil
EAU00791
Rear suspension lubrication
Lubricate the pivoting parts.
Recommended lubricant:
Lithium soap base grease
EAU02939
Front fork inspection
Visual checkEW000115
w
Securely support the motorcycle
so there is no danger of it falling
over.
Check for scratches or damage on
the inner tube and excessive oil leak-
age from the front fork.
5AE-9-E3 (ENG) 4/11/0 11:06 AM Page 70
Page 73 of 104
6-28
PERIODIC MAINTENANCE AND MINOR REPAIR
1
2
3
4
5
6
7
8
9 Operation check
1. Place the motorcycle on a level
place.
2. Hold the motorcycle in an upright
position and apply the front
brake.
3. Push down hard on the handle-
bars several times and check if
the fork rebounds smoothly.
EC000098
cC
If any damage or unsmooth move-
ment is found with the front fork,
consult a Yamaha dealer.
EAU00794Steering inspection
Periodically inspect the condition of
the steering. Worn out or loose steer-
ing bearings may be dangerous.
Place a stand under the engine to
raise the front wheel off the ground.
Hold the lower end of the front forks
and try to move them forward and
backward. If any free play can be felt,
ask a Yamaha dealer to inspect and
adjust the steering. Inspection is eas-
ier if the front wheel is removed.
EW000115
w
Securely support the motorcycle
so there is no danger of it falling
over.
5AE-9-E3 (ENG) 4/11/0 11:06 AM Page 71
Page 82 of 104
6-37
PERIODIC MAINTENANCE AND MINOR REPAIR
1
2
3
4
5
6
7
8
9
EAU01581Troubleshooting chartEW000125
w
Never check the fuel system while smoking or in the vicinity of an open flame.
1. Fuel
2. Compression
3. Ignition
4. Battery
Use electric starter.
Remove spark
There is compression.
Go to ignition check.
No compression.
Ask a Yamaha dealer to inspect.
Wet.
Dry.Wipe clean with dry cloth and correct
Open throttle half-way and start
Ask a Yamaha dealer to inspect.
Check if there is fuel
Enough fuel.
No fuel.Go to compression check.
Supply fuel.
in the fuel tank.
electrodes. plug and check
Engine doesn’t start, go to battery
check. the engine. spark gap or replace spark plug.
Engine turns over
Engine turns overBattery good.
Check connections or
quickly.
slowly. recharge.Engine doesn’t start, ask aYamaha dealer to inspect.
Engine doesn’t start, go to compression check.
5AE-9-E3 (ENG) 4/11/0 11:06 AM Page 80