Page 55 of 282
00 SIENNA(U)
49
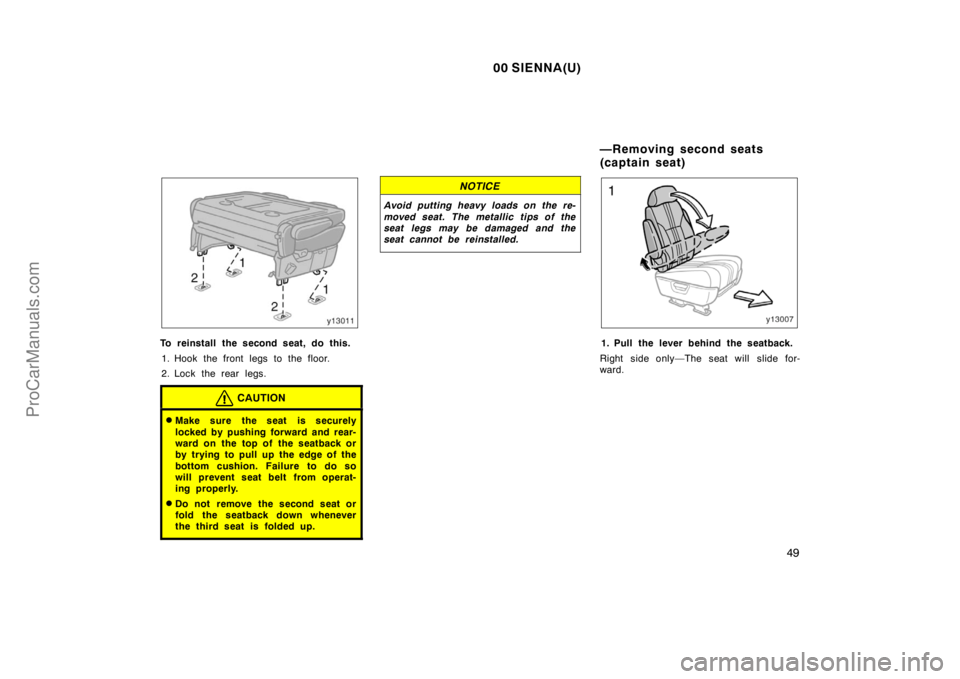
To reinstall the second seat, do this.
1. Hook the front legs to the floor.
2. Lock the rear legs.
CAUTION
�Make sure the seat is securely
locked by pushing forward and rear-
ward on the top of the seatback or
by trying to pull up the edge of the
bottom cushion. Failure to do so
will prevent seat belt from operat-
ing properly.
�Do not remove the second seat or
fold the seatback down whenever
the third seat is folded up.
NOTICE
Avoid putting heavy loads on the re-
moved seat. The metallic tips of the
seat legs may be damaged and the
seat cannot be reinstalled.
1. Pull the lever behind the seatback.
Right side only—The seat will slide for-
ward.
—Removing second seats
(captain seat)
ProCarManuals.com
Page 56 of 282
00 SIENNA(U)
50
2. Lift the seatback angle adjusting le-
ver and fold the seatback down.3. Pull the seat lock release lever. Lift
the seat cushion and remove the
seat toward you.
Removing the second seat will enlarge the
luggage compartment. See “Luggage
stowage precautions” in Section 2 for pre-
cautions to observe for loading luggage.
CAUTION
When removing or reinstalling the
seat, observe the following to prevent
personal injury:
�Be careful not to get your hands or
feet pinched in the seat.
�Be careful not to hit the removed
seat against a person or drop it on
yourself.
ProCarManuals.com
Page 57 of 282
00 SIENNA(U)
51
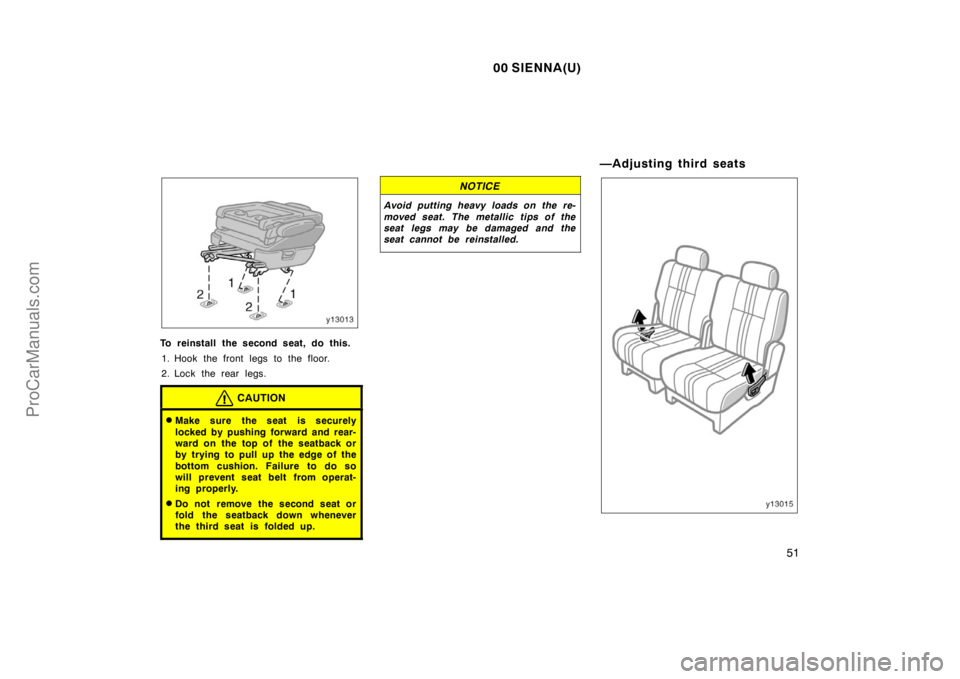
To reinstall the second seat, do this.
1. Hook the front legs to the floor.
2. Lock the rear legs.
CAUTION
�Make sure the seat is securely
locked by pushing forward and rear-
ward on the top of the seatback or
by trying to pull up the edge of the
bottom cushion. Failure to do so
will prevent seat belt from operat-
ing properly.
�Do not remove the second seat or
fold the seatback down whenever
the third seat is folded up.
NOTICE
Avoid putting heavy loads on the re-
moved seat. The metallic tips of the
seat legs may be damaged and the
seat cannot be reinstalled.
—Adjusting third seats
ProCarManuals.com
Page 59 of 282
00 SIENNA(U)
53
FOLDING UP THIRD SEAT
1. Lift the seatback angle adjusting le-
ver (1) or press the lever (2) behind
the seatback and fold the seatback
down.You can use the third seatback as a tem-
porary table only when the vehicle is
stopped.
CAUTION
To avoid serious injury:
�Do not set up the seatback table
while the vehicle is moving.
�Do not sit on the folded seatback.
�Make sure the third seat is securely
locked in position when you set the
third seat as a temporary table.
NOTICE
To prevent the seat from damaging,
avoid putting heavy loads on the tem-
porary table.
ProCarManuals.com
Page 60 of 282

54
2. Remove the head restraint. Unlock
the seat legs by pulling up the left
side handle under the seat, and
swing the whole seat up and for-
ward.
After returning the seat to its origi-")
00 SIENNA(U)
54
2. Remove the head restraint. Unlock
the seat legs by pulling up the left
side handle under the seat, and
swing the whole seat up and for-
ward.
After returning the seat to its origi-
nal position, be certain to replace
the head restraint.
Folding the third seats will enlarge the
luggage compartment. See “Luggage
stowage precautions” in Section 2 for pre-
cautions to observe for loading luggage.
CAUTION
�When folding up the seat or return-
ing it to its original position, be
careful not to get your hands or
feet pinched in the seat.
�Be certain to replace head restraint.
�Make sure the seat is securely
locked by pushing forward and rear-
ward on the top of the seatback or
by trying to pull up the edge of the
bottom cushion. Failure to do so
will prevent seat belt from operat-
ing properly.
—Removing third seats
BEFORE REMOVING THIRD SEAT
Stow the third center seat belt as
shown in the illustration.
This prevents the belt from falling out
when you remove the third seat.
NOTICE
�The third center seat belt must be
stowed before you remove the third
seat.
ProCarManuals.com
Page 62 of 282

56
CAUTION
When removing or reinstalling the
seat, observe the following to prevent
personal injury:
�Be careful not to get your hands or
feet pinched in the seat.
�Be careful not to hit")
00 SIENNA(U)
56
CAUTION
When removing or reinstalling the
seat, observe the following to prevent
personal injury:
�Be careful not to get your hands or
feet pinched in the seat.
�Be careful not to hit the removed
seat against a person or drop it on
yourself.
To reinstall the third seat, do this.
1. Hook the front legs to the floor.
2. Lock the rear legs.
CAUTION
To prevent personal injury in a colli-
sion or sudden stop:
�You must install the removed seat
back in its original position. The
right and the left are not inter-
changeable. If it is installed in the
wrong position, the proper seat belt
tongue and buckle will not attach.
�Make sure the seat is securely
locked by pushing forward and rear-
ward on the top of the seatback or
by trying to pull up the edge of the
bottom cushion. Failure to do so
will prevent seat belt from operat-
ing properly.
�Do not remove the second seat or
fold the seatback down whenever
the third seat is folded up.
NOTICE
Avoid putting heavy loads on the re-
moved seat. The metallic tips of the
seat legs may be damaged and the
seat cannot be reinstalled.
ProCarManuals.com
Page 63 of 282
00 SIENNA(U)
57
If the seat legs are locked in the wrong
position, pull up the right side handle
under the seat. Then lift and remove
the seat.
Head restraints
Ty p e A
Ty p e B
For your safety and comfort, adjust the
head restraint before driving.
To raise: Pull it up.
To lower: Push it down while pressing the
lock release button.
On some models, you can also move the
head restraint forward or backward. If
such adjustment is desired, pull or push
the head restraint.
The head restraint is most effective when
it is close to your head. Therefore, using
a cushion on the seatback is not recom-
mended.
CAUTION
�Adjust the center of the head re-
straint so that it is closest to the
top of your ears.
�After adjusting the head restraint,
make sure it is locked in position.
�Do not drive with the head re-
straints removed.
ProCarManuals.com
Page 65 of 282

59
CAUTION
Persons should ride in their seats
properly wearing their seat belts
whenever the vehicle is moving.
Otherwise, they are much more likely
to suffer serious bodily injury or
dea")
00 SIENNA(U)
59
CAUTION
Persons should ride in their seats
properly wearing their seat belts
whenever the vehicle is moving.
Otherwise, they are much more likely
to suffer serious bodily injury or
death in the event of sudden braking
or a collision.
When using the seat belts, observe
the following:
�Use the belt for only one person at
a time. Do not use a single belt for
two or more people—even children.
�Avoid reclining the seatbacks too
much. The seat belts provide maxi-
mum protection when the seatbacks
are in the upright position. (Refer
to the seat adjustment instructions.)
�Be careful not to damage the belt
webbing or hardware. Take care that
they do not get caught or pinched
in the seat or doors.
�Inspect the belt system periodically.
Check for cuts, fraying, and loose
parts. Damaged parts should be re-
placed. Do not disassemble or
modify the system.
�Keep the belts clean and dry. If
they need cleaning, use a mild soap
solution or lukewarm water. Never
use bleach, dye, or abrasive clean-
ers—they may severely weaken the
belts. (See “Cleaning the interior”
in Section 5.)
�Replace the belt assembly (includ-
ing bolts) if it has been used in a
severe impact. The entire assembly
should be replaced even if damage
is not obvious.
Adjust the seat as needed and sit up
straight and well back in the seat. To
fasten your belt, pull it out of the re-
tractor and insert the tab into the
buckle.
You will hear a click when the tab locks
into the buckle.
The seat belt length automatically adjusts
to your size and the seat position.
The retractor will lock the belt during a
sudden stop or on impact. It also may
lock if you lean forward too quickly. A
slow, easy motion will allow the belt to
extend, and you can move around freely.
—Front seat belts and rear
outside seat belts
ProCarManuals.com

50
2. Lift the seatback angle adjusting le-
ver and fold the seatback down.3. Pull the seat lock release lever. Lift
the seat cushion and remove the
seat toward you.
Removing the second s")

53
FOLDING UP THIRD SEAT
1. Lift the seatback angle adjusting le-
ver (1) or press the lever (2) behind
the seatback and fold the seatback
down.You can use the third seatback as a tem-
p")

57
If the seat legs are locked in the wrong
position, pull up the right side handle
under the seat. Then lift and remove
the seat.
Head restraints
Ty p e A
Ty p e B
For your safety and co")