2000 TOYOTA LAND CRUISER battery
[x] Cancel search: batteryPage 82 of 235
L/C 100_U
104 2000 L/C 100 (OM60866U)
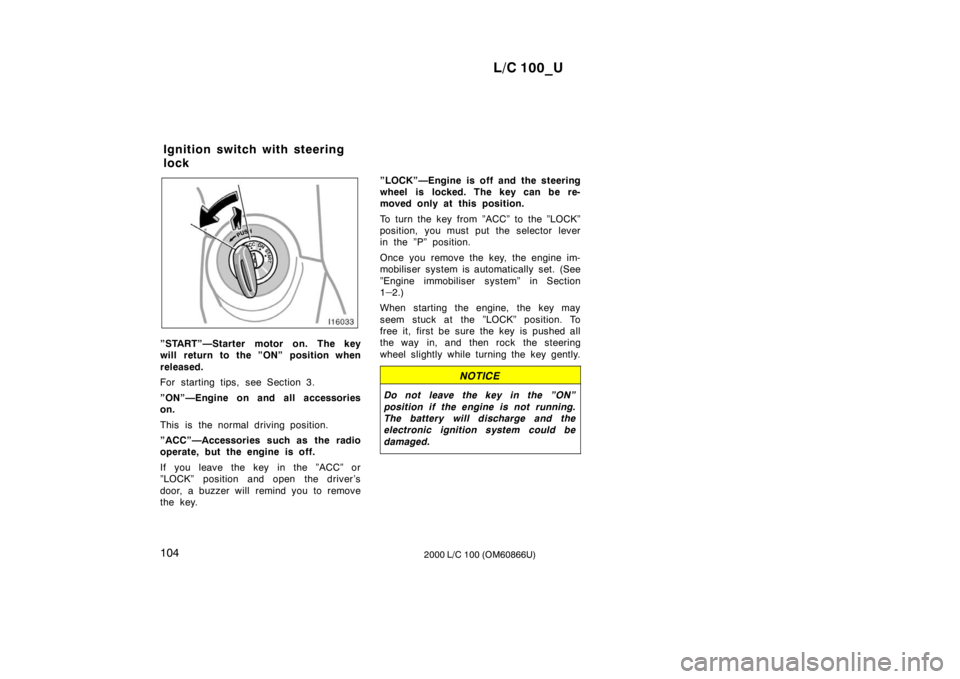
”START”—Starter motor on. The key
will return to the ”ON” position when
released.
For starting tips, see Section 3.
”ON”—Engine on and all accessories on.
This is the normal driving position.
”ACC”—Accessories such as the radio
operate, but the engine is off.
If you leave the key in the ”ACC” or
”LOCK” position and open the driver’s
door, a buzzer will remind you to remove
the key.”LOCK”—Engine is off and the steering
wheel is locked. The key can be re-
moved only at this position.
To turn the key from ”ACC” to the ”LOCK”
position, you must put the selector lever
in the ”P” position.
Once you remove the key, the engine im-
mobiliser system is automatically set. (See
”Engine immobiliser system” in Section 1
–
2.)
When starting the engine, the key may
seem stuck at the ”LOCK” position. To
free it, first be sure the key is pushed all
the way in, and then rock the steering
wheel slightly while turning the key gently.
NOTICE
Do not leave the key in the ”ON”
position if the engine is not running.
The battery will discharge and the
electronic ignition system could be damaged.
Ignition switch with steering
lock
Page 125 of 235

L/C 100_U147
2000 L/C 100 (OM60866U)
Cigarette lighter and ashtray
CIGARETTE LIGHTER
To use the cigarette lighter, press it in.
When it becomes heated, it automatical-
ly pops out ready for use.
If the engine is not running, the key must
be in the ”ACC” position.
Do not hold the cigarette lighter pressed
in.
Use a Toyota genuine cigarette lighter or
equivalent for replacement.
ASHTRAY
To use the ashtray, pull it out.
When finished with your cigarette, thor-
oughly extinguish it in the ashtray to pre-
vent other cigarette butts from catching
fire. After using the ashtray, push it back
in completely.
To remove the ashtray, press down on the
lock spring plate and pull out.
CAUTION
To reduce the chance of injury in
case of an accident or sudden stop
while driving, always close the ash-
tray completely after using.
Power outlets
The power outlets are designed for
power supply for car accessories. To
use them, open the lids as shown in
the following illustrations.
The key must be in the ”ACC” or ”ON”
position to be used.
NOTICE
To prevent the fuse from being
blown, do not use the electricity
over the total vehicle capacity of
12V/120W (all the outlets together).
To prevent the battery from being
discharged, do not use the power
outlets longer than necessary when
the engine is not running.
Close the power outlet lids when
the power outlets are not in use.
Inserting a foreign object other than
plug that fits the outlet, or pouring
juice or other liquid into the outlet
may cause troubles or short cir-
cuits.
Page 158 of 235
L/C 100_U
194 2000 L/C 100 (OM60866U)
Before making these checks, make sure
you have followed the correct starting
procedure given in ”How to start the
engine” in Section 3 and that you have
sufficient fuel. Also check whether the
other keys will start the engine. If they
work, your key may be broken. Have the
key checked at your Toyota dealer. If
none of your keys work, the system is
possibly broken. Call your Toyota dealer.
(See ”Keys” in Section 1
−2.)
If the engine is not turning over or is
turning over too slowly— 1. Check that the battery terminals are tight and clean.
2. If the battery terminals are O.K., switch on the interior light.
3. If the light is out, dim or goes out when the starter is cranked, the battery
is discharged. You may try jump start-
ing. See ”(c) Jump starting” for further
instructions. If the light is O.K., but the engine still will
not start, it needs adjustment or repair.
Call a Toyota dealer or qualified repair
shop.
NOTICE
Do not pull
− or push −start the ve-
hicle. It may damage the vehicle or
cause a collision when the engine
starts. Also the three −way catalytic
converter may overheat and become a
fire hazard.
If the engine turns over at its normal
speed but will not start—
1. The engine may be flooded because of repeated cranking. See ”(b) Starting a
flooded engine” for further instructions.
2. If the engine still will not start, it needs adjustment or repair. Call a Toyota
dealer or qualified repair shop.
If your vehicle will not start—
(a) Simple checks
Page 159 of 235
L/C 100_U195
2000 L/C 100 (OM60866U)
(b) Starting a flooded engine
If the engine will not start, your engine
may be flooded because of repeated
cranking.
If this happens, turn the key to ”START”
with the accelerator pedal held down.
Keep the key and accelerator pedal so for
15 seconds and release them. Then try
starting the engine with your foot off the
accelerator pedal.
If the engine does not start after 15 se-
conds of cranking, release the key, wait
a few minutes and try again.
If the engine still will not start, it needs
adjustment or repair. Call a Toyota dealer
or qualified repair shop for assistance.
NOTICE
Do not crank for more than 30 se-
conds at a time. This may overheat
the starter and wiring systems.
(c) Jump starting
To avoid serious personal injury and
damage to your vehicle which might re-
sult from battery explosion, acid burns,
electrical burns, or damaged electronic
components, these instructions must be
followed precisely.
If you are unsure about how to follow this
procedure, we strongly recommend that
you seek the help of a competent me-
chanic or towing service.
CAUTION
Batteries contain sulfuric acid
which is poisonous and corrosive.
Wear protective safety glasses when
jump starting, and avoid spilling
acid on your skin, clothing, or ve-
hicle.
If you should accidentally get acid
on yourself or in your eyes, remove
any contaminated clothing and flush
the affected area with water im-
mediately. Then get immediate medi-
cal attention. If possible, continue
to apply water with a sponge or
cloth while en route to the medical
office.
The gas normally produced by a
battery will explode if a flame or
spark is brought near. Use only
standardized jumper cables and do
not smoke or light a match while
jump starting.
NOTICE
The battery used for boosting must
be 12 V. Do not jump start unless you
are sure that the booster battery is
correct.
Page 160 of 235
L/C 100_U
196 2000 L/C 100 (OM60866U)
JUMP STARTING PROCEDURE
1. If the booster battery is installed in another vehicle, make sure the vehicles
are not touching. Turn off all unneces-
sary lights and accessories.
2. If required, remove all the vent plugs from the booster and discharged batter-
ies. Lay a cloth over the open vents
on the batteries. (This helps reduce the
explosion hazard, personal injuries and
burns.)
3. If the engine in the vehicle with the booster battery is not running, start it
and let it run for a few minutes. During
jump starting, run the engine at about
2000 rpm with the accelerator pedal
lightly depressed.
Discharged battery
Positive
terminal
(“+” mark) Jumper
cable Booster
battery
Positive terminal
(“+” mark)
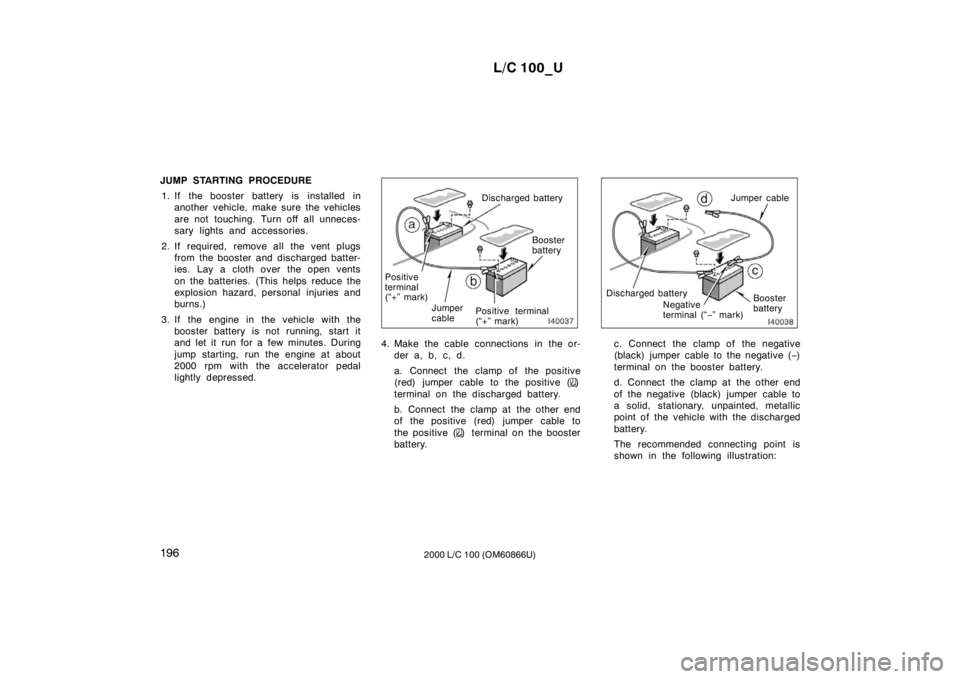
4. Make the cable connections in the or- der a, b, c, d.
a. Connect the clamp of the positive
(red) jumper cable to the positive (
)
terminal on the discharged battery.
b. Connect the clamp at the other end
of the positive (red) jumper cable to
the positive (
) terminal on the booster
battery.
Discharged battery Booster
battery
Negative
terminal (“
−” mark) Jumper cable
c. Connect the clamp of the negative
(black) jumper cable to the negative ( −)
terminal on the booster battery.
d. Connect the clamp at the other end
of the negative (black) jumper cable to
a solid, stationary, unpainted, metallic
point of the vehicle with the discharged
battery.
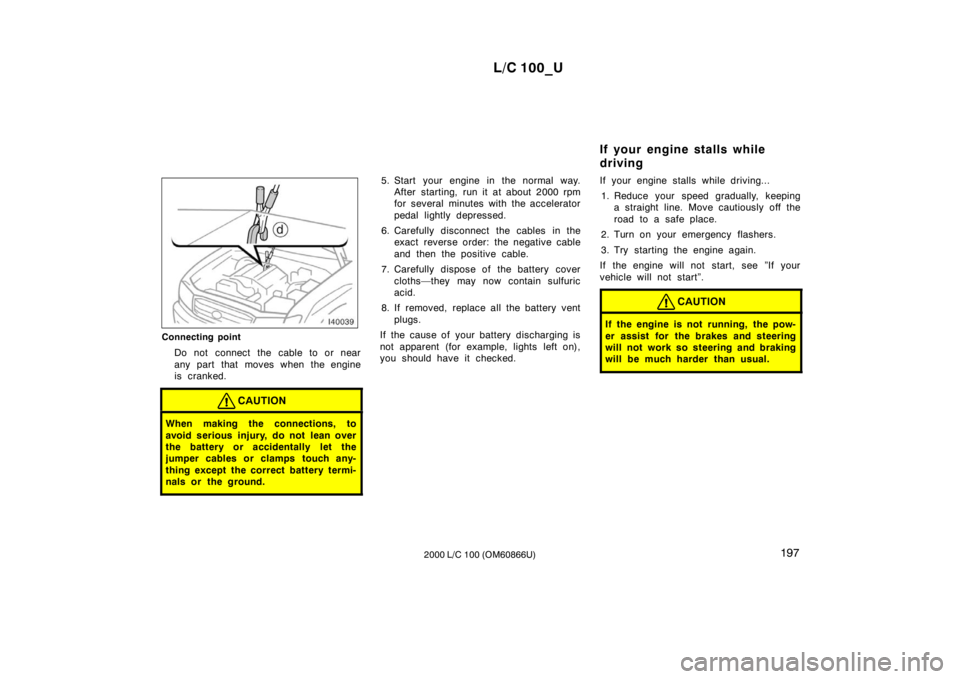
The recommended connecting point is
shown in the following illustration:
Page 161 of 235
L/C 100_U197
2000 L/C 100 (OM60866U)
Connecting point
Do not connect the cable to or near
any part that moves when the engine
is cranked.
CAUTION
When making the connections, to
avoid serious injury, do not lean over
the battery or accidentally let the
jumper cables or clamps touch any-
thing except the correct battery termi-
nals or the ground.
5. Start your engine in the normal way. After starting, run it at about 2000 rpm
for several minutes with the accelerator
pedal lightly depressed.
6. Carefully disconnect the cables in the exact reverse order: the negative cable
and then the positive cable.
7. Carefully dispose of the battery cover cloths—they may now contain sulfuric
acid.
8. If removed, replace all the battery vent plugs.
If the cause of your battery discharging is
not apparent (for example, lights left on),
you should have it checked. If your engine stalls while driving...
1. Reduce your speed gradually, keeping a straight line. Move cautiously off the
road to a safe place.
2. Turn on your emergency flashers.
3. Try starting the engine again.
If the engine will not start, see ”If your
vehicle will not start”.
CAUTION
If the engine is not running, the pow-
er assist for the brakes and steering
will not work so steering and braking
will be much harder than usual.
If your engine stalls while
driving
Page 186 of 235
L/C 100_U
222 2000 L/C 100 (OM60866U)
INSIDE THE VEHICLE
Items listed below should be checked
regularly, e.g. while performing periodic
services, cleaning the vehicle, etc.
Lights
Make sure the headlights, stop lights, tail
lights, turn signal lights, and other lights
are all working. Check headlight aim.
Service reminder indicators and warning
buzzers
Check that all service reminder indicators
and warning buzzers function properly.
Steering wheel
Be alert for changes in steering condition,
such as hard steering or strange noise.
Seats
Check that all front seat controls such as
seat adjusters, seatback recliner, etc. op-
erate smoothly and that all latches lock
securely in any position. Check that the
head restraint move up and down smooth-
ly and that the locks hold securely in any
latched position. For folding
−down rear
seatbacks, swing −up rear seat cushions
and detachable third seats, check that the
latches lock securely. Seat belts
Check that the seat belt system such as
buckles, retractors and anchors operate
properly and smoothly. Make sure the belt
webbing is not cut, frayed, worn or dam-aged.
Accelerator pedal
Check the pedal for smooth operation and
uneven pedal effort or catching.
Brake pedal
Check the pedal for smooth operation and
that the pedal has the proper clearance.
Check the brake booster function.
Brakes
At a safe place, check that the brakes do
not pull to one side when applied.
Parking brake
Check that the lever has the proper travel
and that, on a safe incline, your vehicle
is held securely with only the parking
brake applied.
Automatic transmission ”Park” mecha-
nism
Check the lock release button of the se-
lector lever for proper and smooth opera-
tion. On a safe incline, check that your
vehicle is held securely with the selector
lever in ”P” position and all brakes re-
leased.
IN THE ENGINE COMPARTMENT
Items listed below should be checked
from time to time, e.g. each time when
refueling.
Washer fluid
Make sure there is sufficient fluid in the
tank. See Section 7
−3 for additional in-
formation.
Engine coolant level
Make sure the coolant level is between
the ”FULL” and ”LOW” lines on the see −
through reservoir when the engine is cold.
See Section 7 −2 for additional information.
Battery electrolyte level
Make sure the electrolyte level of all bat-
tery cells is between upper and lower lev-
el lines on the case. Add only distilled
water when replenishing. See Section 7 −3
for additional information.
Page 190 of 235
L/C 100_U
226 2000 L/C 100 (OM60866U)
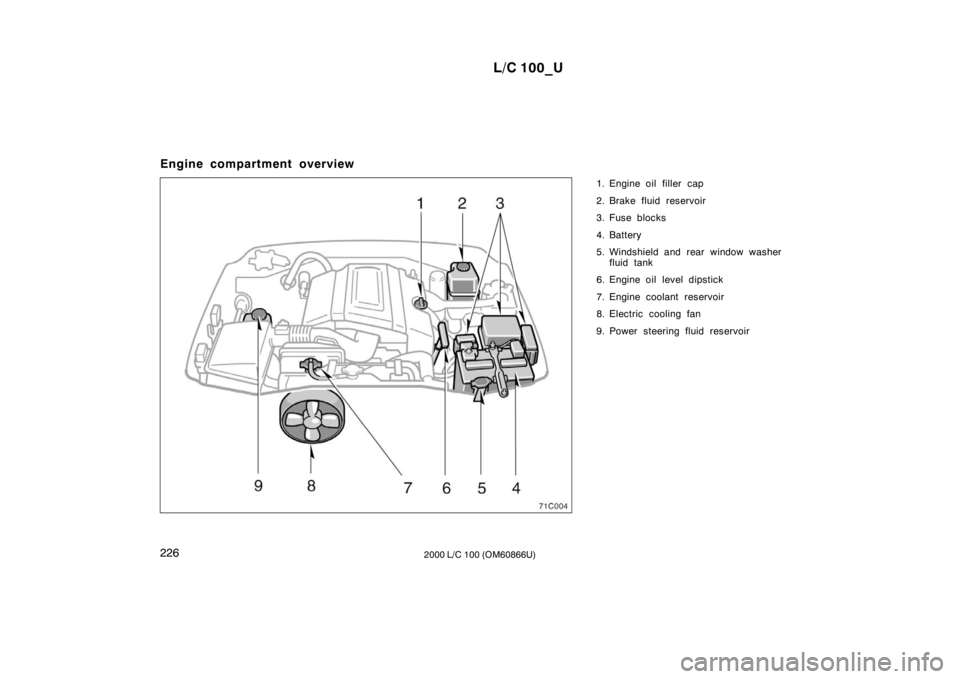
Engine compartment overview
1. Engine oil filler cap
2. Brake fluid reservoir
3. Fuse blocks
4. Battery
5. Windshield and rear window washerfluid tank
6. Engine oil level dipstick
7. Engine coolant reservoir
8. Electric cooling fan
9. Power steering fluid reservoir