Page 329 of 557
1. Oil plug
6A1-34 ENGINE MECHANICAL (G13B, 1-CAM 16-VALVES ENGINE)
4) Disconnect CMP sensor coupler from CMP sensor.
5) Remove CMP sensor case (1) from cylinder head.
Place a container or rag under CMP sensor case, for a small
amount of oil flows out during removal of case.
6) After loosening all valve adjusting screw lock nuts (2), turn ad-
justing screws (1) back all the way to allow all rocker arms (3) to
move freely.
7) Remove camshaft housing and camshaft.
NOTE:
To remove camshaft housing bolts, loosen them in such or-
der as indicated in figure, a little at a time.
8) Remove timing belt inside cover (2).
9) Remove intake rocker arm (1) with clip (2) from rocker arm shaft
(3).
NOTE:
Do not bend clip when removing intake rocker arm.
Page 330 of 557
EX IN
2. Rocker arm shaft
ENGINE MECHANICAL (G13B, 1-CAM 16-VALVES ENGINE) 6A1-35
10) Remove rocker arm shaft bolts (1).
11) Remove exhaust rocker arms (1) and rocker arm spring (2) by
pulling out rocker arm shaft to battery side after removing bat-
tery.
INSPECTION
Adjusting Screw and Rocker Arm
If tip of adjusting screw (1) is badly worn, replace it.
Rocker arm (2) must be replaced if its cam-riding face (3) is badly
worn.
Rocker Arm Shaft Runout
Using “V” blocks and dial gauge, check runout. If runout exceeds
its limit, replace rocker arm shaft.
Runout limit: 0.10 mm (0.004 in.)
Page 331 of 557
6A1-36 ENGINE MECHANICAL (G13B, 1-CAM 16-VALVES ENGINE)
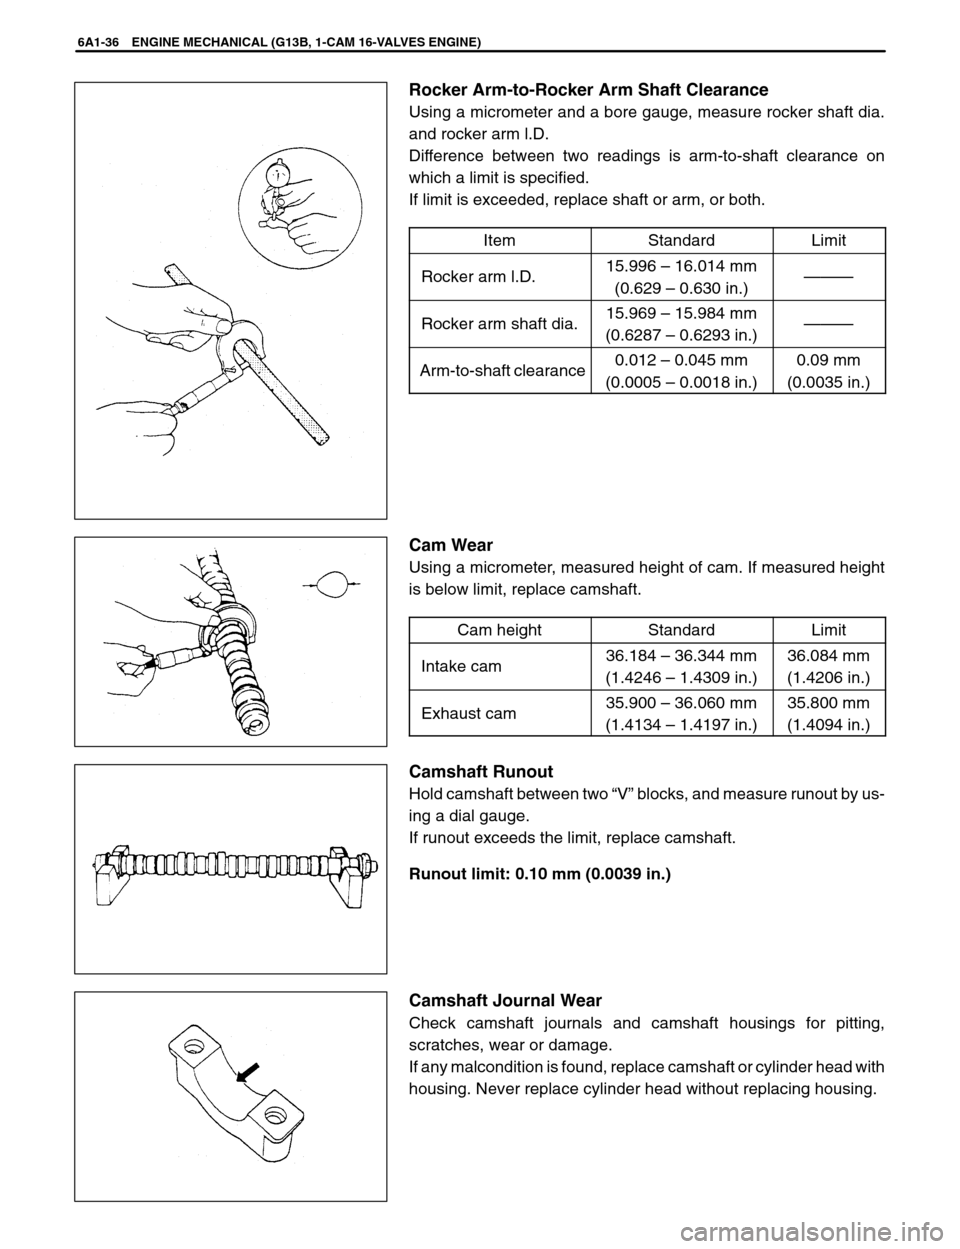
Rocker Arm-to-Rocker Arm Shaft Clearance
Using a micrometer and a bore gauge, measure rocker shaft dia.
and rocker arm l.D.
Difference between two readings is arm-to-shaft clearance on
which a limit is specified.
If limit is exceeded, replace shaft or arm, or both.
Item
StandardLimit
Rocker arm l.D.15.996 – 16.014 mm
(0.629 – 0.630 in.)———
Rocker arm shaft dia.15.969 – 15.984 mm
(0.6287 – 0.6293 in.)———
Arm-to-shaft clearance0.012 – 0.045 mm
(0.0005 – 0.0018 in.)0.09 mm
(0.0035 in.)
Cam Wear
Using a micrometer, measured height of cam. If measured height
is below limit, replace camshaft.
Cam height
StandardLimit
Intake cam36.184 – 36.344 mm
(1.4246 – 1.4309 in.)36.084 mm
(1.4206 in.)
Exhaust cam35.900 – 36.060 mm
(1.4134 – 1.4197 in.)35.800 mm
(1.4094 in.)
Camshaft Runout
Hold camshaft between two “V” blocks, and measure runout by us-
ing a dial gauge.
If runout exceeds the limit, replace camshaft.
Runout limit: 0.10 mm (0.0039 in.)
Camshaft Journal Wear
Check camshaft journals and camshaft housings for pitting,
scratches, wear or damage.
If any malcondition is found, replace camshaft or cylinder head with
housing. Never replace cylinder head without replacing housing.
Page 349 of 557
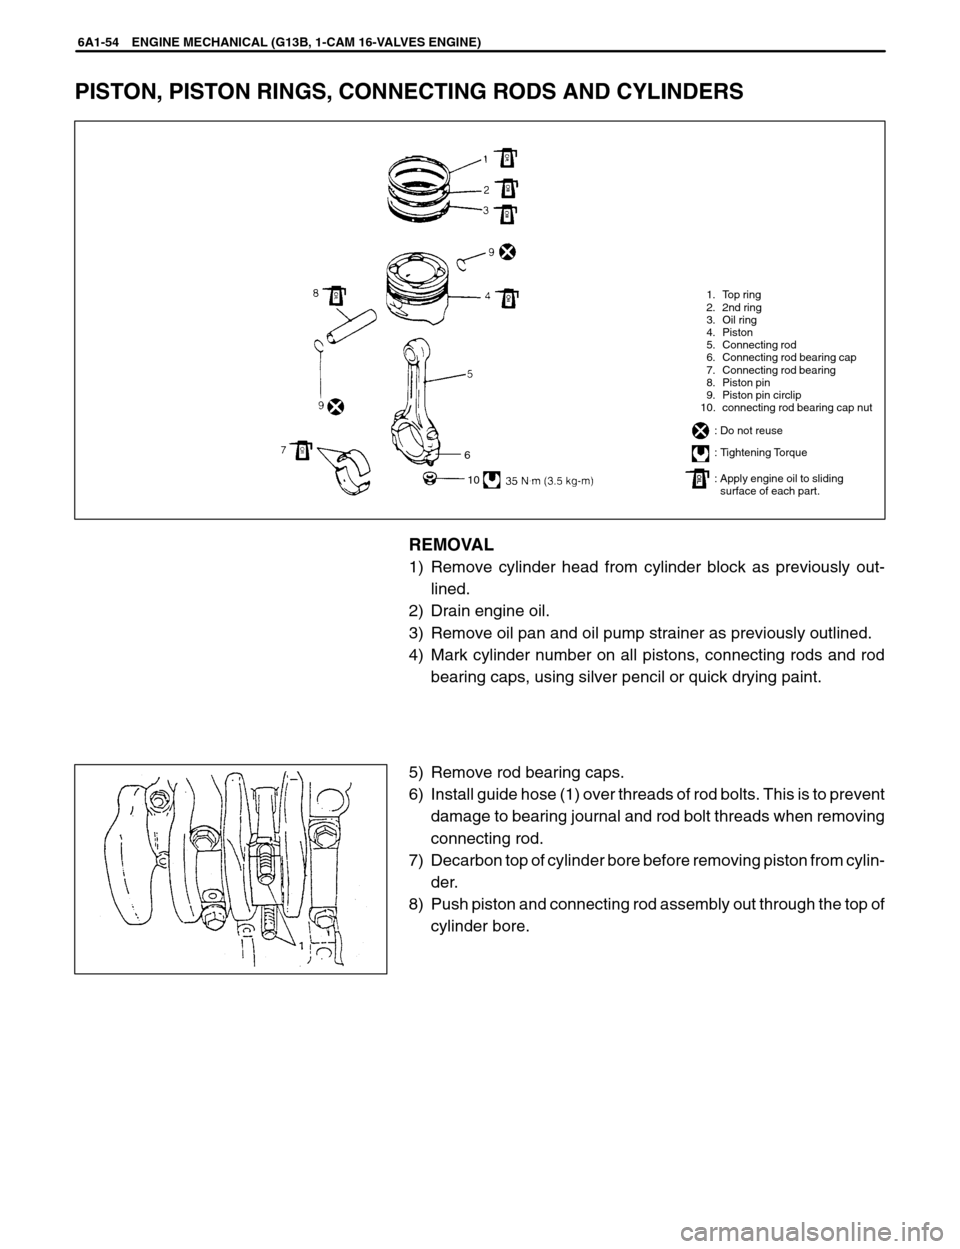
1. Top ring
2. 2nd ring
3. Oil ring
4. Piston
5. Connecting rod
6. Connecting rod bearing cap
7. Connecting rod bearing
8. Piston pin
9. Piston pin circlip
10. connecting rod bearing cap nut
: Do not reuse
: Tightening Torque
: Apply engine oil to sliding
: surface of each part.
6
10
6A1-54 ENGINE MECHANICAL (G13B, 1-CAM 16-VALVES ENGINE)
PISTON, PISTON RINGS, CONNECTING RODS AND CYLINDERS
REMOVAL
1) Remove cylinder head from cylinder block as previously out-
lined.
2) Drain engine oil.
3) Remove oil pan and oil pump strainer as previously outlined.
4) Mark cylinder number on all pistons, connecting rods and rod
bearing caps, using silver pencil or quick drying paint.
5) Remove rod bearing caps.
6) Install guide hose (1) over threads of rod bolts. This is to prevent
damage to bearing journal and rod bolt threads when removing
connecting rod.
7) Decarbon top of cylinder bore before removing piston from cylin-
der.
8) Push piston and connecting rod assembly out through the top of
cylinder bore.
Page 353 of 557
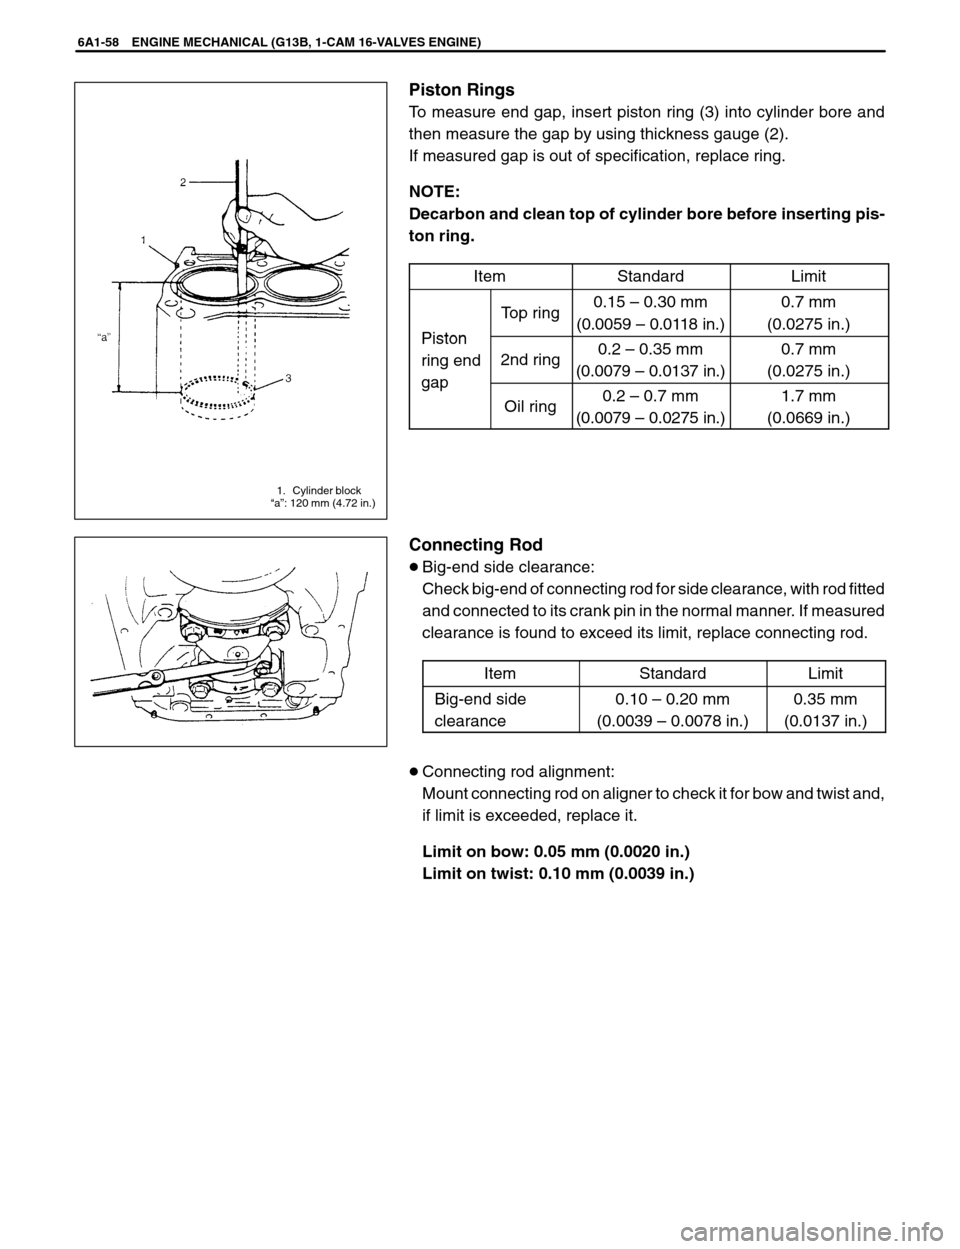
1. Cylinder block
“a”: 120 mm (4.72 in.)
6A1-58 ENGINE MECHANICAL (G13B, 1-CAM 16-VALVES ENGINE)
Piston Rings
To measure end gap, insert piston ring (3) into cylinder bore and
then measure the gap by using thickness gauge (2).
If measured gap is out of specification, replace ring.
NOTE:
Decarbon and clean top of cylinder bore before inserting pis-
ton ring.
Item
StandardLimit
Piston
Top ring0.15 – 0.30 mm
(0.0059 – 0.0118 in.)0.7 mm
(0.0275 in.)
Piston
ring end
gap
2nd ring0.2 – 0.35 mm
(0.0079 – 0.0137 in.)0.7 mm
(0.0275 in.)
ga
Oil ring0.2 – 0.7 mm
(0.0079 – 0.0275 in.)1.7 mm
(0.0669 in.)
Connecting Rod
�Big-end side clearance:
Check big-end of connecting rod for side clearance, with rod fitted
and connected to its crank pin in the normal manner. If measured
clearance is found to exceed its limit, replace connecting rod.
Item
StandardLimit
Big-end side
clearance0.10 – 0.20 mm
(0.0039 – 0.0078 in.)0.35 mm
(0.0137 in.)
�Connecting rod alignment:
Mount connecting rod on aligner to check it for bow and twist and,
if limit is exceeded, replace it.
Limit on bow: 0.05 mm (0.0020 in.)
Limit on twist: 0.10 mm (0.0039 in.)
Page 355 of 557

1 or 2
Piston
No.1 Cylinder
No.2 Cylinder
No.3 Cylinder
No.4 Cylinder
Crank
pulley
side
Flywheel
side
6A1-60 ENGINE MECHANICAL (G13B, 1-CAM 16-VALVES ENGINE)
5) Remove cap and using a scale (2) on gaging plastic (1) enve-
lope, measure gaging plastic width at the widest point (clear-
ance).
If clearance exceeds its limit, use a new standard size bearing
and remeasure clearance.
Item
StandardLimit
Bearing
clearance0.020 – 0.050 mm
(0.0008 – 0.0019 in.)0.080 mm
(0.0031 in.)
6) If clearance can not be brought to within its limit even by using
a new standard size bearing, regrind crankpin to undersize
and use 0.25 mm undersize bearing.
ASSEMBLY
NOTE:
Two sizes of piston are available as standard size spare part
so as to ensure proper piston-to-cylinder clearance. When
installing a standard size piston, make sure to match piston
with cylinder as follows.
a) Each piston has stamped number 1 or 2 as shown. It represents
outer diameter of piston.
b) There are also stamped numbers of 1 and 2 on the cylinder block
as shown. The first number represents inner diameter of No.1
cylinder, the second number of No.2 cylinder, the third number
of No.3 cylinder and the fourth number of No.4 cylinder.
Page 356 of 557
2. Arrow mark
4. Oil hole
The oil hole should
come on intake side
1. Arrow mark
2. 1st ring end
gap
3. 2nd ring end
gap and oil ring
spacer gap
4. Oil ring upper
rail gap
5. Oil ring lower
rail gap
6. Intake side
7. Exhaust side Crankshaft
pulley side
Circlip
or
ENGINE MECHANICAL (G13B, 1-CAM 16-VALVES ENGINE) 6A1-61
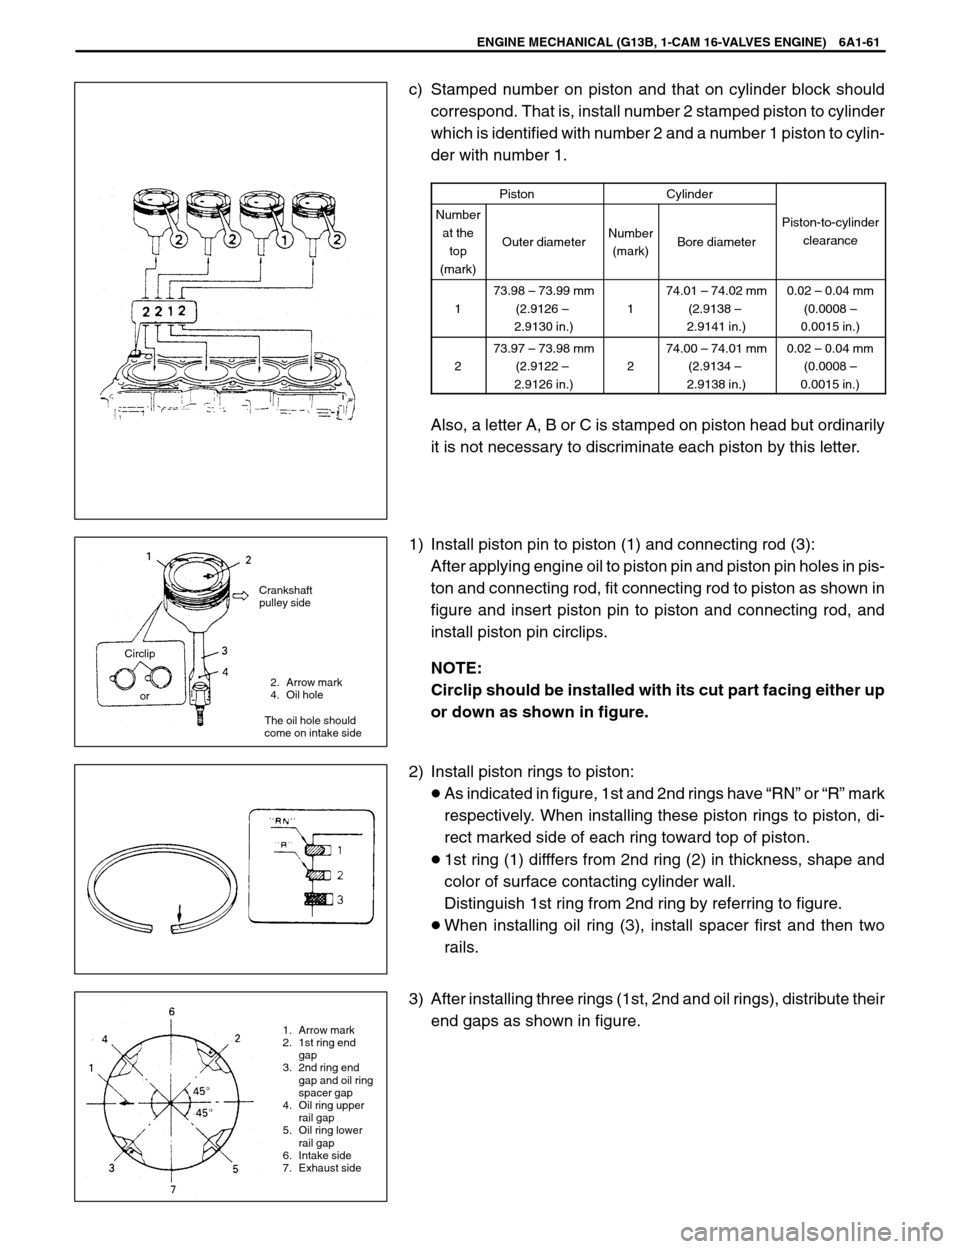
c) Stamped number on piston and that on cylinder block should
correspond. That is, install number 2 stamped piston to cylinder
which is identified with number 2 and a number 1 piston to cylin-
der with number 1.
PistonCylinder
Number
at the
top
(mark)
Outer diameterNumber
(mark)Bore diameter
Piston-to-cylinder
clearance
1
73.98 – 73.99 mm
(2.9126 –
2.9130 in.)
1
74.01 – 74.02 mm
(2.9138 –
2.9141 in.)0.02 – 0.04 mm
(0.0008 –
0.0015 in.)
2
73.97 – 73.98 mm
(2.9122 –
2.9126 in.)
2
74.00 – 74.01 mm
(2.9134 –
2.9138 in.)0.02 – 0.04 mm
(0.0008 –
0.0015 in.)
Also, a letter A, B or C is stamped on piston head but ordinarily
it is not necessary to discriminate each piston by this letter.
1) Install piston pin to piston (1) and connecting rod (3):
After applying engine oil to piston pin and piston pin holes in pis-
ton and connecting rod, fit connecting rod to piston as shown in
figure and insert piston pin to piston and connecting rod, and
install piston pin circlips.
NOTE:
Circlip should be installed with its cut part facing either up
or down as shown in figure.
2) Install piston rings to piston:
�As indicated in figure, 1st and 2nd rings have “RN” or “R” mark
respectively. When installing these piston rings to piston, di-
rect marked side of each ring toward top of piston.
�1st ring (1) difffers from 2nd ring (2) in thickness, shape and
color of surface contacting cylinder wall.
Distinguish 1st ring from 2nd ring by referring to figure.
�When installing oil ring (3), install spacer first and then two
rails.
3) After installing three rings (1st, 2nd and oil rings), distribute their
end gaps as shown in figure.
Page 357 of 557
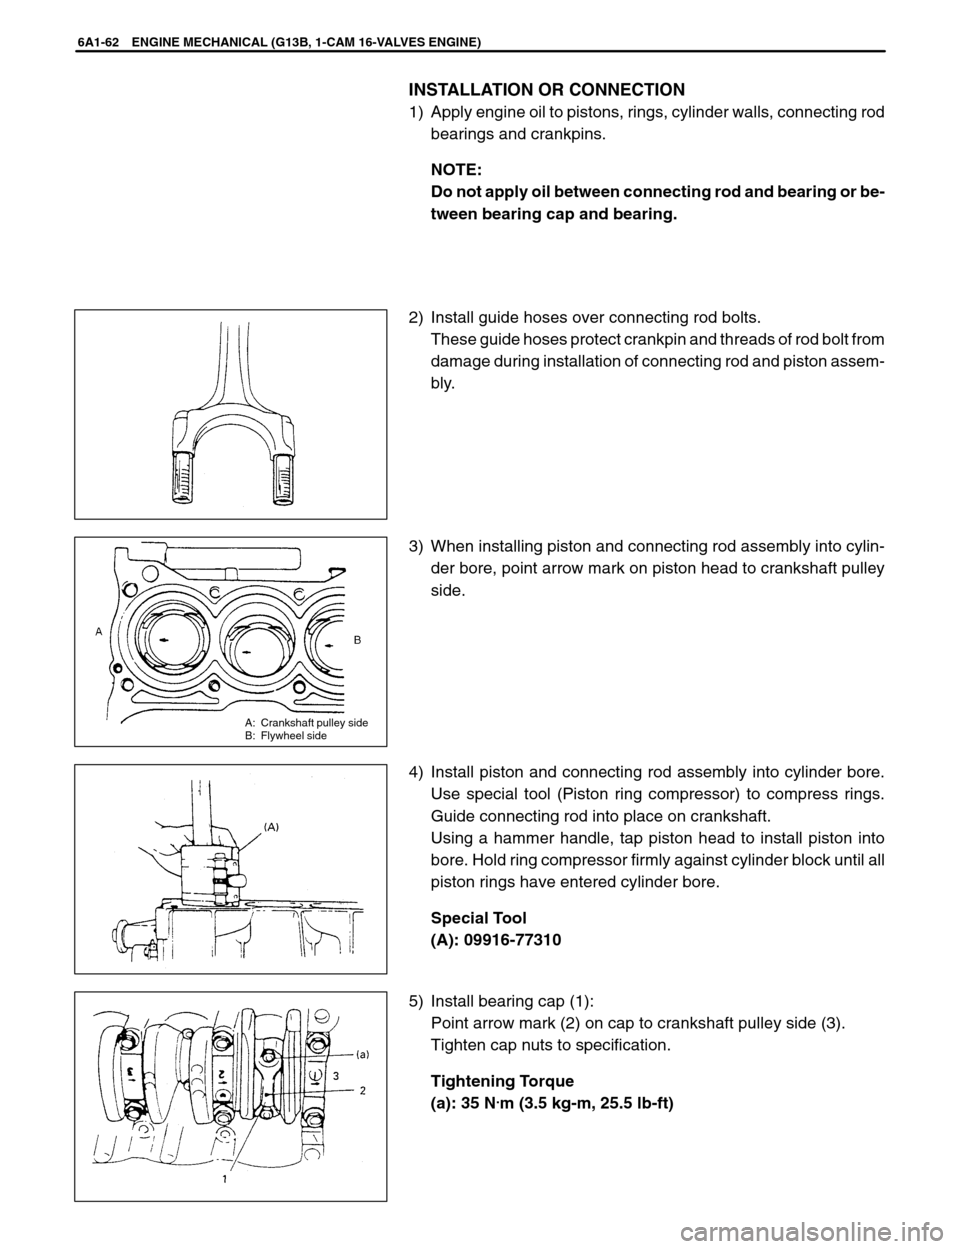
A: Crankshaft pulley side
B: Flywheel side
6A1-62 ENGINE MECHANICAL (G13B, 1-CAM 16-VALVES ENGINE)
INSTALLATION OR CONNECTION
1) Apply engine oil to pistons, rings, cylinder walls, connecting rod
bearings and crankpins.
NOTE:
Do not apply oil between connecting rod and bearing or be-
tween bearing cap and bearing.
2) Install guide hoses over connecting rod bolts.
These guide hoses protect crankpin and threads of rod bolt from
damage during installation of connecting rod and piston assem-
bly.
3) When installing piston and connecting rod assembly into cylin-
der bore, point arrow mark on piston head to crankshaft pulley
side.
4) Install piston and connecting rod assembly into cylinder bore.
Use special tool (Piston ring compressor) to compress rings.
Guide connecting rod into place on crankshaft.
Using a hammer handle, tap piston head to install piston into
bore. Hold ring compressor firmly against cylinder block until all
piston rings have entered cylinder bore.
Special Tool
(A): 09916-77310
5) Install bearing cap (1):
Point arrow mark (2) on cap to crankshaft pulley side (3).
Tighten cap nuts to specification.
Tightening Torque
(a): 35 N
.m (3.5 kg-m, 25.5 lb-ft)