Page 364 of 557
1. Flywheel bolt
2. Bolt
ENGINE MECHANICAL (G13B, 1-CAM 16-VALVES ENGINE) 6A1-69
REMOVAL
1) Remove engine assembly from body as previously outlined.
2) Remove clutch cover, clutch disc and flywheel (drive plate for
A / T).
Special Tool
(A): 09924-17810
3) Remove crankshaft pulley, timing belt and crankshaft timing
pulley.
4) Remove cylinder head assembly.
5) Remove oil pan and oil pump strainer.
6) Remove oil pump (1).
7) Remove oil seal housing.
8) Remove connecting rod bearing caps.
9) Loosen crankshaft bearing cap bolts in such order as indicated
in figure a little at a time and remove bearing caps.
10) Remove crankshaft from cylinder block.
Page 365 of 557
6A1-70 ENGINE MECHANICAL (G13B, 1-CAM 16-VALVES ENGINE)
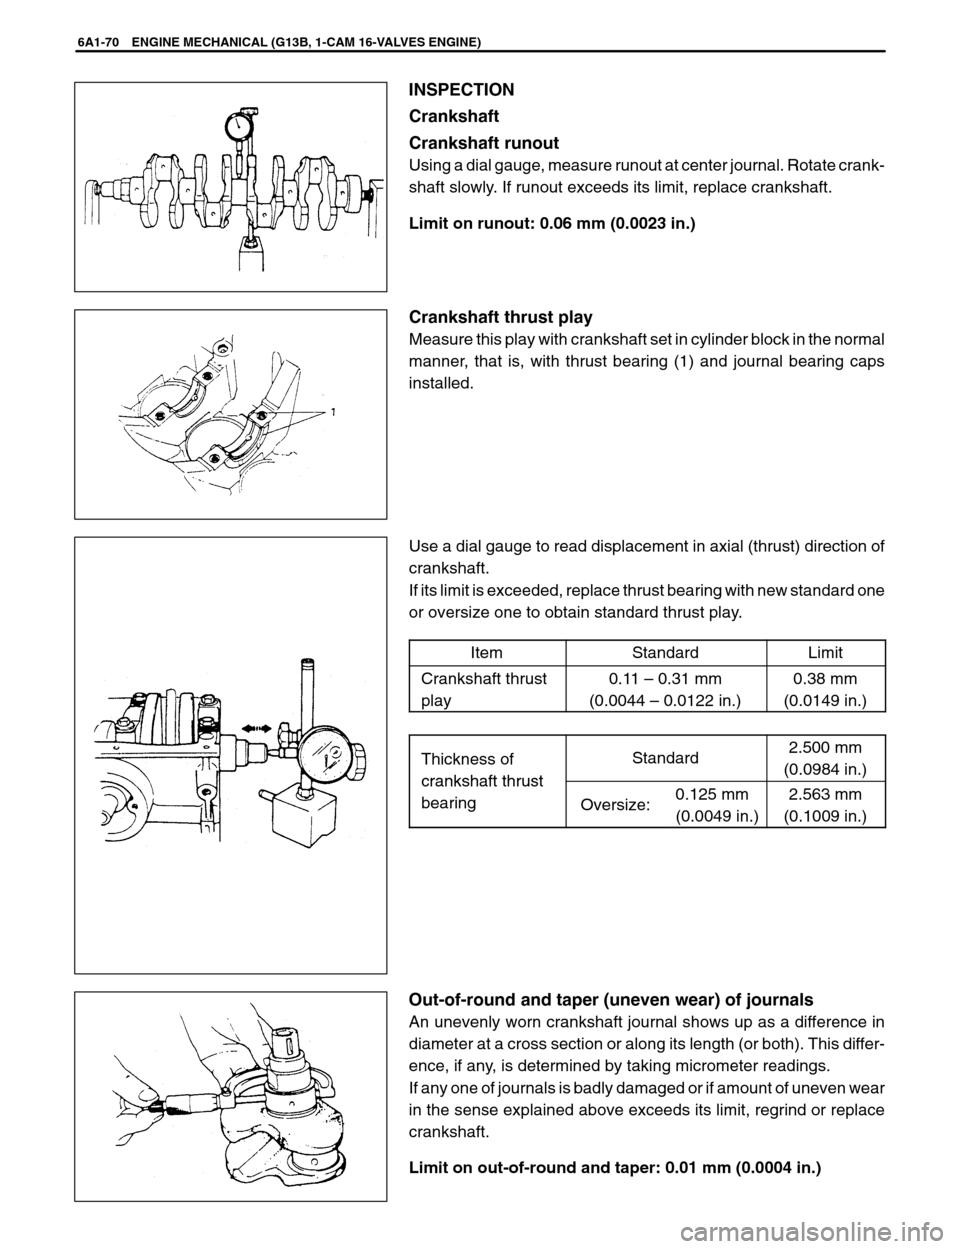
INSPECTION
Crankshaft
Crankshaft runout
Using a dial gauge, measure runout at center journal. Rotate crank-
shaft slowly. If runout exceeds its limit, replace crankshaft.
Limit on runout: 0.06 mm (0.0023 in.)
Crankshaft thrust play
Measure this play with crankshaft set in cylinder block in the normal
manner, that is, with thrust bearing (1) and journal bearing caps
installed.
Use a dial gauge to read displacement in axial (thrust) direction of
crankshaft.
If its limit is exceeded, replace thrust bearing with new standard one
or oversize one to obtain standard thrust play.
Item
StandardLimit
Crankshaft thrust
play0.11 – 0.31 mm
(0.0044 – 0.0122 in.)0.38 mm
(0.0149 in.)
Thickness of
crankshaft thrust
Standard2.500 mm
(0.0984 in.)
crankshaft thrust
bearingOversize:0.125 mm
(0.0049 in.)2.563 mm
(0.1009 in.)
Out-of-round and taper (uneven wear) of journals
An unevenly worn crankshaft journal shows up as a difference in
diameter at a cross section or along its length (or both). This differ-
ence, if any, is determined by taking micrometer readings.
If any one of journals is badly damaged or if amount of uneven wear
in the sense explained above exceeds its limit, regrind or replace
crankshaft.
Limit on out-of-round and taper: 0.01 mm (0.0004 in.)
Page 366 of 557
1. Gaging plastic
ENGINE MECHANICAL (G13B, 1-CAM 16-VALVES ENGINE) 6A1-71
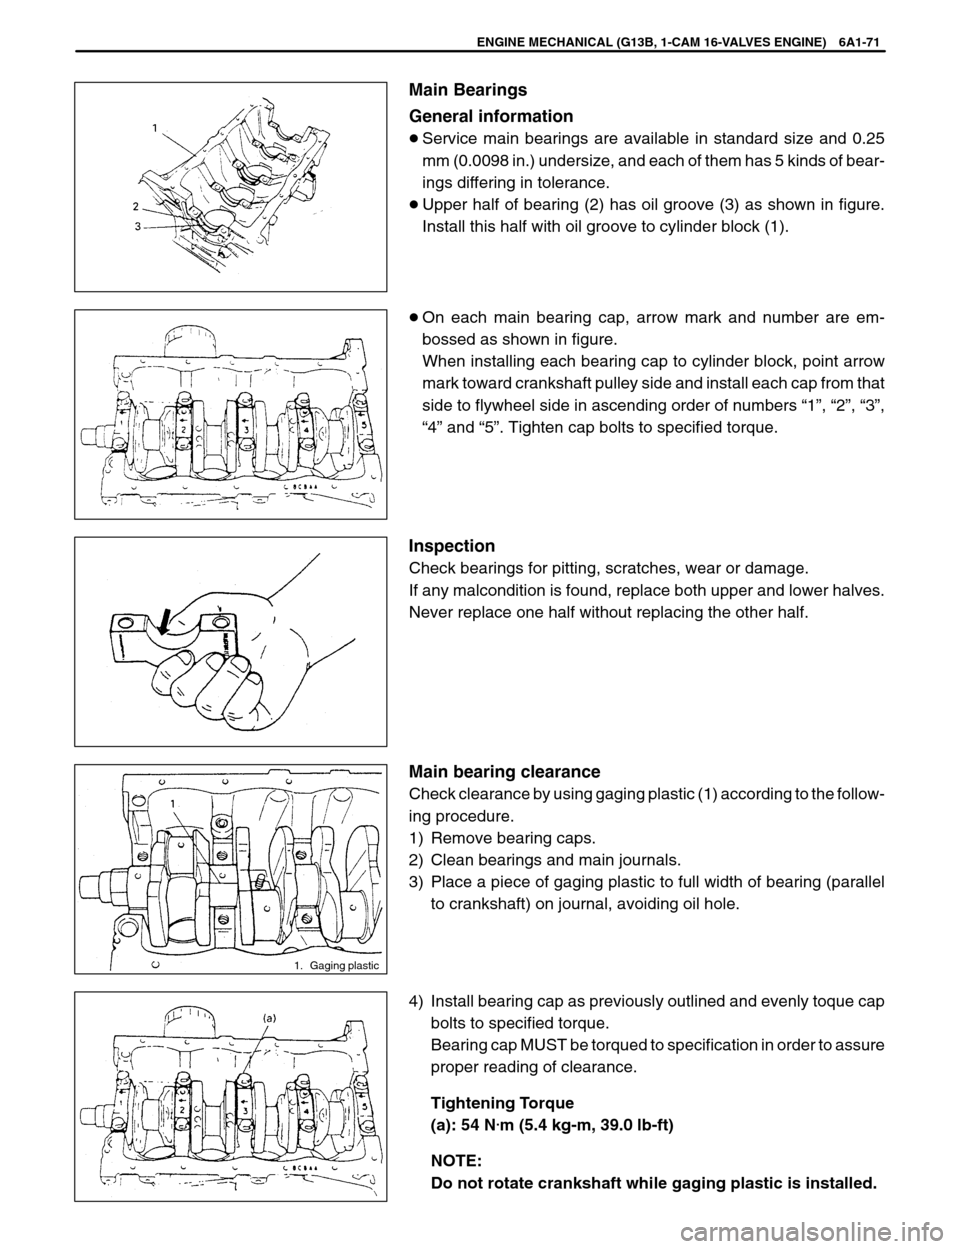
Main Bearings
General information
�Service main bearings are available in standard size and 0.25
mm (0.0098 in.) undersize, and each of them has 5 kinds of bear-
ings differing in tolerance.
�Upper half of bearing (2) has oil groove (3) as shown in figure.
Install this half with oil groove to cylinder block (1).
�On each main bearing cap, arrow mark and number are em-
bossed as shown in figure.
When installing each bearing cap to cylinder block, point arrow
mark toward crankshaft pulley side and install each cap from that
side to flywheel side in ascending order of numbers “1”, “2”, “3”,
“4” and “5”. Tighten cap bolts to specified torque.
Inspection
Check bearings for pitting, scratches, wear or damage.
If any malcondition is found, replace both upper and lower halves.
Never replace one half without replacing the other half.
Main bearing clearance
Check clearance by using gaging plastic (1) according to the follow-
ing procedure.
1) Remove bearing caps.
2) Clean bearings and main journals.
3) Place a piece of gaging plastic to full width of bearing (parallel
to crankshaft) on journal, avoiding oil hole.
4) Install bearing cap as previously outlined and evenly toque cap
bolts to specified torque.
Bearing cap MUST be torqued to specification in order to assure
proper reading of clearance.
Tightening Torque
(a): 54 N
.m (5.4 kg-m, 39.0 lb-ft)
NOTE:
Do not rotate crankshaft while gaging plastic is installed.
Page 367 of 557
6A1-72 ENGINE MECHANICAL (G13B, 1-CAM 16-VALVES ENGINE)
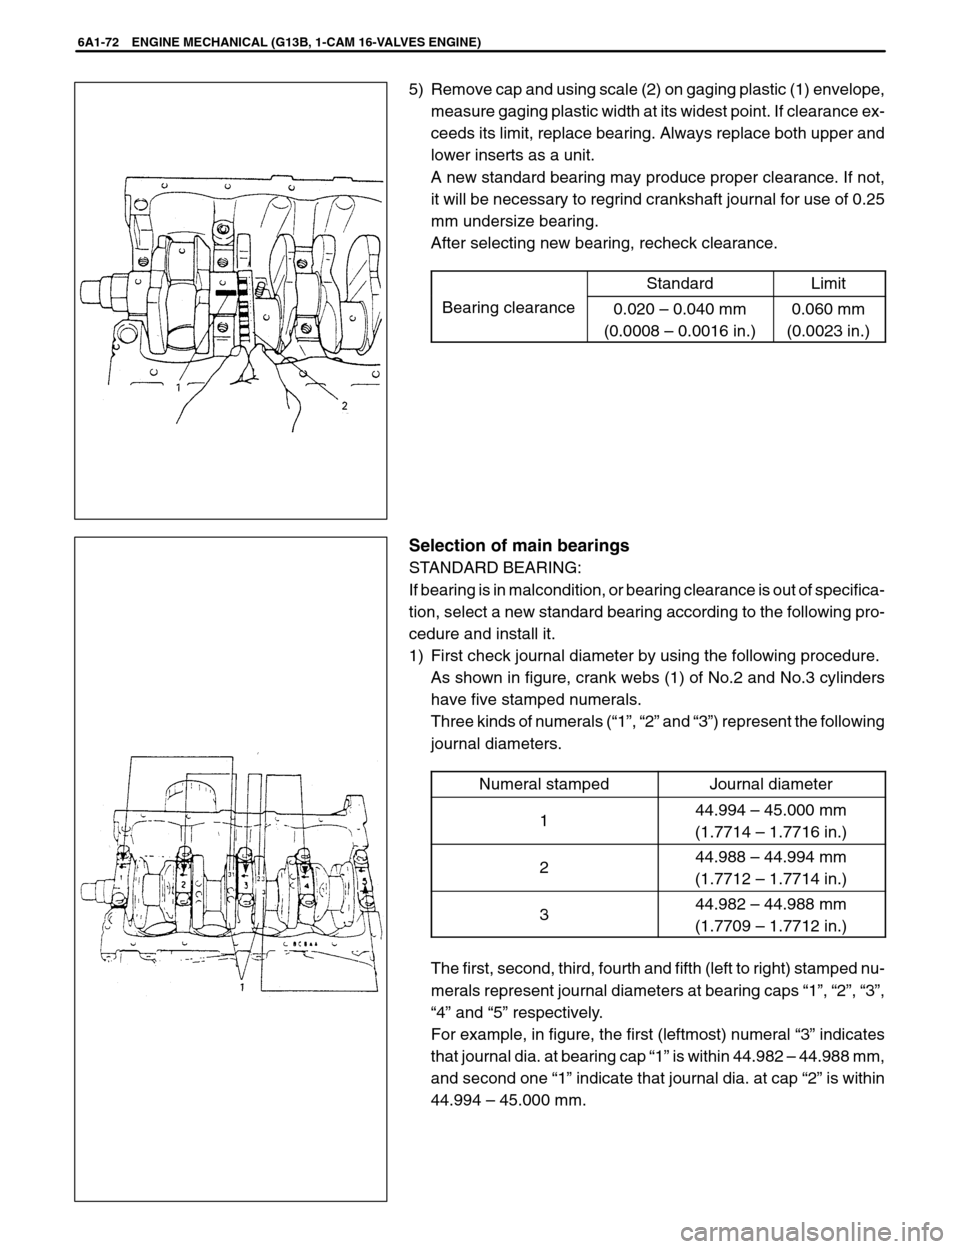
5) Remove cap and using scale (2) on gaging plastic (1) envelope,
measure gaging plastic width at its widest point. If clearance ex-
ceeds its limit, replace bearing. Always replace both upper and
lower inserts as a unit.
A new standard bearing may produce proper clearance. If not,
it will be necessary to regrind crankshaft journal for use of 0.25
mm undersize bearing.
After selecting new bearing, recheck clearance.
StandardLimit
Bearing clearance0.020 – 0.040 mm
(0.0008 – 0.0016 in.)0.060 mm
(0.0023 in.)
Selection of main bearings
STANDARD BEARING:
If bearing is in malcondition, or bearing clearance is out of specifica-
tion, select a new standard bearing according to the following pro-
cedure and install it.
1) First check journal diameter by using the following procedure.
As shown in figure, crank webs (1) of No.2 and No.3 cylinders
have five stamped numerals.
Three kinds of numerals (“1”, “2” and “3”) represent the following
journal diameters.
Numeral stamped
Journal diameter
144.994 – 45.000 mm
(1.7714 – 1.7716 in.)
244.988 – 44.994 mm
(1.7712 – 1.7714 in.)
344.982 – 44.988 mm
(1.7709 – 1.7712 in.)
The first, second, third, fourth and fifth (left to right) stamped nu-
merals represent journal diameters at bearing caps “1”, “2”, “3”,
“4” and “5” respectively.
For example, in figure, the first (leftmost) numeral “3” indicates
that journal dia. at bearing cap “1” is within 44.982 – 44.988 mm,
and second one “1” indicate that journal dia. at cap “2” is within
44.994 – 45.000 mm.
Page 369 of 557
2. Scale
1. Paint
6A1-74 ENGINE MECHANICAL (G13B, 1-CAM 16-VALVES ENGINE)
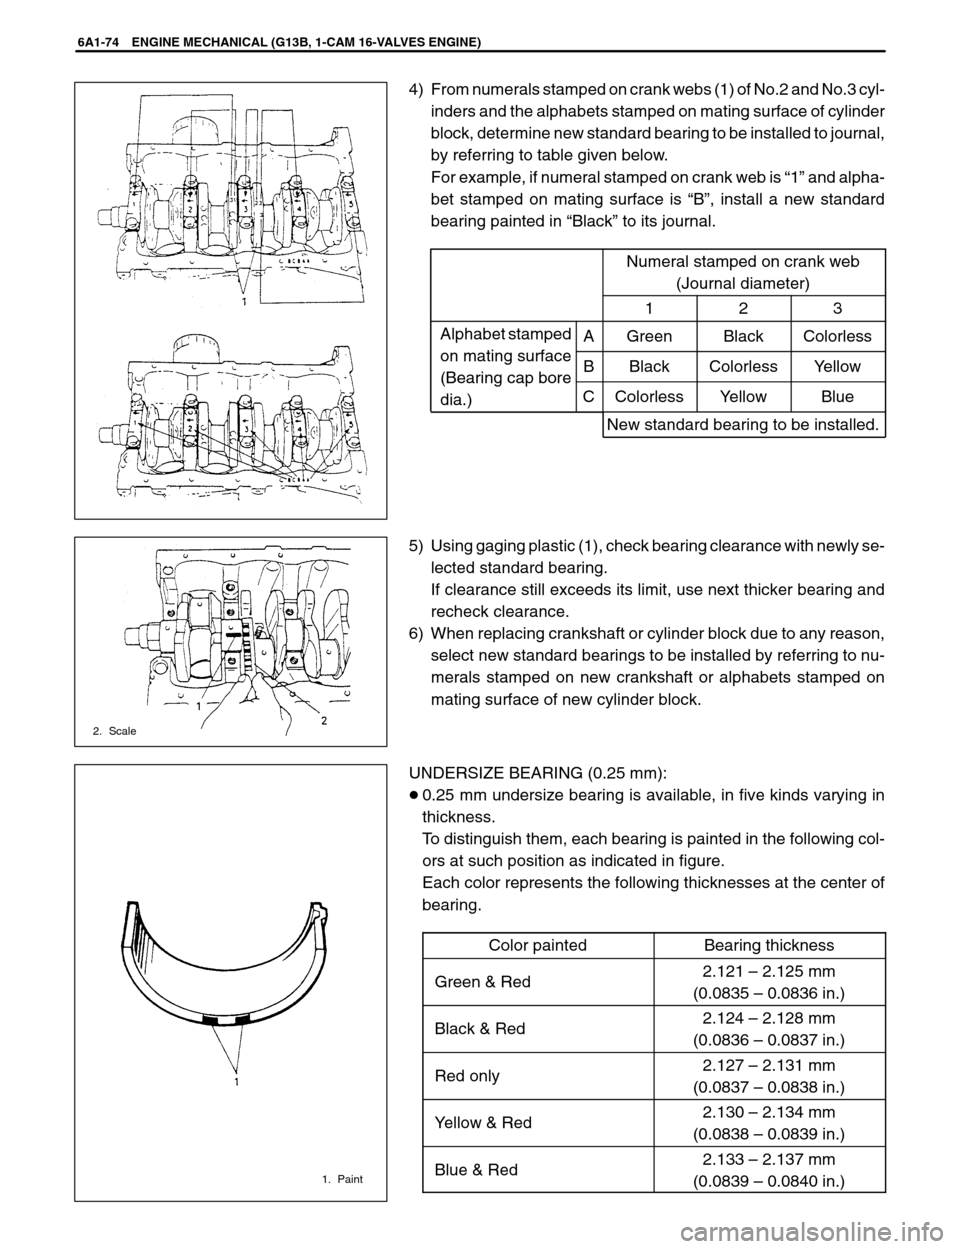
4) From numerals stamped on crank webs (1) of No.2 and No.3 cyl-
inders and the alphabets stamped on mating surface of cylinder
block, determine new standard bearing to be installed to journal,
by referring to table given below.
For example, if numeral stamped on crank web is “1” and alpha-
bet stamped on mating surface is “B”, install a new standard
bearing painted in “Black” to its journal.
Numeral stamped on crank web
(Journal diameter)
123
Alphabet stamped
ti f
AGreenBlackColorless
on mating surface
(Bearing capboreBBlackColorlessYellow(Bearing ca bore
dia.)CColorlessYellowBlue
New standard bearing to be installed.
5) Using gaging plastic (1), check bearing clearance with newly se-
lected standard bearing.
If clearance still exceeds its limit, use next thicker bearing and
recheck clearance.
6) When replacing crankshaft or cylinder block due to any reason,
select new standard bearings to be installed by referring to nu-
merals stamped on new crankshaft or alphabets stamped on
mating surface of new cylinder block.
UNDERSIZE BEARING (0.25 mm):
�0.25 mm undersize bearing is available, in five kinds varying in
thickness.
To distinguish them, each bearing is painted in the following col-
ors at such position as indicated in figure.
Each color represents the following thicknesses at the center of
bearing.
Color painted
Bearing thickness
Green & Red2.121 – 2.125 mm
(0.0835 – 0.0836 in.)
Black & Red2.124 – 2.128 mm
(0.0836 – 0.0837 in.)
Red only2.127 – 2.131 mm
(0.0837 – 0.0838 in.)
Yellow & Red2.130 – 2.134 mm
(0.0838 – 0.0839 in.)
Blue & Red2.133 – 2.137 mm
(0.0839 – 0.0840 in.)
Page 370 of 557
ENGINE MECHANICAL (G13B, 1-CAM 16-VALVES ENGINE) 6A1-75
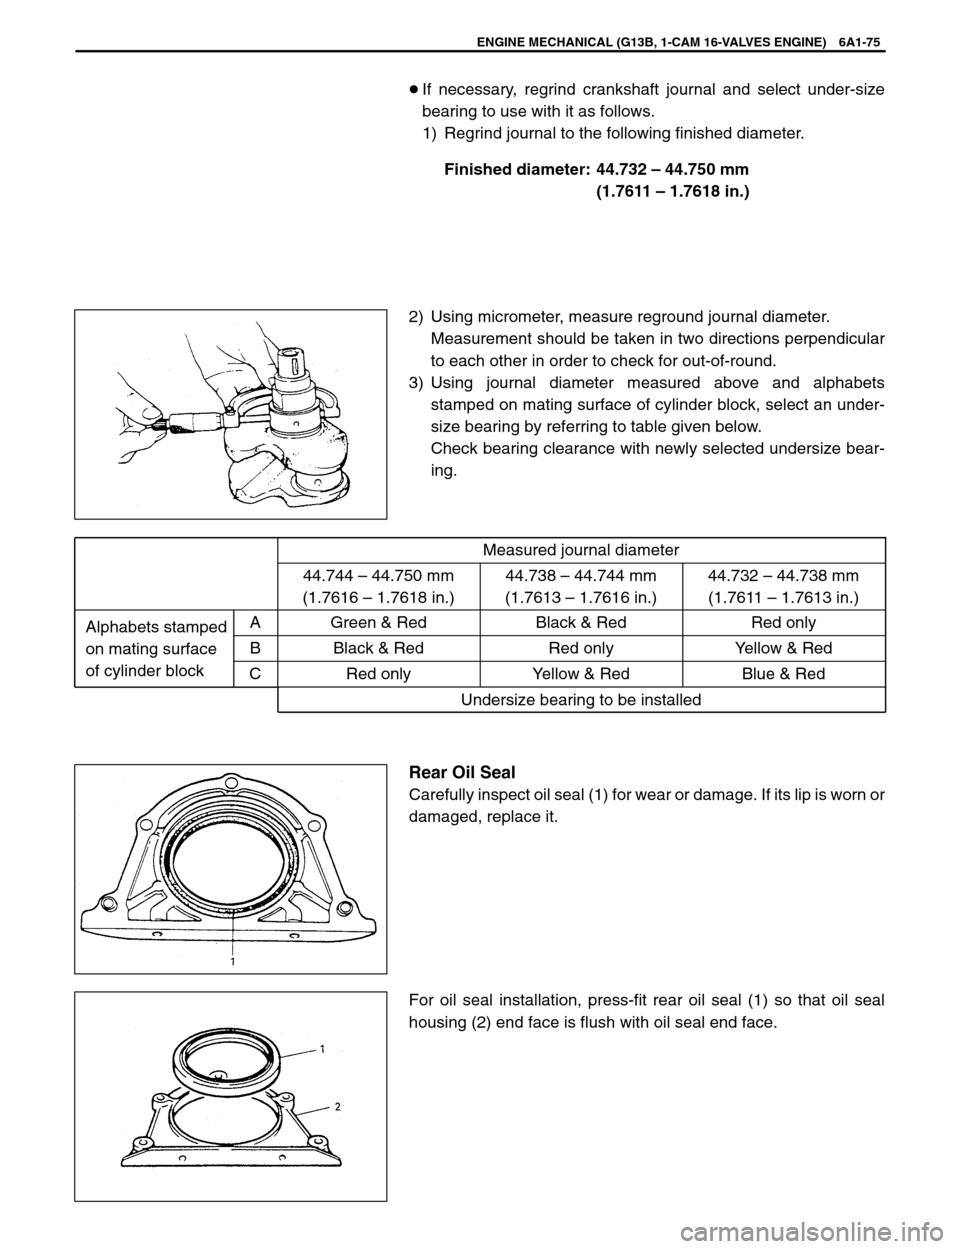
�If necessary, regrind crankshaft journal and select under-size
bearing to use with it as follows.
1) Regrind journal to the following finished diameter.
Finished diameter: 44.732 – 44.750 mm
(1.7611 – 1.7618 in.)
2) Using micrometer, measure reground journal diameter.
Measurement should be taken in two directions perpendicular
to each other in order to check for out-of-round.
3) Using journal diameter measured above and alphabets
stamped on mating surface of cylinder block, select an under-
size bearing by referring to table given below.
Check bearing clearance with newly selected undersize bear-
ing.
Measured journal diameter
44.744 – 44.750 mm
(1.7616 – 1.7618 in.)44.738 – 44.744 mm
(1.7613 – 1.7616 in.)44.732 – 44.738 mm
(1.7611 – 1.7613 in.)
Alphabets stampedAGreen & RedBlack & RedRed only
on mating surfaceBBlack & RedRed onlyYellow & Red
of cylinder block
CRed onlyYellow & RedBlue & Red
Undersize bearing to be installed
Rear Oil Seal
Carefully inspect oil seal (1) for wear or damage. If its lip is worn or
damaged, replace it.
For oil seal installation, press-fit rear oil seal (1) so that oil seal
housing (2) end face is flush with oil seal end face.
Page 372 of 557

ENGINE MECHANICAL (G13B, 1-CAM 16-VALVES ENGINE) 6A1-77
5) Rebore and hone cylinder to calculated dimension.
NOTE:
Before reboring, install all main bearing caps in place and
tighten to specification to avoid distortion of bearing bores.
6) Measure piston clearance after honing.
INSTALLATION
NOTE:
�All parts to be installed must be perfectly clean.
�Be sure to oil crankshaft journals, journal bearings, thrust
bearings, crankpins, connecting rod bearings, pistons, pis-
ton rings and cylinder bores.
�Journal bearings, bearing caps, connecting rods, rod bear-
ings, rod bearing caps, pistons and piston rings are in com-
bination sets. Do not disturb such combination and make
sure that each part goes back to where it came from, when
installing.
1) Install main bearings to cylinder block.
One of two halves of main bearing (2), has an oil groove (3).
Install it to cylinder block (1), and the other half without oil groove
to bearing cap.
Make sure that two halves are painted in the same color.
2) Install thrust bearings (1) to cylinder block between No.2 and
No.3 cylinders. Face oil groove (2) sides to crank webs.
Page 373 of 557
1. Short bolts
2. Long bolts
6A1-78 ENGINE MECHANICAL (G13B, 1-CAM 16-VALVES ENGINE)
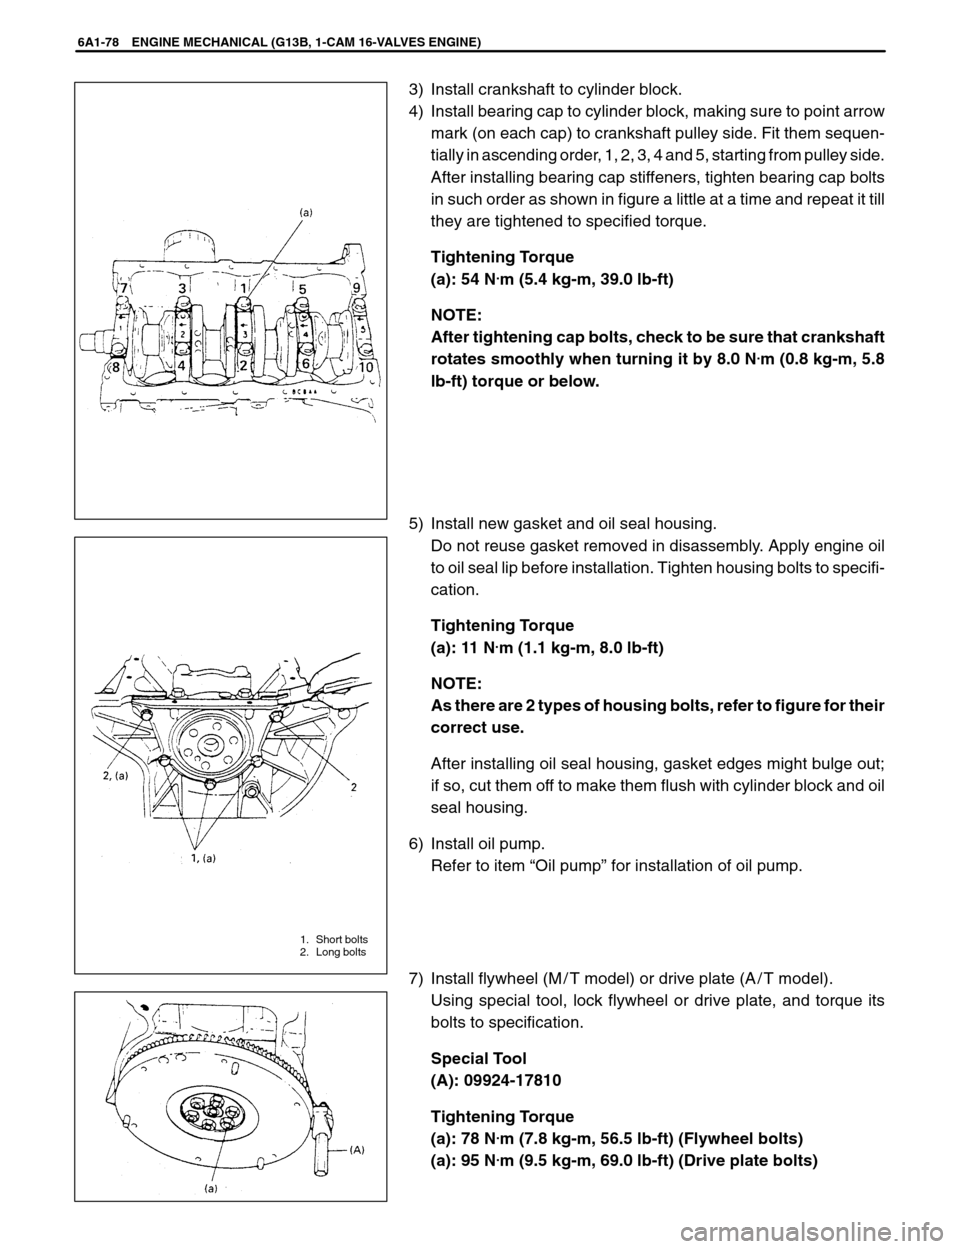
3) Install crankshaft to cylinder block.
4) Install bearing cap to cylinder block, making sure to point arrow
mark (on each cap) to crankshaft pulley side. Fit them sequen-
tially in ascending order, 1, 2, 3, 4 and 5, starting from pulley side.
After installing bearing cap stiffeners, tighten bearing cap bolts
in such order as shown in figure a little at a time and repeat it till
they are tightened to specified torque.
Tightening Torque
(a): 54 N
.m (5.4 kg-m, 39.0 lb-ft)
NOTE:
After tightening cap bolts, check to be sure that crankshaft
rotates smoothly when turning it by 8.0 N
.m (0.8 kg-m, 5.8
lb-ft) torque or below.
5) Install new gasket and oil seal housing.
Do not reuse gasket removed in disassembly. Apply engine oil
to oil seal lip before installation. Tighten housing bolts to specifi-
cation.
Tightening Torque
(a): 11 N
.m (1.1 kg-m, 8.0 lb-ft)
NOTE:
As there are 2 types of housing bolts, refer to figure for their
correct use.
After installing oil seal housing, gasket edges might bulge out;
if so, cut them off to make them flush with cylinder block and oil
seal housing.
6) Install oil pump.
Refer to item “Oil pump” for installation of oil pump.
7) Install flywheel (M / T model) or drive plate (A / T model).
Using special tool, lock flywheel or drive plate, and torque its
bolts to specification.
Special Tool
(A): 09924-17810
Tightening Torque
(a): 78 N
.m (7.8 kg-m, 56.5 lb-ft) (Flywheel bolts)
(a): 95 N
.m (9.5 kg-m, 69.0 lb-ft) (Drive plate bolts)