Page 367 of 557
6A1-72 ENGINE MECHANICAL (G13B, 1-CAM 16-VALVES ENGINE)
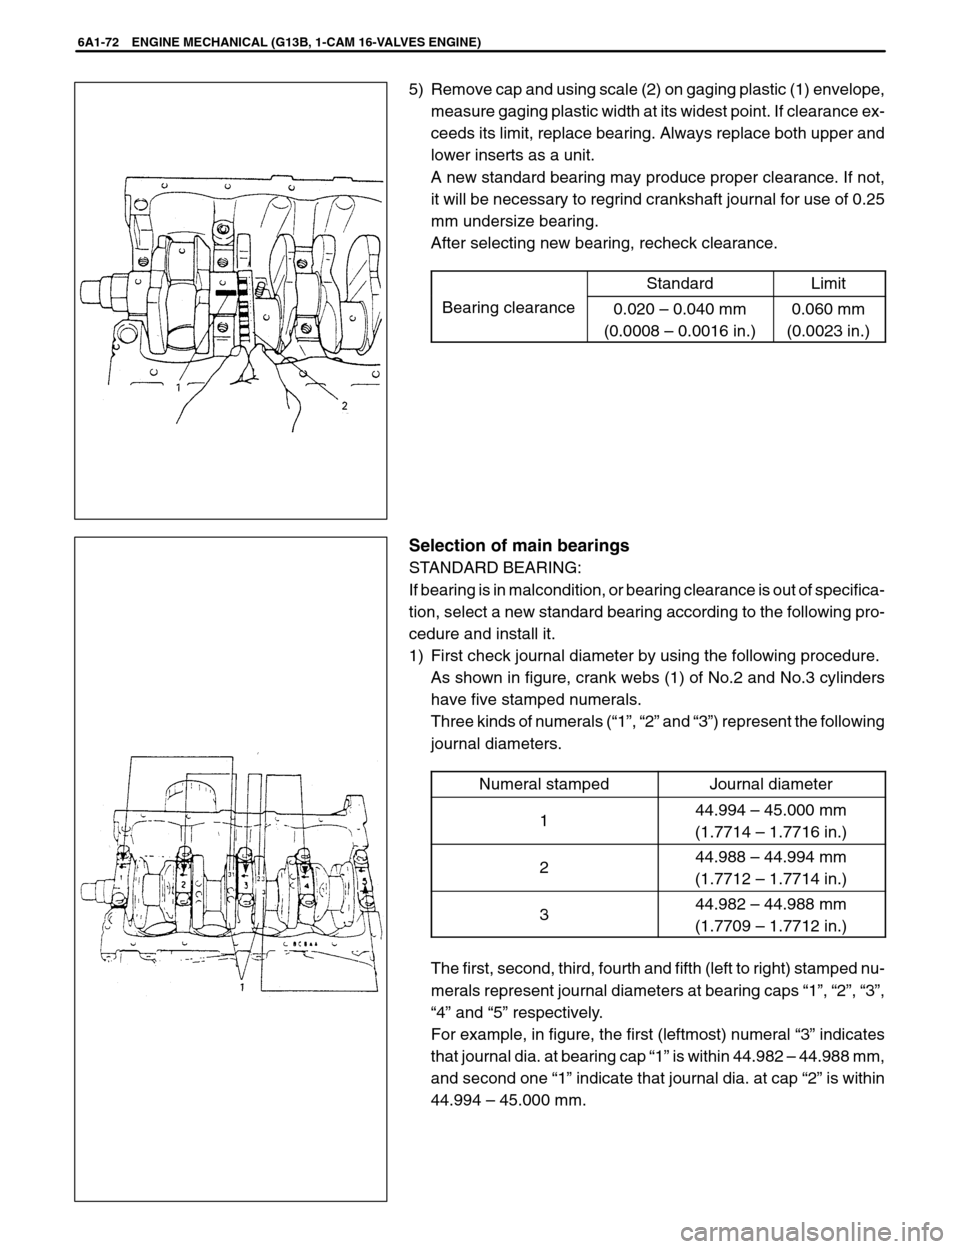
5) Remove cap and using scale (2) on gaging plastic (1) envelope,
measure gaging plastic width at its widest point. If clearance ex-
ceeds its limit, replace bearing. Always replace both upper and
lower inserts as a unit.
A new standard bearing may produce proper clearance. If not,
it will be necessary to regrind crankshaft journal for use of 0.25
mm undersize bearing.
After selecting new bearing, recheck clearance.
StandardLimit
Bearing clearance0.020 – 0.040 mm
(0.0008 – 0.0016 in.)0.060 mm
(0.0023 in.)
Selection of main bearings
STANDARD BEARING:
If bearing is in malcondition, or bearing clearance is out of specifica-
tion, select a new standard bearing according to the following pro-
cedure and install it.
1) First check journal diameter by using the following procedure.
As shown in figure, crank webs (1) of No.2 and No.3 cylinders
have five stamped numerals.
Three kinds of numerals (“1”, “2” and “3”) represent the following
journal diameters.
Numeral stamped
Journal diameter
144.994 – 45.000 mm
(1.7714 – 1.7716 in.)
244.988 – 44.994 mm
(1.7712 – 1.7714 in.)
344.982 – 44.988 mm
(1.7709 – 1.7712 in.)
The first, second, third, fourth and fifth (left to right) stamped nu-
merals represent journal diameters at bearing caps “1”, “2”, “3”,
“4” and “5” respectively.
For example, in figure, the first (leftmost) numeral “3” indicates
that journal dia. at bearing cap “1” is within 44.982 – 44.988 mm,
and second one “1” indicate that journal dia. at cap “2” is within
44.994 – 45.000 mm.
Page 368 of 557
1. Paint
ENGINE MECHANICAL (G13B, 1-CAM 16-VALVES ENGINE) 6A1-73
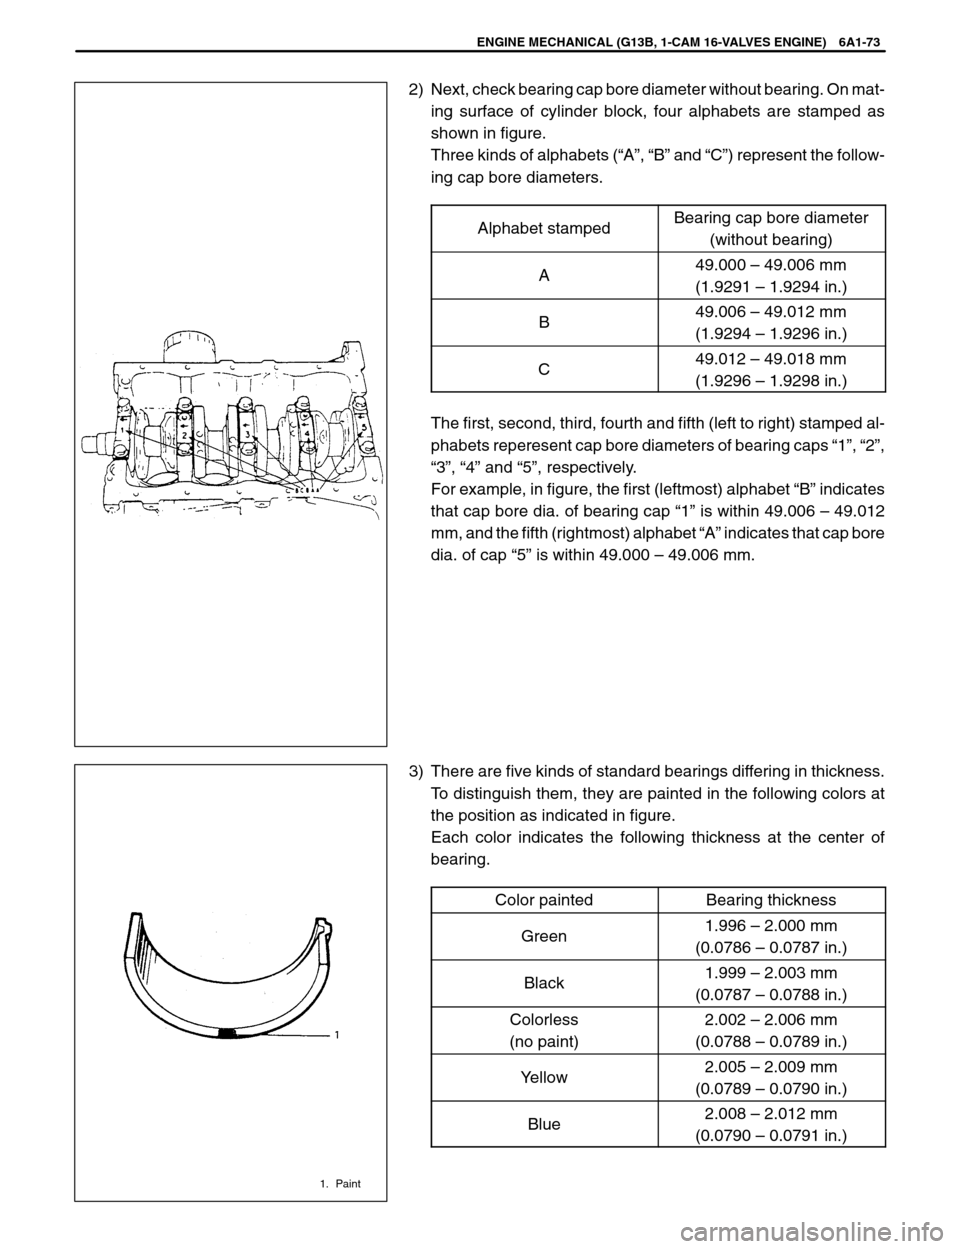
2) Next, check bearing cap bore diameter without bearing. On mat-
ing surface of cylinder block, four alphabets are stamped as
shown in figure.
Three kinds of alphabets (“A”, “B” and “C”) represent the follow-
ing cap bore diameters.
Alphabet stamped
Bearing cap bore diameter
(without bearing)
A49.000 – 49.006 mm
(1.9291 – 1.9294 in.)
B49.006 – 49.012 mm
(1.9294 – 1.9296 in.)
C49.012 – 49.018 mm
(1.9296 – 1.9298 in.)
The first, second, third, fourth and fifth (left to right) stamped al-
phabets reperesent cap bore diameters of bearing caps “1”, “2”,
“3”, “4” and “5”, respectively.
For example, in figure, the first (leftmost) alphabet “B” indicates
that cap bore dia. of bearing cap “1” is within 49.006 – 49.012
mm, and the fifth (rightmost) alphabet “A” indicates that cap bore
dia. of cap “5” is within 49.000 – 49.006 mm.
3) There are five kinds of standard bearings differing in thickness.
To distinguish them, they are painted in the following colors at
the position as indicated in figure.
Each color indicates the following thickness at the center of
bearing.
Color painted
Bearing thickness
Green1.996 – 2.000 mm
(0.0786 – 0.0787 in.)
Black1.999 – 2.003 mm
(0.0787 – 0.0788 in.)
Colorless
(no paint)2.002 – 2.006 mm
(0.0788 – 0.0789 in.)
Yellow2.005 – 2.009 mm
(0.0789 – 0.0790 in.)
Blue2.008 – 2.012 mm
(0.0790 – 0.0791 in.)
Page 369 of 557
2. Scale
1. Paint
6A1-74 ENGINE MECHANICAL (G13B, 1-CAM 16-VALVES ENGINE)
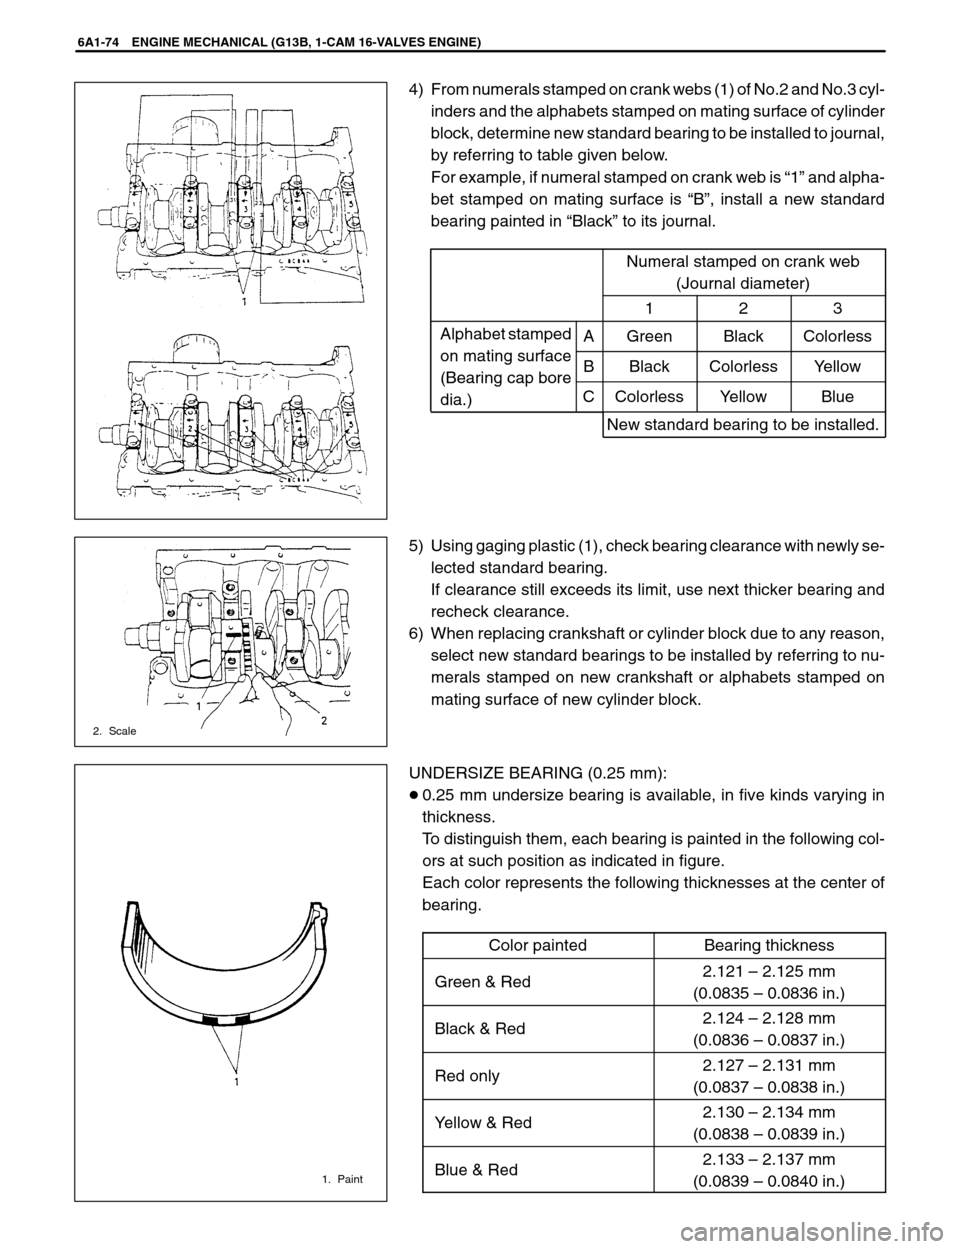
4) From numerals stamped on crank webs (1) of No.2 and No.3 cyl-
inders and the alphabets stamped on mating surface of cylinder
block, determine new standard bearing to be installed to journal,
by referring to table given below.
For example, if numeral stamped on crank web is “1” and alpha-
bet stamped on mating surface is “B”, install a new standard
bearing painted in “Black” to its journal.
Numeral stamped on crank web
(Journal diameter)
123
Alphabet stamped
ti f
AGreenBlackColorless
on mating surface
(Bearing capboreBBlackColorlessYellow(Bearing ca bore
dia.)CColorlessYellowBlue
New standard bearing to be installed.
5) Using gaging plastic (1), check bearing clearance with newly se-
lected standard bearing.
If clearance still exceeds its limit, use next thicker bearing and
recheck clearance.
6) When replacing crankshaft or cylinder block due to any reason,
select new standard bearings to be installed by referring to nu-
merals stamped on new crankshaft or alphabets stamped on
mating surface of new cylinder block.
UNDERSIZE BEARING (0.25 mm):
�0.25 mm undersize bearing is available, in five kinds varying in
thickness.
To distinguish them, each bearing is painted in the following col-
ors at such position as indicated in figure.
Each color represents the following thicknesses at the center of
bearing.
Color painted
Bearing thickness
Green & Red2.121 – 2.125 mm
(0.0835 – 0.0836 in.)
Black & Red2.124 – 2.128 mm
(0.0836 – 0.0837 in.)
Red only2.127 – 2.131 mm
(0.0837 – 0.0838 in.)
Yellow & Red2.130 – 2.134 mm
(0.0838 – 0.0839 in.)
Blue & Red2.133 – 2.137 mm
(0.0839 – 0.0840 in.)
Page 370 of 557
ENGINE MECHANICAL (G13B, 1-CAM 16-VALVES ENGINE) 6A1-75
�If necessary, regrind crankshaft journal and select under-size
bearing to use with it as follows.
1) Regrind journal to the following finished diameter.
Finished diameter: 44.732 – 44.750 mm
(1.7611 – 1.7618 in.)
2) Using micrometer, measure reground journal diameter.
Measurement should be taken in two directions perpendicular
to each other in order to check for out-of-round.
3) Using journal diameter measured above and alphabets
stamped on mating surface of cylinder block, select an under-
size bearing by referring to table given below.
Check bearing clearance with newly selected undersize bear-
ing.
Measured journal diameter
44.744 – 44.750 mm
(1.7616 – 1.7618 in.)44.738 – 44.744 mm
(1.7613 – 1.7616 in.)44.732 – 44.738 mm
(1.7611 – 1.7613 in.)
Alphabets stampedAGreen & RedBlack & RedRed only
on mating surfaceBBlack & RedRed onlyYellow & Red
of cylinder block
CRed onlyYellow & RedBlue & Red
Undersize bearing to be installed
Rear Oil Seal
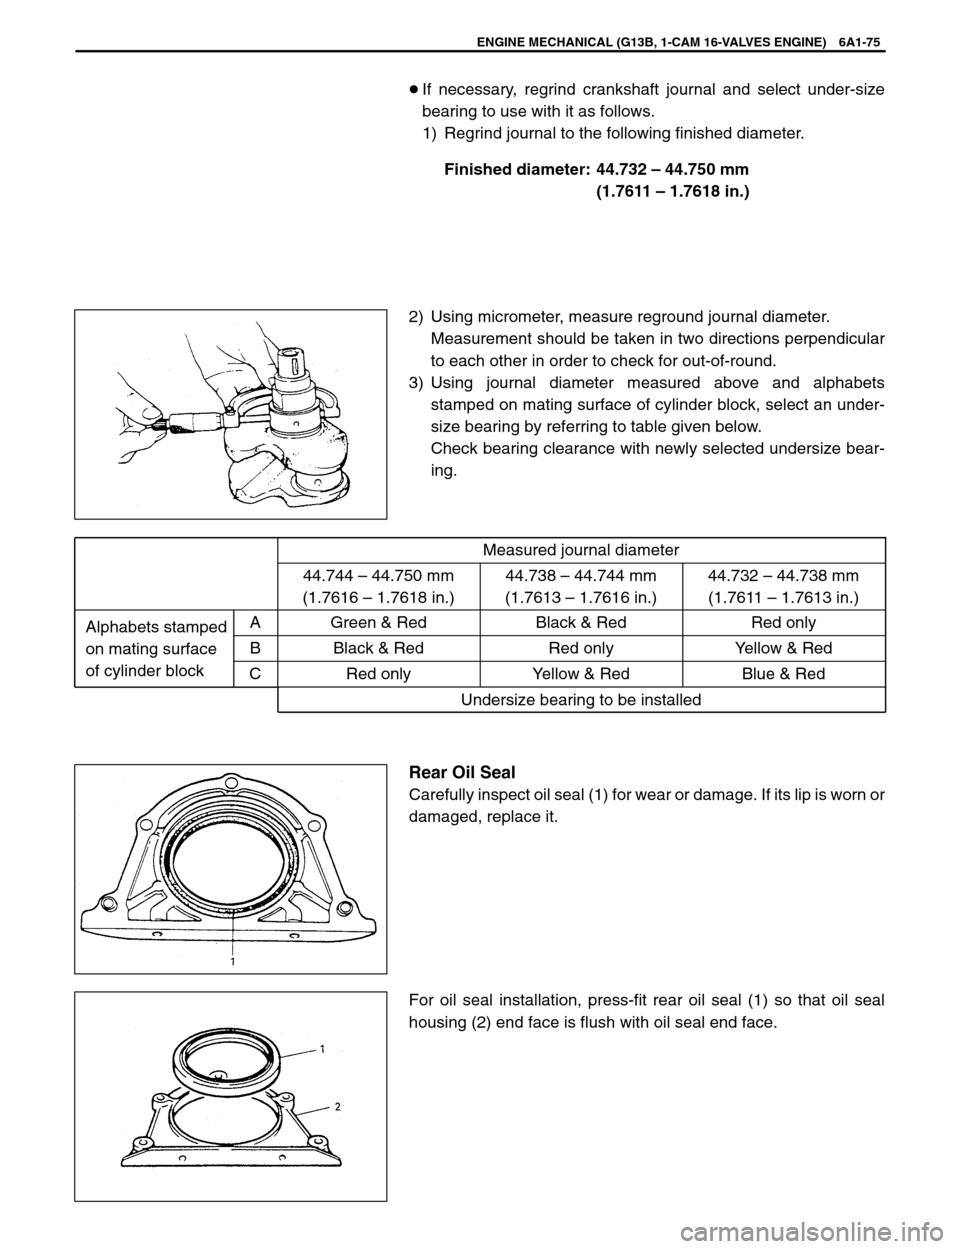
Carefully inspect oil seal (1) for wear or damage. If its lip is worn or
damaged, replace it.
For oil seal installation, press-fit rear oil seal (1) so that oil seal
housing (2) end face is flush with oil seal end face.
Page 371 of 557
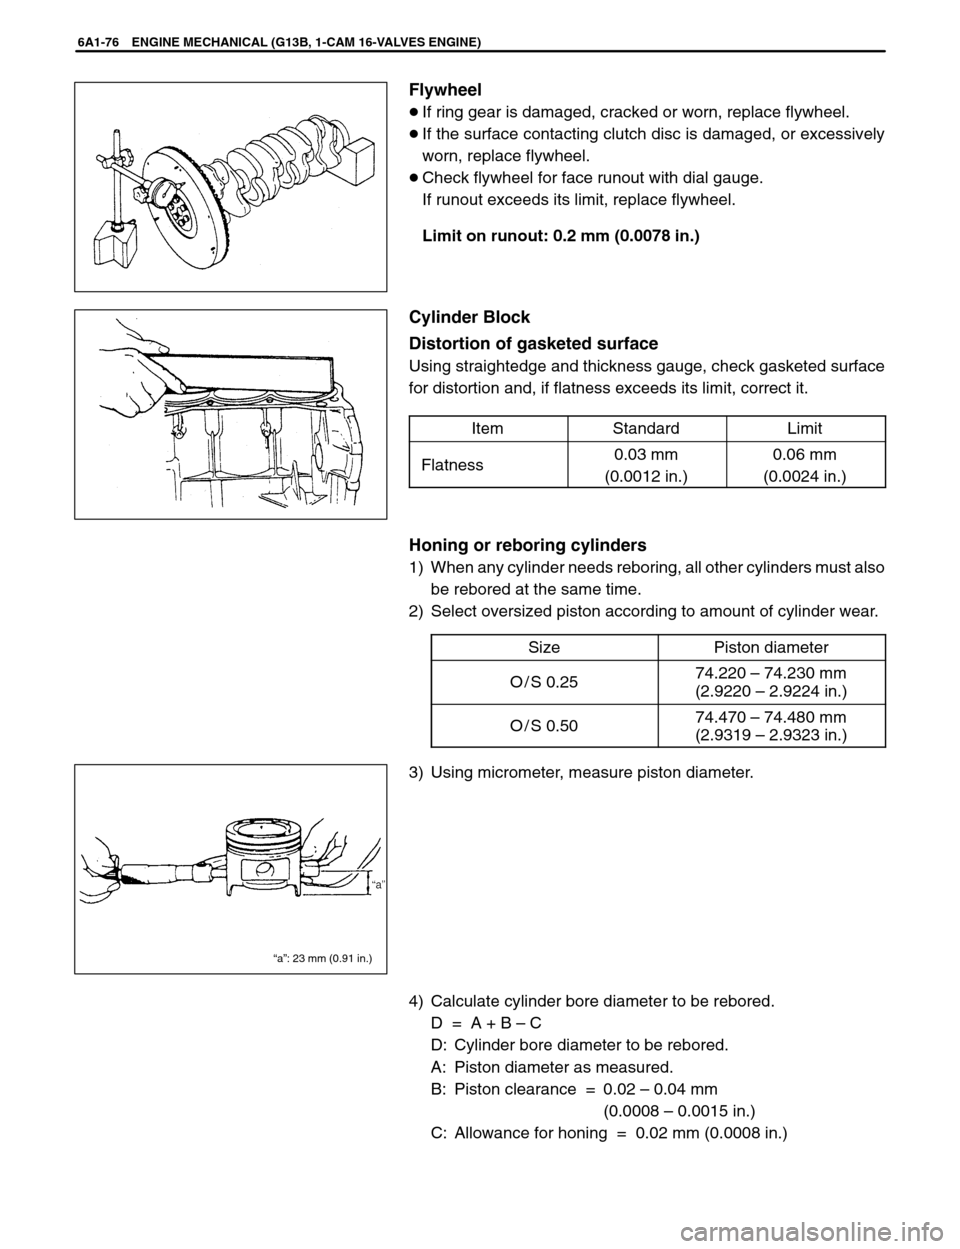
“a”: 23 mm (0.91 in.)
6A1-76 ENGINE MECHANICAL (G13B, 1-CAM 16-VALVES ENGINE)
Flywheel
�If ring gear is damaged, cracked or worn, replace flywheel.
�If the surface contacting clutch disc is damaged, or excessively
worn, replace flywheel.
�Check flywheel for face runout with dial gauge.
If runout exceeds its limit, replace flywheel.
Limit on runout: 0.2 mm (0.0078 in.)
Cylinder Block
Distortion of gasketed surface
Using straightedge and thickness gauge, check gasketed surface
for distortion and, if flatness exceeds its limit, correct it.
Item
StandardLimit
Flatness0.03 mm
(0.0012 in.)0.06 mm
(0.0024 in.)
Honing or reboring cylinders
1) When any cylinder needs reboring, all other cylinders must also
be rebored at the same time.
2) Select oversized piston according to amount of cylinder wear.
Size
Piston diameter
O / S 0.2574.220 – 74.230 mm
(2.9220 – 2.9224 in.)
O / S 0.5074.470 – 74.480 mm
(2.9319 – 2.9323 in.)
3) Using micrometer, measure piston diameter.
4) Calculate cylinder bore diameter to be rebored.
D = A + B – C
D: Cylinder bore diameter to be rebored.
A: Piston diameter as measured.
B: Piston clearance = 0.02 – 0.04 mm
(0.0008 – 0.0015 in.)
C: Allowance for honing = 0.02 mm (0.0008 in.)
Page 373 of 557
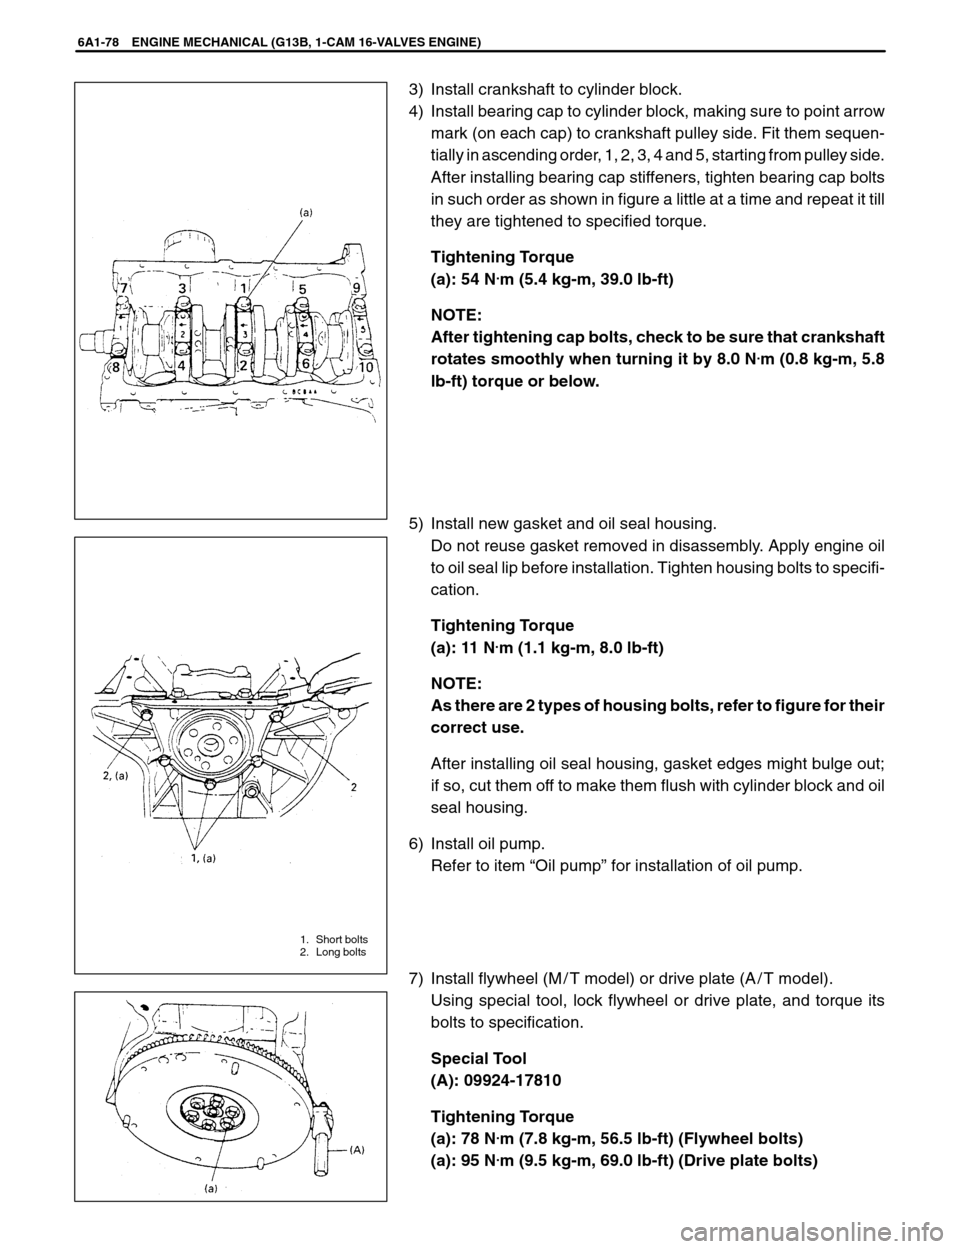
1. Short bolts
2. Long bolts
6A1-78 ENGINE MECHANICAL (G13B, 1-CAM 16-VALVES ENGINE)
3) Install crankshaft to cylinder block.
4) Install bearing cap to cylinder block, making sure to point arrow
mark (on each cap) to crankshaft pulley side. Fit them sequen-
tially in ascending order, 1, 2, 3, 4 and 5, starting from pulley side.
After installing bearing cap stiffeners, tighten bearing cap bolts
in such order as shown in figure a little at a time and repeat it till
they are tightened to specified torque.
Tightening Torque
(a): 54 N
.m (5.4 kg-m, 39.0 lb-ft)
NOTE:
After tightening cap bolts, check to be sure that crankshaft
rotates smoothly when turning it by 8.0 N
.m (0.8 kg-m, 5.8
lb-ft) torque or below.
5) Install new gasket and oil seal housing.
Do not reuse gasket removed in disassembly. Apply engine oil
to oil seal lip before installation. Tighten housing bolts to specifi-
cation.
Tightening Torque
(a): 11 N
.m (1.1 kg-m, 8.0 lb-ft)
NOTE:
As there are 2 types of housing bolts, refer to figure for their
correct use.
After installing oil seal housing, gasket edges might bulge out;
if so, cut them off to make them flush with cylinder block and oil
seal housing.
6) Install oil pump.
Refer to item “Oil pump” for installation of oil pump.
7) Install flywheel (M / T model) or drive plate (A / T model).
Using special tool, lock flywheel or drive plate, and torque its
bolts to specification.
Special Tool
(A): 09924-17810
Tightening Torque
(a): 78 N
.m (7.8 kg-m, 56.5 lb-ft) (Flywheel bolts)
(a): 95 N
.m (9.5 kg-m, 69.0 lb-ft) (Drive plate bolts)
Page 381 of 557
6B-4 ENGINE COOLING
COOLANT (WATER) TEMP. GAUGE
The coolant temp. gauge is included in engine coolant temp. (ECT)
sensor (1). This gauge activates a temp. meter in the instrument
cluster.
DIAGNOSIS
ConditionPossible CauseCorrection
Engine overheats�Loose or broken water pump belt
�Not enough coolant
�Faulty thermostat
�Faulty water pump
�Dirty or bent radiator fins
�Coolant leakage on cooling system
�Defective cooling fan motor
�Plugged radiator
�Faulty radiator cap
�Maladjusted ignition timing
�Dragging brakes
�Slipping clutchAdjust or replace.
Check coolant level and add as
necessary.
Replace.
Replace.
Clean or remedy.
Repair.
Check and replace as
necessary.
Check and replace radiator as
necessary.
Replace.
Adjust.
Adjust brake.
Adjust or replace.
Page 384 of 557
1. Radiator hose
2. Clamp
ENGINE COOLING 6B-7
ON-VEHICLE SERVICE
WARNING:
�Check to make sure that engine coolant temperature is
cold before removing any part of cooling system.
�Also be sure to disconnect negative cord from battery ter-
minal before removing any part.
COOLING WATER PIPES OR HOSES
REMOVAL
1) Drain cooling system.
2) To remove these pipes or hoses, loosen screw on each pipe or
hose clip and pull hose end off.
INSTALLATION
Install removed parts in reverse order of removal procedure, noting
the following.
�Tighten each clamp bolt securely.
�Refill cooling system with proper coolant, referring to description
on COOLANT of MAINTENANCE.
THERMOSTAT
REMOVAL
1) Disconnect negative cable at battery.
2) Drain cooling system and tighten drain plug.
3) Disconnect thermostat cap (1) from thermostat case (2).