2000 SUZUKI SWIFT starter
[x] Cancel search: starterPage 372 of 698

ENGINE GENERAL INFORMATION AND DIAGNOSIS 6-3
DTC P1500 ENGINE STARTER SIGNAL
CIRCUIT MALFUNCTION ........................... 6-110
DTC P1510 ECM BACK-UP POWER
SUPPLY MALFUNCTION ........................... 6-111
DTC P1600 SERIAL COMMUNICATION
PROBLEM BETWEEN ECM AND TCM...... 6-112
DTC P1717 A/T DRIVE RANGE (PARK/
NEUTRAL POSITION) SIGNAL CIRCUIT
MALFUNCTION .......................................... 6-114
TABLE B-1 FUEL INJECTOR CIRCUIT
CHECK ........................................................ 6-117
TABLE B-2 FUEL PUMP AND ITS CIRCUIT CHECK ....................................................... 6-118
TABLE B-3 FUEL PRESSURE CHECK ..... 6-120
TABLE B-4 IDLE AIR CONTROL
SYSTEM CHECK........................................ 6-122
TABLE B-5 A/C SIGNAL CIRCUITS
CHECK (VEHICLE WITH A/C) ................... 6-124
TABLE B-6 ELECTRIC LOAD SIGNAL
CIRCUIT CHECK ........................................ 6-126
TABLE B-7 RADIATOR FAN CONTROL
SYSTEM CHECK........................................ 6-128
SPECIAL TOOL ............................................. 6-130
Page 388 of 698

ENGINE GENERAL INFORMATION AND DIAGNOSIS 6-19
P1451 Barometric pressure sen-
sor performance problemDifference between manifold absolute
pressure (MAP sensor value) and baro-
metric pressure (barometric pressure sen-
sor value) is larger than specification
during cranking.2 driving
cyclesNot
applicable
P1500 Starter signal circuit mal-
functionStarter signal is not inputted from engine
cranking till its start and after or it is always
inputted2 driving
cyclesNot
applicable
P1510 ECM backup power source
malfunctionNo backup power after starting engine 1 driving
cycleNot
applicable
P1600 Serial communication prob-
lem between ECM and
TCMNo signal or check sum error while engine
running1 driving
cycleNot
applicable
P1717 AT D-range signal circuit
malfunctionNo “D” range (park/neutral position signal)
is inputted while vehicle running2 driving
cyclesNot
applicable DTC
NO.DETECTING ITEM DETECTING CONDITION
(DTC will set when detecting :)MIL
(vehicle
with immo-
bilizer indi-
cator lamp)MIL
(vehicle
without
immobi-
lizer indica-
tor lamp)
DTC NO. DETECTING ITEM DETECTING CONDITION
(DTC will set when detecting :)MIL
✱P0702 Transmission Control System Electrical
Refer to Section 7B ✱P0705 Transmission Range Sensor Circuit Malfunc-
tion
✱P0710 Transmission Fluid Temperature Sensor Cir-
cuit Malfunction
✱P0715 Input/turbine Speed Sensor Circuit Malfunc-
tion
✱P0720 Output Shaft Speed Sensor Circuit Malfunc-
tion
✱P0725 Engine Speed Input Circuit Malfunction
✱P0730 Incorrect Gear Ratio
✱P0741 Torque Converter Clutch System Perfor-
mance or Stuck Off
✱P0743 Torque Converter Clutch System Electrical
✱P0753 Shift Solenoid A Electrical
✱P0758 Shift Solenoid B Electrical
✱P0763 Shift Solenoid C Electrical
✱P0768 Shift Solenoid D Electrical
✱P0773 Shift Solenoid E Electrical
✱P1700 Throttle Position Signal Input Malfunction
✱P1702 Internal Control Module Memory Check Some
Error
✱P1709 Engine Coolant Temperature Signal Input
Malfunction
Page 460 of 698

ENGINE GENERAL INFORMATION AND DIAGNOSIS 6-91
DTC P0340 (DTC NO.15) CAMSHAFT POSITION (CMP) SENSOR CIRCUIT MAL-
FUNCTION
WIRING DIAGRAM / CIRCUIT DESCRIPTION
REFERENCE
Connect oscilloscope between terminals E21-11 of ECM connector connected to ECM and body ground and
check CMP sensor signal. When CKP circuit is failed (open or short), ECM identify the cylinder only by CMP
sensor signal.
DTC CONFIRMATION PROCEDURE
1) Clear DTC.
2) Start engine and keep it at idle for 1 min.
3) Select “DTC” mode on scan tool and check DTC.
ECM
5V+B
BLK/RED
RED/YEL
BLK/ORN
C42 (31P) C41 (24P) G02 (17P)1 2 3 4 5 6 7 8 9
10 11 12 13 14 15 16 17 18 19 20 21
22 23 24 25 26 28 27 29 30 315 6
1 2 3 4 5 6 7
11 12
9 10 11 13 12 14 15 16
16 171 2
7 8
13 14 3 4
9 10
15 17 188
19 20 21 22 23 24
C42-11
DTC DETECTING CONDITION POSSIBLE CAUSE
No CMP sensor signal during engine running (CKP
sensor signal is inputted).CMP sensor circuit open or short.
Signal rotor teeth damaged.
CMP sensor malfunction, foreign material being
attached or improper installation.
Incorrect starter signal.
ECM malfunction.
1. No.1 cylinder 3. No.3 cylinder [A] : Oscilloscope Waveforms [C] : CKP sensor signal
2. No.2 cylinder 4. No.4 cylinder [B] : Waveforms at specified idle speed [D] : CMP sensor signal
Page 479 of 698

6-110 ENGINE GENERAL INFORMATION AND DIAGNOSIS
DTC P1500 ENGINE STARTER SIGNAL CIRCUIT MALFUNCTION
CIRCUIT DESCRIPTION
DTC CONFIRMATION PROCEDURE
1) Turn ignition switch OFF.
2) Clear DTC with ignition switch ON, crank engine and run it at idle for 3 min.
3) Check pending DTC in “ON BOARD TEST” or “PENDING DTC” mode and DTC in “DTC” mode.
INSPECTION
1. Ignition switch 2. Transmission range switch (A/T) 3. Starter motor
[A] : Case of TYPE A is shown (See NOTE) [B] : Case of TYPE B is shown (See NOTE)
321
BLK/YEL
C42 (31P) C41 (24P) G02 (17P)1 2 3 4 5 6 7 8 9
10 11 12 13 14 15 16 17 18 19 20 21
22 23 24 25 26 28 27 29 30 315 6
1 2 3 4 5 6 7
11 12
9 10 11 13 12 14 15 16
16 171 2
7 8
13 14 3 4
9 10
15 17 188
19 20 21 22 23 24
ECM
C41-7 [A]
C41-20 [B]
NOTE:
For TYPE A and TYPE B, refer to NOTE in “ECM VOLTAGE VALUES TABLE” for applicable model.
DTC DETECTING CONDITION POSSIBLE CAUSE
Low voltage at terminal C41-7 (Case of TYPE A. See
NOTE) or C41-20 (Case of TYPE B. See NOTE) when
cranking engine or
High voltage at terminal C41-7 (Case of TYPE A. See
NOTE) or C41-20 (Case of TYPE B. See NOTE) after
starting engine.
✱2 driving cycle detection logic, continuous monitoring.“BLK/YEL” circuit open
ECM malfunction
Step Action Yes No
1Was “ENGINE DIAG. FLOW TABLE” performed? Go to Step 2. Go to “ENGINE DIAG.
FLOW TABLE”.
2 Check Terminal Voltage.
1) Check for voltage at terminal C41-7 (Case of
TYPE A. See NOTE) or C41-20 (Case of
TYPE B. See NOTE) of ECM connector con-
nected, under following condition.
While engine cranking : 6 – 10 V
After starting engine : 0 V
Is voltage as specified?Poor C41-7 (Case of TYPE A. See
NOTE) or C41-20 (Case of TYPE B.
See NOTE)
connection or intermittent trouble.
Check for intermittent referring to
“Intermittent and Poor Connection”
in Section 0A.
If wire and connections are OK,
substitute a known-good ECM and
recheck.“BLK/YEL” circuit open.
Page 626 of 698

ENGINE AND EMISSION CONTROL SYSTEM 6E1-5
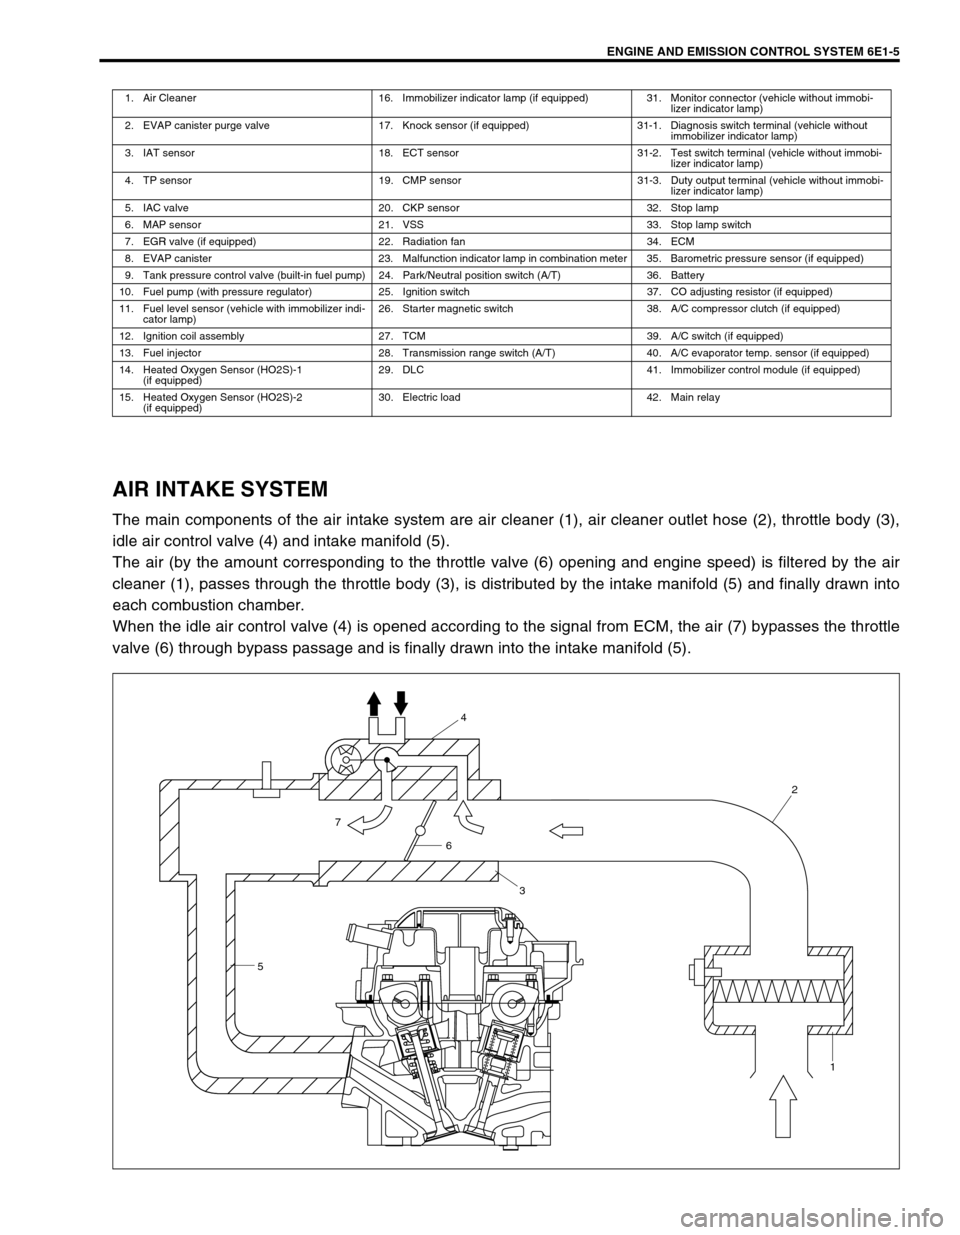
AIR INTAKE SYSTEM
The main components of the air intake system are air cleaner (1), air cleaner outlet hose (2), throttle body (3),
idle air control valve (4) and intake manifold (5).
The air (by the amount corresponding to the throttle valve (6) opening and engine speed) is filtered by the air
cleaner (1), passes through the throttle body (3), is distributed by the intake manifold (5) and finally drawn into
each combustion chamber.
When the idle air control valve (4) is opened according to the signal from ECM, the air (7) bypasses the throttle
valve (6) through bypass passage and is finally drawn into the intake manifold (5).
1. Air Cleaner 16. Immobilizer indicator lamp (if equipped) 31. Monitor connector (vehicle without immobi-
lizer indicator lamp)
2. EVAP canister purge valve 17. Knock sensor (if equipped) 31-1. Diagnosis switch terminal (vehicle without
immobilizer indicator lamp)
3. IAT sensor 18. ECT sensor 31-2. Test switch terminal (vehicle without immobi-
lizer indicator lamp)
4. TP sensor 19. CMP sensor 31-3. Duty output terminal (vehicle without immobi-
lizer indicator lamp)
5. IAC valve 20. CKP sensor 32. Stop lamp
6. MAP sensor 21. VSS 33. Stop lamp switch
7. EGR valve (if equipped) 22. Radiation fan 34. ECM
8. EVAP canister 23. Malfunction indicator lamp in combination meter 35. Barometric pressure sensor (if equipped)
9. Tank pressure control valve (built-in fuel pump) 24. Park/Neutral position switch (A/T) 36. Battery
10. Fuel pump (with pressure regulator) 25. Ignition switch 37. CO adjusting resistor (if equipped)
11. Fuel level sensor (vehicle with immobilizer indi-
cator lamp)26. Starter magnetic switch 38. A/C compressor clutch (if equipped)
12. Ignition coil assembly 27. TCM 39. A/C switch (if equipped)
13. Fuel injector 28. Transmission range switch (A/T) 40. A/C evaporator temp. sensor (if equipped)
14. Heated Oxygen Sensor (HO2S)-1
(if equipped)29. DLC 41. Immobilizer control module (if equipped)
15. Heated Oxygen Sensor (HO2S)-2
(if equipped)30. Electric load 42. Main relay
54
2
1
6
3
7
Page 674 of 698

6G-2 CRANKING SYSTEM
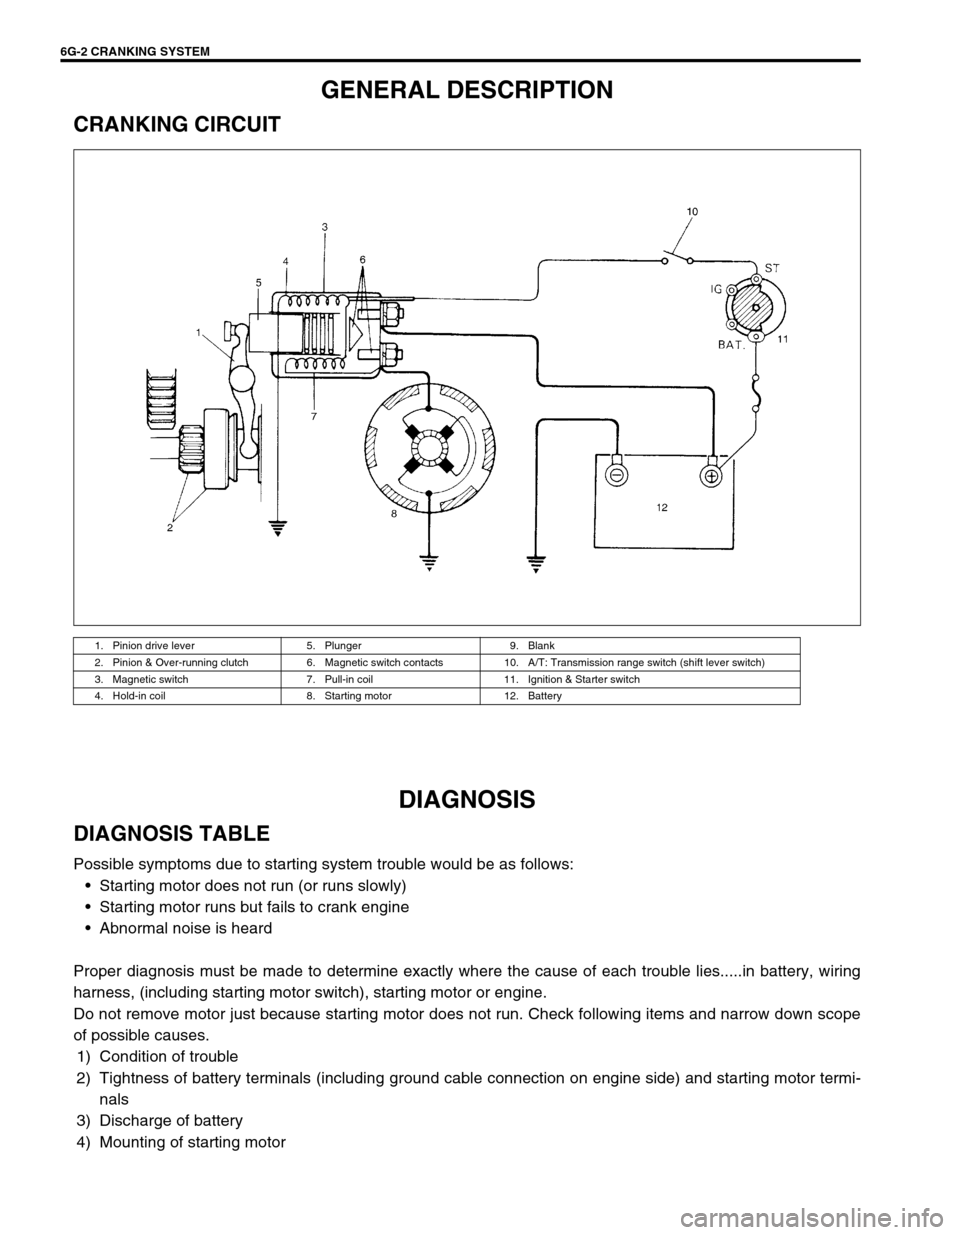
GENERAL DESCRIPTION
CRANKING CIRCUIT
DIAGNOSIS
DIAGNOSIS TABLE
Possible symptoms due to starting system trouble would be as follows:
Starting motor does not run (or runs slowly)
Starting motor runs but fails to crank engine
Abnormal noise is heard
Proper diagnosis must be made to determine exactly where the cause of each trouble lies.....in battery, wiring
harness, (including starting motor switch), starting motor or engine.
Do not remove motor just because starting motor does not run. Check following items and narrow down scope
of possible causes.
1) Condition of trouble
2) Tightness of battery terminals (including ground cable connection on engine side) and starting motor termi-
nals
3) Discharge of battery
4) Mounting of starting motor
1. Pinion drive lever 5. Plunger 9. Blank
2. Pinion & Over-running clutch 6. Magnetic switch contacts 10. A/T: Transmission range switch (shift lever switch)
3. Magnetic switch 7. Pull-in coil 11. Ignition & Starter switch
4. Hold-in coil 8. Starting motor 12. Battery
Page 677 of 698

CRANKING SYSTEM 6G-5
NO-LOAD PERFORMANCE TEST
Connect battery and ammeter to starter as shown.
Check that starter rotates smoothly and steadily with pinion mov-
ing out. Check that ammeter indicates specified current.
Specified current (No-load performance test)
: 90 A MAX. at 11 V
ON-VEHICLE SERVICE
STARTING MOTOR
DISMOUNTING
1) Disconnect negative (–) battery lead at battery.
2) Disconnect magnetic switch lead wire (1) and battery cable (2) from starting motor terminals.
3) Remove starting motor mount bolt (3) and nut (4).
4) Remove starting motor (5).
REMOUNTING
Reverse the dismounting procedure.
Tightening torque
Starting motor battery cable nut (a) : 10 N·m (1.0 kg-m, 7.5 lb-ft)