2000 SUZUKI SWIFT service
[x] Cancel search: servicePage 636 of 698

ENGINE AND EMISSION CONTROL SYSTEM 6E1-15
ON-VEHICLE SERVICE
ACCELERATOR CABLE ADJUSTMENT
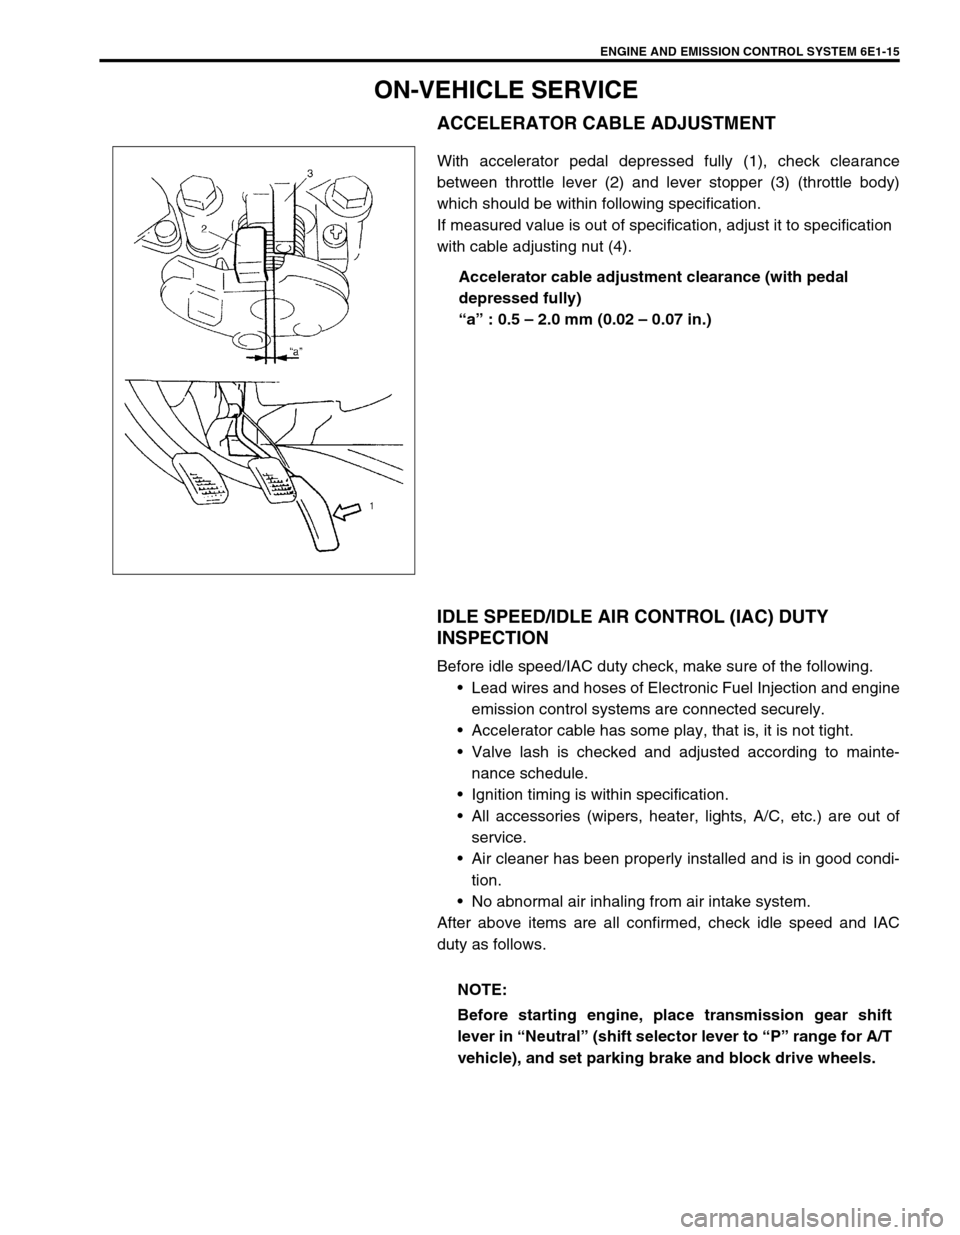
With accelerator pedal depressed fully (1), check clearance
between throttle lever (2) and lever stopper (3) (throttle body)
which should be within following specification.
If measured value is out of specification, adjust it to specification
with cable adjusting nut (4).
Accelerator cable adjustment clearance (with pedal
depressed fully)
“a” : 0.5 – 2.0 mm (0.02 – 0.07 in.)
IDLE SPEED/IDLE AIR CONTROL (IAC) DUTY
INSPECTION
Before idle speed/IAC duty check, make sure of the following.
Lead wires and hoses of Electronic Fuel Injection and engine
emission control systems are connected securely.
Accelerator cable has some play, that is, it is not tight.
Valve lash is checked and adjusted according to mainte-
nance schedule.
Ignition timing is within specification.
All accessories (wipers, heater, lights, A/C, etc.) are out of
service.
Air cleaner has been properly installed and is in good condi-
tion.
No abnormal air inhaling from air intake system.
After above items are all confirmed, check idle speed and IAC
duty as follows.
NOTE:
Before starting engine, place transmission gear shift
lever in “Neutral” (shift selector lever to “P” range for A/T
vehicle), and set parking brake and block drive wheels.
Page 637 of 698

6E1-16 ENGINE AND EMISSION CONTROL SYSTEM
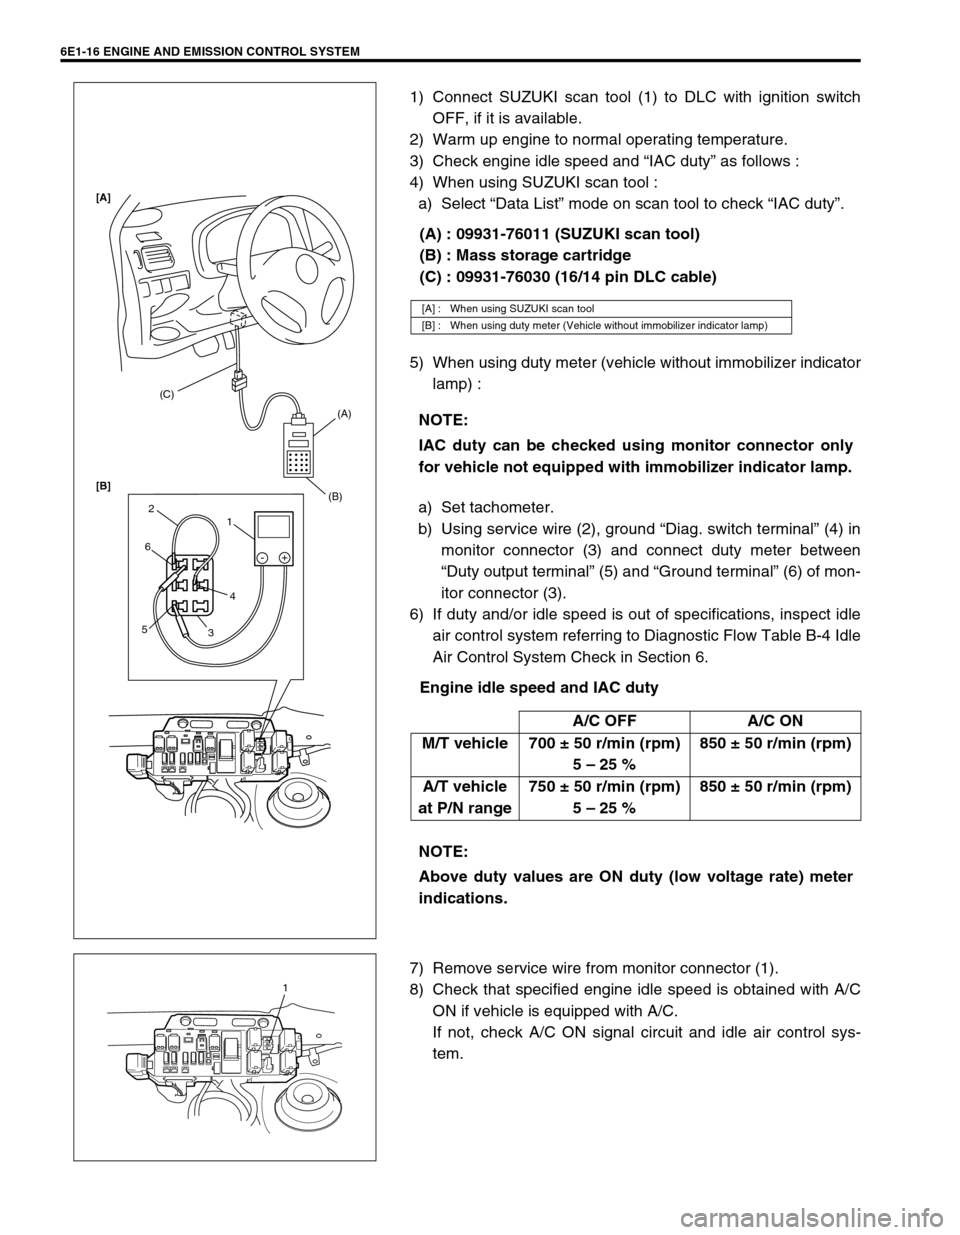
1) Connect SUZUKI scan tool (1) to DLC with ignition switch
OFF, if it is available.
2) Warm up engine to normal operating temperature.
3) Check engine idle speed and “IAC duty” as follows :
4) When using SUZUKI scan tool :
a) Select “Data List” mode on scan tool to check “IAC duty”.
(A) : 09931-76011 (SUZUKI scan tool)
(B) : Mass storage cartridge
(C) : 09931-76030 (16/14 pin DLC cable)
5) When using duty meter (vehicle without immobilizer indicator
lamp) :
a) Set tachometer.
b) Using service wire (2), ground “Diag. switch terminal” (4) in
monitor connector (3) and connect duty meter between
“Duty output terminal” (5) and “Ground terminal” (6) of mon-
itor connector (3).
6) If duty and/or idle speed is out of specifications, inspect idle
air control system referring to Diagnostic Flow Table B-4 Idle
Air Control System Check in Section 6.
Engine idle speed and IAC duty
7) Remove service wire from monitor connector (1).
8) Check that specified engine idle speed is obtained with A/C
ON if vehicle is equipped with A/C.
If not, check A/C ON signal circuit and idle air control sys-
tem.
[A] : When using SUZUKI scan tool
[B] : When using duty meter (Vehicle without immobilizer indicator lamp)
NOTE:
IAC duty can be checked using monitor connector only
for vehicle not equipped with immobilizer indicator lamp.
A/C OFF A/C ON
M/T vehicle 700 ± 50 r/min (rpm)
5 – 25 %850 ± 50 r/min (rpm)
A/T vehicle
at P/N range750 ± 50 r/min (rpm)
5 – 25 %850 ± 50 r/min (rpm)
NOTE:
Above duty values are ON duty (low voltage rate) meter
indications.
(C)
(A)
(B)
1 2
6
54
3-+
[A]
[B]
1
Page 646 of 698

ENGINE AND EMISSION CONTROL SYSTEM 6E1-25
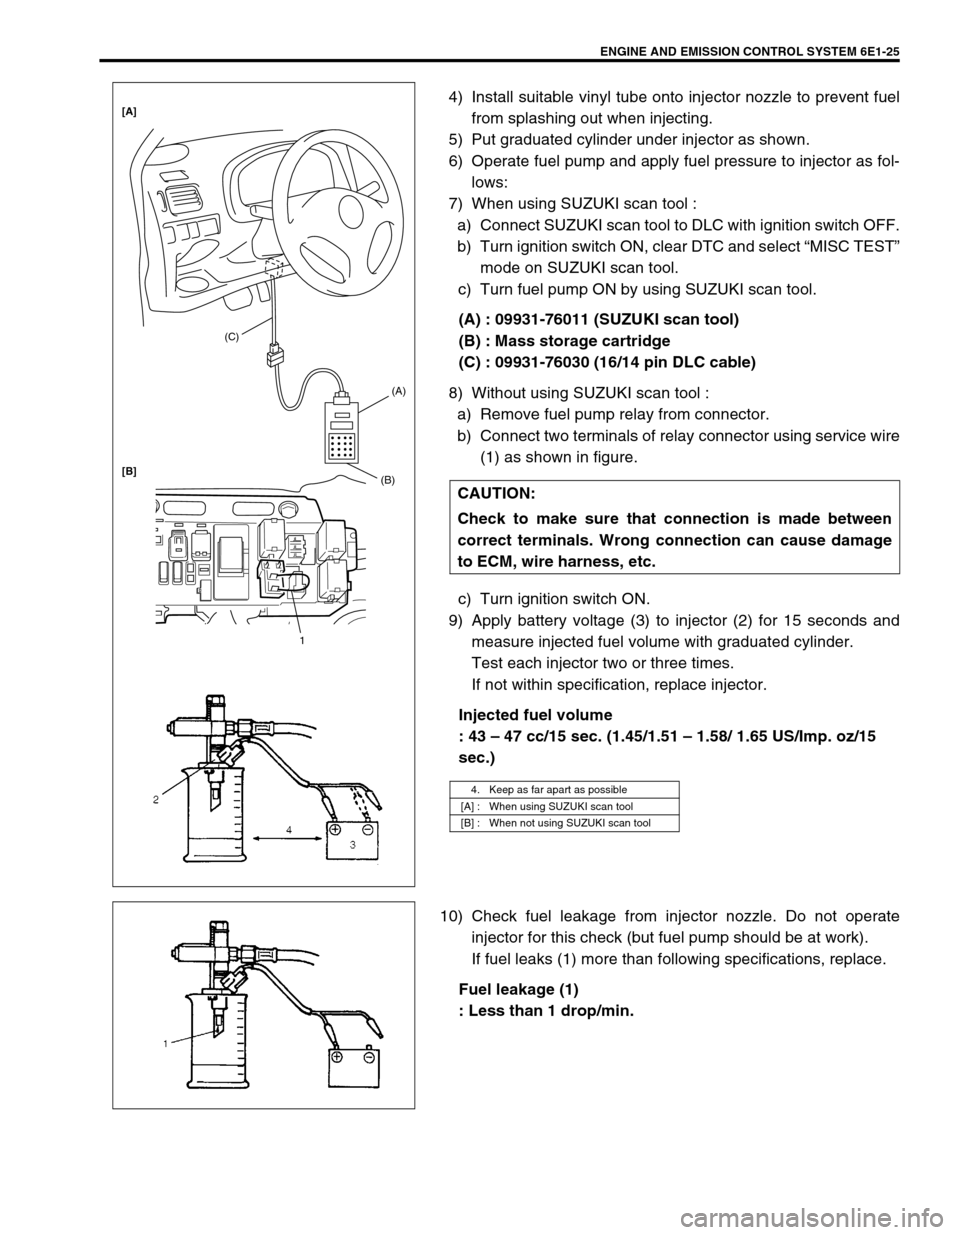
4) Install suitable vinyl tube onto injector nozzle to prevent fuel
from splashing out when injecting.
5) Put graduated cylinder under injector as shown.
6) Operate fuel pump and apply fuel pressure to injector as fol-
lows:
7) When using SUZUKI scan tool :
a) Connect SUZUKI scan tool to DLC with ignition switch OFF.
b) Turn ignition switch ON, clear DTC and select “MISC TEST”
mode on SUZUKI scan tool.
c) Turn fuel pump ON by using SUZUKI scan tool.
(A) : 09931-76011 (SUZUKI scan tool)
(B) : Mass storage cartridge
(C) : 09931-76030 (16/14 pin DLC cable)
8) Without using SUZUKI scan tool :
a) Remove fuel pump relay from connector.
b) Connect two terminals of relay connector using service wire
(1) as shown in figure.
c) Turn ignition switch ON.
9) Apply battery voltage (3) to injector (2) for 15 seconds and
measure injected fuel volume with graduated cylinder.
Test each injector two or three times.
If not within specification, replace injector.
Injected fuel volume
: 43 – 47 cc/15 sec. (1.45/1.51 – 1.58/ 1.65 US/Imp. oz/15
sec.)
10) Check fuel leakage from injector nozzle. Do not operate
injector for this check (but fuel pump should be at work).
If fuel leaks (1) more than following specifications, replace.
Fuel leakage (1)
: Less than 1 drop/min. CAUTION:
Check to make sure that connection is made between
correct terminals. Wrong connection can cause damage
to ECM, wire harness, etc.
4. Keep as far apart as possible
[A] : When using SUZUKI scan tool
[B] : When not using SUZUKI scan tool
(C)
(A)
(B)
1 [A]
[B]
Page 663 of 698

IGNITION SYSTEM (ELECTRONIC IGNITION SYSTEM) 6F1-1
6G
6F2
6G
6H
6K
6F1
7A
7A1
7A1
7D
7E
7F
8A
8B
8C
8D
8E
9
10
10A
10B
SECTION 6F1
IGNITION SYSTEM
(ELECTRONIC IGNITION SYSTEM)
CONTENTS
GENERAL DESCRIPTION ............................. 6F1-2
DIAGNOSIS .................................................... 6F1-3
ON-VEHICLE SERVICE ................................. 6F1-5
IGNITION SPARK TEST ............................. 6F1-5
HIGH-TENSION CORDS ............................ 6F1-5
SPARK PLUGS ........................................... 6F1-6IGNITION COIL ASSEMBLY
(INCLUDING IGNITOR) .............................. 6F1-7
CRANKSHAFT POSITION SENSOR
(CKP SENSOR) .......................................... 6F1-7
IGNITION TIMING ...................................... 6F1-8
SPECIAL TOOL ............................................. 6F1-9
WARNING:
For vehicles equipped with Supplemental Restraint (Air Bag) System:
Service on and around the air bag system components or wiring must be performed only by an
authorized SUZUKI dealer. Refer to “Air Bag System Components and Wiring Location View” under
“General Description” in air bag system section in order to confirm whether you are performing ser-
vice on or near the air bag system components or wiring. Please observe all WARNINGS and “Ser-
vice Precautions” under “On-Vehicle Service” in air bag system section before performing service
on or around the air bag system components or wiring. Failure to follow WARNINGS could result in
unintentional activation of the system or could render the system inoperative. Either of these two
conditions may result in severe injury.
Technical service work must be started at least 90 seconds after the ignition switch is turned to the
“LOCK” position and the negative cable is disconnected from the battery. Otherwise, the system
may be activated by reserve energy in the Sensing and Diagnostic Module (SDM).
Page 667 of 698

IGNITION SYSTEM (ELECTRONIC IGNITION SYSTEM 6F1-5
ON-VEHICLE SERVICE
IGNITION SPARK TEST
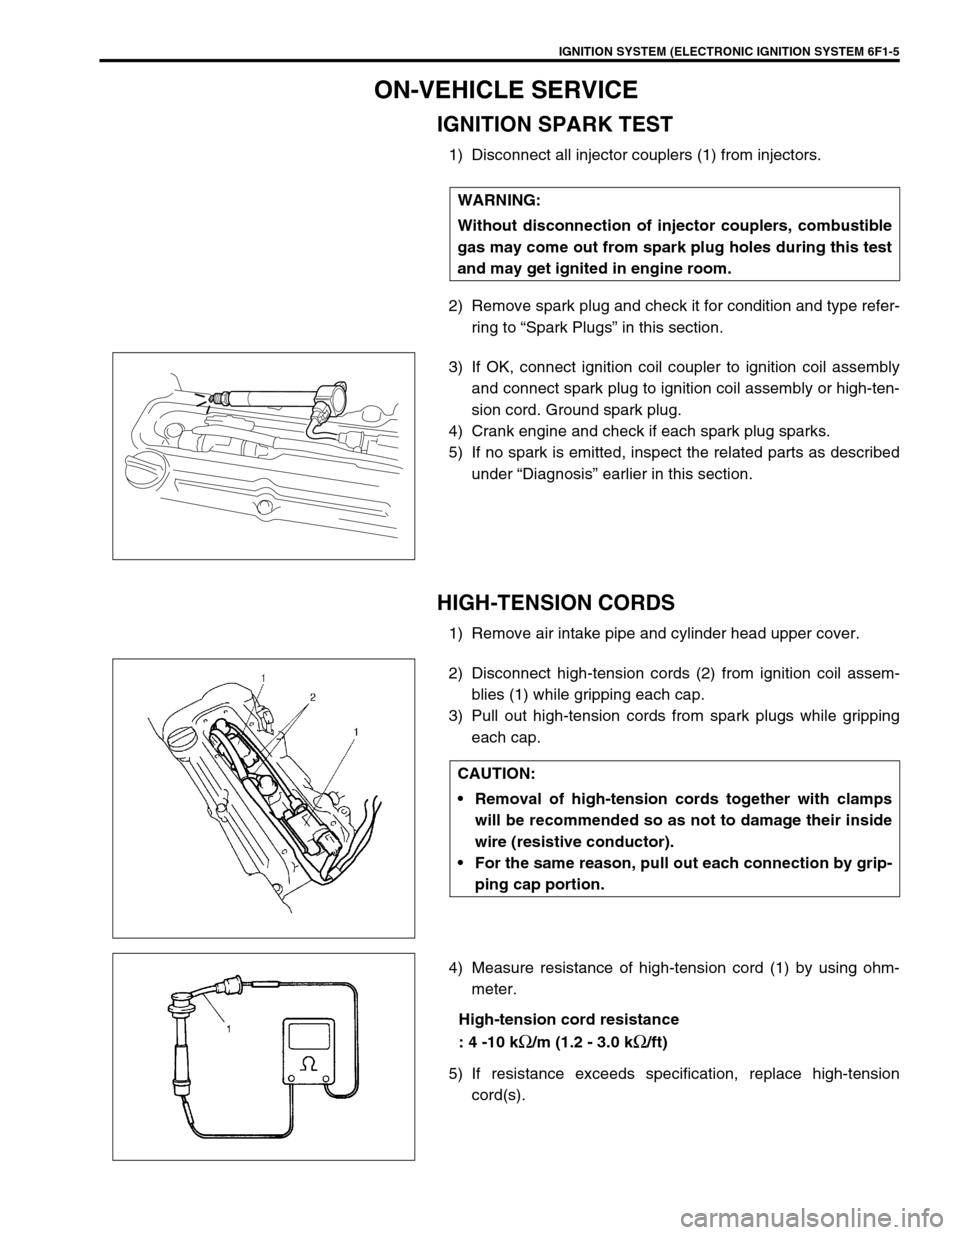
1) Disconnect all injector couplers (1) from injectors.
2) Remove spark plug and check it for condition and type refer-
ring to “Spark Plugs” in this section.
3) If OK, connect ignition coil coupler to ignition coil assembly
and connect spark plug to ignition coil assembly or high-ten-
sion cord. Ground spark plug.
4) Crank engine and check if each spark plug sparks.
5) If no spark is emitted, inspect the related parts as described
under “Diagnosis” earlier in this section.
HIGH-TENSION CORDS
1) Remove air intake pipe and cylinder head upper cover.
2) Disconnect high-tension cords (2) from ignition coil assem-
blies (1) while gripping each cap.
3) Pull out high-tension cords from spark plugs while gripping
each cap.
4) Measure resistance of high-tension cord (1) by using ohm-
meter.
High-tension cord resistance
: 4 -10 k
Ω/m (1.2 - 3.0 kΩ/ft)
5) If resistance exceeds specification, replace high-tension
cord(s). WARNING:
Without disconnection of injector couplers, combustible
gas may come out from spark plug holes during this test
and may get ignited in engine room.
CAUTION:
Removal of high-tension cords together with clamps
will be recommended so as not to damage their inside
wire (resistive conductor).
For the same reason, pull out each connection by grip-
ping cap portion.
Page 670 of 698

6F1-8 IGNITION SYSTEM (ELECTRONIC IGNITION SYSTEM)
IGNITION TIMING
INSPECTION
1) When using SUZUKI scan tool, connect SUZUKI scan tool to
DLC with ignition switch OFF.
Special tool
(A) : 09931-76011 (SUZUKI scan tool)
(B) : Mass storage cartridge
(C) : 09931-76030 (16/14 pin DLC cable)
2) Start engine and warm it up to normal operating tempera-
ture.
3) Make sure that all of electrical loads except ignition are
switched off.
4) Check to be sure that idle speed is within specification.
(Refer to Section 6E1)
5) Fix ignition timing to initial one as follows.
Select “MISC” mode on SUZUKI scan tool and fix ignition
timing to initial one.
If scan tool is not available (vehicle without immobilizer indi-
cator lamp), connect D and E terminals of monitor connector
(1) by using service wire so that ignition timing is fixed on ini-
tial one.
6) Using timing light (1), check that ignition timing is within
specification.
Initial ignition timing (test switch terminal grounded or
fixed with SUZUKI scan tool)
: 5
± 3° BTDC at idle speed
Ignition order
: 1-3-4-2 NOTE:
Ignition timing is not adjustable. If ignition timing is
out of specification, check system related parts.
Before starting engine, place transmission gear shift
lever in “Neutral” (shift selector lever to “P” range for
A/T model), and set parking brake.
(C)
(A)
(B)
D
E1
Page 671 of 698

IGNITION SYSTEM (ELECTRONIC IGNITION SYSTEM 6F1-9
7) If ignition timing is out of specification, check the followings:
CKP sensor
CKP sensor plate
TP sensor
Test switch signal circuit
VSS
Timing chain cover installation
8) After checking Initial Ignition Timing, release ignition timing
fixation by using SUZUKI scan tool or disconnect service
wire from monitor connector.
9) With engine idling (test switch terminal ungrounded, throttle
opening at closed position and car stopped), check that igni-
tion timing is about 7°–17° BTDC. (Constant variation within
a few degrees from 7°–17° indicates no abnormality but
proves operation of electronic timing control system.) Also,
check that increasing engine speed advances ignition timing.
If above check results are not satisfactory, check CKP sen-
sor, test switch terminal circuit and ECM.
SPECIAL TOOL
09931-76011 09931-76030
SUZUKI scan tool kit
(See NOTE.)Mass storage cartridge 16/14 pin DLC cable
NOTE:
This kit includes the following items.
1. Storage case, 2. Operator’s manual, 3. Tech 1A, 4. DLC cable (14/26 pin, 09931-76040),
5. Test lead/probe, 6. Power source cable, 7. DLC cable adaptor, 8. Self-test adaptor
Page 673 of 698

CRANKING SYSTEM 6G-1
6F1
6F2
6H
6K
6G
7A1
7B1
7C1
7D
7E
7F
8A
8B
8C
8D
8E
9
10
10A
10B
SECTION 6G
CRANKING SYSTEM
CONTENTS
GENERAL DESCRIPTION .............................. 6G-2
CRANKING CIRCUIT ................................... 6G-2
DIAGNOSIS ..................................................... 6G-2
DIAGNOSIS TABLE ..................................... 6G-2
PERFORMANCE TEST ............................... 6G-4
PULL-IN TEST ......................................... 6G-4
HOLD-IN TEST ........................................ 6G-4
PLUNGER AND PINION RETURN TEST 6G-4
NO-LOAD PERFORMANCE TEST .......... 6G-5ON-VEHICLE SERVICE ...................................6G-5
STARTING MOTOR .....................................6G-5
DISMOUNTING.........................................6G-5
REMOUNTING..........................................6G-5
DISASSEMBLY AND REASSEMBLY .......6G-6
SPECIFICATION ..............................................6G-8
1.0 kW TYPE.............................................6G-8
1.2 kW TYPE.............................................6G-8
REQUIRED SERVICE MATERIAL...................6G-8
WARNING:
For vehicles equipped with Supplement Restraint (Air Bag) System:
Service on and around the air bag system components or wiring must be performed only by an
authorized SUZUKI dealer. Refer to AIR BAG SYSTEM COMPONENTS and WIRING LOCATION VIEW
under DIAGNOSIS in air bag system section in order to confirm whether you are performing service
on or near the air bag system components or wiring. Please observe all WARNINGS and SERVICE
PRECAUTIONS under PRECAUTIONS in air bag system section before performing service on or
around the air bag system components or wiring. Failure to follow WARNINGS could result in unin-
tentional activation of the system or could render the system inoperative. Either of these two condi-
tions may result in severe injury.
Technical service work must be started at least 90 seconds after the ignition switch is turned to the
“LOCK” position and the negative cable is disconnected from the battery. Otherwise, the system
may be activated by reserve energy in the Sensing and Diagnostic Module (SDM).
NOTE:
Starting motor varies depending on specifications, etc. Therefore, be sure to check model and speci-
fication of the vehicle being serviced before replacing parts.