Page 33 of 118
Downloaded from www.Manualslib.com manuals search engine TOP AND FRONT OF ENGINE
Cylinder head gasket
11
11 - 7
Fit tool Mot. 1159 between the sub-frame and the
cylinder block.
NOTE: cut the base of Mot. 1159 by 30 mm.
Remove the engine mountings Mot. 1453.
99023R2
99024R2
Page 34 of 118
Downloaded from www.Manualslib.com manuals search engine TOP AND FRONT OF ENGINE
Cylinder head gasket
11
11 - 8
Remove:
– the air filter assembly and the air inlet pipe,
– the air ducts (A) and (B),
– the injector connectors and the heater plugs,
– the connectors (1) and (2),
– the oil rebreather pipe (3),
16871R
Page 35 of 118
Downloaded from www.Manualslib.com manuals search engine TOP AND FRONT OF ENGINE
Cylinder head gasket
11
11 - 9
– the brake servo vacuum pipe,
– the pipes on the cylinder head water outlet unit and
the sensor connections (1),
– the pipes (3),– the fuel pipes (4) (fit cleanliness plugs) and the wiring
mounting (5),
– the cylinder marking sensor (7),
16179R
16869R116870R5
16181R
Page 36 of 118
Downloaded from www.Manualslib.com manuals search engine TOP AND FRONT OF ENGINE
Cylinder head gasket
11
11-10
– the low pressure pump connector,
– the bolts (1) and (2),
– the alternator mounting bolts and remove the
alternator, then remove the bolts (3).
Loosen the exhaust pipe clamp mounting.
Remove:
– the catalytic converter mountings on the pre-catalytic
converter,
– the pre-catalytic converter stay (1),
– the mounting (6),
– the oil supply pipe at (7) and remove towards the
bulkhead,
– the pre-catalytic converter mountings to the turbo,
– the catalytic converter removing the engine towards
the cooling system,
– the oil return pipe (8),– the bolt (9) and loosen the other mounting bolts on
the lower timing cover without removing them,
– cylinder head bolts.
Release the cylinder head by setting aside the lower
part of the camshaft housing, without causing the
cylinder head to turn, since this is centred by the two
dowels.
PRF1103
16155R
16156R2
12521-1R3
Page 37 of 118

Downloaded from www.Manualslib.com manuals search engine TOP AND FRONT OF ENGINE
Cylinder head gasket
11
11-11
CLEANING
It is very important not to scratch the gasket faces
of any aluminium component.
Use the Décapjoint product to dissolve any part of the
gasket which remains attached.
W ear gloves whilst carrying out the following
operation.
– Apply the product to the parts to be cleaned; wait
about ten minutes, then remove it using a wooden
spatula.
W e must draw your attention to the care which
must be taken during this operation, to prevent
any foreign bodies from being introduced into the
oil ways (ducts located in the cylinder block and in
the cylinder head).
CHECKING THE GASKET FACE
Check for gasket face bow using a straight edge and a
set of shims.
Maximum deformation: 0.05 mm.
No regrinding of the cylinder head is permitted.
Check the cylinder head for cracks.Checking piston protrusion
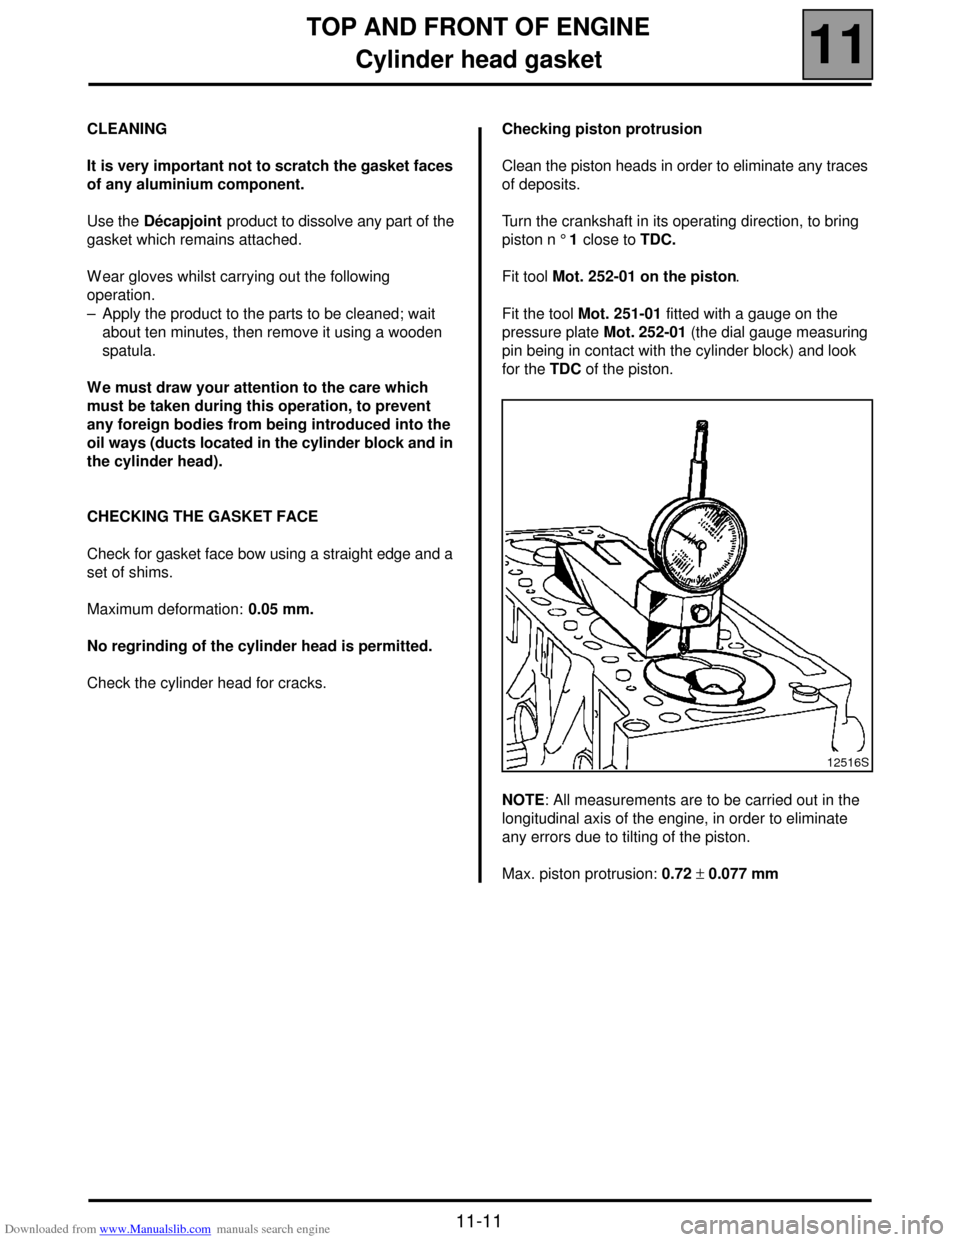
Clean the piston heads in order to eliminate any traces
of deposits.
Turn the crankshaft in its operating direction, to bring
piston n ° 1 close to TDC.
Fit tool Mot. 252-01 on the piston.
Fit the tool Mot. 251-01 fitted with a gauge on the
pressure plate Mot. 252-01 (the dial gauge measuring
pin being in contact with the cylinder block) and look
for the TDC of the piston.
NOTE: All measurements are to be carried out in the
longitudinal axis of the engine, in order to eliminate
any errors due to tilting of the piston.
Max. piston protrusion: 0.72 ± 0.077 mm
12516S
Page 38 of 118
Downloaded from www.Manualslib.com manuals search engine TOP AND FRONT OF ENGINE
Cylinder head gasket
11
11-12
REFITTING (special notes)
Fit the cylinder head gasket. This is centred by two
dowels.
Bring the pistons to mid-stroke position to prevent
them from coming into contact with the valves as the
cylinder head is tightened.
Centre the cylinder head on the dowels.
Lubricate the threads and under the heads of the
mounting bolts.
Tighten the cylinder head using an angular tightening
wrench (see section '07 "Tightening the cylinder
head").
Tightening procedure for the automatic tensioner
mounting
Offer up the three touching bolts then apply a torque of
2.5 daN.m respecting the order shown below.
Refitting is the reverse of removal.
Refit the timing belt, (see procedure described in
section 11 "Timing belt").
Fill and bleed the cooling circuit, (see section 19
"Filling and Bleeding").
To reprime the diesel circuit, consult section 13, "Fuel
filter".
PRF1102
Page 39 of 118
Downloaded from www.Manualslib.com manuals search engine FUEL MIXTURE
Air intake
12
112
FUEL MIXTURE
Air intake
AIR INTAKE CIRCUIT DIAGRAM
1 Air-air exchanger
2 Air filter
3 Flow meter
4 Inlet manifold
5 Turbocharger
A Air inlet
12-1
Page 40 of 118
Downloaded from www.Manualslib.com manuals search engine TURBOCHARGING
Pressure regulating valve
12
12-2
TURBOCHARGING
Pressure regulating valve
The LDA (A) of the pressure regulation valve is controlled by a solenoid valve (B) which is controlled by the injection
computer. This solenoid valve varies the underpressure as a function of the engine operating ranges, which allows
the turbocharging pressure to be regulated.
The pressure regulation valve is open in rest position. The engine operates as normally aspirated.
The solenoid valve, closed in rest position, is supplied after starting the engine, after a delay dependent on the coolant
temperature.
Delay (s)
Temperature (˚C)