Page 6 of 376
iv
Table of Contents (cont'd)
Maintenance Schedule Service and Appearance Care
Section
7
Section
6
Scheduled Maintenance
Owner Checks and Services
Periodic Maintenance InspectionsRecommended Fluids and Lubricants
Maintenance Records
Fuel
Checking Fluids and Lubricants
GM Oil Life System™
Engine Air Cleaner/Filter
Brakes
Bulb ReplacementWindshield Wiper Blade Replacement
Tires and Wheels
Appearance Care
Electrical System/Fuses and Circuit Breakers
Capacities and Specifications
Normal Maintenance Replacement Parts
Page 115 of 376

2-47
Turn Signal/Multifunction Lever
The lever on the left side of the steering column
includes your:
�Turn and Lane Change Signals
�Headlamp High/Low Beam Changer
�Flash
-to-Pass Feature
�Windshield Wipers
�Windshield Washer
�Cruise Control (If Equipped)
Turn and Lane Change Signals
The turn signal has two upward (for right) and two
downward (for left) positions. These positions allow you
to signal a turn or a lane change.
To signal a turn, move the lever all the way up or down.
When the turn is finished, the lever will return to its
original position automatically.
An arrow on the instrument
panel cluster will flash in
the direction of the turn or
lane change.
To signal a lane change, just raise or lower the lever
until the arrow starts to flash. Hold it there until you
complete your lane change. The lever will return to its
original position when you release it.
As you signal a turn or a lane change, if the arrow
flashes faster than normal, a signal bulb may be burned
out and other drivers won't see your turn signal.
Page 116 of 376

2-48
If a bulb is burned out, replace it to help avoid an
accident. If the arrows don't go on at all when you
signal a turn, check for burned
-out bulbs and then check
the fuse (see ªFuses and Circuit Breakersº in the Index).
A chime will sound if you leave the turn signal on for
more than 3/4 mile (1.2 km).
Headlamp High/Low Beam Changer
To change the headlamps
from low beam to high
beam, or high to low, pull
the multifunction lever
all the way toward you.
Then release it.
When the high beams are on, a light on the instrument
panel cluster also will be on. Please note that while you
are in high
-beam mode, your fog lamps will not
be illuminated.
Flash-to-Pass Feature
When the headlamps are off, pull the lever toward you
to momentarily switch on the high beams (to signal that
you are going to pass). When you release the lever, they
will turn off and stay off.
Windshield Wipers
You control the windshield wipers by turning the band
marked WIPER on the turn signal/multifunction lever.
For a single wiping cycle, turn the band to MIST. Hold
it there until the wipers start, then let go. The wipers will
stop after one cycle. If you want more cycles, hold the
band on MIST longer.
For steady wiping at low speed, turn the band to LOW.
For high
-speed wiping, turn the band further, to HIGH.
To stop the wipers, turn the band to OFF.
You can set the wiper speed for a long or short delay
between wipes. This can be very useful in light rain or
snow. Turn the band to choose the delay time. The
closer to LOW, the shorter the delay.
Be sure to clear ice and snow from the wiper blades
before using them. If they're frozen to the windshield,
carefully loosen or thaw them. If the blades do become
damaged, get new blades or blade inserts.
Heavy snow or ice can overload the wipers. A circuit
breaker will stop them until the motor cools. Clear away
snow or ice to prevent an overload.
Page 149 of 376

2-81 Oil Warning Light
United States Canada
If you have a problem with your oil pressure, this light
may stay on after you start your engine, or come on
when you are driving.
This indicates that oil is not going through your engine
quickly enough to keep it lubricated. The engine could
be low on oil or could have some other oil problem.
Have it fixed right away.
The oil light could also come on in two other situations:
�When the ignition is on but the engine is not running,
the light will come on as a test to show you it's
working. The light will go out when you turn the
ignition to RUN. If it doesn't come on with the
ignition on, you may have a problem with the fuse or
bulb. Have it fixed right away.�If you make a hard stop, the light may come on for a
moment. This is normal.
CAUTION:
Don't keep driving if the oil pressure is low.
If you do, your engine can become so hot that it
catches fire. You or others could be burned.
Check your oil as soon as possible and have your
vehicle serviced.
NOTICE:
Damage to your engine from neglected oil
problems can be costly and is not covered by
your warranty.
Page 229 of 376

4-38 Backing Up
Hold the bottom of the steering wheel with one hand.
Then, to move the trailer to the left, just move that hand
to the left. To move the trailer to the right, move your
hand to the right. Always back up slowly and, if
possible, have someone guide you.
Making Turns
NOTICE:
Making very sharp turns while trailering could
cause the trailer to come in contact with the
vehicle. Your vehicle could be damaged. Avoid
making very sharp turns while trailering.
When you're turning with a trailer, make wider turns
than normal. Do this so your trailer won't strike soft
shoulders, curbs, road signs, trees or other objects.
Avoid jerky or sudden maneuvers. Signal well
in advance.
Turn Signals When Towing a Trailer
When you tow a trailer, your vehicle may need a
different turn signal flasher and/or extra wiring. Check
with your dealer. The arrows on your instrument panel
will flash whenever you signal a turn or lane change.
Properly hooked up, the trailer lamps will also flash,
telling other drivers you're about to turn, change lanes
or stop.
When towing a trailer, the arrows on your instrument
panel will flash for turns even if the bulbs on the trailer
are burned out. Thus, you may think drivers behind you
are seeing your signal when they are not. It's important
to check occasionally to be sure the trailer bulbs are
still working.
Your vehicle has bulb warning lights. When you plug a
trailer lighting system into your vehicle's lighting
system, its bulb warning lights may not let you know if
one of your lamps goes out. So, when you have a trailer
lighting system plugged in, be sure to check your
vehicle and trailer lamps from time to time to be sure
they're all working. Once you disconnect the trailer
lamps, the bulb warning lights again can tell you if one
of your vehicle lamps is out.
Page 268 of 376

6-
6-1
Section 6 Service and Appearance Care
Here you will find information about the care of your vehicle. This section begins with service and fuel information,
and then it shows how to check important fluid and lubricant levels. There is also technical information about your
vehicle, and a part devoted to its appearance care.
6
-2 Service
6
-3 Fuel
6
-5 Fuels in Foreign Countries
6
-6 Filling Your Tank
6
-8 Filling a Portable Fuel Container
6
-8 Checking Things Under the Hood
6
-13 Engine Oil
6
-20 Engine Air Cleaner/Filter
6
-21 Supercharger Oil
6
-22 Automatic Transaxle Fluid
6
-26 Engine Coolant
6
-29 Radiator Pressure Cap
6
-29 Power Steering Fluid
6
-31 Windshield Washer Fluid
6
-32 Brakes
6
-35 Battery
6
-36 Bulb Replacement
6
-44 Windshield Wiper Blade Replacement6
-45 Tires
6
-53 Appearance Care
6
-53 Cleaning the Inside of Your Vehicle
6
-55 Care of Safety Belts
6
-57 Cleaning the Outside of Your Vehicle
6
-58 Cleaning Aluminum Wheels (If Equipped)
6
-58 Cleaning Tires
6
-59 Sheet Metal Damage
6
-59 Finish Damage
6
-59 Underbody Maintenance
6
-59 Chemical Paint Spotting
6
-60 GM Vehicle Care/Appearance Materials
6
-61 Vehicle Identification Number (VIN)
6
-61 Service Parts Identification Label
6
-62 Electrical System
6
-68 Replacement Bulbs
6
-68 Capacities and Specifications
6
-69 Normal Maintenance Replacement Parts
Page 303 of 376
6-36
Bulb Replacement
In this section, you'll find directions for changing the
bulbs on your vehicle. See ªReplacement Bulbsº in the
Index to find the type of bulb you should use.
Halogen Bulbs
CAUTION:
Halogen bulbs have pressurized gas inside and
can burst if you drop or scratch the bulb. You or
others could be injured. Be sure to read and
follow the instructions on the bulb package.
Headlamps
1. Open the hood and support properly.
2. Remove the two bolts
from the top of the
headlamp assembly.
Page 305 of 376

6-38
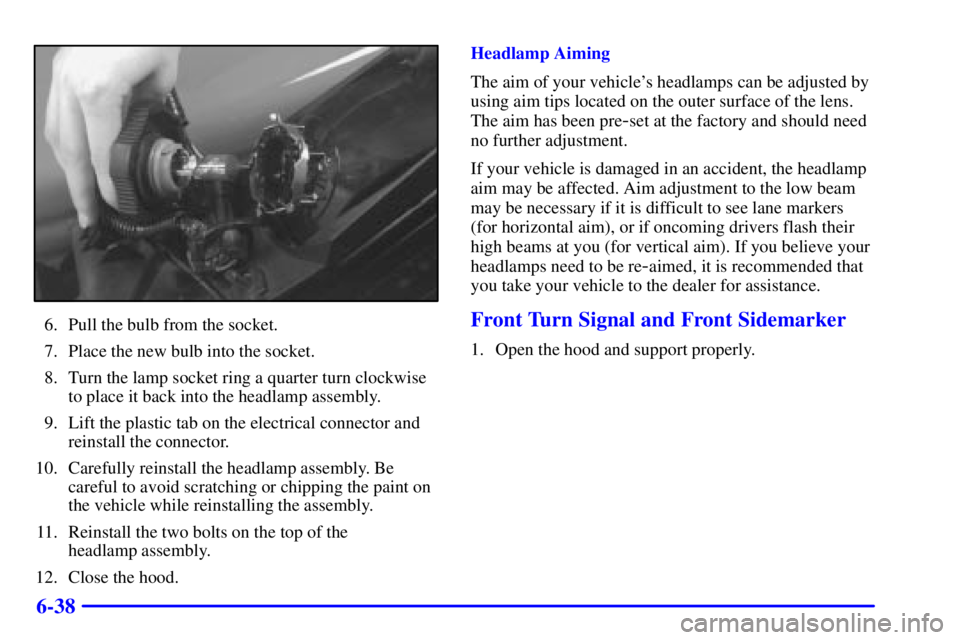
6. Pull the bulb from the socket.
7. Place the new bulb into the socket.
8. Turn the lamp socket ring a quarter turn clockwise
to place it back into the headlamp assembly.
9. Lift the plastic tab on the electrical connector and
reinstall the connector.
10. Carefully reinstall the headlamp assembly. Be
careful to avoid scratching or chipping the paint on
the vehicle while reinstalling the assembly.
11. Reinstall the two bolts on the top of the
headlamp assembly.
12. Close the hood.Headlamp Aiming
The aim of your vehicle's headlamps can be adjusted by
using aim tips located on the outer surface of the lens.
The aim has been pre
-set at the factory and should need
no further adjustment.
If your vehicle is damaged in an accident, the headlamp
aim may be affected. Aim adjustment to the low beam
may be necessary if it is difficult to see lane markers
(for horizontal aim), or if oncoming drivers flash their
high beams at you (for vertical aim). If you believe your
headlamps need to be re
-aimed, it is recommended that
you take your vehicle to the dealer for assistance.
Front Turn Signal and Front Sidemarker
1. Open the hood and support properly.