Page 306 of 376
6-39
2. Remove the two bolts from the top of the
headlamp assembly.
3. Remove the headlamp assembly from the vehicle.
Be careful to avoid scratching or chipping the paint
on the vehicle while removing it.
4. Turn the front sidemarker bulb socket a quarter turn
counterclockwise to remove.5. Remove the bulb from the socket.
6. Place the new bulb into the socket.
7. Turn the bulb socket a quarter turn clockwise to
reinstall it.
8. Carefully reinstall the headlamp assembly. Be
careful to avoid scratching or chipping the paint on
the vehicle.
9. Reinstall the two bolts on the top of the
headlamp assembly.
10. Close the hood.
Page 307 of 376
6-40 Fog Lamps
1. Reach behind the fog lamp that needs to be replaced
from underneath the front of the vehicle.
2. The bulb socket is above wing nut.
3. Turn the bulb socket a quarter turn counterclockwise
to remove socket from assembly.
4. Remove the bulb socket from the assembly.
5. Place the new bulb into socket.
6. Reverse steps to reinstall assembly.
Center High-Mounted Stoplamp
1. Open the trunk.
2. Reach through the access opening in the trunk and
remove the slotted vent by squeezing the ends and
pulling down.
Page 308 of 376
6-41
3. Remove the bulb by turning it a quarter
turn counterclockwise.
4. Place the new bulb into the bulb socket.
5. Turn the bulb a quarter turn clockwise. Reinstall the
vent you removed earlier.
6. Close the trunk.
Back-Up, Tail Lamp and Rear Sidemarker
1. Unhook the convenience net (if equipped)
and remove.
2. Unscrew the upper convenience net
hook attachment.
3. Pull the trunk trim carpeting away from the rear of
the trunk.
4. Remove the upper trunk trim hook and the two
plastic wing nuts from the taillamp.
Page 310 of 376
6-43
7. Remove the bulb.
8. Place the new bulb into the socket.
9. Turn the lamp socket a quarter turn clockwise to
reinstall it.
10. Carefully reinstall the taillamp assembly. Be careful
to avoid scratching or chipping the vehicle paint.
11. Reverse Steps 1 through 4.
12. Close the rear compartment.
License Plate Lamp
1. Remove the two assembly screws located on the top
panel of the license plate holder and pull down
the plate.
2. Turn the bulb socket a quarter turn counterclockwise
to remove from assembly.
3. Remove the bulb from the socket.
4. Place the new bulb into the socket.
5. Reverse the steps to reinstall.
Page 335 of 376

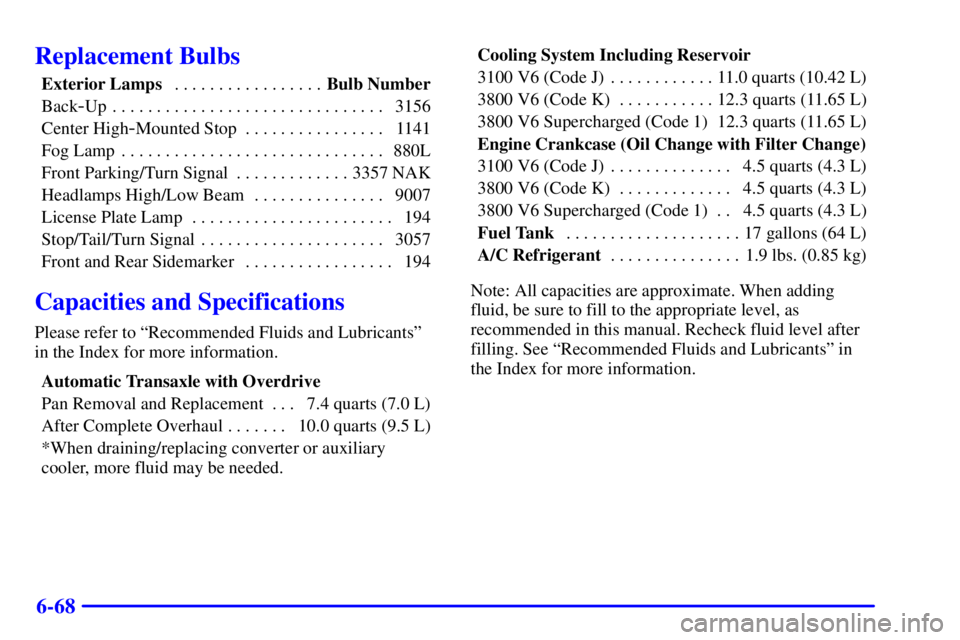
6-68
Replacement Bulbs
Exterior Lamps Bulb Number. . . . . . . . . . . . . . . . .
Back
-Up 3156. . . . . . . . . . . . . . . . . . . . . . . . . . . . . . .
Center High
-Mounted Stop 1141. . . . . . . . . . . . . . . .
Fog Lamp 880L. . . . . . . . . . . . . . . . . . . . . . . . . . . . . .
Front Parking/Turn Signal 3357 NAK. . . . . . . . . . . . .
Headlamps High/Low Beam 9007. . . . . . . . . . . . . . .
License Plate Lamp 194. . . . . . . . . . . . . . . . . . . . . . .
Stop/Tail/Turn Signal 3057. . . . . . . . . . . . . . . . . . . . .
Front and Rear Sidemarker 194. . . . . . . . . . . . . . . . .
Capacities and Specifications
Please refer to ªRecommended Fluids and Lubricantsº
in the Index for more information.
Automatic Transaxle with Overdrive
Pan Removal and Replacement 7.4 quarts (7.0 L). . .
After Complete Overhaul 10.0 quarts (9.5 L). . . . . . .
*When draining/replacing converter or auxiliary
cooler, more fluid may be needed.Cooling System Including Reservoir
3100 V6 (Code J) 11.0 quarts (10.42 L). . . . . . . . . . . .
3800 V6 (Code K) 12.3 quarts (11.65 L). . . . . . . . . . .
3800 V6 Supercharged (Code 1) 12.3 quarts (11.65 L)
Engine Crankcase (Oil Change with Filter Change)
3100 V6 (Code J) 4.5 quarts (4.3 L). . . . . . . . . . . . . .
3800 V6 (Code K) 4.5 quarts (4.3 L). . . . . . . . . . . . .
3800 V6 Supercharged (Code 1) 4.5 quarts (4.3 L). .
Fuel Tank17 gallons (64 L) . . . . . . . . . . . . . . . . . . . .
A/C Refrigerant1.9 lbs. (0.85 kg) . . . . . . . . . . . . . . .
Note: All capacities are approximate. When adding
fluid, be sure to fill to the appropriate level, as
recommended in this manual. Recheck fluid level after
filling. See ªRecommended Fluids and Lubricantsº in
the Index for more information.