2000 NISSAN XTERRA key
[x] Cancel search: keyPage 111 of 263

AM-FM RADIO WITH COMPACT
DISC PLAYER (if so equipped)
ONzOFF/VOL control knob
Turn the ignition key to the ACC or ON, then
push the ONzOFF/VOL control knob. The
mode (radio or CD) which was playing im-
mediately before the system was turned off
resumes playing. When no CD is loaded, the
radio comes on. Pushing the ONzOFF/VOL
button again turns the system off.
Turn the ONzOFF/VOL control knob to ad-
just the volume.
Clock operation
Pressing the clock button alternates the
clock and the radio/CD player options in the
display.
Clock set
Depressing the clock andbuttons to-
gether sets hours. Depressing the clock and
buttons together sets minutes.
AHA1096
4-22Heater, air conditioner and audio systems
ZX
Page 114 of 263
Adjusting tone quality and speaker
balance
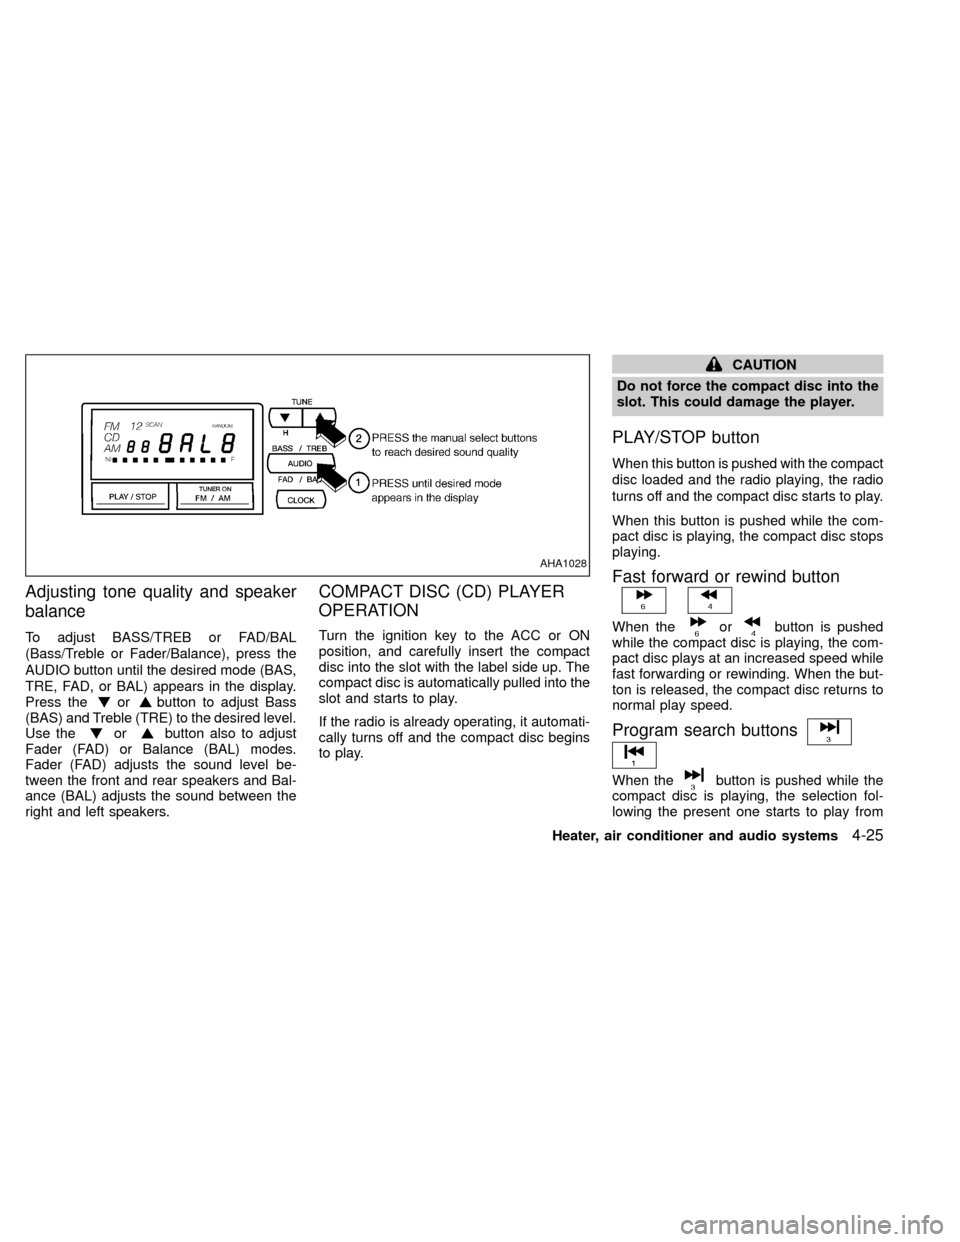
To adjust BASS/TREB or FAD/BAL
(Bass/Treble or Fader/Balance), press the
AUDIO button until the desired mode (BAS,
TRE, FAD, or BAL) appears in the display.
Press the
orbutton to adjust Bass
(BAS) and Treble (TRE) to the desired level.
Use the
orbutton also to adjust
Fader (FAD) or Balance (BAL) modes.
Fader (FAD) adjusts the sound level be-
tween the front and rear speakers and Bal-
ance (BAL) adjusts the sound between the
right and left speakers.
COMPACT DISC (CD) PLAYER
OPERATION
Turn the ignition key to the ACC or ON
position, and carefully insert the compact
disc into the slot with the label side up. The
compact disc is automatically pulled into the
slot and starts to play.
If the radio is already operating, it automati-
cally turns off and the compact disc begins
to play.
CAUTION
Do not force the compact disc into the
slot. This could damage the player.
PLAY/STOP button
When this button is pushed with the compact
disc loaded and the radio playing, the radio
turns off and the compact disc starts to play.
When this button is pushed while the com-
pact disc is playing, the compact disc stops
playing.
Fast forward or rewind button
When theorbutton is pushed
while the compact disc is playing, the com-
pact disc plays at an increased speed while
fast forwarding or rewinding. When the but-
ton is released, the compact disc returns to
normal play speed.
Program search buttons
When thebutton is pushed while the
compact disc is playing, the selection fol-
lowing the present one starts to play from
AHA1028
Heater, air conditioner and audio systems4-25
ZX
Page 117 of 263

AM-FM RADIO WITH CASSETTE
PLAYER AND COMPACT DISC
PLAYER (if so equipped)
ONzOFF/VOL control knob
Turn the ignition key to the ACC or ON
position, then push the ONzOFF/VOL con-
trol knob button. If you listen to the radio
with the engine not running, turn the key to
the ACC position. The mode (radio, tape or
CD) which was playing immediately before
the system was turned off resumes playing.
When no CD or tape is loaded, the radio
comes on. Push the ONzOFF/VOL control
knob button again turns the system off.
Turn the ONzOFF/VOL control knob to ad-
just the volume.
Clock operation
Pressing the clock button displays the clock.
Clock set
Press the CLOCK button for more than 2
seconds the radio beeps and the hours
flash, use the TUNE/FF-REW
but-
tons to set the hour, press the CLOCK
button again until the radio beeps and the
minutes flash, use the TUNE/FF-REW
AHA1112
4-28Heater, air conditioner and audio systems
ZX
Page 121 of 263
CASSETTE TAPE OPERATION
Turn the ignition key to the ACC or ON
position, and carefully insert a cassette tape
into the tape door. The cassette tape auto-
matically pulls into the player. The word
TAPE illuminates in the display. If the radio
is already operating it automatically turns off
and the cassette tape begins to play.
CAUTION
Do not force the cassette tape into the
tape door. This could cause player
damage.
The cassette tape automatically changes
directions to play the other side when the
first side is complete.
Precautions on cassette player op-
eration
OTo maintain good quality sound,
NISSAN recommends using cassette
tapes of 60 minutes or shorter in
length.
OCassette tapes should be removed
from the player when not in use. Store
cassettes in their protective cases
and away from direct sunlight, heat,dust, moisture or magnetic sources.
ODirect sunlight can cause the cassette
to become deformed. The use of de-
formed cassettes may cause the cas-
sette to jam in the player.
ODo not use cassettes that have peel-
ing or loose labels. If used, the label
could jam in the player.
OIf a cassette has loose tape, insert a
pencil through one of the cassette
hubs and rewind the tape firmly.
Loose tape may cause jamming and
wavering sound quality.
OOver a period of time, the playback
head, capstan and pinch roller may
gather a tape coating residue as the
tape is played. This residue accumu-
lation can cause a weak or wavering
sound and should be removed peri-
odically with a head cleaning tape. If
the residue is not removed periodi-
cally, the player may need to be disas-
sembled for cleaning.
PLAY/STOP TAPE button
When thebutton is pushed with the
system turned off and a tape loaded, the
system comes on and the tape plays.The word TAPE illuminates.
When the
button is pushed with either
the radio or compact disc turned on and a
tape loaded, the compact disc or the radio
turns off and the tape plays.
While the tape is playing, pushing the
button stops tape play. Pushing the
button again resumes tape play.
FF (fast forward) and REW (rewind)
buttons
Push thebutton to fast forward the
tape. Push the
button to rewind the
tape. Either REW or FF illuminates in the
display. To stop the FF or REW function,
press the
,,orbuttons.
Automatic Program Search (APS)
SEEK/SCAN buttons
When thebutton is pushed while the
tape is being played, the tape runs quickly,
stops, then plays the next selection from the
beginning. Push the
button several times
to skip several selections. Each time the
button is pushed, the tape fast forwards one
additional selection. This number appears in
4-32Heater, air conditioner and audio systems
ZX
Page 122 of 263
the display window. The tape can be fast
forwarded through up to nine selections. (for
example: 7 in the display indicates that the
button has been pushed seven times to
skip forward through seven selections).
When the
button is pushed, the selection
being played starts again from the begin-
ning. Push the
button several times to
rewind several selections. Each time the
button is pushed, the tape rewinds back
one additional selection. The number of
selections skipped appears in the display
window as a negative number (for example:
-7 in the display indicates that the
button
has been pushed seven times to rewind
back through seven selections). To stop
APS
or, press thebutton.
Either the FF or REW illuminates in the
display when the
(REW) or(FF) but-
ton is pushed.
The system searches for the blank intervals
between selections. If there is a blank inter-
val within one selection or there is no inter-
val between selections, the system may not
stop in the desired or expected location.
SIDE button
Push thebutton to change the tape side
while the tape is being played.
The cassette tape automatically changes
directions to play the other side when the
first side is complete.
Dolby NR (noise reduction)
Push thebutton for Dolby NR encoded
tapes to reduce high frequency tape noise.
The
indicator illuminates in the display.
Dolby NR is manufactured under license
from Dolby Laboratories Licensing Corpora-
tion. DOLBY NR and the double-D symbol
are trademarks of Dolby Laboratories Li-
censing Corporation.
Metal or chrome tape usage
The cassette player is automatically set to
high performance play when playing a metal
or chrome cassette tape.
TAPE EJECT button
Push thebutton to eject an inserted
cassette tape.
COMPACT DISC (CD) PLAYER
OPERATION
Turn the ignition key to the ACC or ON
position and carefully insert the compact
disc into the slot with the label side up. The
compact disc is automatically pulled into the
slot and starts to play.
If the radio or cassette tape is already
operating, it automatically turns off and the
compact disc begins to play.
CAUTION
Do not force the compact disc into the
slot. This could damage the player.
CD button
When thebutton is pushed with the
compact disc loaded and the tape or the
radio playing, the tape or radio turns off and
compact disc starts to play.
FF (fast forward) REW (rewind)
buttons
When theorbutton is pushed
while the compact disc is playing, the com-
pact disc plays at an increased speed while
Heater, air conditioner and audio systems
4-33
ZX
Page 131 of 263
correctly could result in loss of con-
trol and/or a rollover accident.
OAlways use tires of the same type,
size, brand, construction (bias, bias
belted or radial), and tread pattern
on all four wheels. Install tire chains
on the rear wheels when driving on
slippery roads and drive carefully.
OBe sure to check the brakes immedi-
ately after driving in mud or water.
See ``Brake system'' later in this sec-
tion for ``Wet brakes''.
OAvoid parking your vehicle on steep
hills. If you get out of the vehicle and
it rolls forward, backward or side-
ways, you could be injured.
OWhenever you drive off-road
through sand, mud or water as deep
as the wheel hub, more frequent
maintenance may be required. See
``Periodic maintenance'' in the
``Maintenance'' section of this
manual.
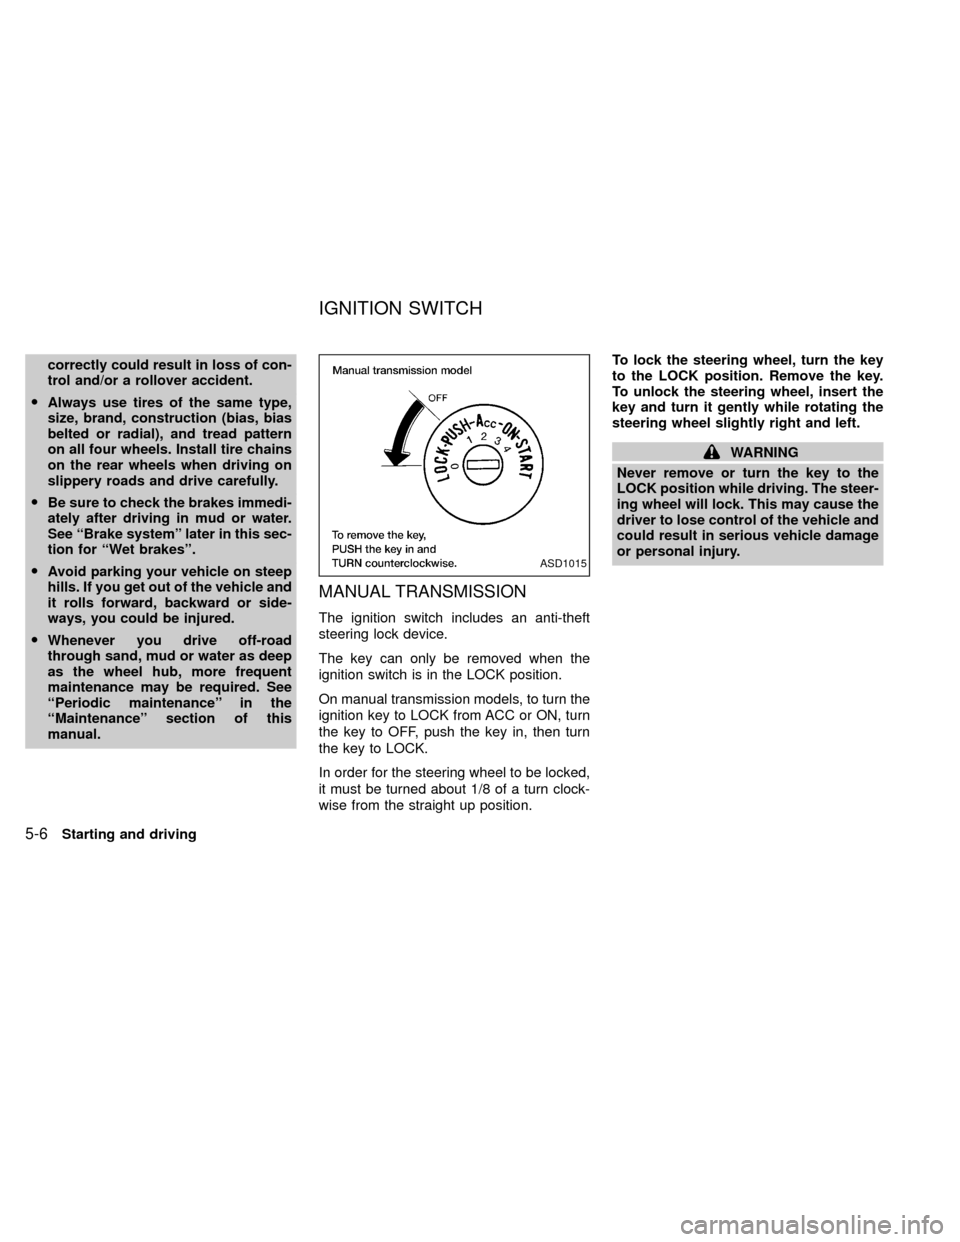
MANUAL TRANSMISSION
The ignition switch includes an anti-theft
steering lock device.
The key can only be removed when the
ignition switch is in the LOCK position.
On manual transmission models, to turn the
ignition key to LOCK from ACC or ON, turn
the key to OFF, push the key in, then turn
the key to LOCK.
In order for the steering wheel to be locked,
it must be turned about 1/8 of a turn clock-
wise from the straight up position.To lock the steering wheel, turn the key
to the LOCK position. Remove the key.
To unlock the steering wheel, insert the
key and turn it gently while rotating the
steering wheel slightly right and left.
WARNING
Never remove or turn the key to the
LOCK position while driving. The steer-
ing wheel will lock. This may cause the
driver to lose control of the vehicle and
could result in serious vehicle damage
or personal injury.
ASD1015
IGNITION SWITCH
5-6Starting and driving
ZX
Page 132 of 263
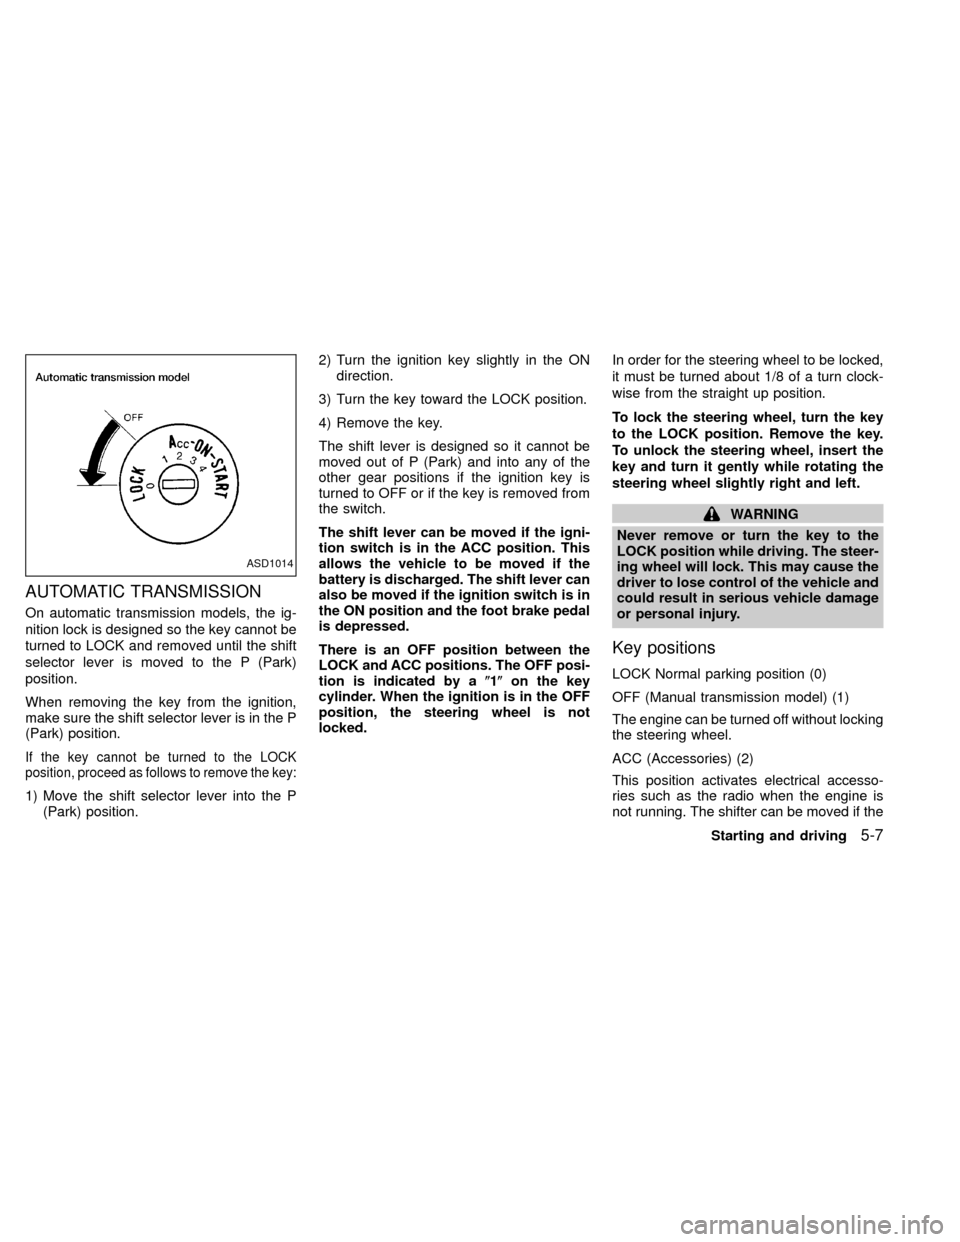
AUTOMATIC TRANSMISSION
On automatic transmission models, the ig-
nition lock is designed so the key cannot be
turned to LOCK and removed until the shift
selector lever is moved to the P (Park)
position.
When removing the key from the ignition,
make sure the shift selector lever is in the P
(Park) position.
If the key cannot be turned to the LOCK
position, proceed as follows to remove the key:
1) Move the shift selector lever into the P
(Park) position.2) Turn the ignition key slightly in the ON
direction.
3) Turn the key toward the LOCK position.
4) Remove the key.
The shift lever is designed so it cannot be
moved out of P (Park) and into any of the
other gear positions if the ignition key is
turned to OFF or if the key is removed from
the switch.
The shift lever can be moved if the igni-
tion switch is in the ACC position. This
allows the vehicle to be moved if the
battery is discharged. The shift lever can
also be moved if the ignition switch is in
the ON position and the foot brake pedal
is depressed.
There is an OFF position between the
LOCK and ACC positions. The OFF posi-
tion is indicated by a(1(on the key
cylinder. When the ignition is in the OFF
position, the steering wheel is not
locked.In order for the steering wheel to be locked,
it must be turned about 1/8 of a turn clock-
wise from the straight up position.
To lock the steering wheel, turn the key
to the LOCK position. Remove the key.
To unlock the steering wheel, insert the
key and turn it gently while rotating the
steering wheel slightly right and left.
WARNING
Never remove or turn the key to the
LOCK position while driving. The steer-
ing wheel will lock. This may cause the
driver to lose control of the vehicle and
could result in serious vehicle damage
or personal injury.
Key positions
LOCK Normal parking position (0)
OFF (Manual transmission model) (1)
The engine can be turned off without locking
the steering wheel.
ACC (Accessories) (2)
This position activates electrical accesso-
ries such as the radio when the engine is
not running. The shifter can be moved if the
ASD1014
Starting and driving5-7
ZX
Page 133 of 263
ignition switch is in ACC position.
ON (Normal operating position) (3)
This position turns on the ignition system
and electrical accessories.
START (4)
This position starts the engine. As soon as
the engine has started, release the key. It
automatically returns to the ON position.OMake sure the area around the vehicle is
clear.
OCheck fluid levels such as engine oil,
coolant, brake and clutch fluid, and win-
dow washer fluid as frequently as pos-
sible, at least whenever you refuel.
OCheck that all windows and lights are
clean.
OVisually inspect tires for their appearance
and condition. Also check tires for proper
inflation.
OLock all doors.
OPosition seat and adjust head restraints.
OAdjust inside and outside mirrors.
OFasten seat belts and ask all passengers
to do likewise.
OCheck the operation of warning lights
when key is turned to the ON (3) position.
See9Warning/Indicator lights and
chimes9in the9Instruments and controls9
section.WARNING
ODo not depress the accelerator pedal
while shifting from P (Park) or N
(Neutral) to R (Reverse), D (Drive), 2
or 1. Always depress the brake pedal
until shifting is completed. Failure to
do so could cause you to lose con-
trol and have an accident.
OCold engine idle speed is high, so
use caution when shifting into a for-
ward or reverse gear before the en-
gine has warmed up.
ONever shift to P (Park) or R (Reverse)
while the vehicle is moving. This
could cause an accident.
CAUTION
OWhen stopping the vehicle on an
uphill grade, do not hold the vehicle
by depressing the accelerator pedal.
The foot brake should be used for
this purpose.
OOn slippery roads, do not downshift.
This may cause a loss of control.
BEFORE STARTING THE
ENGINEDRIVING WITH AUTOMATIC
TRANSMISSION (if so
equipped)
5-8Starting and driving
ZX