2000 NISSAN XTERRA door lock
[x] Cancel search: door lockPage 75 of 263
CHILD SAFETY REAR DOOR
LOCK
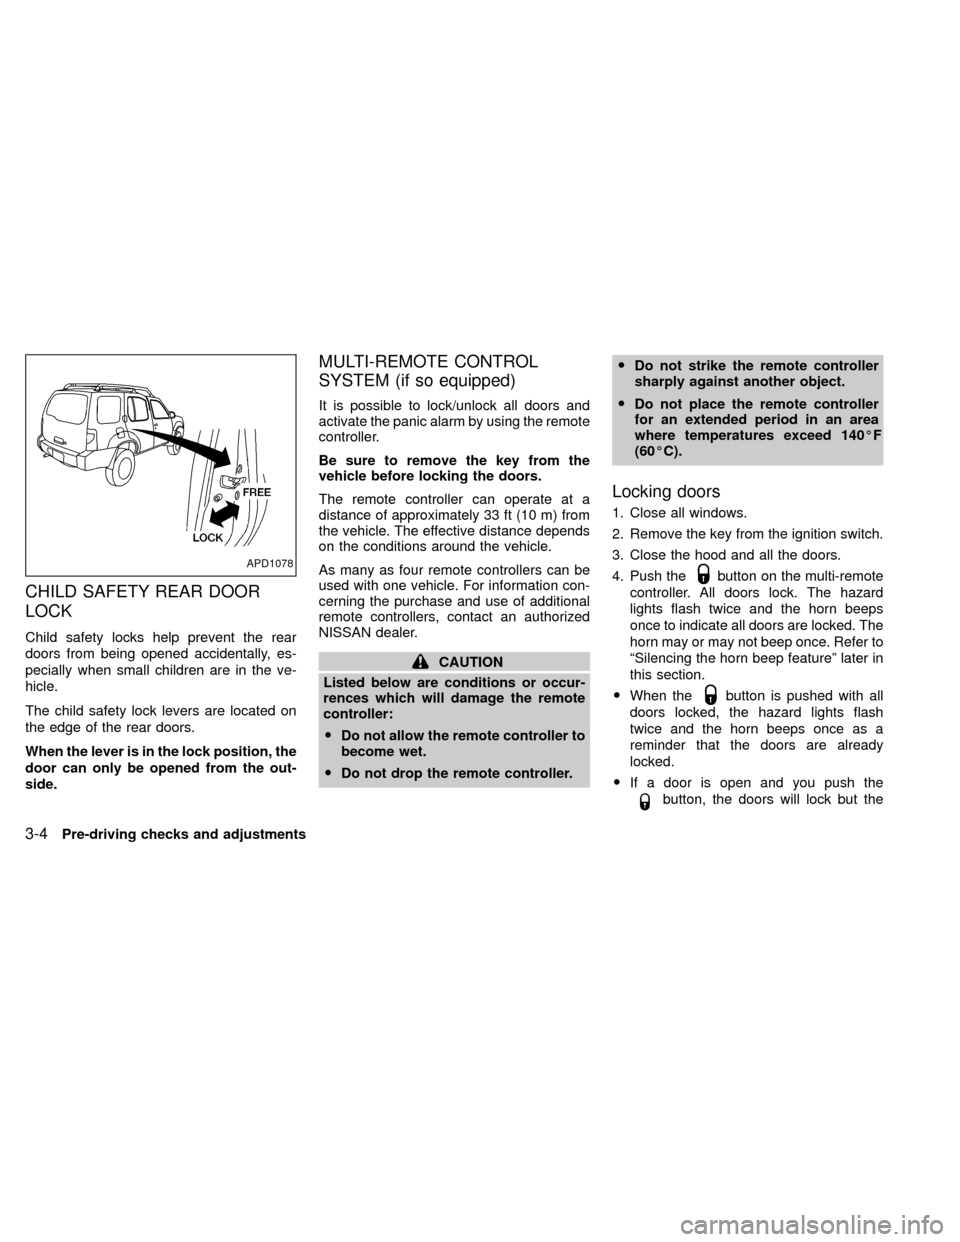
Child safety locks help prevent the rear
doors from being opened accidentally, es-
pecially when small children are in the ve-
hicle.
The child safety lock levers are located on
the edge of the rear doors.
When the lever is in the lock position, the
door can only be opened from the out-
side.
MULTI-REMOTE CONTROL
SYSTEM (if so equipped)
It is possible to lock/unlock all doors and
activate the panic alarm by using the remote
controller.
Be sure to remove the key from the
vehicle before locking the doors.
The remote controller can operate at a
distance of approximately 33 ft (10 m) from
the vehicle. The effective distance depends
on the conditions around the vehicle.
As many as four remote controllers can be
used with one vehicle. For information con-
cerning the purchase and use of additional
remote controllers, contact an authorized
NISSAN dealer.
CAUTION
Listed below are conditions or occur-
rences which will damage the remote
controller:
ODo not allow the remote controller to
become wet.
ODo not drop the remote controller.ODo not strike the remote controller
sharply against another object.
ODo not place the remote controller
for an extended period in an area
where temperatures exceed 140ÉF
(60ÉC).
Locking doors
1. Close all windows.
2. Remove the key from the ignition switch.
3. Close the hood and all the doors.
4. Push the
button on the multi-remote
controller. All doors lock. The hazard
lights flash twice and the horn beeps
once to indicate all doors are locked. The
horn may or may not beep once. Refer to
ªSilencing the horn beep featureº later in
this section.
OWhen the
button is pushed with all
doors locked, the hazard lights flash
twice and the horn beeps once as a
reminder that the doors are already
locked.
OIf a door is open and you push the
button, the doors will lock but the
APD1078
3-4Pre-driving checks and adjustments
ZX
Page 76 of 263

horn will not beep and the hazard lights
will not flash.Unlocking doors
1. Push thebutton on the multi-
remote controller. Only the driver's side
door unlocks.2. Push the
button on the multi-
remote controller again within five sec-
onds. All doors unlock.
3. The interior lights illuminate for 30 sec-
onds when the interior light switch is in
the O or DOOR position.
The interior lights can be turned off without
waiting 30 seconds by inserting the key into
the ignition or locking the doors with the
multi-remote controller or pushing the
interior light switch to the OFF position.
Using the panic alarm
If you are near your vehicle and feel threat-
ened, you may activate the panic alarm to
call attention as follows:
1. Push the
button on the remote con-
troller forlonger than 1.5 seconds.
2. The theft warning alarm and headlights
will stay on for 30 seconds.
3. The panic alarm stops when:
Oit has run for 30 seconds, or
Othe
,or thebutton is
pressed, on the multi-remote controller.
APD1079
Pre-driving checks and adjustments3-5
ZX
Page 81 of 263
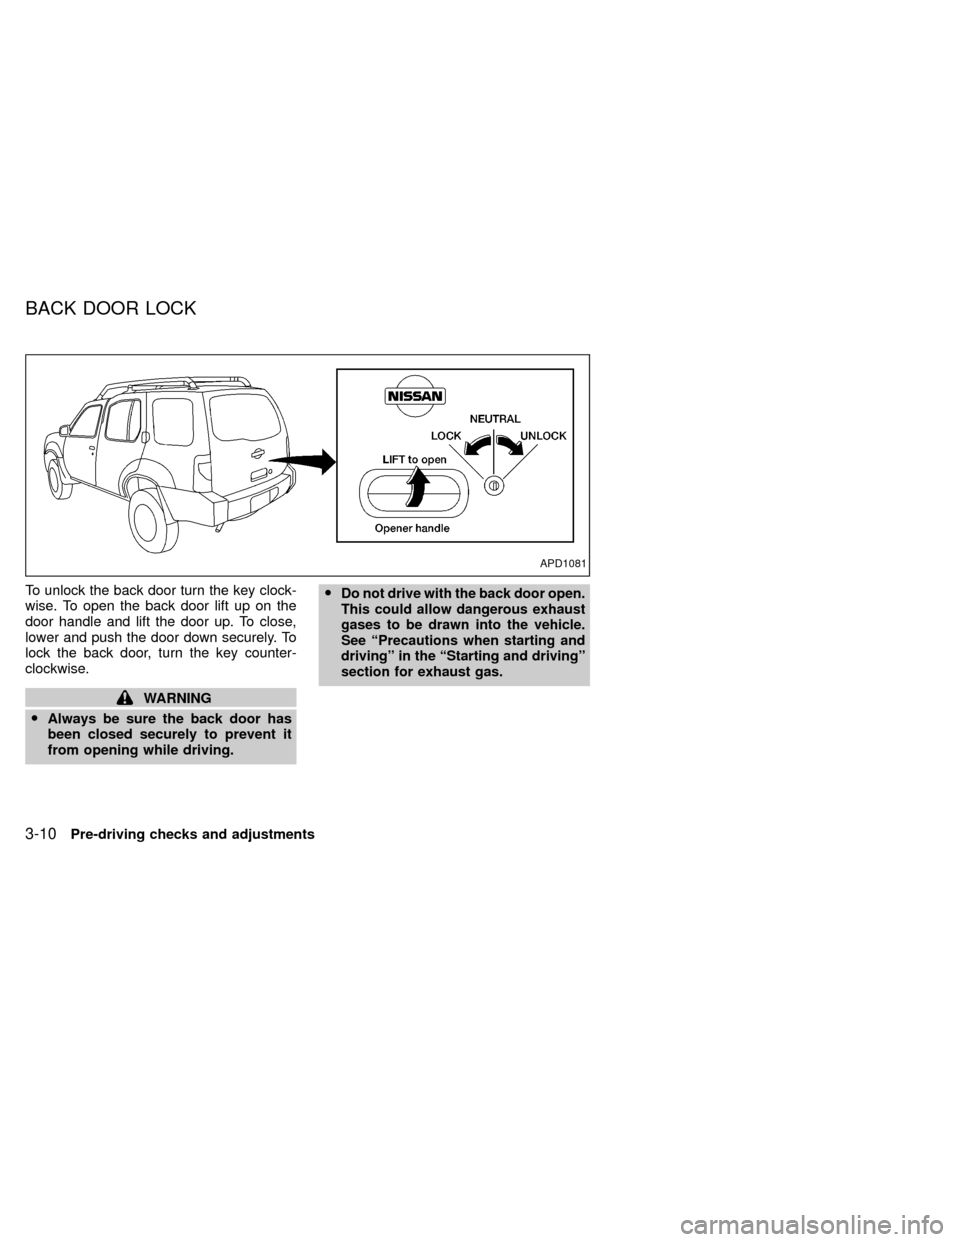
To unlock the back door turn the key clock-
wise. To open the back door lift up on the
door handle and lift the door up. To close,
lower and push the door down securely. To
lock the back door, turn the key counter-
clockwise.
WARNING
OAlways be sure the back door has
been closed securely to prevent it
from opening while driving.O
Do not drive with the back door open.
This could allow dangerous exhaust
gases to be drawn into the vehicle.
See ªPrecautions when starting and
drivingº in the ªStarting and drivingº
section for exhaust gas.
APD1081
BACK DOOR LOCK
3-10Pre-driving checks and adjustments
ZX
Page 133 of 263
ignition switch is in ACC position.
ON (Normal operating position) (3)
This position turns on the ignition system
and electrical accessories.
START (4)
This position starts the engine. As soon as
the engine has started, release the key. It
automatically returns to the ON position.OMake sure the area around the vehicle is
clear.
OCheck fluid levels such as engine oil,
coolant, brake and clutch fluid, and win-
dow washer fluid as frequently as pos-
sible, at least whenever you refuel.
OCheck that all windows and lights are
clean.
OVisually inspect tires for their appearance
and condition. Also check tires for proper
inflation.
OLock all doors.
OPosition seat and adjust head restraints.
OAdjust inside and outside mirrors.
OFasten seat belts and ask all passengers
to do likewise.
OCheck the operation of warning lights
when key is turned to the ON (3) position.
See9Warning/Indicator lights and
chimes9in the9Instruments and controls9
section.WARNING
ODo not depress the accelerator pedal
while shifting from P (Park) or N
(Neutral) to R (Reverse), D (Drive), 2
or 1. Always depress the brake pedal
until shifting is completed. Failure to
do so could cause you to lose con-
trol and have an accident.
OCold engine idle speed is high, so
use caution when shifting into a for-
ward or reverse gear before the en-
gine has warmed up.
ONever shift to P (Park) or R (Reverse)
while the vehicle is moving. This
could cause an accident.
CAUTION
OWhen stopping the vehicle on an
uphill grade, do not hold the vehicle
by depressing the accelerator pedal.
The foot brake should be used for
this purpose.
OOn slippery roads, do not downshift.
This may cause a loss of control.
BEFORE STARTING THE
ENGINEDRIVING WITH AUTOMATIC
TRANSMISSION (if so
equipped)
5-8Starting and driving
ZX
Page 151 of 263
WARNING
The anti-lock brake system is a sophisti-
cated device, but it cannot prevent acci-
dents resulting from careless or danger-
ous driving techniques. It can help
maintain vehicle control under braking on
slippery surfaces, but remember that the
stopping distance on slippery surfaces
will be longer than on normal surfaces
even with the anti-lock brake system.
Stopping distances may also be longer
on rough, gravel, or snow covered roads,
or if you are using tire chains. Always
maintain a safe distance from the vehicle
in front of you. Ultimately, the responsi-
bility for safety of self and others rests in
the hands of the driver.
Tire type and condition may also affect
braking effectiveness.
OWhen replacing tires, install the speci-
fied tire size on all four wheels.
OWhen installing a spare tire, make sure
it is the proper size and type as speci-
fied on the tire placard. For tire placard
location information refer to ``Tire plac-
ard'' in the ``Technical and consumer
information'' section of this manual.
Freeing a frozen door lock
To prevent a door lock from freezing, apply
de-icer or glycerin through the key hole. If
the lock becomes frozen, heat the key be-
fore inserting it in the key hole.
Anti-freeze
In the winter when it is anticipated that the
temperature will drop below 32ÉF (0ÉC),
check anti-freeze (ethylene glycol base) to
assure proper winter protection. For details,
see ``Engine cooling system'' in the ``Do-it-
yourself'' section of this manual.
Battery
If the battery is not fully charged during
extremely cold weather conditions, the bat-
tery fluid may freeze and damage the bat-
tery. To maintain maximum efficiency, the
battery should be checked regularly. For
details, see ``Battery'' in the ``Do-it-yourself''
section of this manual.
Draining of coolant water
If the vehicle is to be left outside without
anti-freeze, drain the cooling system by open-
ing the drain valves located under the radiator
and on the engine block. Refill before operat-ing the vehicle. For details, see ``Changing
engine coolant'' in the ``Do-it-yourself'' section
of this manual.
Tire equipment
1. SUMMER tires have a tread designed to
provide superior performance on dry
pavement. However, the performance of
these tires will be substantially reduced
in snowy and icy conditions. If you oper-
ate your vehicle on snowy or icy roads,
NISSAN recommends the use on all four
wheels of MUD & SNOW or ALL SEA-
SON tires. Please consult your NISSAN
dealer for the tire type, size, speed rating
and availability information.
2. For additional traction on icy roads, stud-
ded tires may be used. However, some
U.S. states and Canadian provinces pro-
hibit their use. Check local, state and pro-
vincial laws before installing studded tires.
Skid and traction capabilities of studded
snow tires on wet or dry surfaces may be
poorer than that of non-studded snow
tires.
3. Tire chains may be used. Use of tire
chains may be prohibited according to
location. Check the local laws before
COLD WEATHER DRIVING
5-26Starting and driving
ZX
Page 156 of 263
5. Raise the hood to warn other traffic and
to signal professional road assistance
personnel that you require assistance.
6. Have all passengers get out of the ve-
hicle and stand in a safe place away from
traffic and clear of the vehicle.
WARNING
OMake sure the parking brake is se-
curely applied and the manual trans-
mission is shifted into R (Reverse),
or the automatic transmission into P
(Park).
ONever change tires when the vehicle
is on a slope, ice or slippery areas.
This is hazardous.
ONever change tires if oncoming traf-
fic is close to your vehicle. Wait for
professional road assistance.
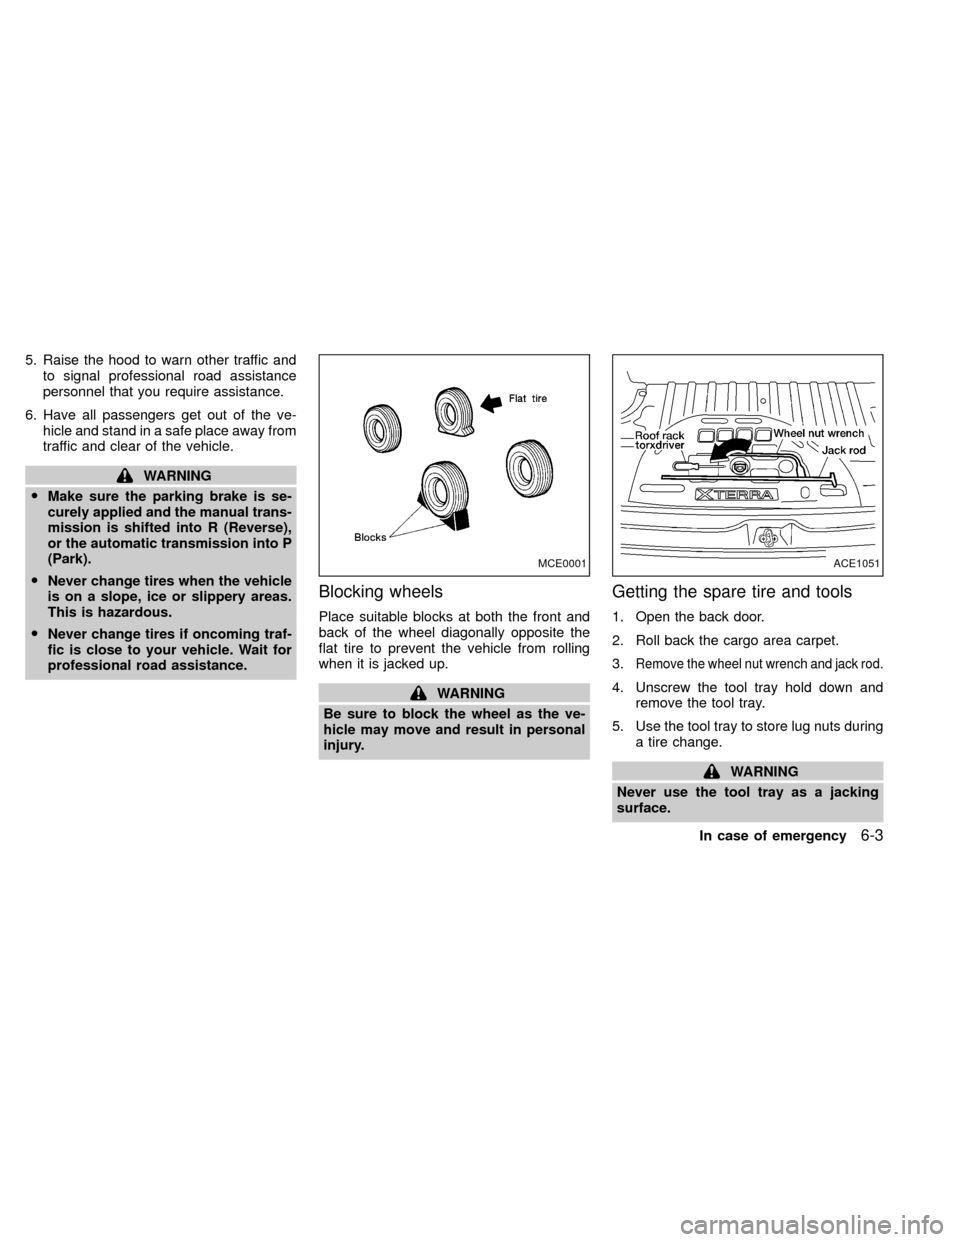
Blocking wheels
Place suitable blocks at both the front and
back of the wheel diagonally opposite the
flat tire to prevent the vehicle from rolling
when it is jacked up.
WARNING
Be sure to block the wheel as the ve-
hicle may move and result in personal
injury.
Getting the spare tire and tools
1. Open the back door.
2. Roll back the cargo area carpet.
3.
Remove the wheel nut wrench and jack rod.
4. Unscrew the tool tray hold down and
remove the tool tray.
5. Use the tool tray to store lug nuts during
a tire change.
WARNING
Never use the tool tray as a jacking
surface.
MCE0001ACE1051
In case of emergency6-3
ZX
Page 216 of 263

sure no wheel nuts are missing, and check for
any loose wheel nuts. Tighten if necessary.
Tire rotation*Tires should be rotated every
7,500 miles (12,000 km).
Wheel alignment and balanceIf the ve-
hicle should pull to either side while driving
on a straight and level road, or if you detect
uneven or abnormal tire wear, there may be
a need for wheel alignment.
If the steering wheel or seat vibrates at
normal highway speeds, wheel balancing
may be needed.
Windshield wiper blades*Check for
cracks or wear if they do not wipe properly.
Doors and hoodCheck that all doors and
the hood operate properly. Also ensure that
all latches lock securely. Lubricate hinges,
latches, rollers and links if necessary. Make
sure that the secondary latch keeps the
hood from opening when the primary latch
is released.
When driving in areas using road salt or
other corrosive materials, check lubrication
frequently.
Lights*Make sure that the headlights, stop
lights, tail lights, turn signal lights, and otherlights are all operating properly and installed
securely. Also check headlight aim.INSIDE THE VEHICLE
The maintenance items listed here should
be checked on a regular basis, such as
when performing periodic maintenance,
cleaning the vehicle, etc.
Additional information on the following
items with an ``*'' is found in the ``Do-it-
yourself'' section of this manual.
Warning lights and chimesMake sure all
warning lights and chimes are operating
properly.
Windshield wiper and washer*Check that
the wipers and washer operate properly and
that the wipers do not streak.
Windshield defrosterCheck that the air
comes out of the defroster outlets properly
and in sufficient quantity when operating the
heater or air conditioner.
Steering wheelCheck for changes in the
steering conditions, such as excessive free-
play, hard steering or strange noises.
SeatsCheck seat position controls such as
seat adjusters, seatback recliner, etc. toensure they operate smoothly and all
latches lock securely in every position.
Check that the head restraints move up and
down smoothly and the locks (if so
equipped) hold securely in all latched posi-
tions.
Seat beltsCheck that all parts of the seat
belt system (e.g., buckles, anchors, adjust-
ers and retractors) operate properly and
smoothly, and are installed securely. Check
the belt webbing for cuts, fraying, wear or
damage.
Accelerator pedalCheck the pedal for
smooth operation and make sure the pedal
does not catch or require uneven effort.
Keep the floor mat away from the pedal.
Clutch pedal*Make sure the pedal oper-
ates smoothly and check that it has the
proper free travel.
BrakesCheck that the brakes do not pull
the vehicle to one side when applied.
Brake pedal and booster*Check the pedal
for smooth operation and make sure it has
the proper distance under it when de-
pressed fully. Check the brake booster func-
tion. Be certain to keep the floor mat away
from the pedal.
Maintenance
9-3
ZX
Page 243 of 263

Payload Weight Ratings (1)
2WD 4WD
KA24DE VG33E
Manual
TransmissionManual
TransmissionAutomatic
TransmissionManual
TransmissionAutomatic
Transmission
XE XE SE XE SE
lbs kg lbs kg lbs kg lbs kg lbs kg
Federal 1,250 567 1,000 454 1,000 454 1,000 454 1,000 454
California 1,250 567 1,000 454 1,000 454 1,000 454 1,000 454
Canada N/A N/A 1,000 454 1,000 454 1,000 454 1,000 454
(1) The payload weight rating is the maximum total weight of passengers, optional equipment (air
conditioning, trailer hitch, etc) and cargo that your vehicle is designed to carry. Before driving a
loaded vehicle, confirm that you do not exceed the Gross Vehicle Weight Rating (GVWR) or the
Gross Axle Weight Rating (GAWR) for your vehicle. See ``Vehicle Loading Information'' earlier in this
section for details.
Measurement of weights
Secure loose items to prevent weight shifts
that could affect the balance of your vehicle.
When the vehicle is loaded, drive to a scale
and weigh the front and the rear wheels
separately to determine axle loads. Indi-
vidual axle loads should not exceed either
of the gross axle weight ratings (GAWR).
The total of the axle loads should not ex-
ceed the gross vehicle weight rating
(GVWR). These ratings are given on the
vehicle certification label that is located on
the driver's door lock pillar. If weight ratings
are exceeded, move or remove items to
bring all weights below the ratings.
10-18Technical and consumer information
ZX