2000 NISSAN XTERRA weight
[x] Cancel search: weightPage 4 of 263

Welcome To The World Of NISSAN
Your new NISSAN is the result of our dedication
to produce the finest in safe, reliable and eco-
nomical transportation. Your vehicle is the prod-
uct of a successful worldwide company that
manufactures cars and trucks in over 17 coun-
tries and distributes them in 170 nations.
NISSAN vehicles are designed and manufac-
tured by Nissan Motor Co., Ltd. which was
founded in Tokyo, Japan in 1933, and NISSAN
affiliates world wide, collectively growing to be-
come the fifth largest automaker in the world. In
addition to cars and trucks, NISSAN also makes
textile machinery, fork-lift trucks, marine engines,
boats and other products.
NISSAN has made a substantial and growing
investment in North America, starting with the
opening of Nissan Motor Corporation U.S.A. in
1960, and continuing with the production of somecars and trucks at one of the world's most
modern manufacturing facilities, Nissan Motor
Manufacturing Corporation U.S.A. in Smyrna,
Tennessee, vehicle styling at Nissan Design In-
ternational in San Diego, California, and engi-
neering at Nissan Research and Development in
Farmington Hills, Michigan.
NISSAN and its dealers indirectly employ about
60,000 Americans.
NISSAN is also a substantial contributor to the
Canadian economy. Nissan Canada Inc., its sup-
pliers and over 140 dealers employ approxi-
mately 4,500 people. These include company
employees and the staffs of NISSAN dealers all
across Canada. In addition, many Canadians
work for companies that supply NISSAN and
NISSAN dealers with materials and services
ranging from operation of port facilities and trans-portation services to the supply of lubricants,
parts and accessories.
NISSAN pioneered the use of electronics and
computers in automobiles, and has led the indus-
try in improving both performance and fuel effi-
ciency through new engine designs and the use
of synthetic materials to reduce vehicle weight.
The company has also developed ways to build
quality into its vehicles at each stage of the
production process, both through extensive use
of automation and Ð most importantly Ð
through an awareness thatpeopleare the cen-
tral element in quality control.
From the time the parts arrived from our suppli-
ers until you took delivery of your new NISSAN,
dozens of checks were made to ensure that only
the best job was being done in producing and
delivering your vehicle. NISSAN also takes great
care to ensure that when you take your NISSAN
to your dealer for maintenance, the service tech-
nician will perform his work according to the
quality standards that have been established by
the factory.
Safety has also been built into your NISSAN. As
you know, seat belts are an integral part of the
safety systems that will help protect you and your
passengers in the event of a sudden stop or an
accident. We urge you to use the seat belts every
time you drive the vehicle.
The NISSAN story of growth and achievement
reflects our major goal: to provide you, our
customer, with a vehicle that is built with quality
and craftsmanship Ð a product that we can be
proud to build and you can be proud to own.
AFW0001
ZX
Page 82 of 263

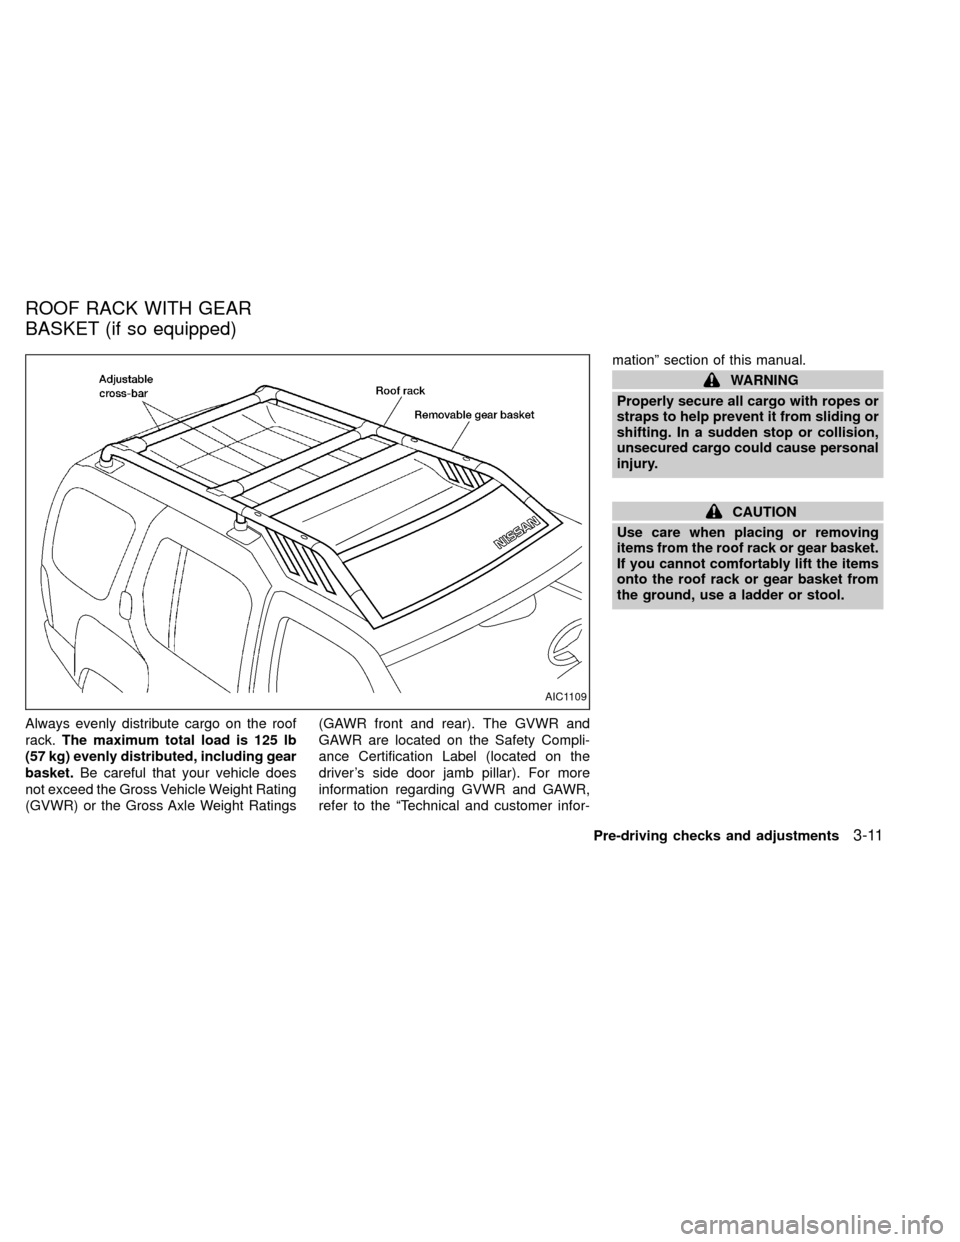
Always evenly distribute cargo on the roof
rack.The maximum total load is 125 lb
(57 kg) evenly distributed, including gear
basket.Be careful that your vehicle does
not exceed the Gross Vehicle Weight Rating
(GVWR) or the Gross Axle Weight Ratings(GAWR front and rear). The GVWR and
GAWR are located on the Safety Compli-
ance Certification Label (located on the
driver's side door jamb pillar). For more
information regarding GVWR and GAWR,
refer to the ªTechnical and customer infor-mationº section of this manual.
WARNING
Properly secure all cargo with ropes or
straps to help prevent it from sliding or
shifting. In a sudden stop or collision,
unsecured cargo could cause personal
injury.
CAUTION
Use care when placing or removing
items from the roof rack or gear basket.
If you cannot comfortably lift the items
onto the roof rack or gear basket from
the ground, use a ladder or stool.
AIC1109
ROOF RACK WITH GEAR
BASKET (if so equipped)
Pre-driving checks and adjustments3-11
ZX
Page 207 of 263

If you have a flat tire, see the ``In case of
emergency'' section of this manual.
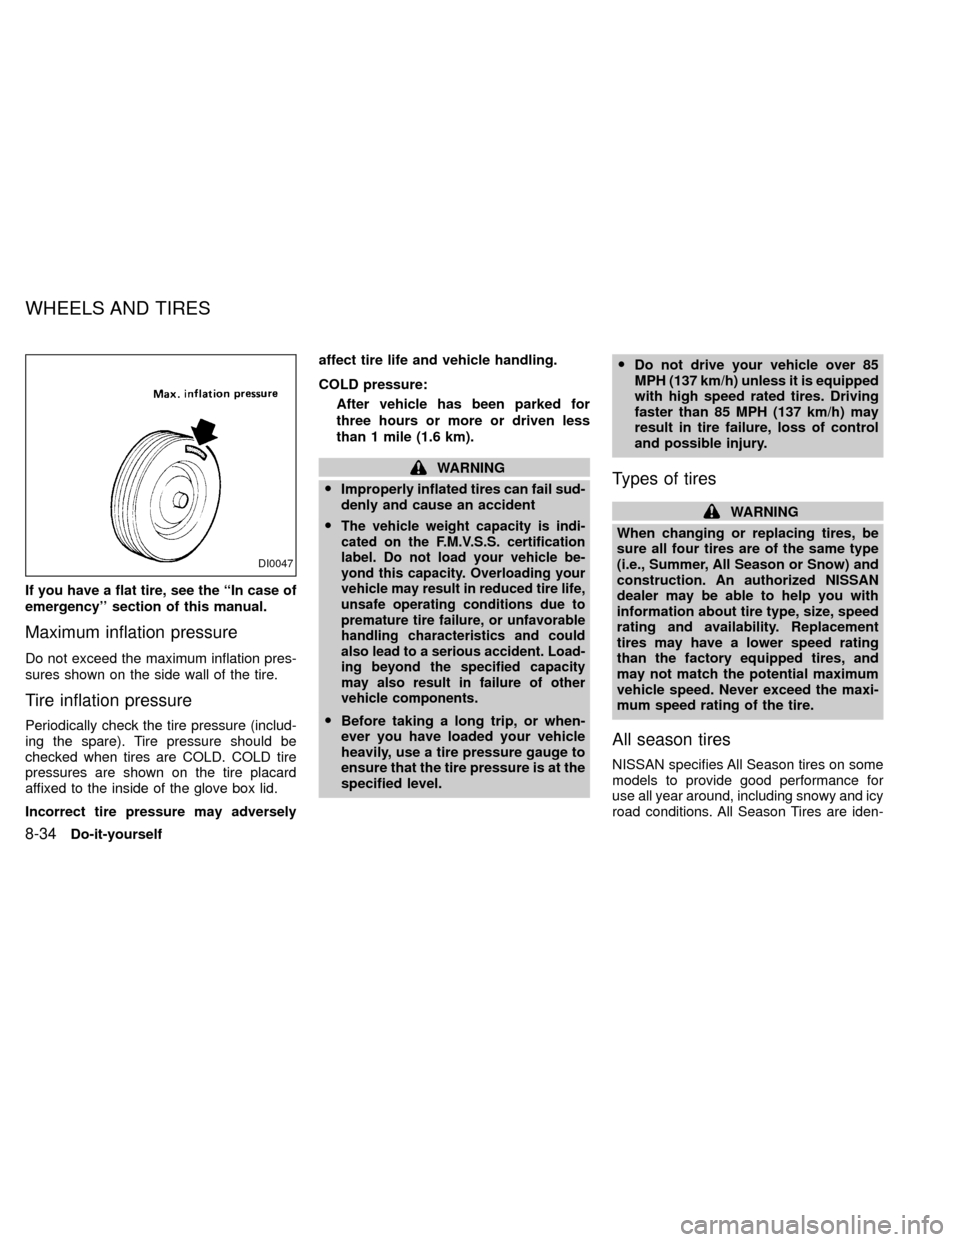
Maximum inflation pressure
Do not exceed the maximum inflation pres-
sures shown on the side wall of the tire.
Tire inflation pressure
Periodically check the tire pressure (includ-
ing the spare). Tire pressure should be
checked when tires are COLD. COLD tire
pressures are shown on the tire placard
affixed to the inside of the glove box lid.
Incorrect tire pressure may adverselyaffect tire life and vehicle handling.
COLD pressure:
After vehicle has been parked for
three hours or more or driven less
than 1 mile (1.6 km).
WARNING
OImproperly inflated tires can fail sud-
denly and cause an accident
O
The vehicle weight capacity is indi-
cated on the F.M.V.S.S. certification
label. Do not load your vehicle be-
yond this capacity. Overloading your
vehicle may result in reduced tire life,
unsafe operating conditions due to
premature tire failure, or unfavorable
handling characteristics and could
also lead to a serious accident. Load-
ing beyond the specified capacity
may also result in failure of other
vehicle components.
OBefore taking a long trip, or when-
ever you have loaded your vehicle
heavily, use a tire pressure gauge to
ensure that the tire pressure is at the
specified level.ODo not drive your vehicle over 85
MPH (137 km/h) unless it is equipped
with high speed rated tires. Driving
faster than 85 MPH (137 km/h) may
result in tire failure, loss of control
and possible injury.
Types of tires
WARNING
When changing or replacing tires, be
sure all four tires are of the same type
(i.e., Summer, All Season or Snow) and
construction. An authorized NISSAN
dealer may be able to help you with
information about tire type, size, speed
rating and availability. Replacement
tires may have a lower speed rating
than the factory equipped tires, and
may not match the potential maximum
vehicle speed. Never exceed the maxi-
mum speed rating of the tire.
All season tires
NISSAN specifies All Season tires on some
models to provide good performance for
use all year around, including snowy and icy
road conditions. All Season Tires are iden-
DI0047
WHEELS AND TIRES
8-34Do-it-yourself
ZX
Page 226 of 263

10 Technical and consumer information
Capacities and recommended fuel/lubricants ......10-2
Fuel recommendation...........................................10-4
Engine oil and oil filter recommendation..............10-6
Recommended SAE viscosity number.................10-7
Air conditioner system refrigerant and
lubricant recommendations ..................................10-8
Engine ..................................................................10-9
Wheel/tire size ....................................................10-10
Dimensions and weights .................................... 10-11
Registering your vehicle in another country ......10-12
Vehicle identification ...........................................10-12
Vehicle identification number (VIN) plate ...........10-12
Vehicle identification number
(chassis number) ................................................10-12
Engine serial number .........................................10-13Fmvss certification label .....................................10-13
Emission control information label .....................10-14
Tire placard ........................................................10-14
Air conditioner specification label.......................10-14
Installing license plate ........................................10-15
Vehicle loading information ................................10-15
Securing the load ...............................................10-16
Trailer towing ......................................................10-19
Towing load/specification chart ..........................10-21
Uniform tire quality grading ................................10-25
Emission control system warranty .....................10-26
Reporting safety defects (US only) ....................10-27
Readiness for inspection/maintenance (I/M)
test (US only) .....................................................10-27
ZX
Page 236 of 263

Unit: in (mm)
XE XE XE SE SE
4x2 4x2 4x4 4x2 4x4
KA24DE VG33E VG33E VG33E VG33E
Overall length 178 (4,520) 178 (4,520) 178 (4,520) 178 (4,520) 178 (4,520)
Overall width 70.4 (1,788) 70.4 (1,788) 70.4 (1,788) 70.4 (1,788) 70.4 (1,788)
Overall height
w/roof rack 73.3 (1,862) 73.3 (1,862) 74 (1,880) 73.6 (1,870) 73.4 (1,865)
w/o roof rack 69.4 (1,764) 69.4 (1,764) 69.4 (1,764) 69.8 (1773) 69.6 (1,768)
Front tread 60 (1,525) 60 (1,525) 60 (1,525) 60 (1,525) 60 (1,525)
Rear tread 59.3 (1,507) 59.3 (1,507) 59.3 (1,507) 59.3 (1,507) 59.3 (1,507)
Wheelbase 104.3 (2,649) 104.3 (2,649) 104.3 (2,649) 104.3 (2,649) 104.3 (2,649)
Gross vehicle weight rating
lb (kg)
Gross axle weight ratingSee the ``F.M.V.S.S. certification label'' on the
driver side door jamb pillar.
Front lb (kg)
Rear lb (kg)
DIMENSIONS AND WEIGHTS
Technical and consumer information10-11
ZX
Page 238 of 263

ENGINE SERIAL NUMBER
The number is stamped on the engine as
shown.
FMVSS CERTIFICATION LABEL
The Federal Motor Vehicle Safety Standard
(FMVSS) certification label is attached as
shown. This label contains valuable vehicle
information, such as: Gross Vehicle Weight
Rating (GVWR), Gross Axle Weight Rating
(GAWR), month and year of manufacture,
Vehicle Identification Number (VIN), etc.
Review it carefully.
ATI1016ATI1017ATI1018
Technical and consumer information10-13
ZX
Page 240 of 263

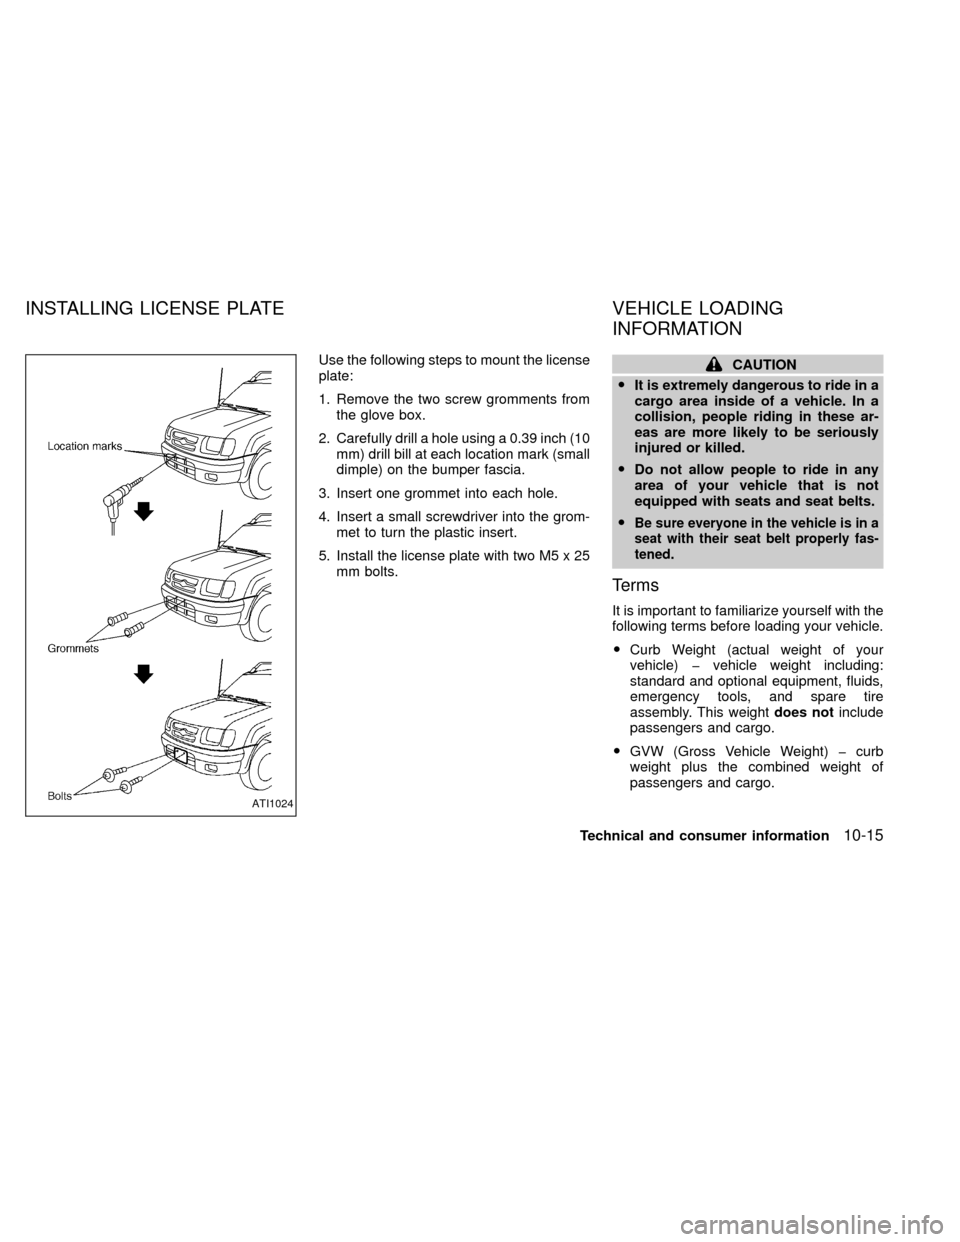
Use the following steps to mount the license
plate:
1. Remove the two screw gromments from
the glove box.
2. Carefully drill a hole using a 0.39 inch (10
mm) drill bill at each location mark (small
dimple) on the bumper fascia.
3. Insert one grommet into each hole.
4. Insert a small screwdriver into the grom-
met to turn the plastic insert.
5. Install the license plate with two M5 x 25
mm bolts.CAUTION
OIt is extremely dangerous to ride in a
cargo area inside of a vehicle. In a
collision, people riding in these ar-
eas are more likely to be seriously
injured or killed.
ODo not allow people to ride in any
area of your vehicle that is not
equipped with seats and seat belts.
O
Be sure everyone in the vehicle is in a
seat with their seat belt properly fas-
tened.
Terms
It is important to familiarize yourself with the
following terms before loading your vehicle.
OCurb Weight (actual weight of your
vehicle) þ vehicle weight including:
standard and optional equipment, fluids,
emergency tools, and spare tire
assembly. This weightdoes notinclude
passengers and cargo.
OGVW (Gross Vehicle Weight) þ curb
weight plus the combined weight of
passengers and cargo.
ATI1024
INSTALLING LICENSE PLATE VEHICLE LOADING
INFORMATION
Technical and consumer information10-15
ZX
Page 241 of 263

OGVWR (Gross Vehicle Weight Rating) þ
maximum total weight (load) limit speci-
fied for the vehicle.
OGAWR (Gross Axle Weight Rating) þ
maximum weight (load) limit specified for
the front or rear axle.
Determining Vehicle Load Capacity
The load capacity of this vehicle is deter-
mined by weight, not by available cargo
space. For example, a roof rack, bike car-
rier, or similar equipment does not increase
load carrying capacity of your vehicle.
To determine vehicle load capacity:
Vehicle weight can be determined by using
a commercial-grade scale, found at places
such as a truck stop, gravel quarry, grain
elevator, or a scrap metal recycling facility.
1) Determine the curb weight of your ve-
hicle.
2) Compare the curb weight amount to the
GVWR specified for your vehicle to de-
termine how much more weight your
vehicle can carry.
3) After loading (cargo and passengers),
reweigh your vehicle to determine if ei-ther GVWR or GAWR for your vehicle is
exceeded. If GVWR is exceeded, re-
move cargo as necessary. If either the
front or rear GAWR is exceeded, shift the
load or remove cargo as necessary.
Loading Tips
OThe GVW must not exceed GVWR or
GAWR as specified on the FMVSS Cer-
tification Label located on the driver's
door jamb pillar.
ODo not load the front and rear axle to the
GAWR. Doing so will exceed the GVWR.
OLoads should be spread out, and cargo
should be properly secured. Large or
heavy objects should be placed toward
the front of the trunk box to help prevent
sliding or shifting.
SECURING THE LOAD
There are tie down hooks located in the
cargo area. The tie down hooks can be used
to secure cargo with ropes or other types of
straps.
Do not apply a total load of more than 33
lbs. (15 kg) to a single hook when secur-
ing cargo.
AIC1106
10-16Technical and consumer information
ZX