2000 NISSAN SENTRA check transmission fluid
[x] Cancel search: check transmission fluidPage 50 of 240

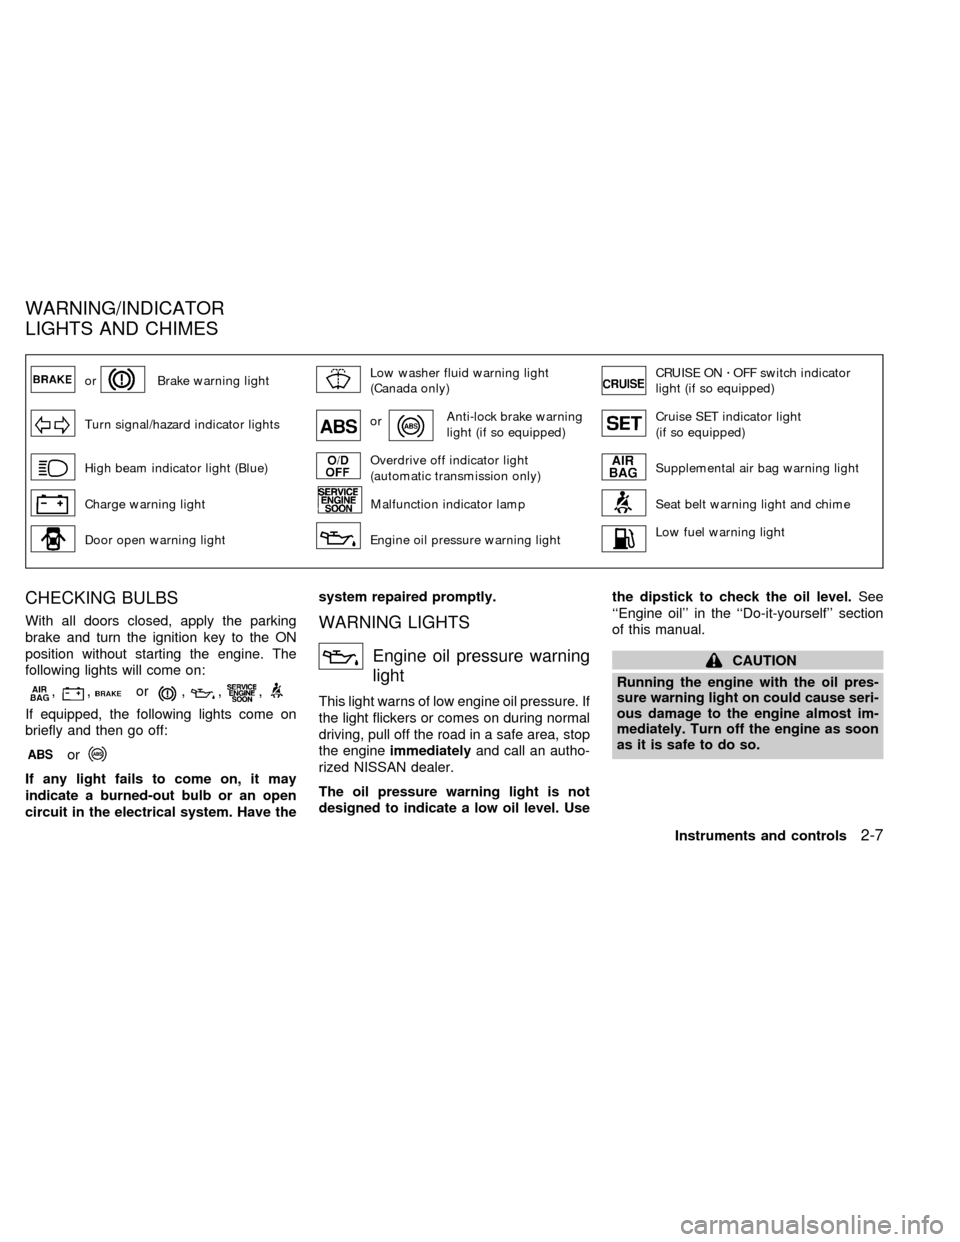
orBrake warning lightLow washer fluid warning light
(Canada only)CRUISE ONzOFF switch indicator
light (if so equipped)
Turn signal/hazard indicator lightsorAnti-lock brake warning
light (if so equipped)Cruise SET indicator light
(if so equipped)
High beam indicator light (Blue)Overdrive off indicator light
(automatic transmission only)Supplemental air bag warning light
Charge warning lightMalfunction indicator lampSeat belt warning light and chime
Door open warning lightEngine oil pressure warning lightLow fuel warning light
CHECKING BULBS
With all doors closed, apply the parking
brake and turn the ignition key to the ON
position without starting the engine. The
following lights will come on:
,,or,,,
If equipped, the following lights come on
briefly and then go off:
or
If any light fails to come on, it may
indicate a burned-out bulb or an open
circuit in the electrical system. Have thesystem repaired promptly.
WARNING LIGHTS
Engine oil pressure warning
light
This light warns of low engine oil pressure. If
the light flickers or comes on during normal
driving, pull off the road in a safe area, stop
the engineimmediatelyand call an autho-
rized NISSAN dealer.
The oil pressure warning light is not
designed to indicate a low oil level. Usethe dipstick to check the oil level.See
``Engine oil'' in the ``Do-it-yourself'' section
of this manual.
CAUTION
Running the engine with the oil pres-
sure warning light on could cause seri-
ous damage to the engine almost im-
mediately. Turn off the engine as soon
as it is safe to do so.
WARNING/INDICATOR
LIGHTS AND CHIMES
Instruments and controls2-7
ZX
Page 52 of 240

1.Check the brake fluid level. Add brake fluid
as necessary. See ``Brake fluid'' in the
``Do-it-yourself'' section of this manual.
2. If the brake fluid level is correct, have the
warning system checked by an autho-
rized NISSAN dealer.
WARNING
cIf the level is below the MINIMUM or
MIN mark on the brake fluid reser-
voir, do not drive until the brake
system has been checked at an au-
thorized NISSAN dealer.
cYour brake system may not be work-
ing properly if the warning light is
on. Driving could be dangerous. If
you judge it to be safe, drive care-
fully to the nearest service station
for repairs. Otherwise, have your ve-
hicle towed.
cPressing the brake pedal with the
engine stopped and/or a low brake
fluid level may increase your stop-
ping distance and braking will re-
quire greater pedal effort as well as
pedal travel.
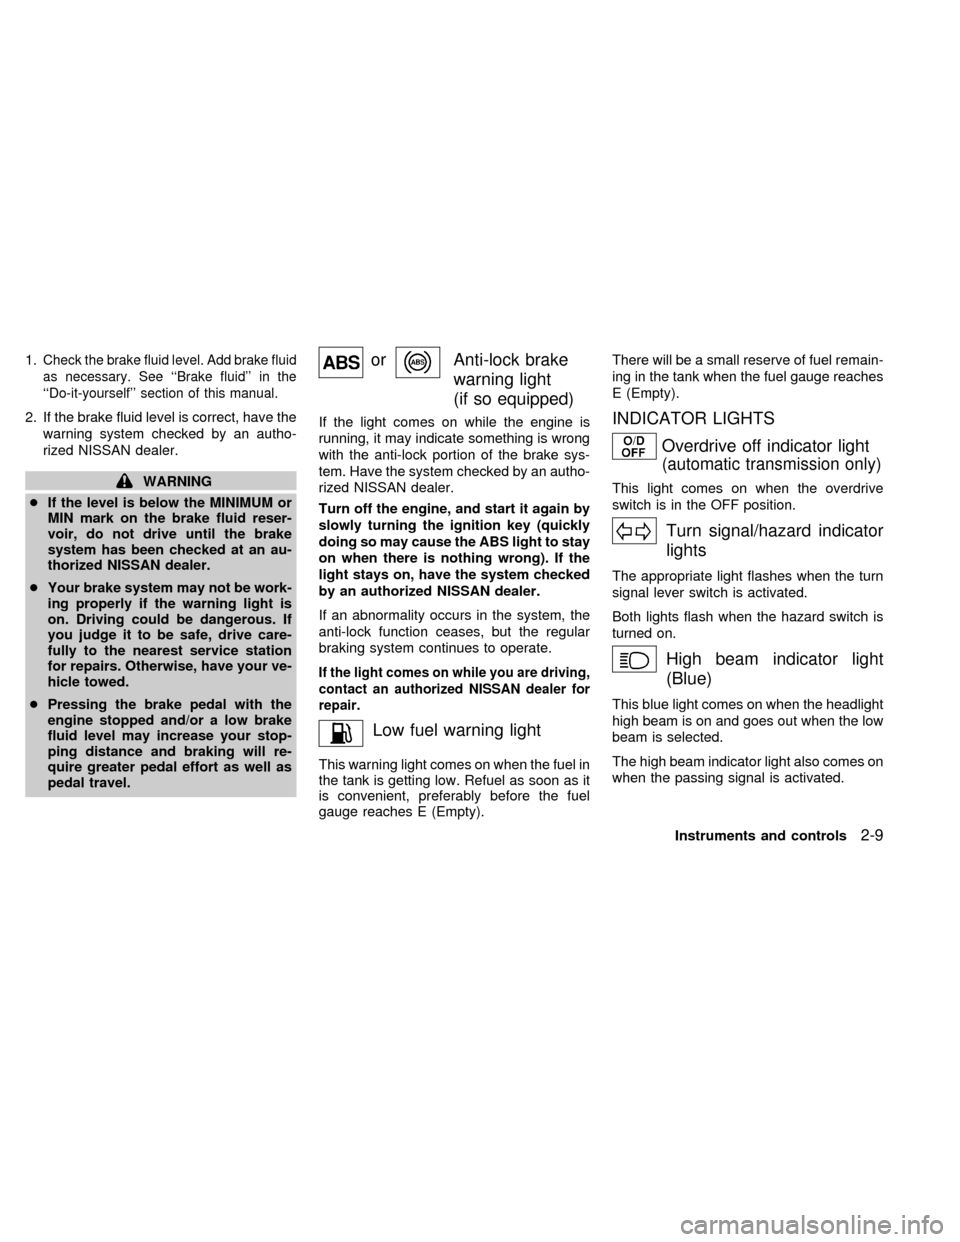
orAnti-lock brake
warning light
(if so equipped)
If the light comes on while the engine is
running, it may indicate something is wrong
with the anti-lock portion of the brake sys-
tem. Have the system checked by an autho-
rized NISSAN dealer.
Turn off the engine, and start it again by
slowly turning the ignition key (quickly
doing so may cause the ABS light to stay
on when there is nothing wrong). If the
light stays on, have the system checked
by an authorized NISSAN dealer.
If an abnormality occurs in the system, the
anti-lock function ceases, but the regular
braking system continues to operate.
If the light comes on while you are driving,
contact an authorized NISSAN dealer for
repair.
Low fuel warning light
This warning light comes on when the fuel in
the tank is getting low. Refuel as soon as it
is convenient, preferably before the fuel
gauge reaches E (Empty).There will be a small reserve of fuel remain-
ing in the tank when the fuel gauge reaches
E (Empty).
INDICATOR LIGHTS
Overdrive off indicator light
(automatic transmission only)
This light comes on when the overdrive
switch is in the OFF position.
Turn signal/hazard indicator
lights
The appropriate light flashes when the turn
signal lever switch is activated.
Both lights flash when the hazard switch is
turned on.
High beam indicator light
(Blue)
This blue light comes on when the headlight
high beam is on and goes out when the low
beam is selected.
The high beam indicator light also comes on
when the passing signal is activated.
Instruments and controls
2-9
ZX
Page 157 of 240

8 Do-it-yourself
Maintenance precautions .......................................8-2
Engine compartment check locations -
QG engine .............................................................8-4
Engine compartment check locations -
SR engine ..............................................................8-5
Engine cooling system ...........................................8-6
Checking engine coolant level ...............................8-6
Changing engine coolant .......................................8-8
Engine oil ...............................................................8-9
Checking engine oil level .......................................8-9
Changing engine oil .............................................8-10
Changing engine oil filter .....................................8-12
Automatic transmission fluid ................................8-13
Temperature conditions for checking ...................8-14
Power steering fluid..............................................8-15
Brake fluid ............................................................8-15
Clutch fluid............................................................8-16
Window washer fluid ............................................8-16
Battery ..................................................................8-17
Jump starting ........................................................8-18
Drive belts ............................................................8-19
Spark plug ............................................................8-20Replacing spark plugs ..........................................8-20
Air cleaner ............................................................8-21
Windshield wiper blades ......................................8-22
Cleaning ...............................................................8-22
Replacing .............................................................8-22
Parking brake and brake pedal ............................8-23
Checking park brake ............................................8-23
Checking brake pedal ..........................................8-23
Brake booster .......................................................8-24
Clutch pedal .........................................................8-25
Checking clutch pedal ..........................................8-25
Fuses ....................................................................8-25
Engine compartment ............................................8-25
Passenger compartment ......................................8-27
Multi-remote controller battery replacement ........8-28
Lights ....................................................................8-29
Headlights ............................................................8-29
Fog lights (if so equipped) ...................................8-32
Exterior and interior lights ....................................8-33
Wheels and tires ..................................................8-36
Tire pressure ........................................................8-36
Types of tires........................................................8-37
ZX
Page 171 of 240

TEMPERATURE CONDITIONS
FOR CHECKING
cThe fluid level should be checked using
the HOT range on the dipstick after the
following conditions have been met:
Ð The engine should be warmed up to
operating temperature.
Ð The vehicle should be driven at least 5
minutes.
Ð The automatic transmission fluid should
be warmed to between 122 and 176ÉF
(50 and 80ÉC).cThe fluid can be checked at fluid tem-
peratures of 86 to 122ÉF (30 to 50ÉC)
using the COLD range on the dipstick
after the engine is warmed up and before
driving. However, the fluid should be
re-checked using the HOT range.
1. Park the vehicle on a level surface and
set the parking brake.
2. Start the engine and then move the shift
selector lever through each gear range.
Move the shift selector lever to P (Park)
after you have moved it through all
ranges.3. Check the fluid level with the engine
idling.
4. Remove the dipstick and wipe it clean
with lint-free paper.
5. Reinsert the dipstick into the dipstick
tube as far as it will go.
6. Remove the dipstick and note the read-
ing. If the level is at the low side of either
range, add fluid through the dipstick tube.
WDI0019
8-14Do-it-yourself
ZX
Page 172 of 240

CAUTION
DO NOT OVERFILL. Use ONLY Nissan
Matic `D' (Continental U.S. and Alaska)
or Canada NISSAN Automatic Trans-
mission Fluid. Dexron
TMIII/MerconTM
or equivalent may also be used. Out-
side the continental United States and
Alaska contact an authorized NISSAN
dealership for more information re-
garding suitable fluids, including rec-
ommended brand(s) of Dexron
TM
III/MerconTMAutomatic Transmission
Fluid.
NOTE:
If the vehicle has been driven for a long
time at high speeds, or in city traffic in
hot weather, or if it is being used to pull
a trailer, the accurate fluid level cannot
be read. You should wait until the fluid
has cooled down (about 30 minutes) be-
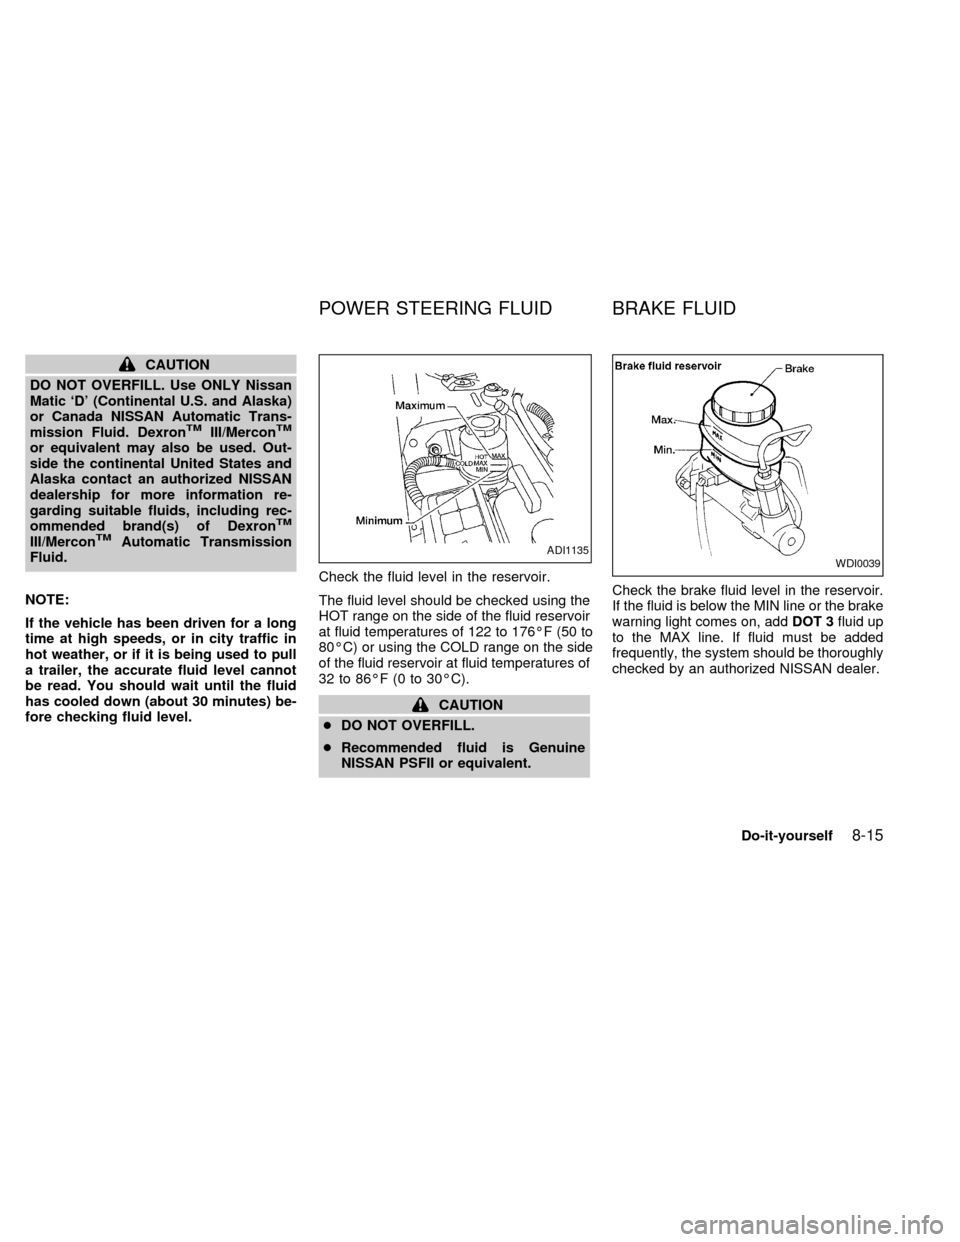
fore checking fluid level.Check the fluid level in the reservoir.
The fluid level should be checked using the
HOT range on the side of the fluid reservoir
at fluid temperatures of 122 to 176ÉF (50 to
80ÉC) or using the COLD range on the side
of the fluid reservoir at fluid temperatures of
32 to 86ÉF (0 to 30ÉC).
CAUTION
cDO NOT OVERFILL.
cRecommended fluid is Genuine
NISSAN PSFII or equivalent.Check the brake fluid level in the reservoir.
If the fluid is below the MIN line or the brake
warning light comes on, addDOT 3fluid up
to the MAX line. If fluid must be added
frequently, the system should be thoroughly
checked by an authorized NISSAN dealer.
ADI1135WDI0039
POWER STEERING FLUID BRAKE FLUID
Do-it-yourself8-15
ZX
Page 173 of 240

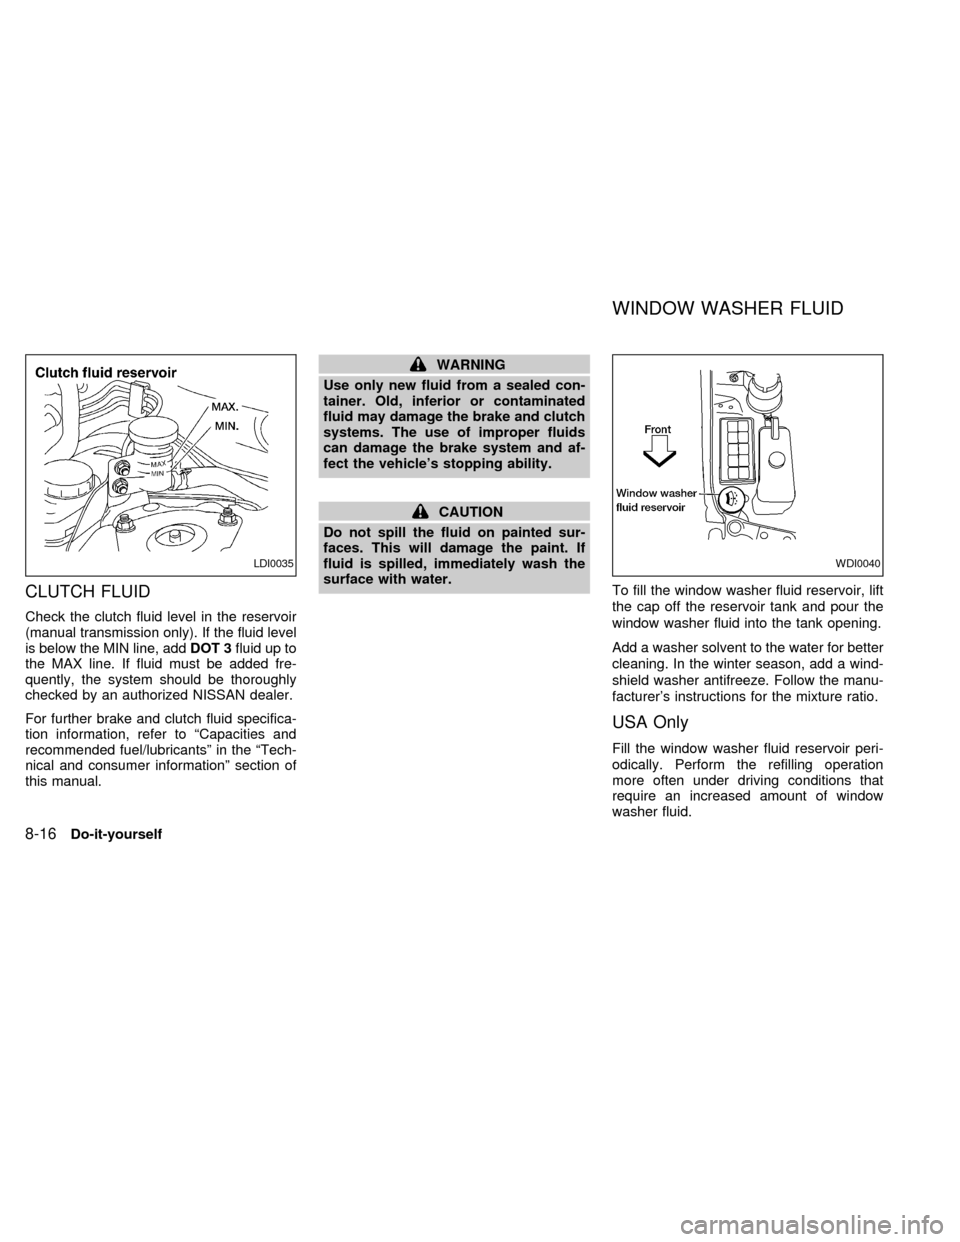
CLUTCH FLUID
Check the clutch fluid level in the reservoir
(manual transmission only). If the fluid level
is below the MIN line, addDOT 3fluid up to
the MAX line. If fluid must be added fre-
quently, the system should be thoroughly
checked by an authorized NISSAN dealer.
For further brake and clutch fluid specifica-
tion information, refer to ªCapacities and
recommended fuel/lubricantsº in the ªTech-
nical and consumer informationº section of
this manual.
WARNING
Use only new fluid from a sealed con-
tainer. Old, inferior or contaminated
fluid may damage the brake and clutch
systems. The use of improper fluids
can damage the brake system and af-
fect the vehicle's stopping ability.
CAUTION
Do not spill the fluid on painted sur-
faces. This will damage the paint. If
fluid is spilled, immediately wash the
surface with water.
To fill the window washer fluid reservoir, lift
the cap off the reservoir tank and pour the
window washer fluid into the tank opening.
Add a washer solvent to the water for better
cleaning. In the winter season, add a wind-
shield washer antifreeze. Follow the manu-
facturer's instructions for the mixture ratio.
USA Only
Fill the window washer fluid reservoir peri-
odically. Perform the refilling operation
more often under driving conditions that
require an increased amount of window
washer fluid.
LDI0035WDI0040
WINDOW WASHER FLUID
8-16Do-it-yourself
ZX
Page 203 of 240

has the proper distance under it when de-
pressed fully. Check the brake booster func-
tion. Be certain to keep the floor mat away
from the pedal.
Parking brake* ÐCheck that the lever has
the proper travel and confirm that your
vehicle is held securely on a fairly steep hill
with only the parking brake applied.
Automatic transmission ``P position''
mechanism ÐOn a fairly steep hill check
that your vehicle is held securely with the
selector lever in the P (Park) position with-
out applying any brakes.
Under the hood and vehicle
The maintenance items listed here should
be checked periodically, such as each time
you check the engine oil or refuel.
Additional information on the following
items with an ``*'' is found in the ``Do-it-
yourself'' section of this manual.
Windshield washer fluid* ÐCheck for
adequate fluid in the tank.
Engine oil level* ÐCheck the level after
parking the vehicle on a level surface, with
the engine off. Wait a few minutes for the oil
to drain back into the oil pan.Brake and (if so equipped) clutch fluid
levels* ÐMake sure the brake and clutch
fluid level is between the MIN and MAX
lines on each reservoir.
Power steering fluid level* and lines Ð
Check the level when the fluid is cold, with
the engine off. Check the lines for proper
attachment, leaks, cracks, etc.
Automatic transmission fluid level* Ð
Check the level after putting the shift selec-
tor lever in P (Park) with the engine idling at
operating temperature.
Engine coolant level* ÐCheck the cool-
ant level when the engine is cold.
Radiator and hoses ÐCheck the front of
the radiator and clean off any dirt, insects,
leaves, etc., that may have accumulated.
Make sure the hoses have no cracks, de-
formation, rot or loose connections.
Engine drive belts* ÐMake sure the drive
belts are not frayed, worn, cracked or oily.
Battery* ÐCheck the fluid level in each
cell.Exhaust system ÐMake sure there are no
cracks, holes, loose joints or supports. If the
sound of the exhaust seems unusual or
there is a smell of exhaust fumes, immedi-
ately have the exhaust system inspected by
an authorized NISSAN dealer. See the car-
bon monoxide warning in the ``Starting and
driving'' section of this manual.
Underbody ÐThe underbody is frequently
exposed to corrosive substances such as
those used on icy roads or to control dust. It
is very important to remove these sub-
stances, from the underbody, otherwise rust
may form on the floor pan, frame, fuel lines
and exhaust system. At the end of winter,
the underbody should be thoroughly flushed
with plain water, especially those areas
where mud and dirt may have accumulated.
See the ``Appearance and care'' section of
this manual.
Fluid leaks ÐCheck under the vehicle for
fuel, oil, water or other fluid leaks after the
vehicle has been parked for awhile. Water
dripping from the air conditioner after use is
normal. If you should notice any leaks or if
gasoline fumes are evident, check for the
cause and have it corrected immediately by
an authorized NISSAN dealer.
9-4Maintenance
ZX
Page 209 of 240

EXPLANATION OF MAINTE-
NANCE ITEMS
Additional information on the following
items with an ``*'' is found in the ``Do-it-
yourself'' section of this manual.
Emission control system maintenance
Drive belts* ÐCheck drive belts for wear,
fraying or cracking and also for proper ten-
sion. Replace any damaged drive belts.
Air cleaner filter ÐUnder normal driving
conditions, the air cleaner filter should be
replaced in accordance with the mainte-
nance schedule. However, driving the ve-
hicle in dusty areas may cause rapid clog-
ging of the element. Consequently, the
element may have to be replaced more
frequently.
EVAP vapor lines ÐCheck vapor lines and
connections for leaks, looseness or deteriora-
tion. If leaks are found, replace them.
Fuel lines ÐCheck the fuel hoses, piping
and connections for leaks, looseness or
deterioration. Replace any damaged parts.
Engine coolant* ÐDrain and flush the
cooling system.Engine oil & oil filter* ÐUnder normal
driving conditions, the engine oil and oil filter
should be replaced in accordance with the
maintenance schedule. However, under se-
vere driving conditions, they may have to be
replaced more frequently.
Spark plugs* ÐReplace with new plugs
having the correct heat range.
Intake & exhaust valve clearance Ð
Check and adjust the valve clearance.
Chassis and body maintenance
Brake lines & cables ÐCheck the brake
lines and hoses (including brake booster
vacuum hoses, connections & check valve)
and parking brake cables for proper attach-
ment, leaks, cracks, chafing, abrasion, de-
terioration, etc.
Brake pads, rotors, drums & linings Ð
Check these and the other brake compo-
nents for wear, deterioration and leaks. Un-
der severe driving conditions, they may
have to be inspected more frequently.
Manual & automatic transmission fluid*
ÐCheck the fluid level and visually inspect
for signs of leakage. Under severe drivingconditions, the fluid should be replaced at
the specified interval.
Steering gear & linkage, axle & suspen-
sion parts, and drive shaft boots Ð
Check for damage, looseness and leakage
of oil or grease. Under severe driving con-
ditions, inspection should be performed
more frequently.
Exhaust system ÐVisually check the ex-
haust pipes, muffler, and hangers for proper
attachment, leaks, cracks, chafing, abra-
sion, deterioration, etc. Under severe driv-
ing conditions, inspection should be per-
formed more frequently.
Supplemental air bag and supplemental
side air bag (if so equipped) system Ð
Check the supplemental air bag system(s)
components for proper attachment, damage,
deformities, cracks, rust, etc. Work around and
on the supplemental air bag system should be
done by an authorized NISSAN dealer.
9-10Maintenance
ZX