2000 NISSAN QUEST seat adjustment
[x] Cancel search: seat adjustmentPage 6 of 292

Table of
ContentsSeats, restraints and supplemental air bag systems
Instruments and controls
Pre-driving checks and adjustments
Heater, air conditioner and audio systems
Starting and driving
In case of emergency
Appearance and care
Do-it-yourself
Maintenance
Technical and consumer information
Index
1
2
3
4
5
6
7
8
9
10
11
Page 7 of 292

1 Seats, restraints and supplemental air
bag systems
Seats ......................................................................1-2
Front manual seat adjustment ...............................1-3
Front power seat adjustment (if so equipped) .......1-4
Three-passenger seat adjustment .........................1-7
Head restraint adjustment ....................................1-10
Armrests ...............................................................1-11
Underseat storage tray.........................................1-11
Flexible seating .................................................1-12
Tabletop seats ......................................................1-18
Seats/floor mats ...................................................1-19
Seating arrangements ..........................................1-19
Seat positions .......................................................1-20
With second row bench seat................................1-20
With second row bucket seats .............................1-24
Floor mat positions ...............................................1-27
Supplemental restraint system .............................1-31
Precautions on supplemental restraint system ....1-31
Supplemental air bag warning labels ...................1-36
Supplemental air bag warning light......................1-37
Seat belts .............................................................1-39
Precautions on seat belt usage ...........................1-39
Child safety...........................................................1-40Pregnant women ..................................................1-41
Injured persons ....................................................1-42
Three-point type seat belt with retractor ..............1-42
Three-point type seat belt with retractor for
second row bucket seats .....................................1-45
Three-passenger bench seat in the second
row position ..........................................................1-49
Three-passenger bench seat ...............................1-50
Two-point type seat belt without retractor
(center of rear seat) .............................................1-51
Seat belt extenders ..............................................1-53
Seat belt maintenance .........................................1-54
Precautions on child restraints .............................1-54
Child restraints .....................................................1-54
Installation on three-passenger bench seat
center position ......................................................1-56
Installation on second and third row outboard
positions ...............................................................1-59
Installation on front passenger seat .....................1-64
Child restraint with top tether strap ......................1-67
Installation on second row bench or bucket
seat .......................................................................1-68
ZX
Page 10 of 292
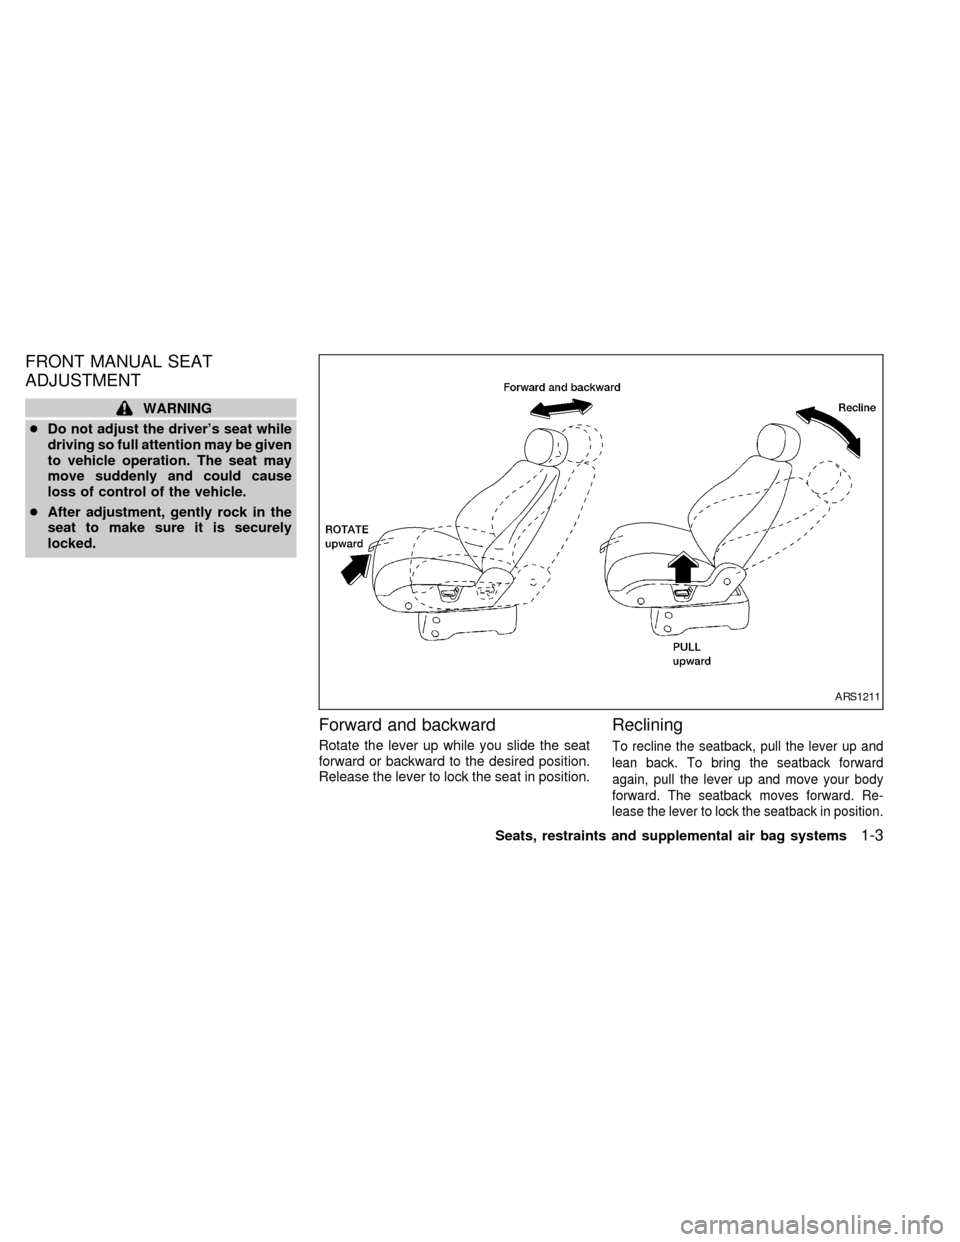
FRONT MANUAL SEAT
ADJUSTMENT
WARNING
cDo not adjust the driver's seat while
driving so full attention may be given
to vehicle operation. The seat may
move suddenly and could cause
loss of control of the vehicle.
cAfter adjustment, gently rock in the
seat to make sure it is securely
locked.
Forward and backward
Rotate the lever up while you slide the seat
forward or backward to the desired position.
Release the lever to lock the seat in position.
Reclining
To recline the seatback, pull the lever up and
lean back. To bring the seatback forward
again, pull the lever up and move your body
forward. The seatback moves forward. Re-
lease the lever to lock the seatback in position.
ARS1211
Seats, restraints and supplemental air bag systems1-3
ZX
Page 11 of 292
FRONT POWER SEAT
ADJUSTMENT (if so equipped)
WARNING
cDo not adjust the driver's seat while
driving so full attention may be given
to vehicle operation.
c
Do not leave children unattended in-
side the vehicle. They could unknow-
ingly activate switches or controls.
Unattended children could become
involved in serious accidents.
For memory seat and mirror information
see ``Memory driver seat and mirrors'' in the
``Pre-driving checks and adjustments'' sec-
tion.
Operating tips
cThe motor has an auto-reset overload
protection circuit. If the motor stops dur-
ing operation, wait 30 seconds, then re-
activate the switch.cDo not operate the power support seat
for a long period of time when the engine
is off. This discharges the battery.
1-4Seats, restraints and supplemental air bag systems
ZX
Page 14 of 292
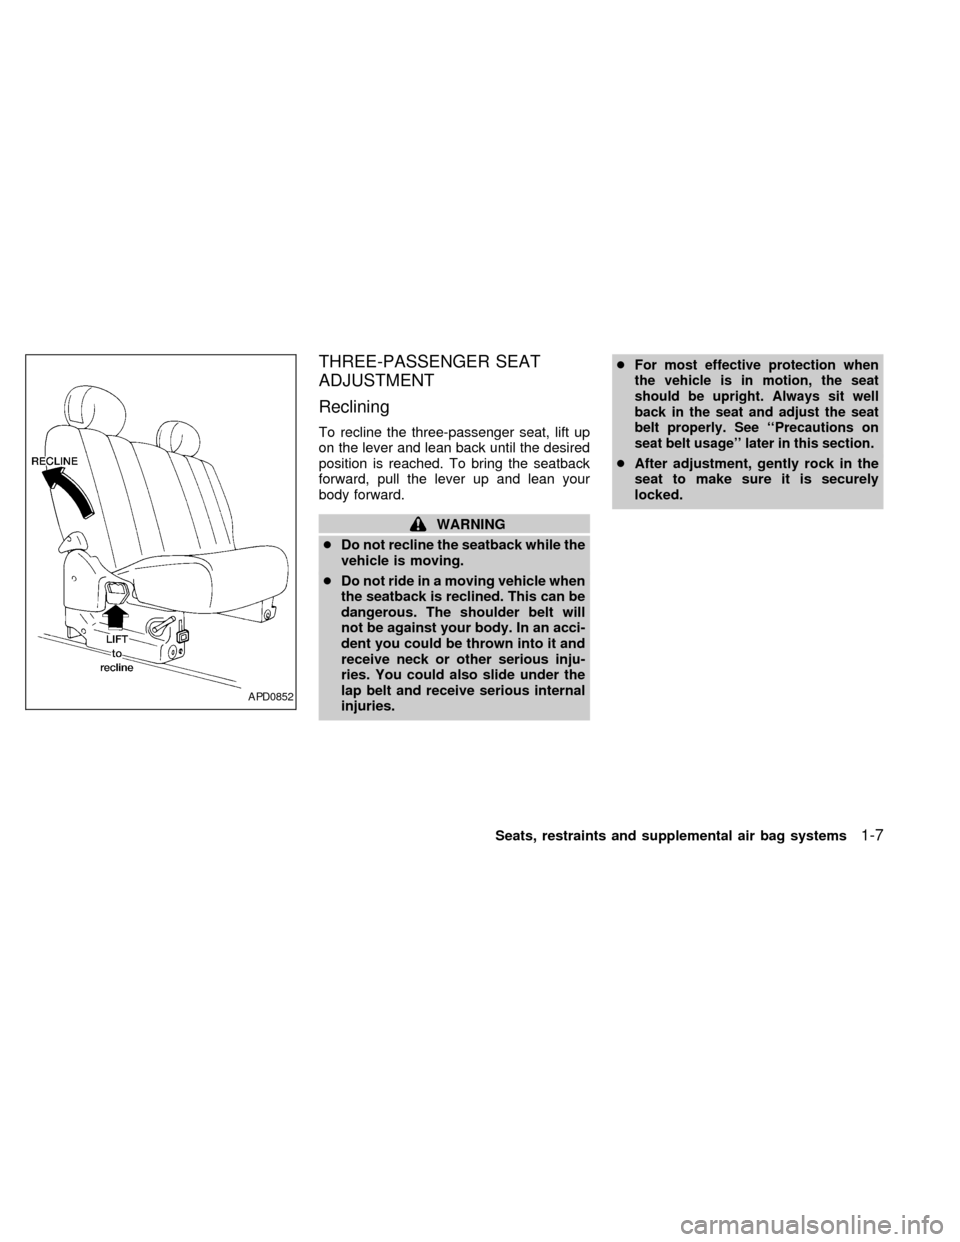
THREE-PASSENGER SEAT
ADJUSTMENT
Reclining
To recline the three-passenger seat, lift up
on the lever and lean back until the desired
position is reached. To bring the seatback
forward, pull the lever up and lean your
body forward.
WARNING
cDo not recline the seatback while the
vehicle is moving.
cDo not ride in a moving vehicle when
the seatback is reclined. This can be
dangerous. The shoulder belt will
not be against your body. In an acci-
dent you could be thrown into it and
receive neck or other serious inju-
ries. You could also slide under the
lap belt and receive serious internal
injuries.c
For most effective protection when
the vehicle is in motion, the seat
should be upright. Always sit well
back in the seat and adjust the seat
belt properly. See ``Precautions on
seat belt usage'' later in this section.
cAfter adjustment, gently rock in the
seat to make sure it is securely
locked.
APD0852
Seats, restraints and supplemental air bag systems1-7
ZX
Page 16 of 292
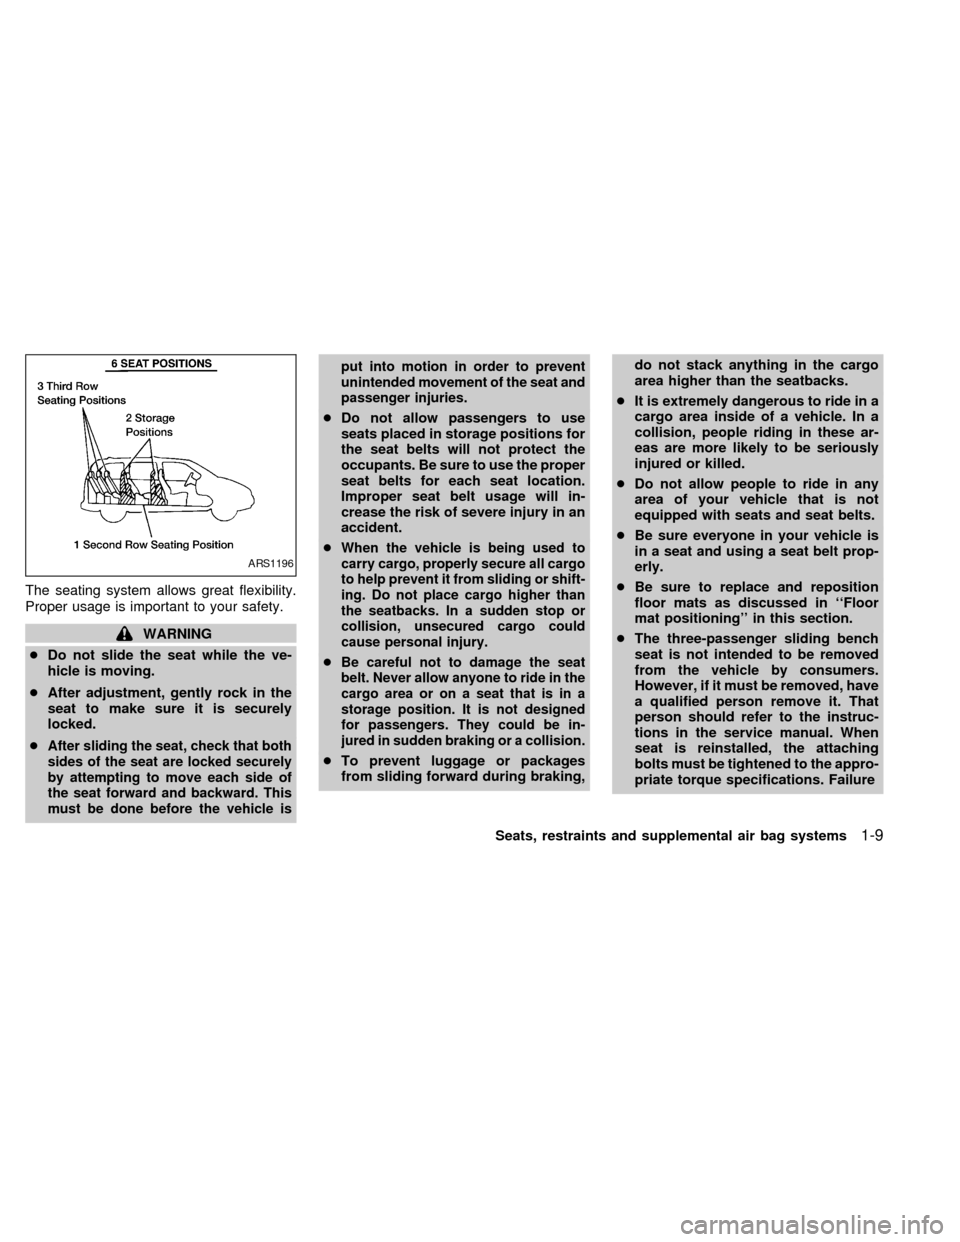
The seating system allows great flexibility.
Proper usage is important to your safety.
WARNING
cDo not slide the seat while the ve-
hicle is moving.
cAfter adjustment, gently rock in the
seat to make sure it is securely
locked.
c
After sliding the seat, check that both
sides of the seat are locked securely
by attempting to move each side of
the seat forward and backward. This
must be done before the vehicle isput into motion in order to prevent
unintended movement of the seat and
passenger injuries.
cDo not allow passengers to use
seats placed in storage positions for
the seat belts will not protect the
occupants. Be sure to use the proper
seat belts for each seat location.
Improper seat belt usage will in-
crease the risk of severe injury in an
accident.
c
When the vehicle is being used to
carry cargo, properly secure all cargo
to help prevent it from sliding or shift-
ing. Do not place cargo higher than
the seatbacks. In a sudden stop or
collision, unsecured cargo could
cause personal injury.
cBe careful not to damage the seat
belt. Never allow anyone to ride in the
cargo area or on a seat that is in a
storage position. It is not designed
for passengers. They could be in-
jured in sudden braking or a collision.
cTo prevent luggage or packages
from sliding forward during braking,do not stack anything in the cargo
area higher than the seatbacks.
cIt is extremely dangerous to ride in a
cargo area inside of a vehicle. In a
collision, people riding in these ar-
eas are more likely to be seriously
injured or killed.
cDo not allow people to ride in any
area of your vehicle that is not
equipped with seats and seat belts.
cBe sure everyone in your vehicle is
in a seat and using a seat belt prop-
erly.
cBe sure to replace and reposition
floor mats as discussed in ``Floor
mat positioning'' in this section.
cThe three-passenger sliding bench
seat is not intended to be removed
from the vehicle by consumers.
However, if it must be removed, have
a qualified person remove it. That
person should refer to the instruc-
tions in the service manual. When
seat is reinstalled, the attaching
bolts must be tightened to the appro-
priate torque specifications. Failure
ARS1196
Seats, restraints and supplemental air bag systems1-9
ZX
Page 17 of 292
to follow these instructions could
increase the chance and/or severity
of injury in an accident.
Cleaning the seat tracks
The seat tracks for the three-passenger
sliding bench seat should be cleaned peri-
odically with a high-powered vacuum
cleaner. Dirty seat tracks may reduce the
sliding ability of the seat. A wet cleansing
agent may be used if necessary, but the
seat tracks must be thoroughly dried.
Use a cloth wrapped around a screwdriver
(or similar object) to clean the seat tracks.
Do not use your fingers to clean debris from
the tracks.
Do not apply any type of lubricant to the
seat tracks.
CAUTION
Never insert fingers into the seat track
rails. The rails may be sharp and could
cause injury.
HEAD RESTRAINT ADJUST-
MENT
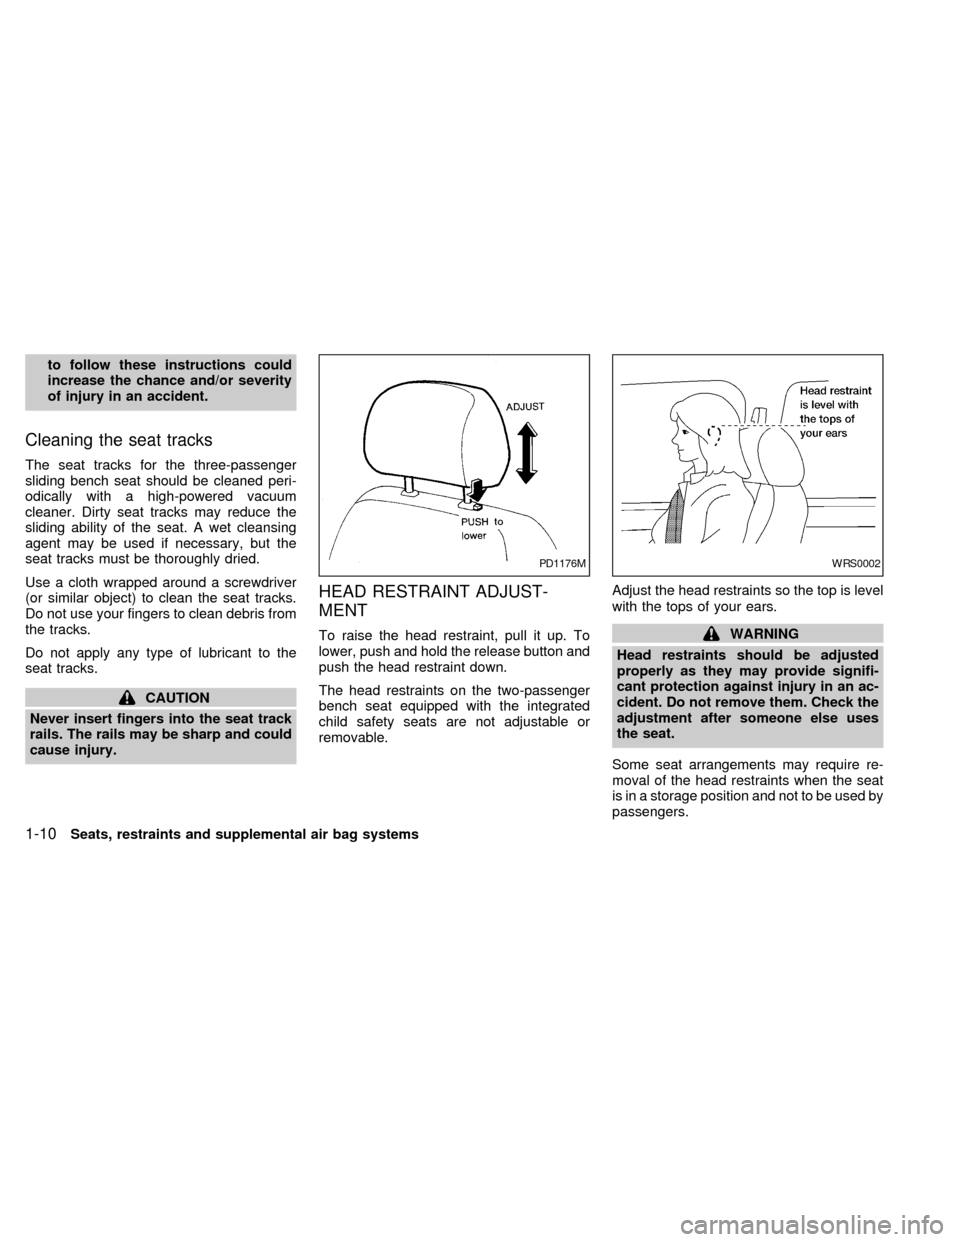
To raise the head restraint, pull it up. To
lower, push and hold the release button and
push the head restraint down.
The head restraints on the two-passenger
bench seat equipped with the integrated
child safety seats are not adjustable or
removable.Adjust the head restraints so the top is level
with the tops of your ears.WARNING
Head restraints should be adjusted
properly as they may provide signifi-
cant protection against injury in an ac-
cident. Do not remove them. Check the
adjustment after someone else uses
the seat.
Some seat arrangements may require re-
moval of the head restraints when the seat
is in a storage position and not to be used by
passengers.
PD1176MWRS0002
1-10Seats, restraints and supplemental air bag systems
ZX
Page 19 of 292
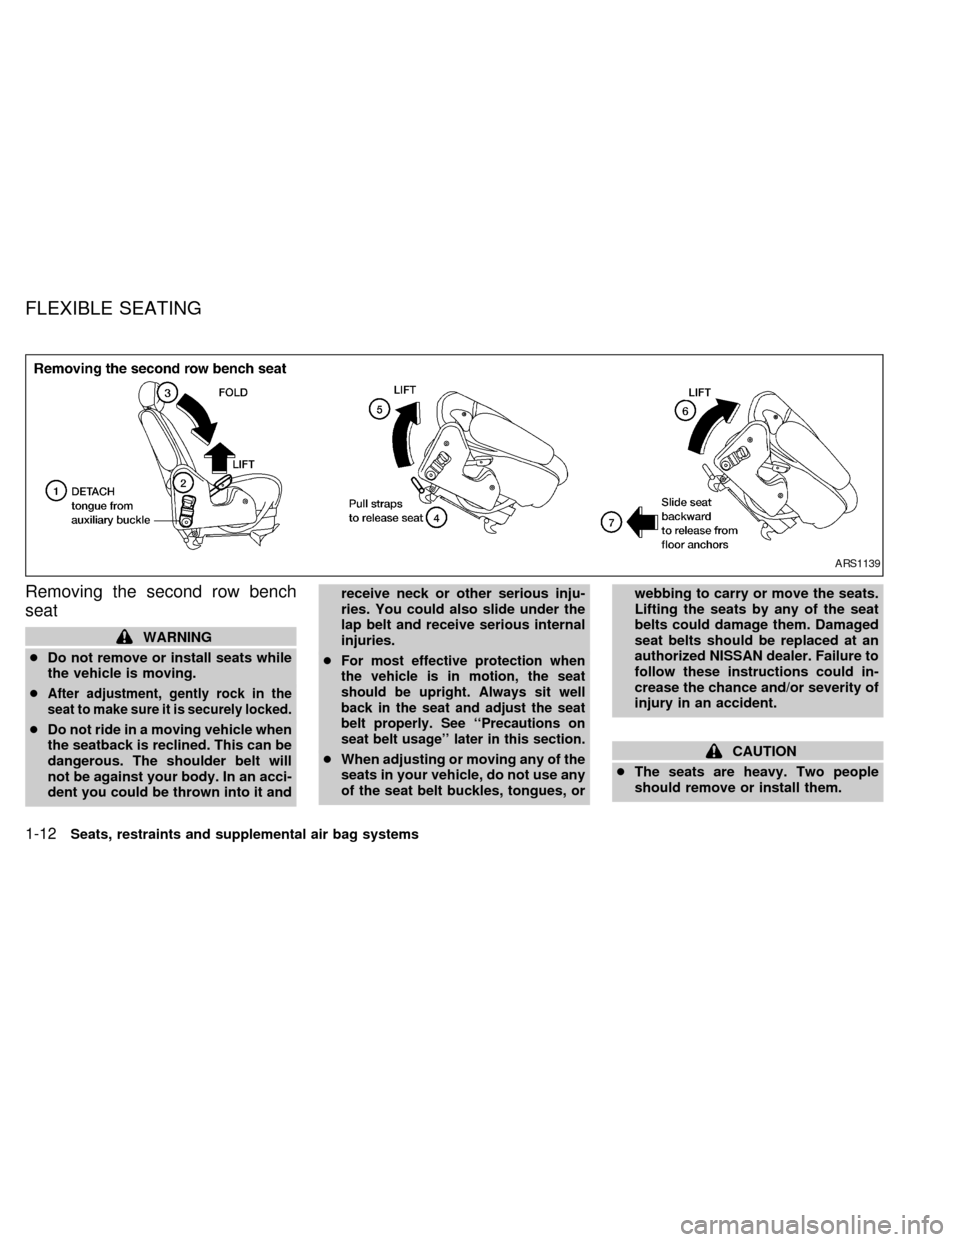
Removing the second row bench
seat
WARNING
cDo not remove or install seats while
the vehicle is moving.
c
After adjustment, gently rock in the
seat to make sure it is securely locked.
cDo not ride in a moving vehicle when
the seatback is reclined. This can be
dangerous. The shoulder belt will
not be against your body. In an acci-
dent you could be thrown into it andreceive neck or other serious inju-
ries. You could also slide under the
lap belt and receive serious internal
injuries.
c
For most effective protection when
the vehicle is in motion, the seat
should be upright. Always sit well
back in the seat and adjust the seat
belt properly. See ``Precautions on
seat belt usage'' later in this section.
cWhen adjusting or moving any of the
seats in your vehicle, do not use any
of the seat belt buckles, tongues, orwebbing to carry or move the seats.
Lifting the seats by any of the seat
belts could damage them. Damaged
seat belts should be replaced at an
authorized NISSAN dealer. Failure to
follow these instructions could in-
crease the chance and/or severity of
injury in an accident.CAUTION
cThe seats are heavy. Two people
should remove or install them.
ARS1139
FLEXIBLE SEATING
1-12Seats, restraints and supplemental air bag systems
ZX