2000 NISSAN QUEST door lock
[x] Cancel search: door lockPage 55 of 292

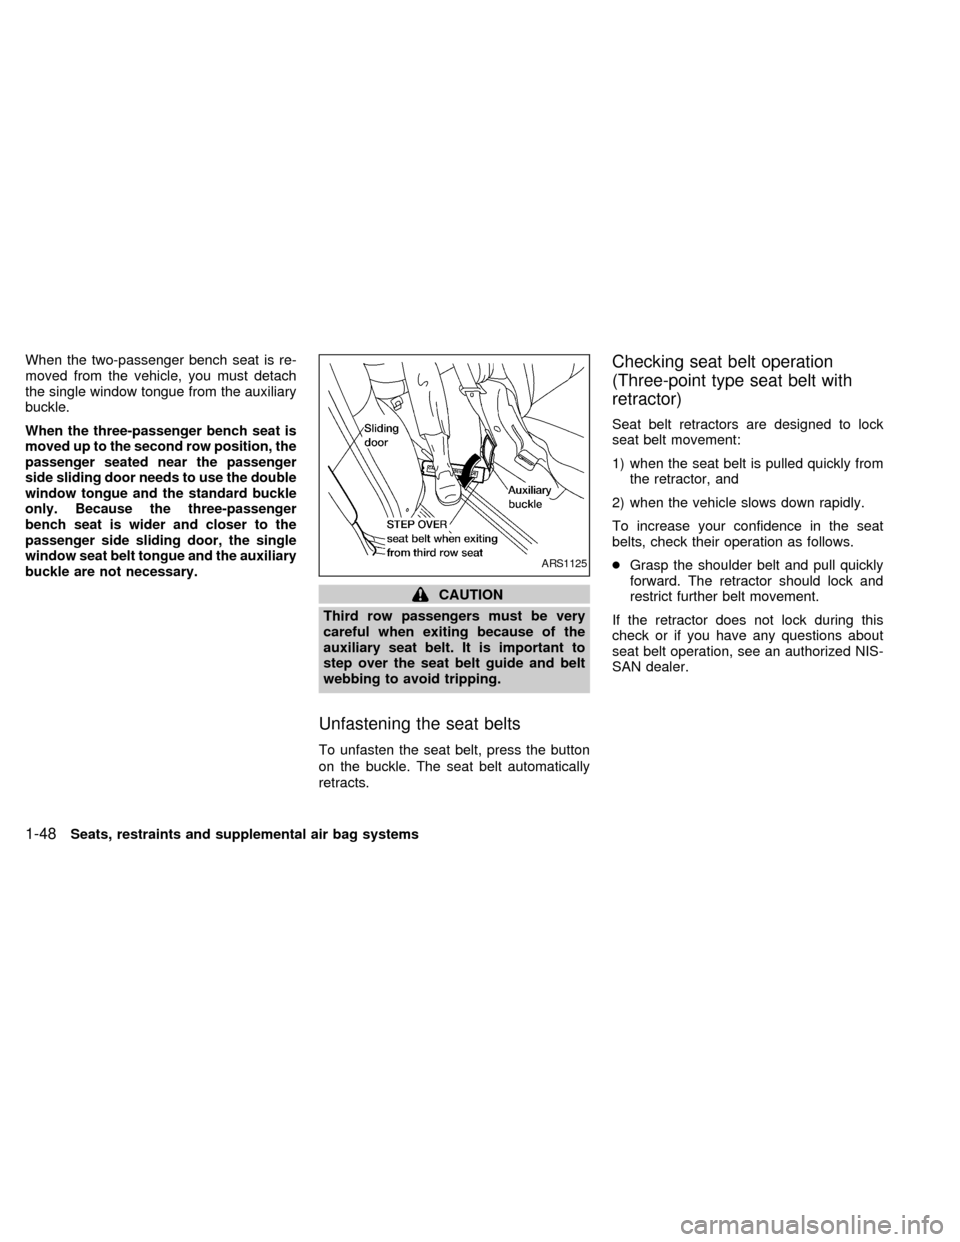
When the two-passenger bench seat is re-
moved from the vehicle, you must detach
the single window tongue from the auxiliary
buckle.
When the three-passenger bench seat is
moved up to the second row position, the
passenger seated near the passenger
side sliding door needs to use the double
window tongue and the standard buckle
only. Because the three-passenger
bench seat is wider and closer to the
passenger side sliding door, the single
window seat belt tongue and the auxiliary
buckle are not necessary.
CAUTION
Third row passengers must be very
careful when exiting because of the
auxiliary seat belt. It is important to
step over the seat belt guide and belt
webbing to avoid tripping.
Unfastening the seat belts
To unfasten the seat belt, press the button
on the buckle. The seat belt automatically
retracts.
Checking seat belt operation
(Three-point type seat belt with
retractor)
Seat belt retractors are designed to lock
seat belt movement:
1) when the seat belt is pulled quickly from
the retractor, and
2) when the vehicle slows down rapidly.
To increase your confidence in the seat
belts, check their operation as follows.
cGrasp the shoulder belt and pull quickly
forward. The retractor should lock and
restrict further belt movement.
If the retractor does not lock during this
check or if you have any questions about
seat belt operation, see an authorized NIS-
SAN dealer.
ARS1125
1-48Seats, restraints and supplemental air bag systems
ZX
Page 66 of 292

INSTALLATION ON SECOND
AND THIRD ROW OUTBOARD
POSITIONS
Front facing
The following instructions apply to second
row bucket seats, the second row bench
seat and the outboard positions of the three-
passenger bench seat.
WARNING
When installing a child restraint in the
two-passenger bench seat, if it is
placed in the seating position next to
the passenger side sliding door, be
sure both the auxiliary buckle and main
buckle are properly fastened. Failure to
do so could increase the chance and/or
severity of injury in an accident.
WARNING
cThe three-point belt in your vehicle
is equipped with locking mode re-
tractor which must be used when
installing a child restraint.
cFailure to use the retractor's locking
mode will result in the child restraint
not being properly secured. The re-
straint could tip over or otherwise be
unsecured and cause injury to the
child in a sudden stop or collision.
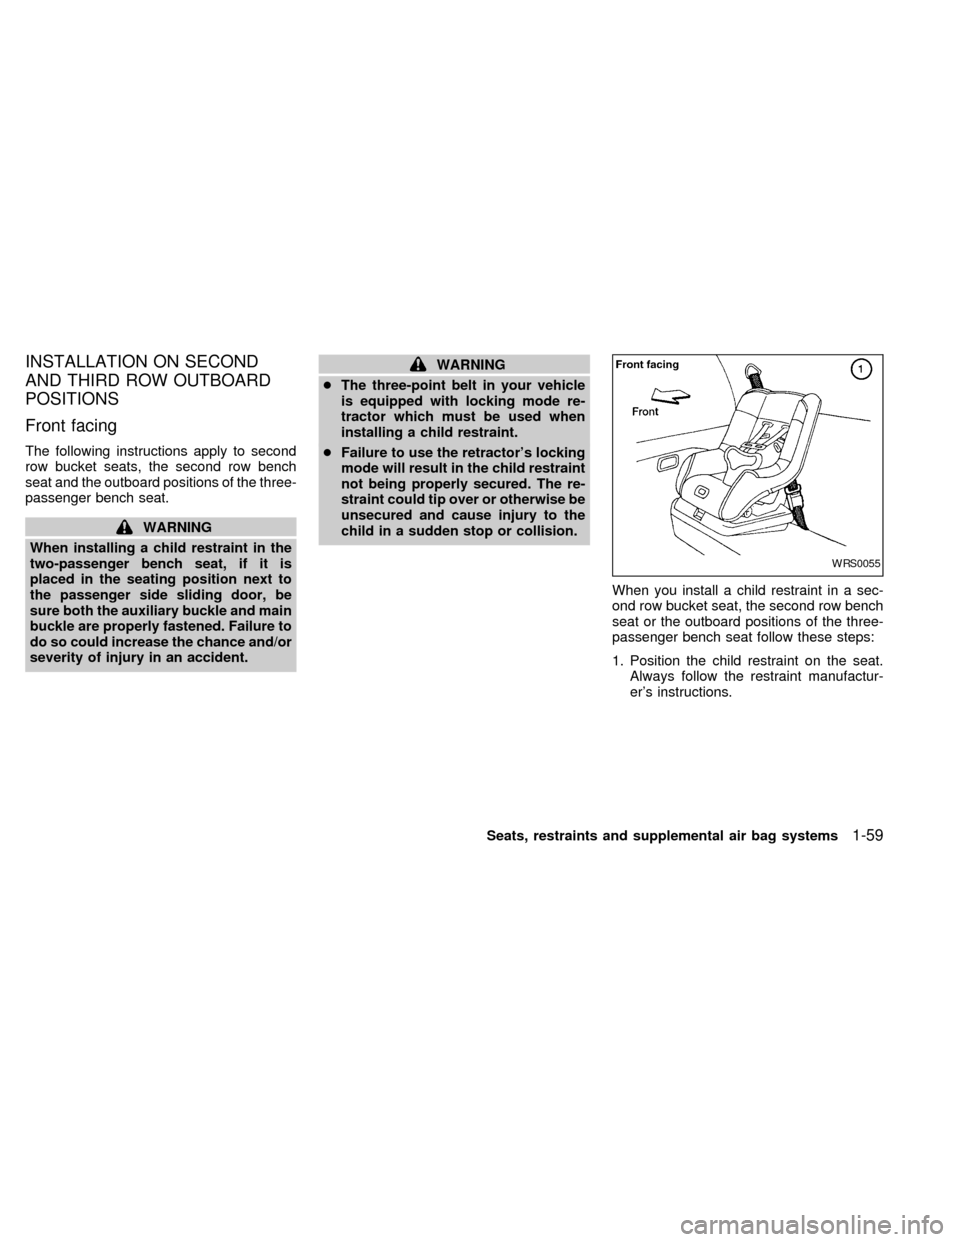
When you install a child restraint in a sec-
ond row bucket seat, the second row bench
seat or the outboard positions of the three-
passenger bench seat follow these steps:
1. Position the child restraint on the seat.
Always follow the restraint manufactur-
er's instructions.
WRS0055
Seats, restraints and supplemental air bag systems1-59
ZX
Page 68 of 292

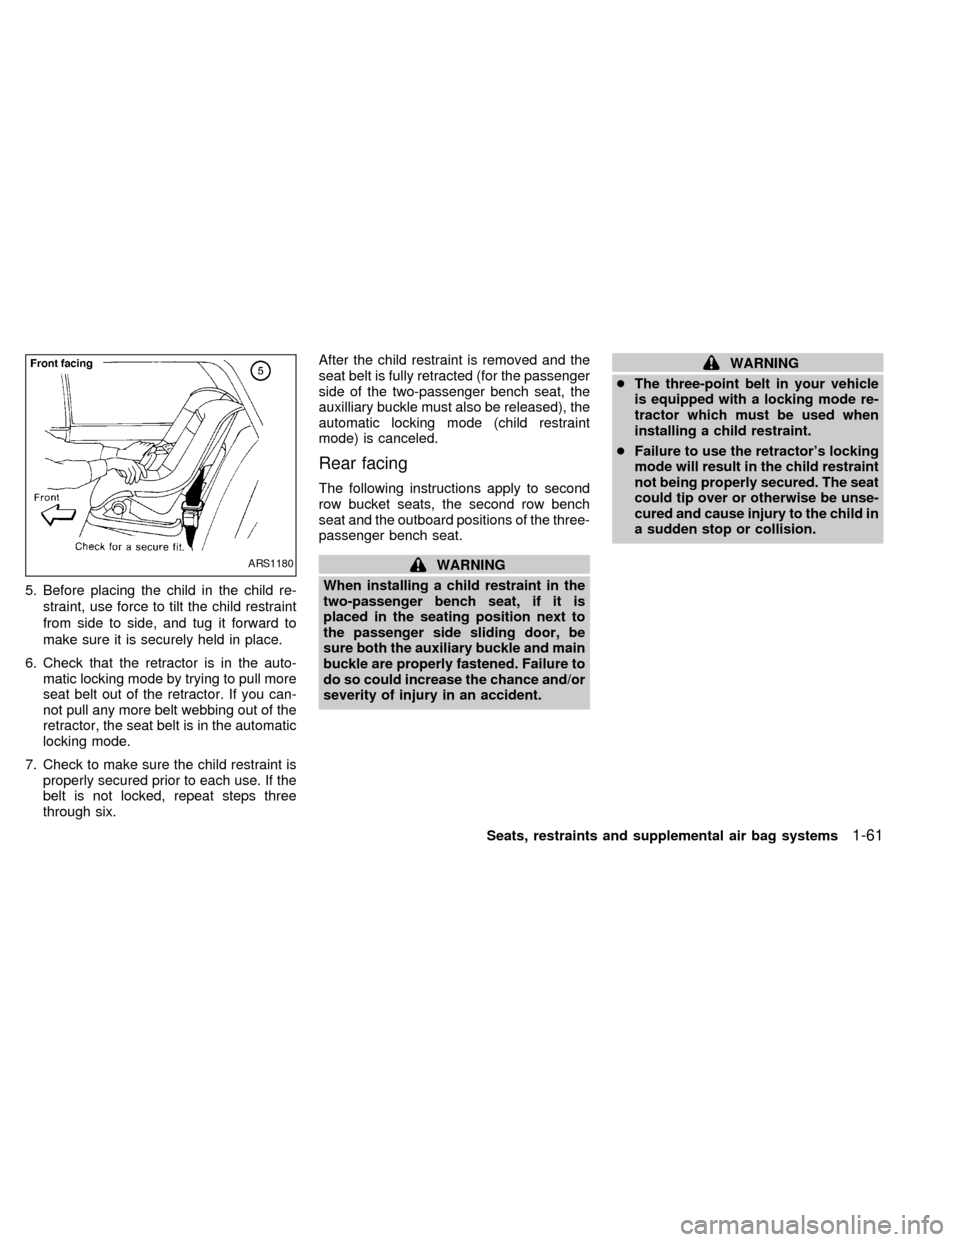
5. Before placing the child in the child re-
straint, use force to tilt the child restraint
from side to side, and tug it forward to
make sure it is securely held in place.
6. Check that the retractor is in the auto-
matic locking mode by trying to pull more
seat belt out of the retractor. If you can-
not pull any more belt webbing out of the
retractor, the seat belt is in the automatic
locking mode.
7. Check to make sure the child restraint is
properly secured prior to each use. If the
belt is not locked, repeat steps three
through six.After the child restraint is removed and the
seat belt is fully retracted (for the passenger
side of the two-passenger bench seat, the
auxilliary buckle must also be released), the
automatic locking mode (child restraint
mode) is canceled.
Rear facing
The following instructions apply to second
row bucket seats, the second row bench
seat and the outboard positions of the three-
passenger bench seat.
WARNING
When installing a child restraint in the
two-passenger bench seat, if it is
placed in the seating position next to
the passenger side sliding door, be
sure both the auxiliary buckle and main
buckle are properly fastened. Failure to
do so could increase the chance and/or
severity of injury in an accident.
WARNING
cThe three-point belt in your vehicle
is equipped with a locking mode re-
tractor which must be used when
installing a child restraint.
cFailure to use the retractor's locking
mode will result in the child restraint
not being properly secured. The seat
could tip over or otherwise be unse-
cured and cause injury to the child in
a sudden stop or collision.
ARS1180
Seats, restraints and supplemental air bag systems1-61
ZX
Page 97 of 292

CHIMES
Key reminder chime
The chime sounds if the driver's door is
opened while the key is left in the ignition
switch. Remove the key and take it with you
when leaving the vehicle.
Light reminder chime
A chime sounds when the driver's door is
opened with the headlight control switch on
(ignition switch is turned OFF).
The chime will not sound when the Auto-
lamp (if so equipped) shut-off delay is acti-
vated. Refer to the ``Autolamp Switch'' in-
structions later in this section.
Turn the headlight control switch to OFF
when you leave the vehicle.
Brake pad wear warning
The disc brake pads have audible wear
warnings. When a brake pad requires re-
placement, it makes a high pitched scraping
sound when the vehicle is in motion whether
or not the brake pedal is depressed. Have
the brakes checked as soon as possible if
the warning sound is heard.The theft warning system provides audio
and visual alarm signals if parts of the
vehicle are disturbed.
Security indicator light
This light will illuminate for the theft warning
system.
This light blinks whenever the ignition
switch is in the LOCK, OFF, or ACC posi-
tion. This function indicates the security
systems equipped on the vehicle are opera-
tional.
IC0005LIC0004
THEFT WARNING
(if so equipped)
2-10Instruments and controls
ZX
Page 98 of 292

How to activate the theft warning
system
1. Close all windows.(The system can be
activated even if the windows are
open).
2. Remove the key from the ignition switch.
3. Close all doors and the hood.
4. Push the
button on the multi-remote
controller. All doors lock. The hazard
lights flash twice and the horn beeps
once to indicate all doors are locked.
cWhen the
button is pushed with all
doors locked, the hazard lights flash
twice and the horn beeps once as a
reminder that the doors are already
locked.
The horn may or may not beep once.
Refer to ``silencing the horn beep fea-
ture'' later in this section for details.
5. Confirm that the SECURITY indicator
light comes on. The SECURITY light
glows for about 30 seconds and then
begins to flash once every three seconds.
The system is now activated. If, during
this 30-second time period, the door is
unlocked by the key or the multi-remotecontroller, or the ignition key is turned to
ACC or ON, the system will not activate.
If the key is turned slowly when locking
the door, the system may not activate.
Furthermore, if the key is turned exces-
sively to the unlock position, the system
may be deactivated when the key is re-
moved. If the indicator light fails to glow
for 30 seconds, unlock the door once
and lock it again.
Even when the driver and/or passengers
are in the vehicle, the system will acti-
vate with all doors, hood and rear door
closed with the ignition key in the OFF
position.
Theft warning system operation
The theft warning system emits the follow-
ing alarm:
cThe headlights and tail lights flash and
the horn sounds intermittently. In addi-
tion, the starter motor does not operate.
cThe alarm automatically turns off after
two to three minutes. However, the alarm
reactivates if the vehicle is tampered with
again. The alarm can be shut off by
unlocking a door with the key or bypressing the
button on the multi-
remote controller.
The alarm is activated when:
ca door is unlocked or opened without
using the key or the multi-remote control-
ler. This includes unlocking the doors
with the inside door lock switch.
cthe hood is opened.
cthe ignition is placed into the ACC, ON,
or START position without the key in the
ignition.
How to stop the alarm
The alarm stops only by unlocking a door
with the key or by pressing the
button on
the multi-remote controller.
The alarm does not stop if the ignition
key is turned to the ACC or ON position.
Instruments and controls
2-11
ZX
Page 114 of 292

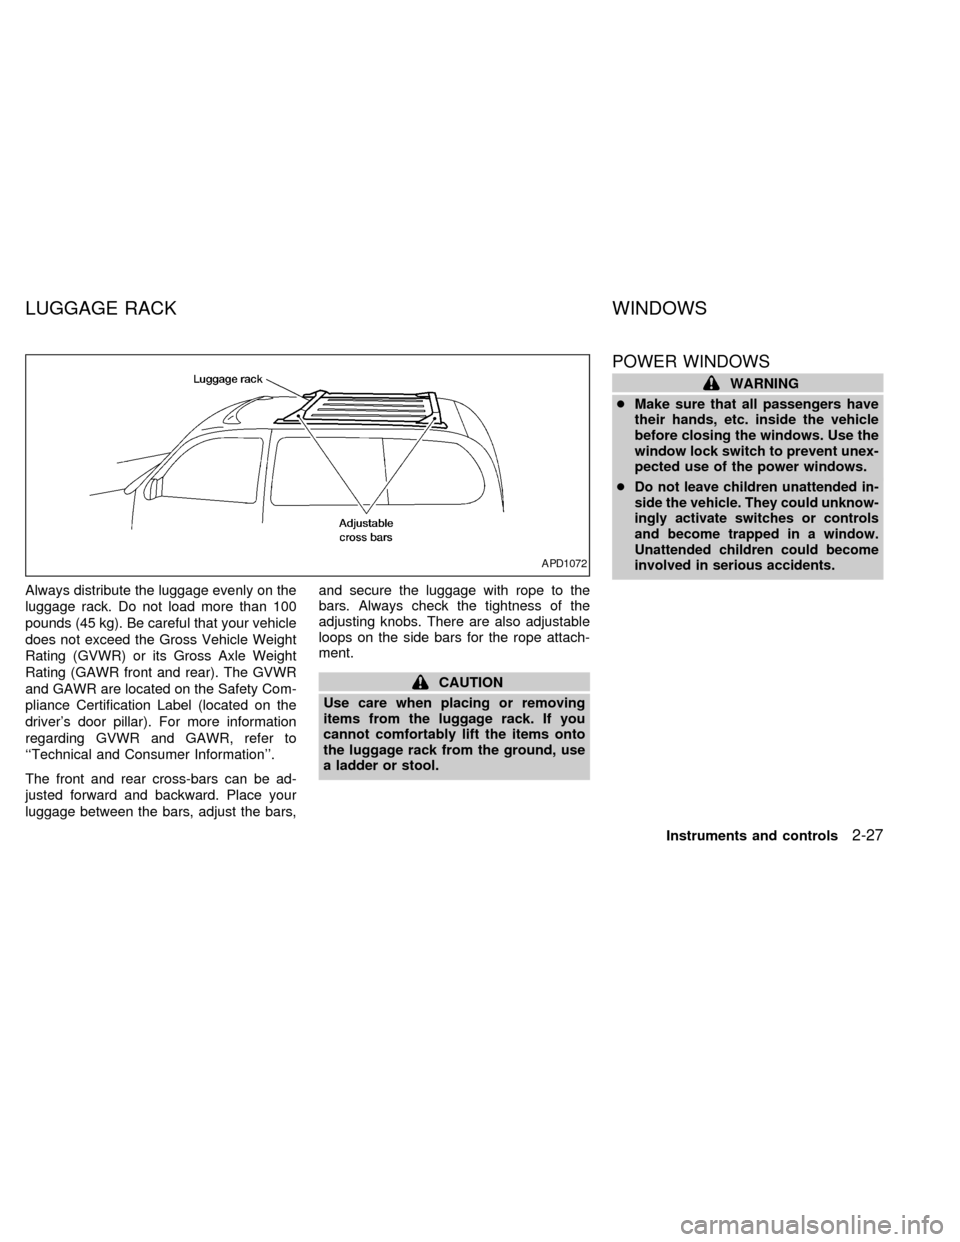
Always distribute the luggage evenly on the
luggage rack. Do not load more than 100
pounds (45 kg). Be careful that your vehicle
does not exceed the Gross Vehicle Weight
Rating (GVWR) or its Gross Axle Weight
Rating (GAWR front and rear). The GVWR
and GAWR are located on the Safety Com-
pliance Certification Label (located on the
driver's door pillar). For more information
regarding GVWR and GAWR, refer to
``Technical and Consumer Information''.
The front and rear cross-bars can be ad-
justed forward and backward. Place your
luggage between the bars, adjust the bars,and secure the luggage with rope to the
bars. Always check the tightness of the
adjusting knobs. There are also adjustable
loops on the side bars for the rope attach-
ment.
CAUTION
Use care when placing or removing
items from the luggage rack. If you
cannot comfortably lift the items onto
the luggage rack from the ground, use
a ladder or stool.
POWER WINDOWS
WARNING
cMake sure that all passengers have
their hands, etc. inside the vehicle
before closing the windows. Use the
window lock switch to prevent unex-
pected use of the power windows.
c
Do not leave children unattended in-
side the vehicle. They could unknow-
ingly activate switches or controls
and become trapped in a window.
Unattended children could become
involved in serious accidents.
APD1072
LUGGAGE RACK WINDOWS
Instruments and controls2-27
ZX
Page 115 of 292

The main switch (on the driver side) opens
or closes the driver's, and passenger's win-
dows, and (if so equipped) rear vent win-
dows.
To open the window, press the switch down.
To close the window, lift the switch up.
The power windows operate when the igni-
tion key is in the ON position, or for 15
minutes after the ignition key is turned to the
OFF position. If the driver's or passenger's
door is opened during this 15 minute period,
power to the windows is cancelled.
Locking passenger's window
When the power window lock-out button is
pushed in, the passenger's window cannot
be opened or closed. Push the power win-
dow lock-out button again to cancel this
feature.
Automatic operation
To fully open the driver side window, press
down firmly on the switch and release it; you
do not need to hold the switch down. The
window automatically opens all the way.
The automatic feature can be interrupted
before the window is fully open by briefly
lifting up on the switch as the window moves
down.
AIC1079AIC1080
2-28Instruments and controls
ZX
Page 116 of 292

The passenger side switch opens or closes
the passenger window only. To open the
window, press the switch down. To close
the window, lift the switch up.Use the vent window switches on the driv-
er's side window controls to open and close
the power vent windows. To open one of the
power vent windows, press the switch
down. To close the window, lift the switch
up.
The power vent windows operate when the
ignition key is in the ON position, or for 15
minutes after the ignition key is turned to the
OFF position. If the driver's or passenger's
door is opened during this 15 minute period,
power to the vent windows is cancelled.To open the manual vent windows, pull the
rear portion of the latch toward you until it
releases. To lock the window in the open
position, push the latch rearward until you
hear it latch. To close the windows, pull the
latch toward you and push the rear portion
of the latch toward the rear of the vehicle
until you feel it latch.
AIC1081AIC1067AIC0111
POWER VENT WINDOWS
(if so equipped)MANUAL VENT WINDOWS
Instruments and controls2-29
ZX