2000 NISSAN QUEST cabin filter
[x] Cancel search: cabin filterPage 144 of 292
WARNING
cThe air conditioner cooling function
operates only when the engine is
running.
cDo not leave children, impaired
adults, or pets alone in your vehicle.
On hot, sunny days, temperatures in
a closed vehicle could quickly be-
come high enough to cause severe
or possibly fatal injuries to people or
animals.
cDo not use the recirculation mode
for long periods as it may cause the
interior air to become stale and the
windows to fog up.
cPositioning of the heater and air con-
ditioner controls should not be done
while driving so full attention may be
given to vehicle operation.
The cabin air filter (if so equipped) requires
periodic maintenance. See the ``Do it your-
self'' section for additional information.
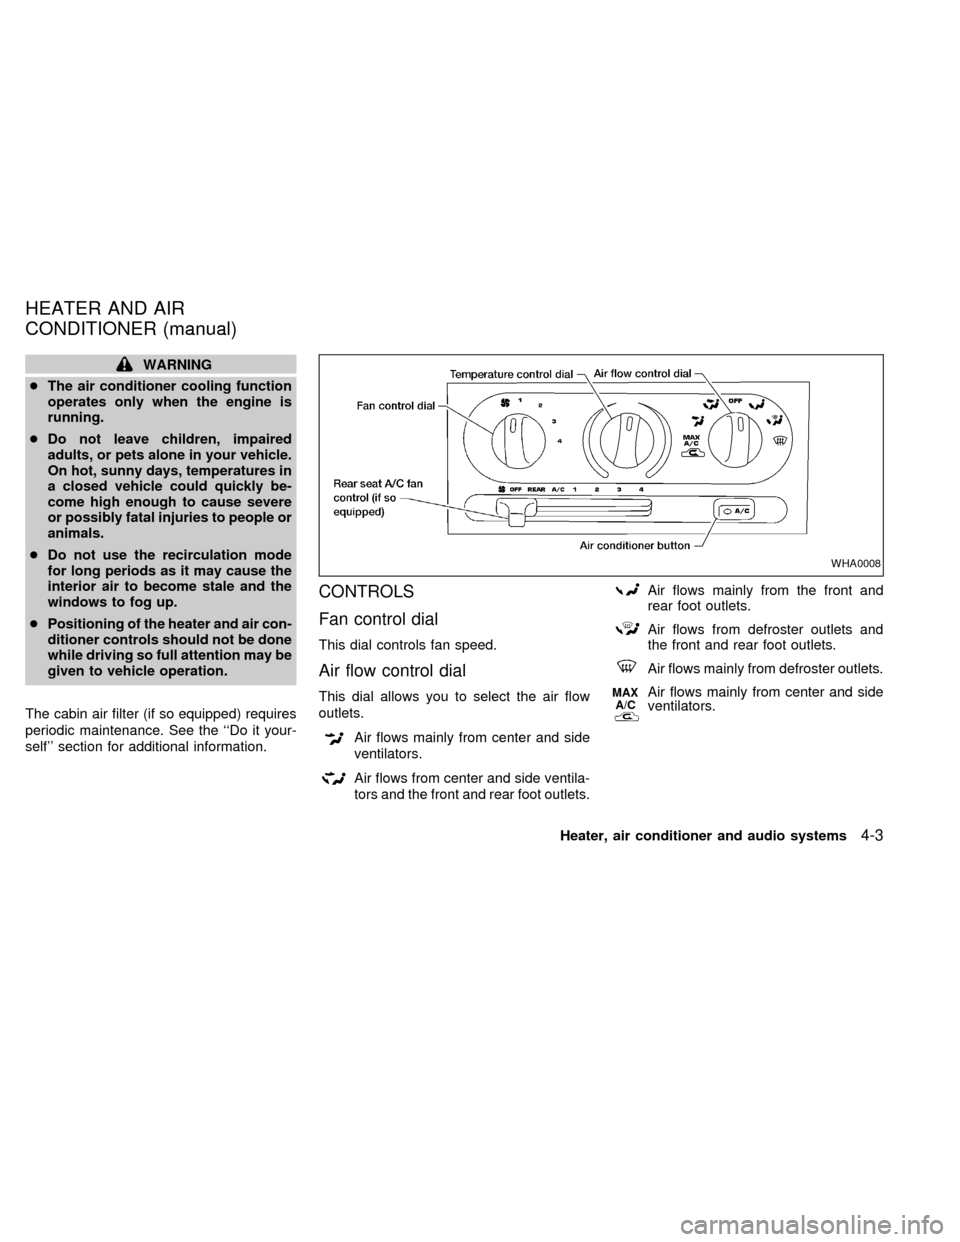
CONTROLS
Fan control dial
This dial controls fan speed.
Air flow control dial
This dial allows you to select the air flow
outlets.
Air flows mainly from center and side
ventilators.
Air flows from center and side ventila-
tors and the front and rear foot outlets.
Air flows mainly from the front and
rear foot outlets.
Air flows from defroster outlets and
the front and rear foot outlets.
Air flows mainly from defroster outlets.
MAX
A/CAir flows mainly from center and side
ventilators.
WHA0008
HEATER AND AIR
CONDITIONER (manual)
Heater, air conditioner and audio systems4-3
ZX
Page 152 of 292
WARNING
cThe air conditioner cooling function
operates only when the engine is
running.
cDo not leave children, impaired
adults, or pets alone in your vehicle.
On hot, sunny days, temperatures in
a closed vehicle could quickly be-
come high enough to cause severe
or possibly fatal injuries to people or
animals.
cDo not use the recirculation mode
for long periods as it may cause theinterior air to become stale and the
windows to fog up.
cPositioning of the heater and air con-
ditioner controls should not be done
while driving so full attention may be
given to vehicle operation.
The cabin air filter (if so equipped) requires
periodic maintenance. See the ``Do it your-
self'' section for additional information.
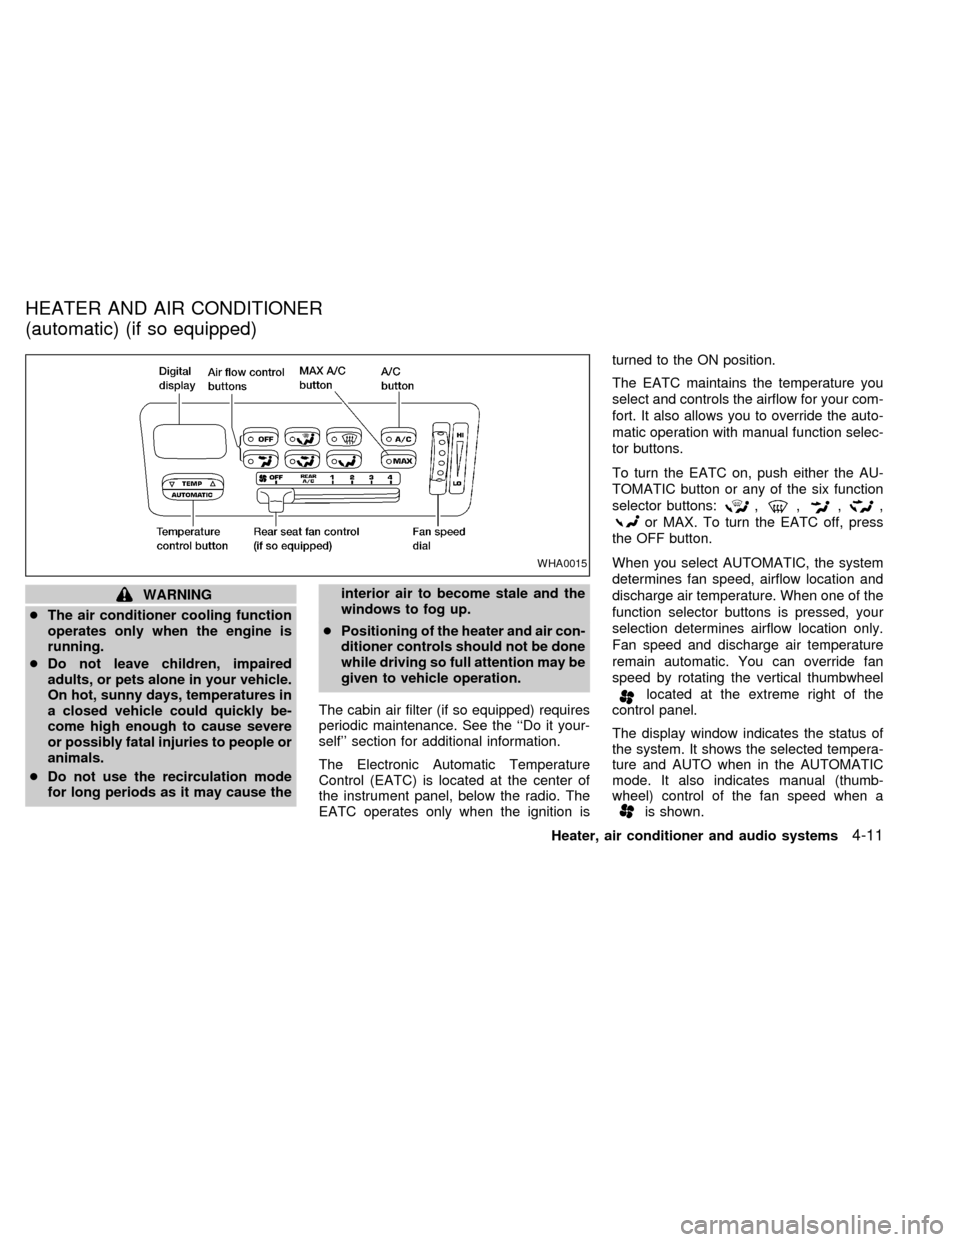
The Electronic Automatic Temperature
Control (EATC) is located at the center of
the instrument panel, below the radio. The
EATC operates only when the ignition isturned to the ON position.
The EATC maintains the temperature you
select and controls the airflow for your com-
fort. It also allows you to override the auto-
matic operation with manual function selec-
tor buttons.
To turn the EATC on, push either the AU-
TOMATIC button or any of the six function
selector buttons:
,,,,
or MAX. To turn the EATC off, press
the OFF button.
When you select AUTOMATIC, the system
determines fan speed, airflow location and
discharge air temperature. When one of the
function selector buttons is pressed, your
selection determines airflow location only.
Fan speed and discharge air temperature
remain automatic. You can override fan
speed by rotating the vertical thumbwheel
located at the extreme right of the
control panel.
The display window indicates the status of
the system. It shows the selected tempera-
ture and AUTO when in the AUTOMATIC
mode. It also indicates manual (thumb-
wheel) control of the fan speed when a
is shown.
WHA0015
HEATER AND AIR CONDITIONER
(automatic) (if so equipped)
Heater, air conditioner and audio systems4-11
ZX
Page 216 of 292

8 Do-it-yourself
Maintenance precautions .......................................8-2
Engine compartment check locations ....................8-3
Engine cooling system ...........................................8-4
Checking engine coolant level ...............................8-4
Changing engine coolant .......................................8-5
Engine oil ...............................................................8-5
Checking engine oil level .......................................8-5
Changing engine oil ...............................................8-6
Changing engine oil filter .......................................8-7
Automatic transmission fluid ..................................8-8
Temperature conditions for checking .....................8-8
Power steering fluid................................................8-9
Brake fluid ..............................................................8-9
Window washer fluid ............................................8-10
Battery ..................................................................8-10
Jump starting ........................................................8-11
Drive belts ............................................................8-12
Spark plugs ..........................................................8-12
Replacing spark plugs ..........................................8-12
Air cleaner ............................................................8-13Cabin air filter .......................................................8-14
Windshield wiper blades ......................................8-17
Cleaning ...............................................................8-17
Replacing .............................................................8-17
Parking brake and brake pedal ............................8-19..........................................8-19
Checking parking brake .......................................8-19
Checking brake pedal ..........................................8-19
Brake booster .......................................................8-20
Fuses ....................................................................8-20
Engine compartment ............................................8-20
Passenger compartment ......................................8-21
Multi-remote controller battery replacement ........8-22
Lights ....................................................................8-23
Headlights ............................................................8-23
Exterior and interior lights ....................................8-24
Wheels and tires ..................................................8-28
Tire pressure ........................................................8-28
Types of tires........................................................8-29
Tire chains ............................................................8-30
Changing tires and wheels...................................8-30
ZX
Page 229 of 292
WARNING
cOperating the engine with the air
cleaner removed can cause you or
others to be burned. The air cleaner
not only cleans the air, it stops flame
if the engine backfires. If it isn't there
and the engine backfires, you could
be burned. Do not drive with the air
cleaner removed, and be careful
when working on the engine with the
air cleaner removed.
cNever pour fuel into the throttle body
or attempt to start the engine with
the air cleaner removed. Doing so
could result in serious injury.
CABIN AIR FILTER
The cabin air filter restricts the entry of
airborne dust and pollen particles and re-
duces some objectionable outside odors.
The filter is located just in front of the
windshield under the cowl cover on the
passenger side of the vehicle.
To replace the filter, perform the following
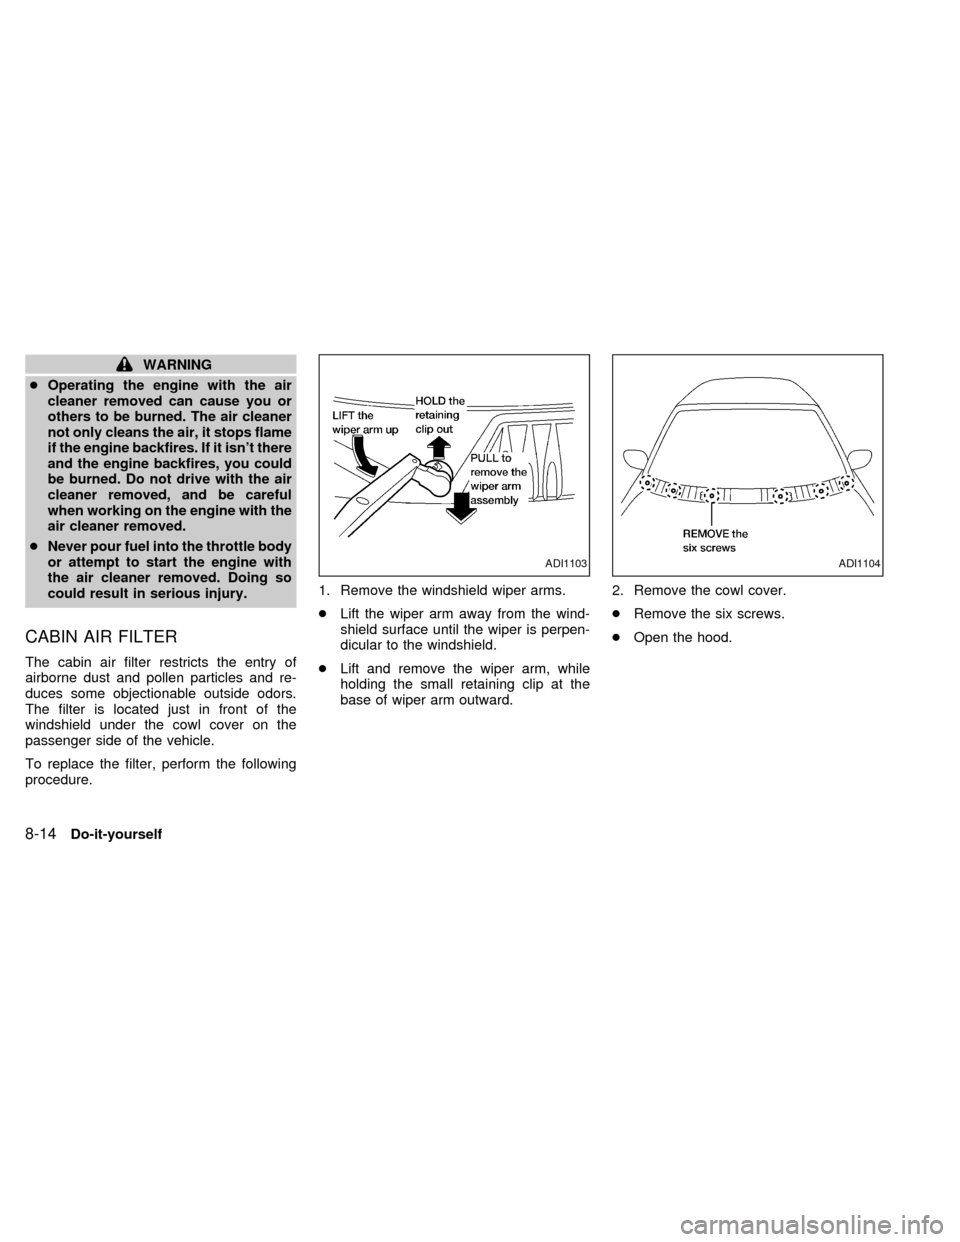
procedure.1. Remove the windshield wiper arms.
cLift the wiper arm away from the wind-
shield surface until the wiper is perpen-
dicular to the windshield.
cLift and remove the wiper arm, while
holding the small retaining clip at the
base of wiper arm outward.2. Remove the cowl cover.
cRemove the six screws.
cOpen the hood.
ADI1103ADI1104
8-14Do-it-yourself
ZX
Page 230 of 292
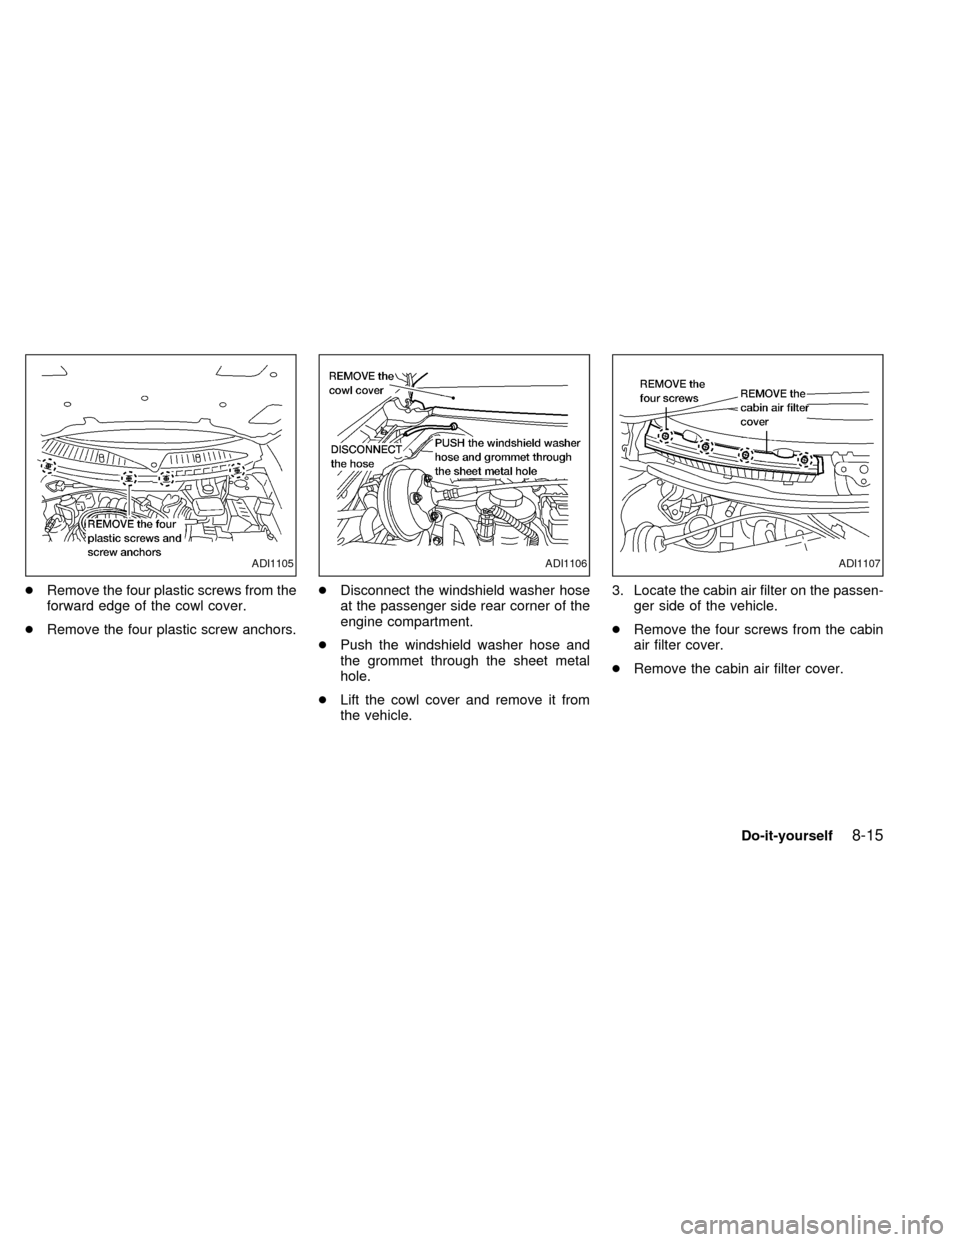
cRemove the four plastic screws from the
forward edge of the cowl cover.
cRemove the four plastic screw anchors.cDisconnect the windshield washer hose
at the passenger side rear corner of the
engine compartment.
cPush the windshield washer hose and
the grommet through the sheet metal
hole.
cLift the cowl cover and remove it from
the vehicle.3. Locate the cabin air filter on the passen-
ger side of the vehicle.
cRemove the four screws from the cabin
air filter cover.
cRemove the cabin air filter cover.
ADI1105ADI1106ADI1107
Do-it-yourself8-15
ZX
Page 231 of 292
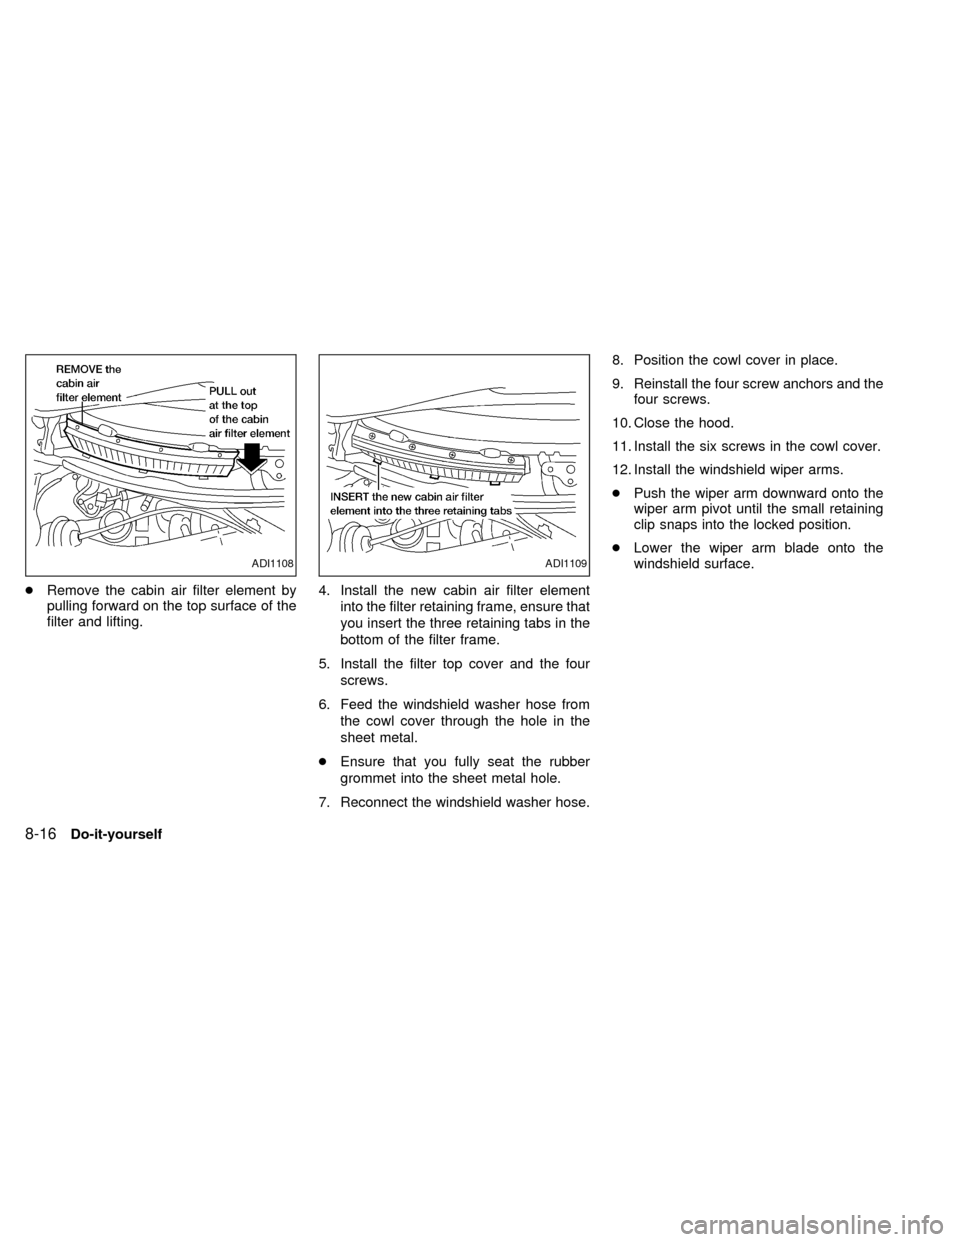
cRemove the cabin air filter element by
pulling forward on the top surface of the
filter and lifting.4. Install the new cabin air filter element
into the filter retaining frame, ensure that
you insert the three retaining tabs in the
bottom of the filter frame.
5. Install the filter top cover and the four
screws.
6. Feed the windshield washer hose from
the cowl cover through the hole in the
sheet metal.
cEnsure that you fully seat the rubber
grommet into the sheet metal hole.
7. Reconnect the windshield washer hose.8. Position the cowl cover in place.
9. Reinstall the four screw anchors and the
four screws.
10. Close the hood.
11. Install the six screws in the cowl cover.
12. Install the windshield wiper arms.
cPush the wiper arm downward onto the
wiper arm pivot until the small retaining
clip snaps into the locked position.
cLower the wiper arm blade onto the
windshield surface.
ADI1108ADI1109
8-16Do-it-yourself
ZX
Page 256 of 292
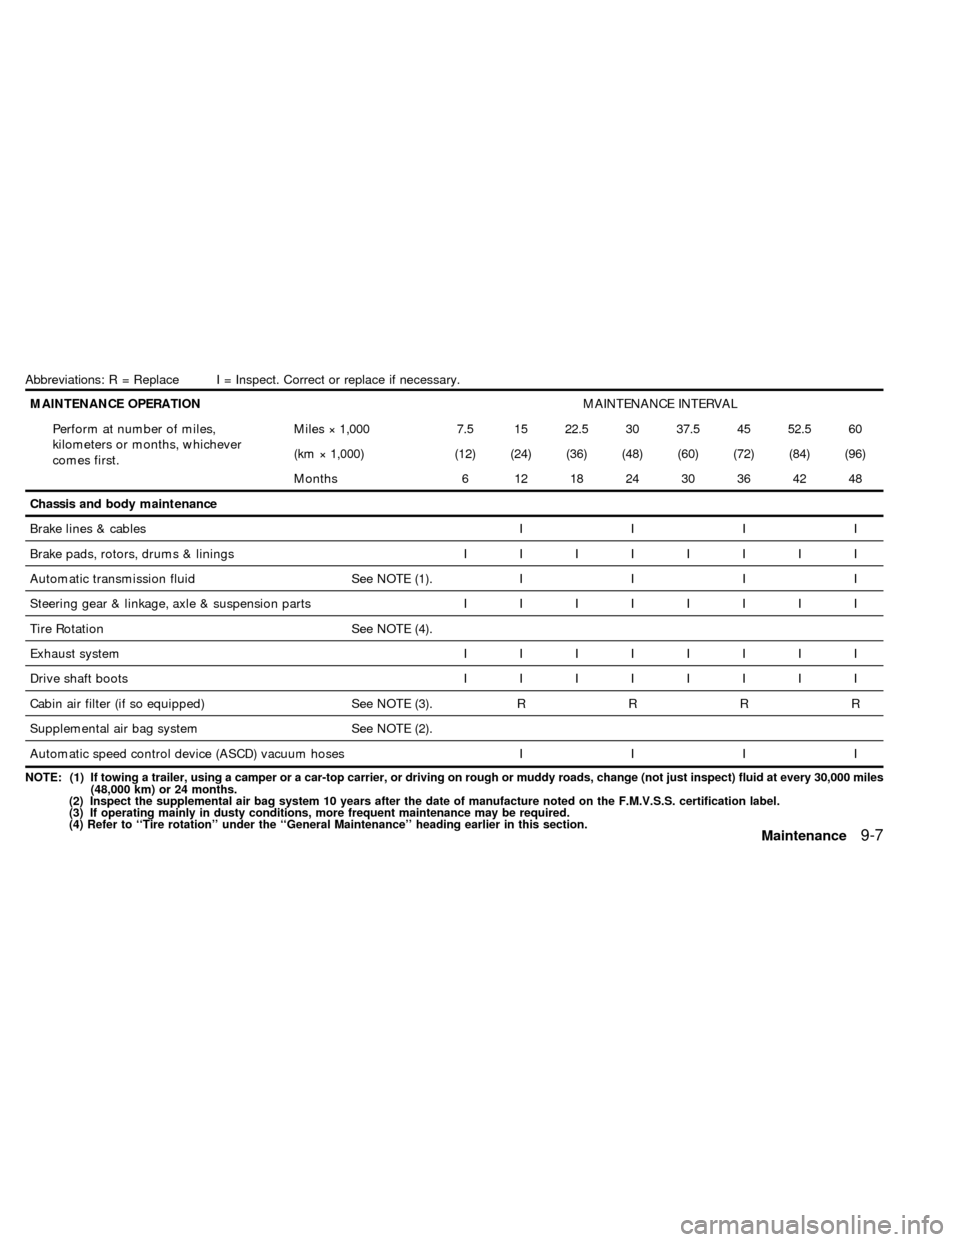
Abbreviations: R = Replace I = Inspect. Correct or replace if necessary.
MAINTENANCE OPERATIONMAINTENANCE INTERVAL
Perform at number of miles,
kilometers or months, whichever
comes first.Miles ý 1,000 7.5 15 22.5 30 37.5 45 52.5 60
(km ý 1,000) (12) (24) (36) (48) (60) (72) (84) (96)
Months 6 12 18 24 30 36 42 48
Chassis and body maintenance
Brake lines & cablesIIII
Brake pads, rotors, drums & liningsIIIIIIII
Automatic transmission fluid See NOTE (1).IIII
Steering gear & linkage, axle & suspension partsIIIIIIII
Tire Rotation See NOTE (4).
Exhaust systemIIIIIIII
Drive shaft bootsIIIIIIII
Cabin air filter (if so equipped) See NOTE (3).RRRR
Supplemental air bag system See NOTE (2).
Automatic speed control device (ASCD) vacuum hosesIIII
NOTE: (1) If towing a trailer, using a camper or a car-top carrier, or driving on rough or muddy roads, change (not just inspect) fluid at every 30,000 miles
(48,000 km) or 24 months.
(2) Inspect the supplemental air bag system 10 years after the date of manufacture noted on the F.M.V.S.S. certification label.
(3) If operating mainly in dusty conditions, more frequent maintenance may be required.
(4) Refer to ``Tire rotation'' under the ``General Maintenance'' heading earlier in this section.
Maintenance9-7
ZX
Page 258 of 292
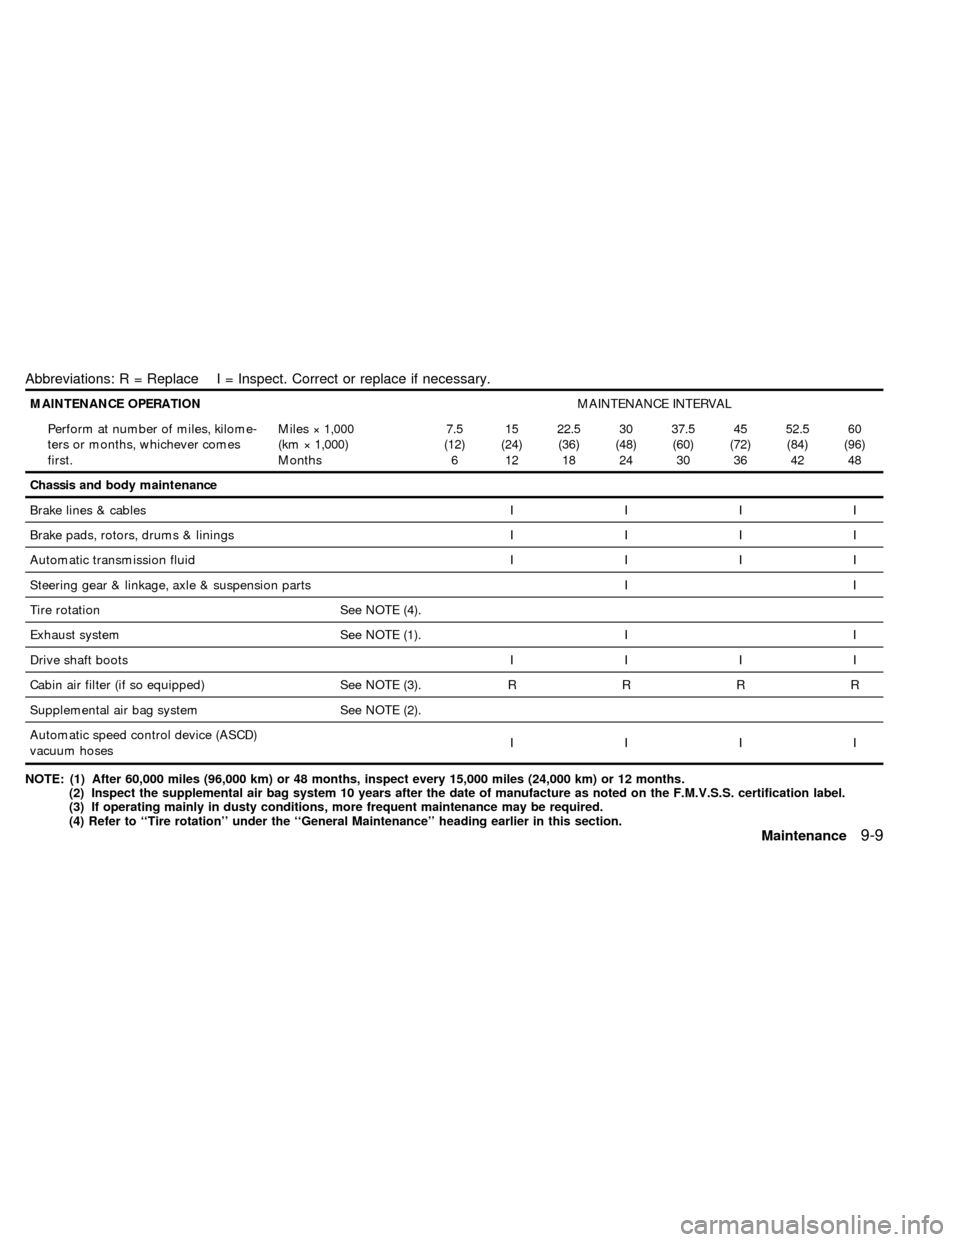
Abbreviations: R = Replace I = Inspect. Correct or replace if necessary.
MAINTENANCE OPERATIONMAINTENANCE INTERVAL
Perform at number of miles, kilome-
ters or months, whichever comes
first.Miles ý 1,000
(km ý 1,000)
Months7.5
(12)
615
(24)
1222.5
(36)
1830
(48)
2437.5
(60)
3045
(72)
3652.5
(84)
4260
(96)
48
Chassis and body maintenance
Brake lines & cablesIIII
Brake pads, rotors, drums & liningsIIII
Automatic transmission fluidIIII
Steering gear & linkage, axle & suspension parts I I
Tire rotation See NOTE (4).
Exhaust system See NOTE (1). I I
Drive shaft bootsIIII
Cabin air filter (if so equipped) See NOTE (3).RRRR
Supplemental air bag system See NOTE (2).
Automatic speed control device (ASCD)
vacuum hosesIIII
NOTE: (1) After 60,000 miles (96,000 km) or 48 months, inspect every 15,000 miles (24,000 km) or 12 months.
(2) Inspect the supplemental air bag system 10 years after the date of manufacture as noted on the F.M.V.S.S. certification label.
(3) If operating mainly in dusty conditions, more frequent maintenance may be required.
(4) Refer to ``Tire rotation'' under the ``General Maintenance'' heading earlier in this section.
Maintenance9-9
ZX