2000 NISSAN QUEST height
[x] Cancel search: heightPage 13 of 292

Seat lifter (driver's seat only)
To raise the height of the seat, lift the power
seat height switch and release it when the
desired position is reached. To lower the
height of the seat, push the power seat
height switch down and release it when the
desired position is reached.
Lumbar support (if so equipped for
driver's seat)
The lumbar support provides lower back
support to the driver. Move the lever up or
down to adjust the seat lumbar area.
ARS1158ARS1121
1-6Seats, restraints and supplemental air bag systems
ZX
Page 51 of 292

Unfastening the seat belts
To unfasten the seat belt, press the button
on the buckle. The seat belt automatically
retracts.
Checking seat belt operation
Seat belt retractors are designed to lock
seat belt movement:
1) when the seat belt is pulled quickly from
the retractor, and
2) when the vehicle slows down rapidly.
To increase your confidence in the seat
belts, check their operation as follows.cGrasp the shoulder belt and pull quickly
forward. The retractor should lock and
restrict further belt movement.
If the retractor does not lock during this
check or if you have any questions about
belt operation, see an authorized NISSAN
dealer.
Shoulder belt height adjustment (for
front seats)
The shoulder belt anchor height should be
adjusted to the position best for you (See
``Precautions on seat belt usage'' earlier in
this section.). To adjust, press the release
button and move the shoulder belt anchor to
the desired position so the belt passes over
the center of the shoulder. The belt should
be away from your face and neck, but not
falling off your shoulder. Release the button
to lock the shoulder belt anchor into position.
ARS1054APD0831
1-44Seats, restraints and supplemental air bag systems
ZX
Page 52 of 292

WARNING
cAfter adjustment, release the adjust-
ment button and try to move the
shoulder belt anchor up and down to
make sure it is securely fixed in
position.
cThe shoulder belt anchor height
should be adjusted to the position
best for you. Failure to do so may
reduce the effectiveness of the en-
tire restraint system and increase
the chance or severity of injury in an
accident.
THREE-POINT TYPE SEAT BELT
WITH RETRACTOR FOR SECOND
ROW BUCKET SEATS
WARNING
cEvery person who drives or rides in
this vehicle should use a seat belt at
all times.
cDo not ride in a moving vehicle when
the seatback is reclined. This can be
dangerous. The shoulder belt willnot be against your body. In an acci-
dent you could be thrown into it and
receive neck or other serious inju-
ries. You could also slide under the
lap belt and receive serious internal
injuries.
cFor most effective protection when
the vehicle is in motion, the seat
should be upright. Always sit well
back in the seat and adjust the seat
belt properly.
Fastening the seat belt
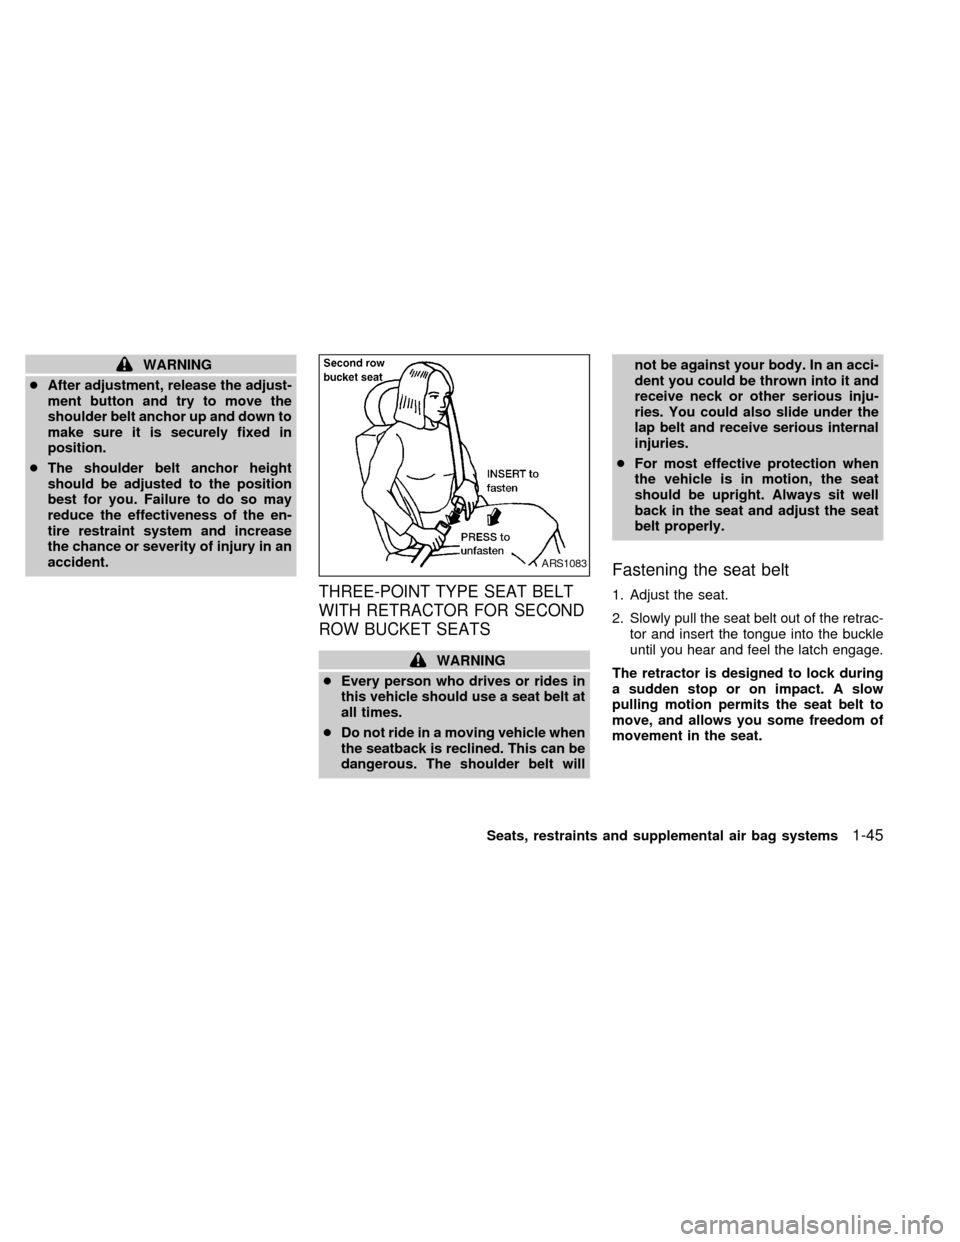
1. Adjust the seat.
2. Slowly pull the seat belt out of the retrac-
tor and insert the tongue into the buckle
until you hear and feel the latch engage.
The retractor is designed to lock during
a sudden stop or on impact. A slow
pulling motion permits the seat belt to
move, and allows you some freedom of
movement in the seat.
ARS1083
Seats, restraints and supplemental air bag systems1-45
ZX
Page 79 of 292

INTEGRATED CHILD SAFETY
SEATS (if so equipped)
WARNING
cFailure to follow the instructions for
the use of these integrated child
safety seats can result in your child
striking the vehicle's interior during
a sudden stop or crash, causing the
injury or death of your child.
cImproper use of a child restraint can
increase the risk or severity of injury
for both the child and other occu-
pants of the vehicle.
All U.S. states and Canadian provinces
require that infants and small children be
restrained in approved child restraints at
all times while the vehicle is being oper-
ated.
The optional second row bench seat con-
tains two integrated child safety seats.
These seats are designed for use only by
children who weigh between 22 and 60
pounds (10-27 kg) and whose height is 45
inches (1145 mm) or less and who are
capable of sitting upright alone.In addition, these integrated child safety
seats must only be used by children who
meet the following requirements:
cAGE:
At least one year old
cSEATED HEIGHT:
Top of child's shoulders must be below
the shoulder harness openings of the
integrated child seat.
Children less than one year old should be
restrained in an appropriate separate child
restraint. Children whose shoulders are
above the shoulder harness openings of
integrated child seat should also be re-
strained in an appropriate separate child
restraint or in the appropriate vehicle seat
belt system. Refer to ``Child Restraints'' and
``Precautions On Seat Belt Usage'' in this
section for important child safety information.
1-72Seats, restraints and supplemental air bag systems
ZX
Page 81 of 292

Securing the child
Before using the integrated child safety
seats, carefully read the shoulder har-
ness, seatback release, and integrated
child safety seat cushion labels.
The following steps apply to both the left
and right integrated child safety seats.
1. Be sure your child meets all of the re-
quired age, weight and height require-
ments for the safe use of the integrated
child safety seat.
2. Be sure the second row bench seat is
securely latched to the floor of the ve-
hicle. Refer to ``Flexible seating'' in this
section for proper seat installation proce-
dures.
3. Be sure the second row bench seatback
is locked by grasping it and trying to rock
it back and forth. Also, check that the
seatback release lever is in the full down
position.
4. Pull the cushion release strap and lower
the intregrated child safety seat cushion
completely.NOTE: The head restraints on the pas-
senger bench seat equipped with the
integrated child safety seats, are not
adjustable or removable.
ARS1201
1-74Seats, restraints and supplemental air bag systems
ZX
Page 112 of 292

WARNING
cBefore using the parcel shelf, the
three-passenger bench seat must be
in the third row position, and theseat back must be upright.
cAfter adjusting the parcel shelf to the
desired height, make sure the lock
knob is securely latched.cProperly secure all packages under
the parcel shelf net to prevent them
from sliding or shifting. Do not place
packages higher than the three-
passenger bench seat back. In a
sudden stop or collision, unsecured
packages could cause personal in-
jury.
cBe sure to secure all three parcel
shelf net loops onto the retainers
located on the bottom side of the
parcel shelf. The packages placed
on the parcel shelf and restrained by
the parcel shelf net must not exceed
30 pounds (13.6 kg), or the parcel
shelf may not remain secure.
cDo not allow people or pets on or
under the parcel shelf.
cThe parcel shelf must be removed
from the vehicle if installing a child
restraint on the three-passenger
bench seat that requires the use of a
top tether strap that is anchored to
the vehicle floor. Failure to remove
the parcel shelf can increase the
severity of injury to the child in an
accident.
APD1071
PARCEL SHELF (if so
equipped)
Instruments and controls2-25
ZX
Page 113 of 292

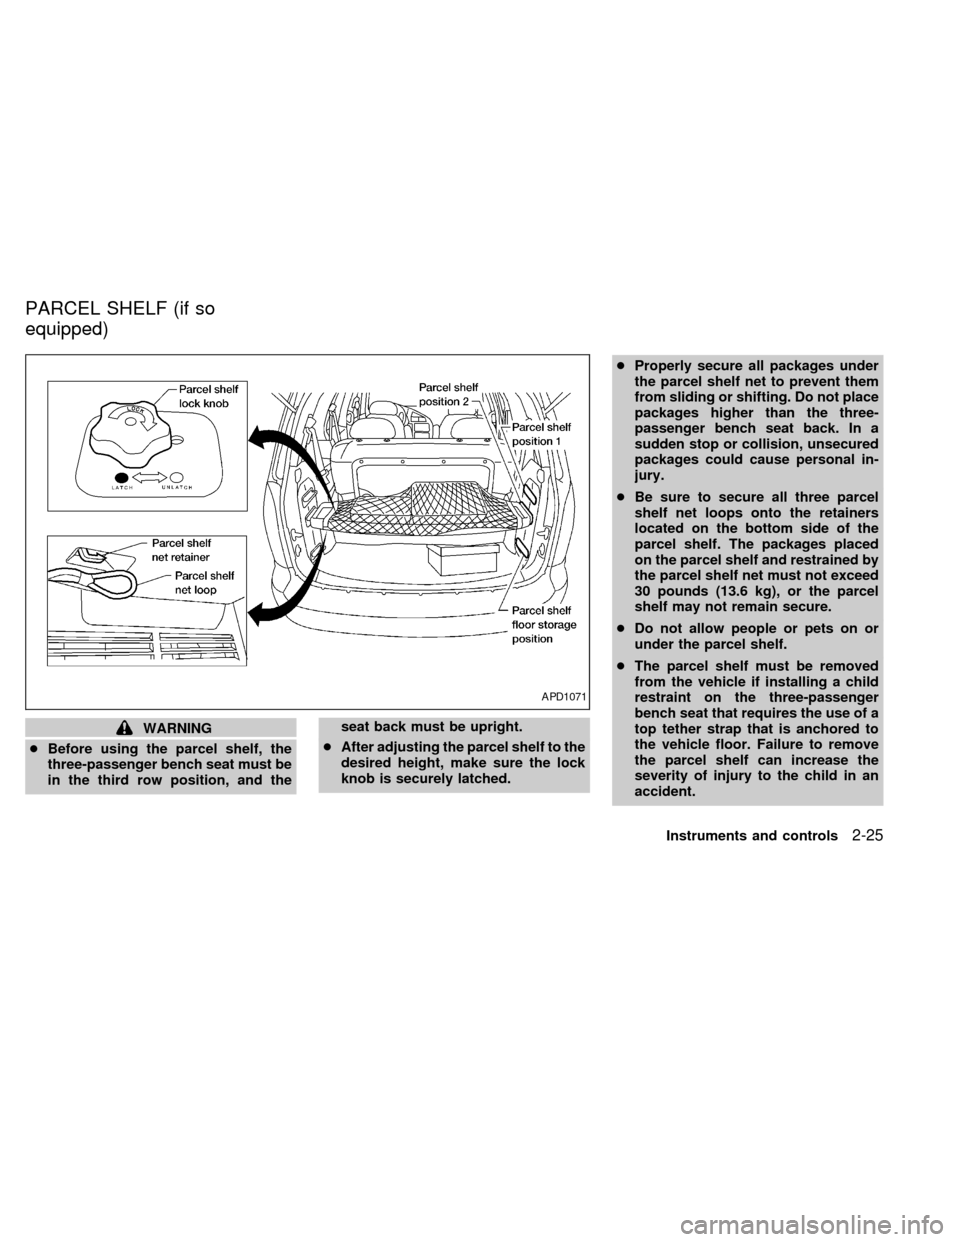
The parcel shelf allows for additional stor-
age for packages.
Do not load more than 30 pounds (13.6 kg)
on the parcel shelf. The parcel shelf can be
installed at two different heights and in a
storage position.
To install the parcel shelf:
c
Position the right side of the parcel shelf
in to one of the shelf positions on the right
side luggage compartment trim panel.
cPosition the left side of the parcel shelf
into the matching position (same height)
on the left side luggage compartment trim
panel.
cSlide the parcel shelf lock knob fully to
the left side (latch in green dot position).
cTurn the parcel shelf lock knob clock-
wise until securely locked.
The parcel shelf is also equipped with a
parcel shelf net to keep packages on the
parcel shelf from moving around while the
vehicle is in motion.
The parcel shelf net is permanently at-
tached to the back side of the parcel shelf.
Pull the parcel shelf net over the packagesand attach the three loops to the three
retainers on the bottom side of the parcel
shelf. Make sure the parcel shelf is securely
locked before covering the packages with
the parcel shelf net.
To remove the parcel shelf:
cUnlock the parcel shelf net.
cRemove all packages from the parcel
shelf.
cTurn the parcel shelf lock knob counter
clockwise until loose (maximum two
turns).
cSlide the parcel shelf lock knob fully to
the right side (unlatch in red dot posi-
tion).
cRemove the parcel shelf from the left
side luggage compartment trim panel,
then the right side luggage compartment
trim panel and reposition the parcel shelf
where desired.Put the parcel shelf in the floor storage
position when the parcel shelf is not used or
required.
APD1073
2-26Instruments and controls
ZX
Page 234 of 292

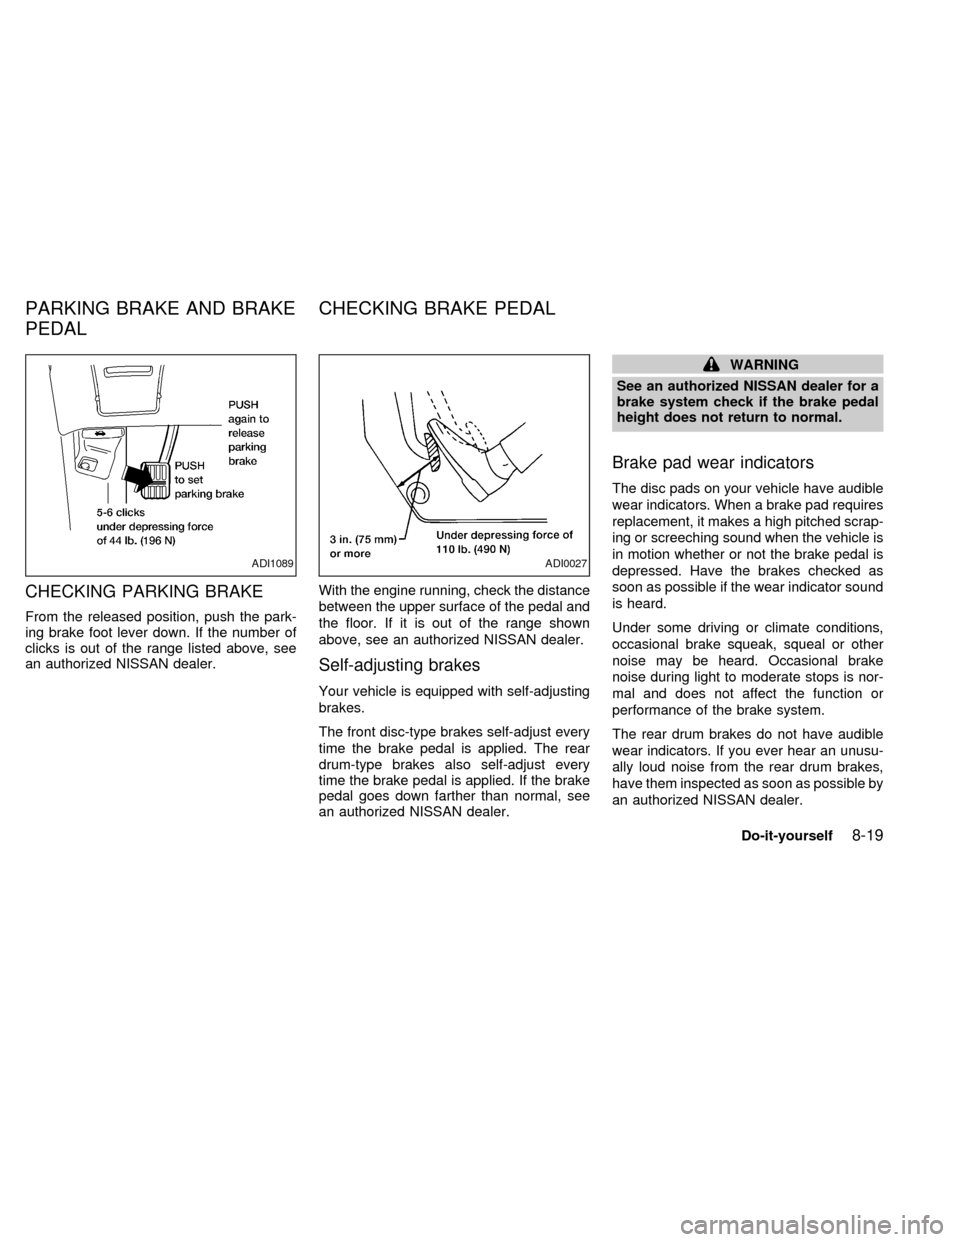
CHECKING PARKING BRAKE
From the released position, push the park-
ing brake foot lever down. If the number of
clicks is out of the range listed above, see
an authorized NISSAN dealer.With the engine running, check the distance
between the upper surface of the pedal and
the floor. If it is out of the range shown
above, see an authorized NISSAN dealer.
Self-adjusting brakes
Your vehicle is equipped with self-adjusting
brakes.
The front disc-type brakes self-adjust every
time the brake pedal is applied. The rear
drum-type brakes also self-adjust every
time the brake pedal is applied. If the brake
pedal goes down farther than normal, see
an authorized NISSAN dealer.
WARNING
See an authorized NISSAN dealer for a
brake system check if the brake pedal
height does not return to normal.
Brake pad wear indicators
The disc pads on your vehicle have audible
wear indicators. When a brake pad requires
replacement, it makes a high pitched scrap-
ing or screeching sound when the vehicle is
in motion whether or not the brake pedal is
depressed. Have the brakes checked as
soon as possible if the wear indicator sound
is heard.
Under some driving or climate conditions,
occasional brake squeak, squeal or other
noise may be heard. Occasional brake
noise during light to moderate stops is nor-
mal and does not affect the function or
performance of the brake system.
The rear drum brakes do not have audible
wear indicators. If you ever hear an unusu-
ally loud noise from the rear drum brakes,
have them inspected as soon as possible by
an authorized NISSAN dealer.
ADI1089ADI0027
PARKING BRAKE AND BRAKE
PEDALCHECKING BRAKE PEDAL
Do-it-yourself8-19
ZX