2000 NISSAN QUEST stop start
[x] Cancel search: stop startPage 203 of 292
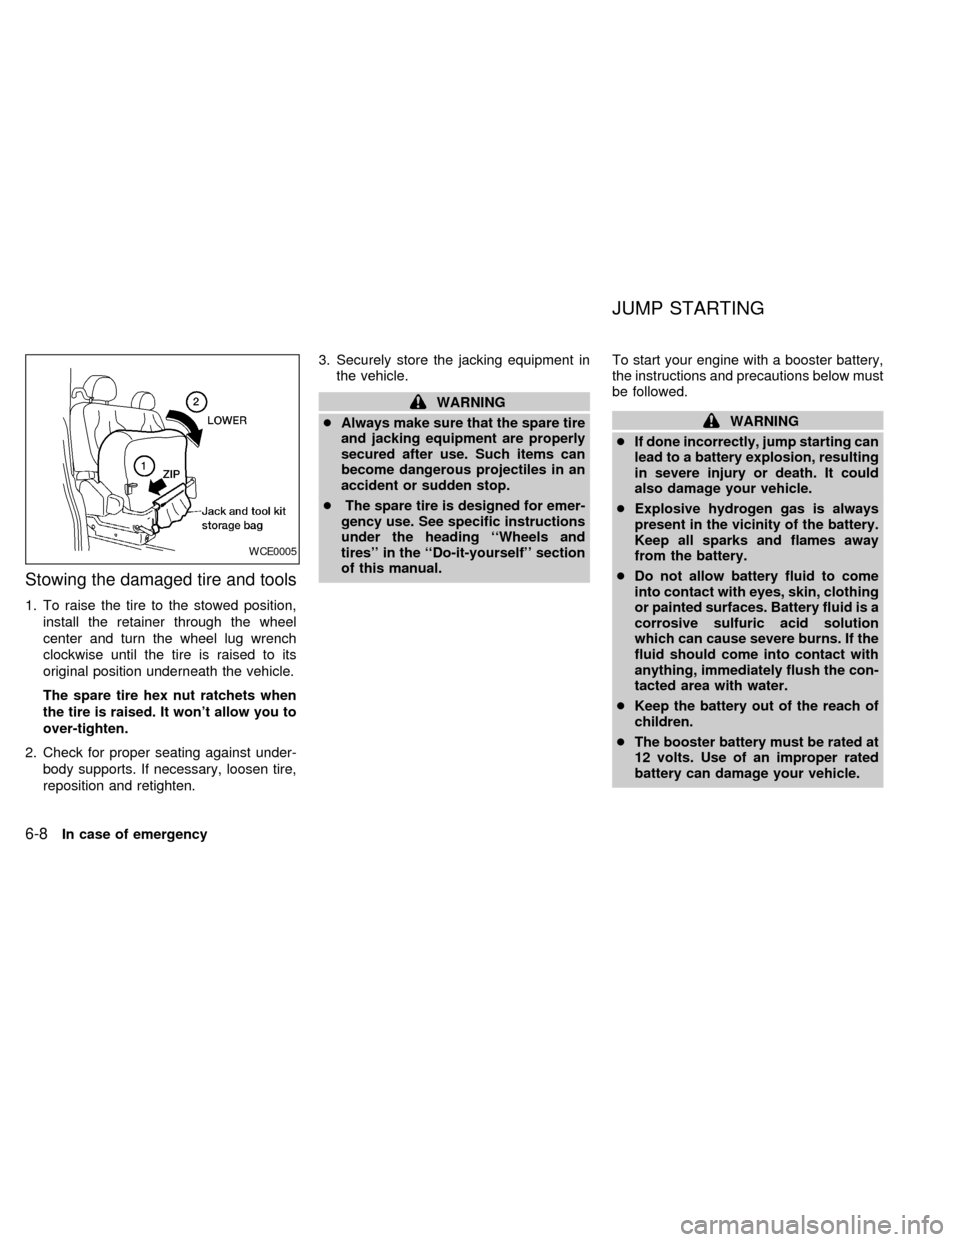
Stowing the damaged tire and tools
1. To raise the tire to the stowed position,
install the retainer through the wheel
center and turn the wheel lug wrench
clockwise until the tire is raised to its
original position underneath the vehicle.
The spare tire hex nut ratchets when
the tire is raised. It won't allow you to
over-tighten.
2. Check for proper seating against under-
body supports. If necessary, loosen tire,
reposition and retighten.3. Securely store the jacking equipment in
the vehicle.
WARNING
cAlways make sure that the spare tire
and jacking equipment are properly
secured after use. Such items can
become dangerous projectiles in an
accident or sudden stop.
cThe spare tire is designed for emer-
gency use. See specific instructions
under the heading ``Wheels and
tires'' in the ``Do-it-yourself'' section
of this manual.To start your engine with a booster battery,
the instructions and precautions below must
be followed.
WARNING
cIf done incorrectly, jump starting can
lead to a battery explosion, resulting
in severe injury or death. It could
also damage your vehicle.
cExplosive hydrogen gas is always
present in the vicinity of the battery.
Keep all sparks and flames away
from the battery.
cDo not allow battery fluid to come
into contact with eyes, skin, clothing
or painted surfaces. Battery fluid is a
corrosive sulfuric acid solution
which can cause severe burns. If the
fluid should come into contact with
anything, immediately flush the con-
tacted area with water.
cKeep the battery out of the reach of
children.
cThe booster battery must be rated at
12 volts. Use of an improper rated
battery can damage your vehicle.
WCE0005
JUMP STARTING
6-8In case of emergency
ZX
Page 205 of 292
cMake sure the jumper cables do not
touch moving parts in the engine
compartment and that the clamps do
not contact any other metal.
5. Start the engine of the other vehicle and
let it run for a few minutes.
6. Keep the engine speed of the other ve-
hicle at about 2,000 RPM, and start the
engine of the vehicle being jump started.
CAUTION
Do not keep the starter motor engaged
for more than 10 seconds. If the engine
does not start right away, turn the key
off and wait 3 to 4 seconds before
trying again.
7. After starting your engine, carefully dis-
connect the negative cable and then the
positive cable.
8. Replace the vent caps (if so equipped).
Be sure to dispose of the cloth used to
cover the vent holes as it may be con-
taminated with corrosive acid.
CAUTION
Automatic transmission models cannot
be push or tow started. This may cause
transmission or other vehicle damage.If your vehicle is overheating (indicated by
an extremely high temperature gauge read-
ing), or if you feel a lack of engine power,
detect abnormal noise, etc., take the follow-
ing steps:
WARNING
cDo not continue to drive if your ve-
hicle overheats. Doing so could
cause a vehicle fire.
cTo avoid the danger of being
scalded, never remove the radiator
cap while the engine is still hot.
When the radiator cap is removed,
pressurized hot water will spurt out,
possibly causing serious injury.
cDo not open the hood if steam is
coming out.
1. Move the vehicle safely off the road,
apply the parking brake and move the
gearshift lever to the P (Park) position.
Do not stop the engine.
2. Turn off the air conditioner switch. Open
all the windows, move the temperature
control dial to warm and fan control dial
to four.
PUSH STARTING IF YOUR VEHICLE
OVERHEATS
6-10In case of emergency
ZX
Page 206 of 292
3. If engine overheating is caused by climb-
ing a long hill on a hot day, run the engine
at a fast idle (approximately 1,500 RPM)
until the temperature gauge indication
returns to normal.
4. Get out of the vehicle. Look and listen for
steam or coolant escaping from the ra-
diator before opening the hood. Wait until
no steam or coolant can be seen before
proceeding.
5. Open the hood.
WARNING
If steam or water is coming from the
engine, stand clear to prevent getting
burned.
6. Visually check if the cooling fan is run-
ning. The radiator hoses and radiator
should not leak water. If coolant is leak-
ing or the cooling fan does not run, stop
the engine.
WARNING
Be careful not to allow your hands, hair
or clothing to come into contact with,
or get caught in, engine belts or the
engine cooling fan. The engine cooling
fan can start at any time when the
coolant temperature is high.
7. After the engine cools down completely,
check the coolant level in the reservoir
tank with the engine running. Add coolant
to the reservoir tank, if necessary. Have
your vehicle repaired at an authorized
NISSAN dealer.
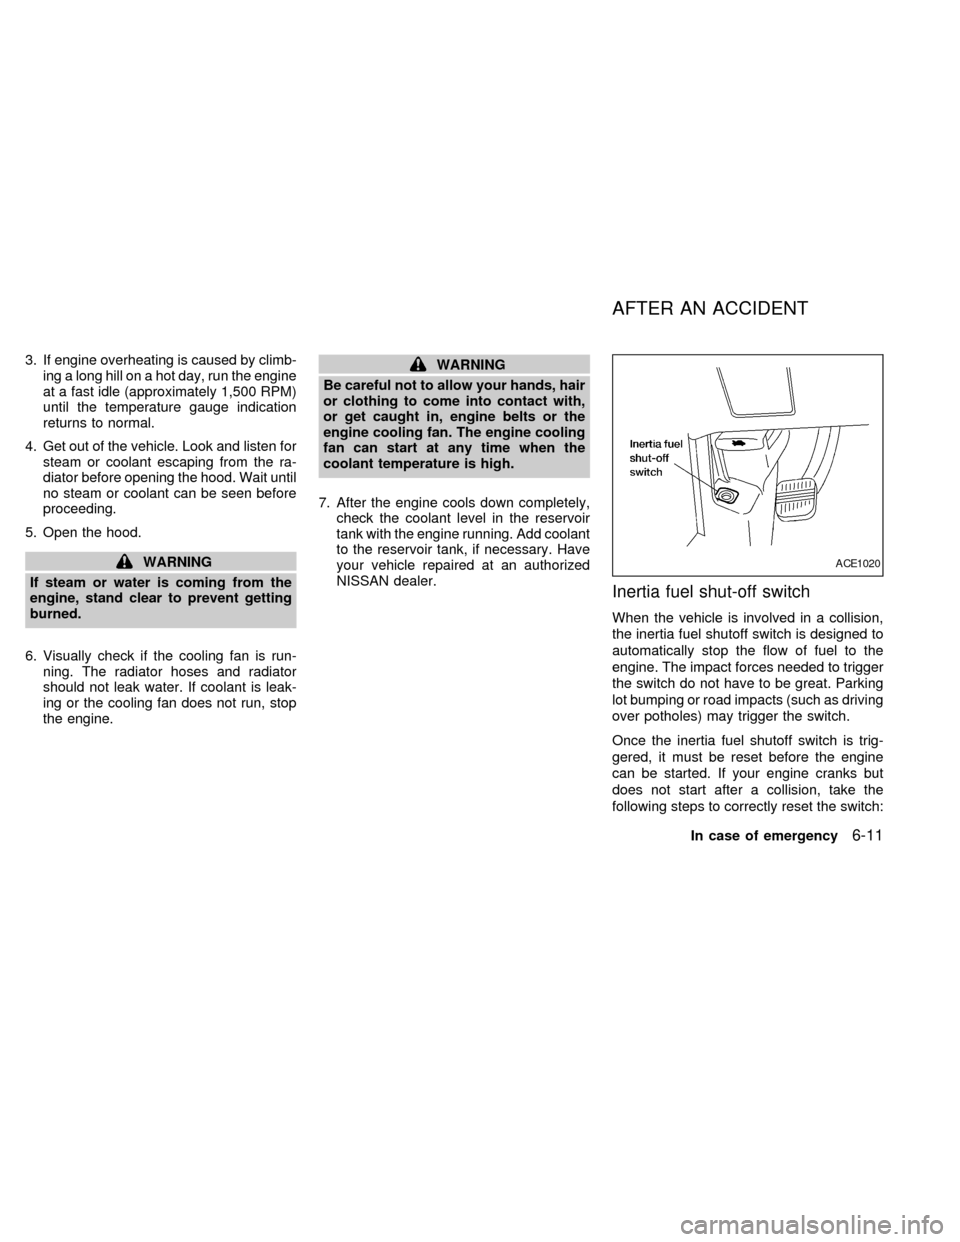
Inertia fuel shut-off switch
When the vehicle is involved in a collision,
the inertia fuel shutoff switch is designed to
automatically stop the flow of fuel to the
engine. The impact forces needed to trigger
the switch do not have to be great. Parking
lot bumping or road impacts (such as driving
over potholes) may trigger the switch.
Once the inertia fuel shutoff switch is trig-
gered, it must be reset before the engine
can be started. If your engine cranks but
does not start after a collision, take the
following steps to correctly reset the switch:
ACE1020
AFTER AN ACCIDENT
In case of emergency6-11
ZX
Page 229 of 292
WARNING
cOperating the engine with the air
cleaner removed can cause you or
others to be burned. The air cleaner
not only cleans the air, it stops flame
if the engine backfires. If it isn't there
and the engine backfires, you could
be burned. Do not drive with the air
cleaner removed, and be careful
when working on the engine with the
air cleaner removed.
cNever pour fuel into the throttle body
or attempt to start the engine with
the air cleaner removed. Doing so
could result in serious injury.
CABIN AIR FILTER
The cabin air filter restricts the entry of
airborne dust and pollen particles and re-
duces some objectionable outside odors.
The filter is located just in front of the
windshield under the cowl cover on the
passenger side of the vehicle.
To replace the filter, perform the following
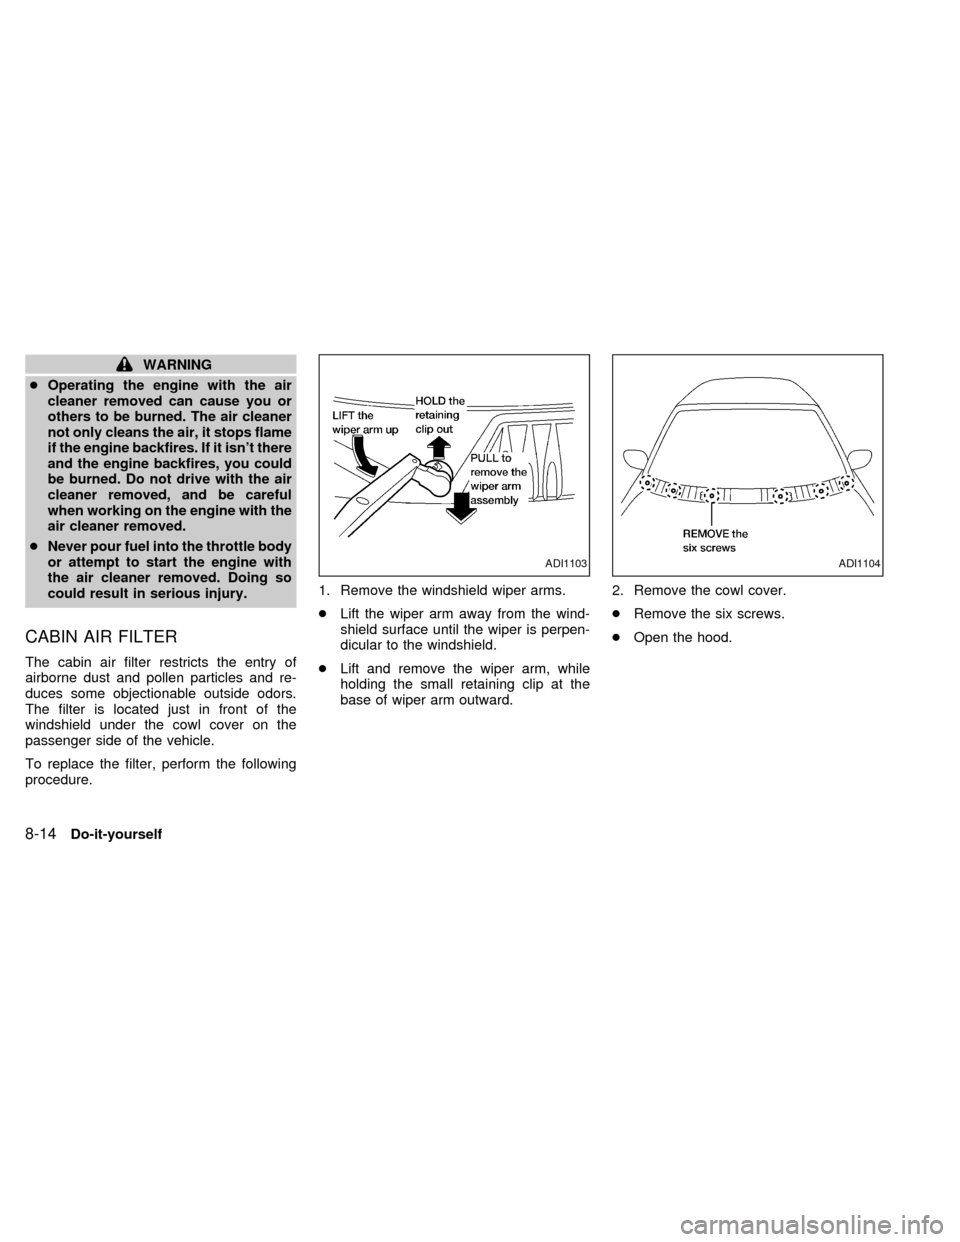
procedure.1. Remove the windshield wiper arms.
cLift the wiper arm away from the wind-
shield surface until the wiper is perpen-
dicular to the windshield.
cLift and remove the wiper arm, while
holding the small retaining clip at the
base of wiper arm outward.2. Remove the cowl cover.
cRemove the six screws.
cOpen the hood.
ADI1103ADI1104
8-14Do-it-yourself
ZX
Page 279 of 292
Trailer brakes
If your trailer is equipped with a braking
system, make sure it conforms to Federal
and/or local regulations and it is properly
installed.
WARNING
Never connect a trailer brake system
directly to the vehicle brake system.
Pre-towing tips
cBe certain your vehicle maintains a level
position when a loaded and/or unloaded
trailer is hitched. Do not drive the vehicle
if it has an abnormal nose-up or nose-
down condition; check for improper
tongue load, overload, worn suspension
or other possible causes of either condi-
tion.
cAlways secure items in the trailer to
prevent load shift while driving.
cBe certain your rear view mirrors conform
to all federal, state or local regulations. If
not, install any mirrors required for towing
before driving the vehicle.
Trailer towing tips
In order to gain skill and an understanding
of the vehicle's behavior, you should prac-
tice turning, stopping and backing up in an
area which is free from traffic. Steering,
stability, and braking performance are
somewhat different than under normal driv-
ing conditions.
cAlways secure items in the trailer to
prevent load shift while driving.
c
Avoid abrupt starts, acceleration or stops.
cAvoid sharp turns or lane changes.
cAlways drive your vehicle at a moderate
speed.
cAlways block the wheels on both vehicle
and trailer when parking. Parking on a
slope is not recommended; however, if
you must do so, first block the wheels
and apply the parking brake, and then
move the transmission shift selector le-
ver into the P (Park) position. If you move
the shift selector lever to the P (Park)
position before blocking the wheels and
applying the parking brake, transmission
damage could occur.
cWhen going down a hill, shift into a lowergear and use the engine braking effect.
When ascending a long grade, downshift
the transmission to a lower gear and
reduce speed to reduce chances of en-
gine overloading and/or overheating.
cIf the engine coolant rises to an ex-
tremely high temperature when the air
conditioning system is on, turn the air
conditioner off. Coolant heat can be ad-
ditionally vented by opening the win-
dows, switching the fan control dial to
high and setting the temperature control
dial to the WARM position.
cTrailer towing requires more fuel than
normal circumstances.
cAvoid towing a trailer for the first 500
miles (800 km) of the vehicle's life.
cHave your vehicle serviced more often
than at intervals specified in the recom-
mended Maintenance Schedule.
cWhen making a turn, your trailer wheels
will be closer to the inside of the turn than
your vehicle wheels. To compensate for
this, make a larger than normal turning
radius during the turn.
cCrosswinds and rough roads adversely
10-18Technical and consumer information
ZX
Page 282 of 292
Due to legal requirements in some states
and Canadian Provinces, your vehicle may
be required to be in the ready condition for
an Inspection/Maintenance (I/M) test of the
emission control system.
The vehicle is set to the ready condition
when it is driven through certain driving pat-
terns. Usually, the ready condition can be
obtained by ordinary usage of the vehicle.
If a powertrain system component is repaired
or the battery is disconnected, the vehicle
may be reset to a not ready condition. Before
taking the I/M test, drive the vehicle through
the following pattern to set the vehicle to the
ready condition. If you cannot or do not want
to perform the driving pattern, an authorized
NISSAN dealer can conduct it for you.
WARNING
Always drive the vehicle in a safe and
prudent manner according to traffic
conditions and obey all traffic laws.
1. Start the engine when the engine coolant
temperature gauge needle points to C.
Allow the engine to idle until the gauge
needle points between the C and H (nor-
mal operating temperature).2. Accelerate the vehicle to 55 MPH (88
km/h), then quickly release the accelera-
tor pedal completely and keep it released
for at least 6 seconds.
3. Quickly depress the accelerator pedal for
a moment, then drive the vehicle at a
speed of 53 to 60 MPH (86 to 96 km/h)
for at least 5 minutes.
4. Stop the vehicle.
5. Accelerate the vehicle to 35 mph (55
km/h) and maintain the speed for 20
seconds.
6. Repeat steps four through five at least
three times.
7. Accelerate the vehicle to 55 mph (88
km/h) and maintain the speed for at least
3 minutes.
8. Stop the vehicle (shift lever in the ``P'' or
``N'' position).
9. Rev the engine up between 2,500 and
3,500 rpm and hold it for 3 consecutive
minutes, then release the accelerator
pedal completely.
10. Wait 5 seconds at idle.
11. Rev the engine up between 2,000 and3,000 rpm and maintain it for 5 consecu-
tive minutes.
12. Stop the vehicle and turn the engine off.
13. Repeat steps one through twelve at
least one more time.
If step one through seven are interrupted,
repeat the preceding step. Any safe driving
mode is acceptable between steps. Do not
stop the engine until step seven is com-
pleted.
READINESS FOR
INSPECTION/MAINTENANCE
(I/M) TEST (US only)
Technical and consumer information10-21
ZX
Page 286 of 292
11 Index
A
Accident
Interia fuel shut-off switch .................... 6-11
After an accident........................................ 6-11
Air bag (See supplemental restraint
system) ...................................................... 1-31
Air bag warning light .................................. 1-37
Air cleaner housing filter ............................ 8-13
Air conditioner
Air conditioner operation ........................ 4-5
Air conditioner service .......................... 4-15
Air conditioner specification label ....... 10-12
Air conditioner system refrigerant and
lubrication recommendations ................ 10-6
Heater and air conditioner (automatic)
(if so equipped)..................................... 4-11
Heater and air conditioner (manual)....... 4-3
Rear seat air conditioner ...................... 4-14
Air filter
Cabin air filter ....................................... 8-14
Air flow charts .............................................. 4-7
Alarm system (See theft warning) ............. 2-10
Anti-lock brake system (ABS).................... 5-15
Anti-lock brake warning light ....................... 2-8
Armrests..................................................... 1-11
Ashtray (See cigarette lighter and
ashtray) ...................................................... 2-19Audio system
Compact disc (CD) player ........... 4-28, 4-30
FM-AM radio with cassette player ........ 4-16
FM-AM radio with cassette player and
compact disc (CD) player ..................... 4-22
Autolamp switch......................................... 2-15
Automatic
Automatic power window switch .......... 2-28
Automatic transmission fluid (ATF) ........ 8-8
Driving with automatic transmission ....... 5-6
Transmission selector lever lock
release .................................................... 5-6
B
Battery........................................................ 8-10
Battery replacement (See multi-remote
control system) ............................................ 3-8
Before starting the engine ........................... 5-5
Brake
Anti-lock brake system (ABS) .............. 5-15
Brake booster ....................................... 8-20
Brake fluid ..................................... 10-2, 8-9
Brake light (See stop light) ................... 8-24
Brake pedal .......................................... 8-19
Brake system ........................................ 5-14
Brake warning light ................................. 2-7
Brake wear indicators ........................... 2-10Parking brake check ............................. 8-19
Parking brake operation ......................... 5-9
Self-adjusting brakes ............................ 8-19
Break-in schedule ...................................... 5-11
Bulb check/instrument panel ....................... 2-6
Bulb replacement ....................................... 8-24
C
Cabin air filter ............................................ 8-14
Capacities and recommended fuel/
lubricants.................................................... 10-2
Car phone or CB radio .............................. 4-35
Cargo net ................................................... 2-24
Cargo (See vehicle loading
information) .............................................. 10-13
Check engine indicator light
(See malfunction indicator light) .................. 2-9
Child restraint with top tether strap ........... 1-67
Child restraints ........................................... 1-54
Child safety sliding door lock....................... 3-5
Cigarette lighter (accessory)
and ashtray ................................................ 2-19
Cleaning exterior and interior ...................... 7-2
Clock................................................. 4-18, 4-24
Cold weather driving .................................. 5-16
Compact disc (CD) player ................ 4-28, 4-30
ZX
Page 288 of 292
G
Gauge
Engine coolant temperature gauge ........ 2-4
Fuel gauge.............................................. 2-5
Odometer ................................................ 2-4
Speedometer .......................................... 2-4
Tachometer............................................. 2-4
Trip odometer ......................................... 2-4
General maintenance .................................. 9-2
Glove box................................................... 2-22
H
Hazard warning flasher switch .................. 2-17
Head restraints .......................................... 1-10
Headlight control switch............................. 2-14
Headlights .................................................. 8-23
Heater
Heater and air conditioner (automatic)
(if so equipped)..................................... 4-11
Heater and air conditioner (manual)....... 4-3
Rear seat air conditioner ...................... 4-14
Homelink Transceiver
Integrated HomeLinkTUniversal
Transceiver (If so equipped) ................ 2-32
Hood release ............................................... 3-9
Horn ........................................................... 2-18I
Ignition switch .............................................. 5-4
Important vehicle information label.......... 10-11
Increasing fuel economy............................ 5-12
Indicator lights and chimes (See warning/
indicator lights and chimes) ......................... 2-6
Instrument brightness control .................... 2-14
Integrated child safety seats...................... 1-72
Integrated HomeLinkTUniversal Transceiver
(If so equipped).......................................... 2-32
Interia fuel shut-off switch.......................... 6-11
Interior lights .............................................. 2-31
J
Jump starting ...................................... 6-8, 8-11
K
Key ............................................................... 3-2
Keyless entry system (See multi-remote
control system) ............................................ 3-6
L
Labels
Air conditioner specification label ....... 10-12
Emission control information label...... 10-11
Engine serial number ......................... 10-11F.M.V.S.S. certification label .............. 10-11
Vehicle identification number (VIN) .... 10-10
Vehicle identification number (VIN)
plate .................................................... 10-10
Warning labels (for SRS) ..................... 1-36
License plate
Installing the license plate .................. 10-12
Light
Air bag warning light............................. 1-37
Brake light (See stop light) ................... 8-24
Bulb check/instrument panel .................. 2-6
Bulb replacement.................................. 8-24
Cornering light ...................................... 2-17
Headlight control switch ....................... 2-14
Headlights ............................................. 8-23
Interior lights ......................................... 2-31
Light bulbs ............................................ 8-23
Luggage compartment lights ................ 2-31
Spotlights (See map light) .................... 2-32
Warning/indicator lights and chimes ...... 2-6
Lock
Child safety sliding door lock ................. 3-5
Door locks............................................... 3-2
Fuel filler lid lock opener lever ............. 3-11
Power door locks ............................ 3-2, 3-4
Rear door lock ...................................... 3-10
Luggage compartment lights ..................... 2-31
Luggage rack ............................................. 2-27
Luggage (See vehicle loading
information) .............................................. 10-13
11-3
ZX