2000 NISSAN QUEST lights
[x] Cancel search: lightsPage 163 of 292

FM-AM RADIO WITH CASSETTE
PLAYER AND COMPACT DISC
(CD) PLAYER
Audio main operationTo turn the radio on, turn the ignition key to
ACC or ON. If you listen to the radio with the
engine not running, turn the key to the ACC
position.
Radio reception is affected by station signal
strength, distance from radio transmitter,buildings, bridges, mountains, and other
external influences. Intermittent changes in
reception quality normally are caused by
external influences.
Using a cellular phone in or near the
vehicle may influence radio reception
quality.
Power/Volume control
Push the VOL knob to turn the radio on.
Push the VOL knob once more to turn the
radio OFF.
The control buttons are illuminated when
the parking lamps or headlamps are on.
Only the text for the active controls will
illuminate for each specific type of media.
No bulbs or lights have malfunctioned. For
example when a cassette tape is being
played, SHUFFLE will not illuminate.
Turn the knob to raise or lower volume. If
the knob is set above a certain volume level
and the ignition is turned off, the volume will
come back on at a nominal listening level
when the ignition is turned back on.
AHA1058
4-22Heater, air conditioner and audio systems
ZX
Page 182 of 292

cMake sure the area around the vehicle is
clear.
cMaintenance items listed here should be
checked periodically (for example, each
time you check engine oil).
cCheck that all windows and lights are
clean.
cVisually inspect tires for their appearance
and condition. Also check tires for proper
inflation.
cLock all doors.
cPosition seat and adjust head restraints.
cAdjust inside and outside mirrors.
cFasten seat belts and ask all passengers
to do likewise.
cCheck the operation of warning lights
when key is turned to the ON position.
See ``Warning/Indicator lights and chimes''
in the ``Instrument and controls'' section.
1. Apply the parking brake.
2. Move the selector lever to P (Park) or N
(Neutral) (P is recommended).
The shift selector lever cannot be
moved out of P and into any of the
other gear positions under the follow-
ing conditions:
cThe ignition key is turned to the
LOCK position.
cThe ignition key is turned to the ON
position without depressing the
foot brake pedal.
The starter will not operate if the shift
selector lever is in one of the driving
positions.
3. Crank the enginewith your foot off the
accelerator pedalby turning the ignition
key to START. Release the key when the
engine starts. If the engine starts, but
fails to run, repeat the above procedure.
Ð If the engine is very hard to start in
extremely cold or hot weather, de-
press the accelerator pedal to the
floor and hold it to help start the
engine.Ð In the summer, when restarting the
engine within 30 minutes after it has
been stopped, keep the accelerator
pedal slightly depressed while start-
ing.
CAUTION
Do not operate the starter for more than
15 seconds at a time. If the engine does
not start, turn the key off and wait 10
seconds before cranking again, other-
wise the starter could be damaged.
4. Warm-up
Allow the engine to idle for at least 30
seconds after starting. Drive at moderate
speeds for a short distance first, espe-
cially in cold weather.
BEFORE STARTING THE
ENGINESTARTING THE ENGINE
Starting and driving5-5
ZX
Page 187 of 292

The cruise control allows driving at speeds
between 30 and 90 MPH (48 and 144 km/h)
without keeping your foot on the accelerator
pedal.
To turn the cruise control on,push the
CRUISE main switch. The indicator light on
the switch comes on.
To set at cruising speed,accelerate your
vehicle to the desired speed, push the
COAST/SET switch and release it. The
CRUISE light in the instrument cluster
comes on. Take your foot off the accelerator
pedal. Your vehicle maintains the set
speed.cTo pass another vehicle,depress the
accelerator pedal. When you release the
pedal, the vehicle returns to the previ-
ously set speed.
cThe vehicle may not maintain the set
speed when going up or down steep hills.
If this happens, drive without the cruise
control.
To cancel the preset speed,follow any of
these three methods.
a) Push the CANCEL button; the CRUISE
light in the instrument panel goes out.b) Tap the brake pedal; the CRUISE light
goes out.
c)
Push the cruise control OFF switch. Both
the main switch indicator and CRUISE
lights go out.
cIf you depress the brake pedal while
pushing the RES/ACCEL switch, the
RES/ ACCEL function is cancelled.
In order for the RES/ACCEL switch to
operate, the COAST/SET must be used
to re-engage the system.
cThe cruise control automatically cancels
if the vehicle slows down more than 5
MPH (8 km/h) below the set speed.
WSD0003
5-10Starting and driving
ZX
Page 204 of 292

cWhenever working on or near a bat-
tery, always wear suitable eye pro-
tectors (for example, goggles or in-
dustrial safety spectacles) and
remove rings, metal bands, or any
other jewelry. Do not lean over when
jump starting.
cDo not attempt to jump start a frozen
battery. It could explode and cause
serious injury.
cYour vehicle has an automatic en-
gine cooling fan. It could come on at
any time. Keep hands and other ob-
jects away from it.
Always follow the instructions below.
Failure to do so could result in damage
to the charging system and cause per-
sonal injury.
1. If the booster battery is in another ve-
hicle, position the two vehicles to bring
their batteries close to each other.
Do not allow the two vehicles to touch.
2. Apply the parking brake. Move the gear-
shift lever to the P (Park) position. Switch
off all unnecessary electrical systems
(lights, heater, air conditioner, etc.).3. Remove vent caps on the battery (if so
equipped). Cover the battery with an old
cloth to reduce explosion hazard.
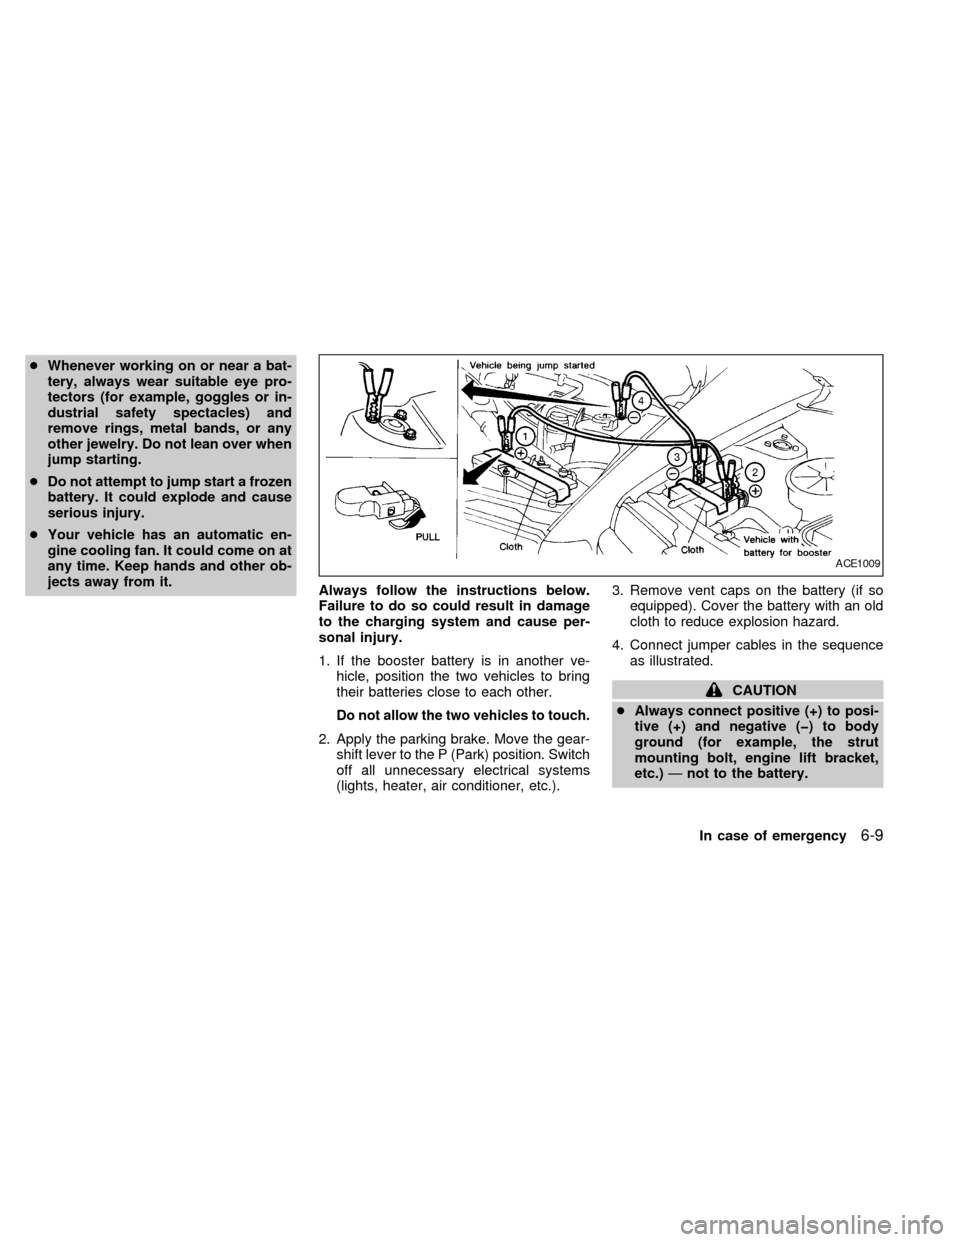
4. Connect jumper cables in the sequence
as illustrated.
CAUTION
cAlways connect positive (+) to posi-
tive (+) and negative (þ) to body
ground (for example, the strut
mounting bolt, engine lift bracket,
etc.)Ðnot to the battery.
ACE1009
In case of emergency6-9
ZX
Page 216 of 292

8 Do-it-yourself
Maintenance precautions .......................................8-2
Engine compartment check locations ....................8-3
Engine cooling system ...........................................8-4
Checking engine coolant level ...............................8-4
Changing engine coolant .......................................8-5
Engine oil ...............................................................8-5
Checking engine oil level .......................................8-5
Changing engine oil ...............................................8-6
Changing engine oil filter .......................................8-7
Automatic transmission fluid ..................................8-8
Temperature conditions for checking .....................8-8
Power steering fluid................................................8-9
Brake fluid ..............................................................8-9
Window washer fluid ............................................8-10
Battery ..................................................................8-10
Jump starting ........................................................8-11
Drive belts ............................................................8-12
Spark plugs ..........................................................8-12
Replacing spark plugs ..........................................8-12
Air cleaner ............................................................8-13Cabin air filter .......................................................8-14
Windshield wiper blades ......................................8-17
Cleaning ...............................................................8-17
Replacing .............................................................8-17
Parking brake and brake pedal ............................8-19..........................................8-19
Checking parking brake .......................................8-19
Checking brake pedal ..........................................8-19
Brake booster .......................................................8-20
Fuses ....................................................................8-20
Engine compartment ............................................8-20
Passenger compartment ......................................8-21
Multi-remote controller battery replacement ........8-22
Lights ....................................................................8-23
Headlights ............................................................8-23
Exterior and interior lights ....................................8-24
Wheels and tires ..................................................8-28
Tire pressure ........................................................8-28
Types of tires........................................................8-29
Tire chains ............................................................8-30
Changing tires and wheels...................................8-30
ZX
Page 238 of 292

HEADLIGHTS
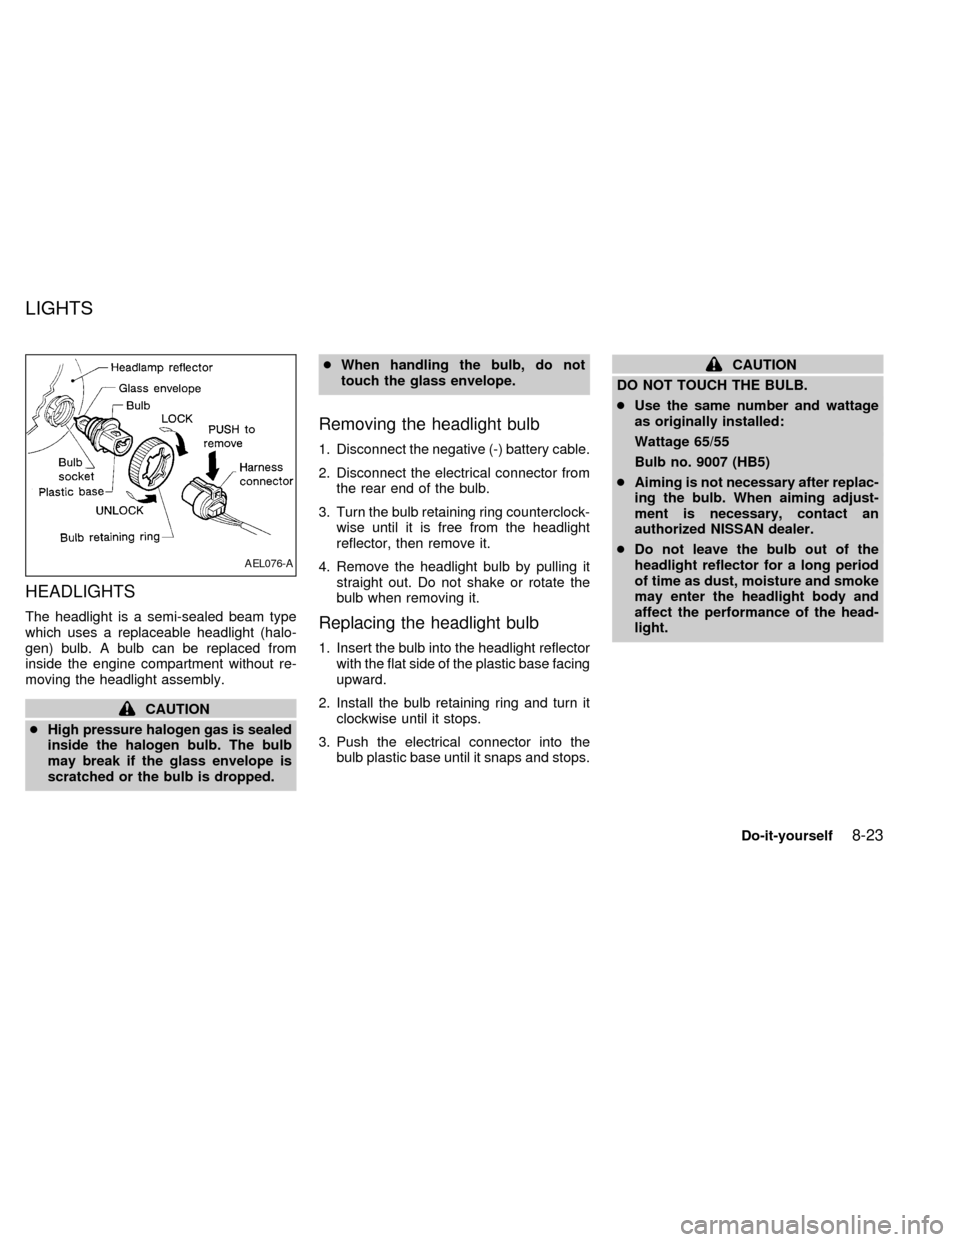
The headlight is a semi-sealed beam type
which uses a replaceable headlight (halo-
gen) bulb. A bulb can be replaced from
inside the engine compartment without re-
moving the headlight assembly.
CAUTION
cHigh pressure halogen gas is sealed
inside the halogen bulb. The bulb
may break if the glass envelope is
scratched or the bulb is dropped.cWhen handling the bulb, do not
touch the glass envelope.
Removing the headlight bulb
1. Disconnect the negative (-) battery cable.
2. Disconnect the electrical connector from
the rear end of the bulb.
3. Turn the bulb retaining ring counterclock-
wise until it is free from the headlight
reflector, then remove it.
4. Remove the headlight bulb by pulling it
straight out. Do not shake or rotate the
bulb when removing it.
Replacing the headlight bulb
1. Insert the bulb into the headlight reflector
with the flat side of the plastic base facing
upward.
2. Install the bulb retaining ring and turn it
clockwise until it stops.
3. Push the electrical connector into the
bulb plastic base until it snaps and stops.
CAUTION
DO NOT TOUCH THE BULB.
cUse the same number and wattage
as originally installed:
Wattage 65/55
Bulb no. 9007 (HB5)
cAiming is not necessary after replac-
ing the bulb. When aiming adjust-
ment is necessary, contact an
authorized NISSAN dealer.
cDo not leave the bulb out of the
headlight reflector for a long period
of time as dust, moisture and smoke
may enter the headlight body and
affect the performance of the head-
light.
AEL076-A
LIGHTS
Do-it-yourself8-23
ZX
Page 239 of 292

EXTERIOR AND INTERIOR
LIGHTS
Item Wattage (W) Bulb No.
Headlight assembly
High/Low 65/55 9007 (HB5)
Front turn signal light 8.25/27 3157NA
Front combination light:
Front side marker light 3.8 194
Parking/Cornering 8.25/27 3157K
Rear combination light:
Turn signal 27 3156K
Stop/Tail 8.25/27 3157K
Rear side marker light 5 168
Back-up light 27 3156K
License plate light 3.8 194
High-mounted stop light 12.8 912
Interior lights 12 211-2
Personal reading light 10 578
Luggage compartment light 12 211-2
Steplight 3.8 194
Spotlight 10 578
8-24Do-it-yourself
ZX
Page 240 of 292

Replacement procedures
All lights (except for headlights) are either
type A, B, C or D. When replacing a bulb,
first remove the lens and/or cover.
WDI0012
ADI1093
Do-it-yourself8-25
ZX