2000 NISSAN FRONTIER engine battery
[x] Cancel search: engine batteryPage 77 of 269
CAUTION
Leaving the dome light switch in the ON
position for extended periods of time
will result in a discharged battery.
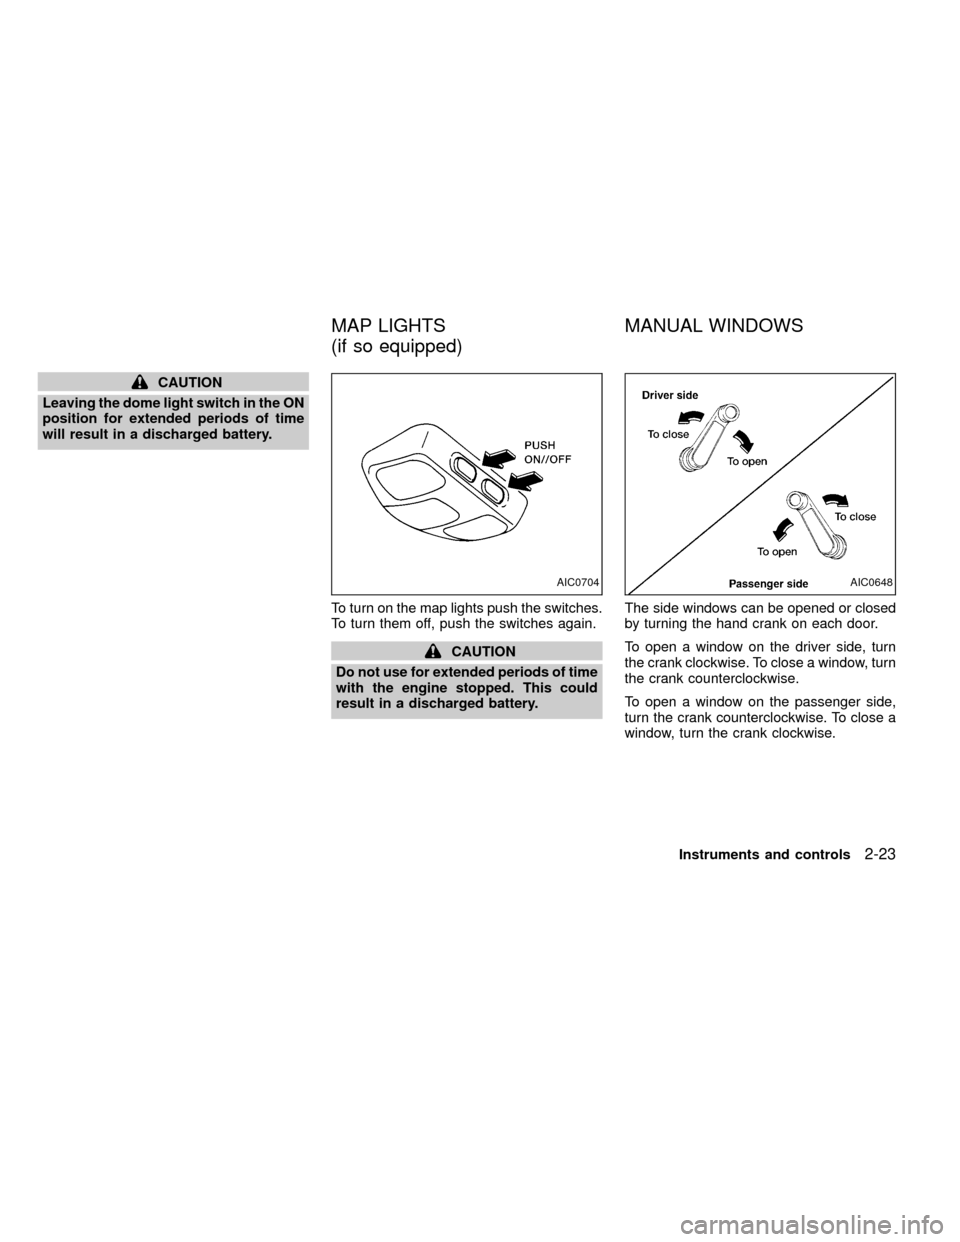
To turn on the map lights push the switches.
To turn them off, push the switches again.
CAUTION
Do not use for extended periods of time
with the engine stopped. This could
result in a discharged battery.The side windows can be opened or closed
by turning the hand crank on each door.
To open a window on the driver side, turn
the crank clockwise. To close a window, turn
the crank counterclockwise.
To open a window on the passenger side,
turn the crank counterclockwise. To close a
window, turn the crank clockwise.
AIC0704AIC0648
MAP LIGHTS
(if so equipped)MANUAL WINDOWS
Instruments and controls2-23
ZX
Page 137 of 269
AUTOMATIC TRANSMISSION
On automatic transmission models, the ig-
nition lock is designed so the key cannot be
turned to LOCK and removed until the shift
selector lever is moved to the P (Park)
position.
When removing the key from the ignition,
make sure the shift selector lever is in the P
(Park) position.
If the key cannot be turned to the LOCK
position, proceed as follows to remove the key:
1) Move the shift selector lever into the P
(Park) position.2) Turn the ignition key slightly in the ON
direction.
3) Turn the key toward the LOCK position.
4) Remove the key.
The shift lever is designed so it cannot be
moved out of P (Park) and into any of the
other gear positions if the ignition key is
turned to OFF or if the key is removed from
the switch.
The shift lever can be moved if the igni-
tion switch is in the ACC position. This
allows the vehicle to be moved if the
battery is discharged. The shift lever can
also be moved if the ignition switch is in
the ON position and the foot brake pedal
is depressed.
There is an OFF position between the
LOCK and ACC positions. The OFF posi-
tion is indicated by a²1²on the key
cylinder. When the ignition is in the OFF
position, the steering wheel is not
locked.
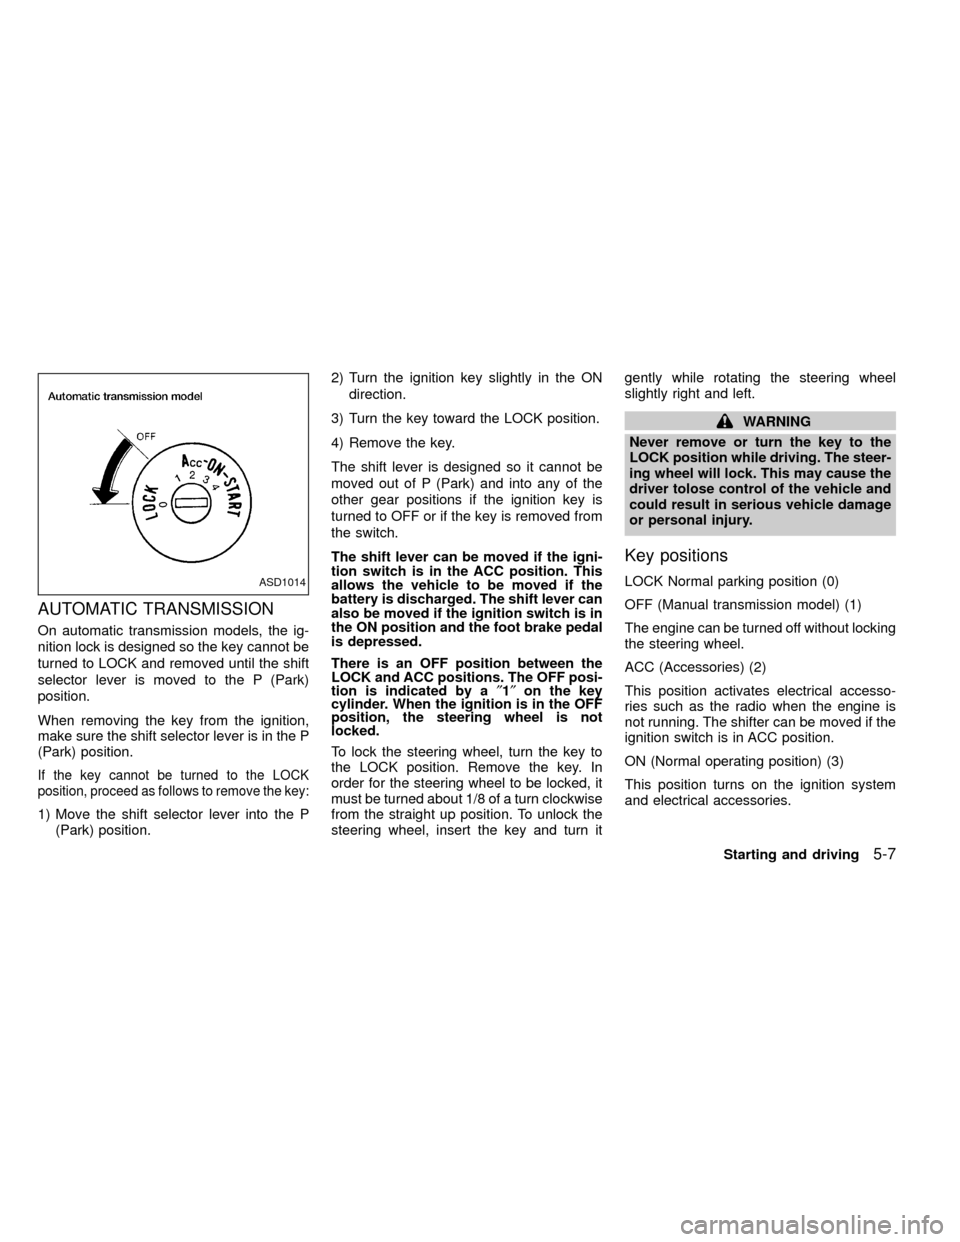
To lock the steering wheel, turn the key to
the LOCK position. Remove the key. In
order for the steering wheel to be locked, it
must be turned about 1/8 of a turn clockwise
from the straight up position. To unlock the
steering wheel, insert the key and turn itgently while rotating the steering wheel
slightly right and left.
WARNING
Never remove or turn the key to the
LOCK position while driving. The steer-
ing wheel will lock. This may cause the
driver tolose control of the vehicle and
could result in serious vehicle damage
or personal injury.
Key positions
LOCK Normal parking position (0)
OFF (Manual transmission model) (1)
The engine can be turned off without locking
the steering wheel.
ACC (Accessories) (2)
This position activates electrical accesso-
ries such as the radio when the engine is
not running. The shifter can be moved if the
ignition switch is in ACC position.
ON (Normal operating position) (3)
This position turns on the ignition system
and electrical accessories.ASD1014
Starting and driving5-7
ZX
Page 139 of 269

The automatic transmission in your vehicle
is electronically controlled by a transmission
control module to produce maximum power
and smooth operation.
The recommended operating procedures for
this transmission are shown on the following
pages. Follow these procedures for maximum
vehicle performance and driving enjoyment.
Starting the vehicle
IAfter starting the engine, fully depress
the foot brake pedal to ensure the ve-
hicle is at a complete stop before at-
tempting to shift the selector lever.
IKeep the foot brake pedal depressed
and shift the selector lever into a driving
gear.
IRelease the foot brake, then gradually
start the vehicle in motion.
This automatic transmission is designed
so the foot brake pedal MUST be de-
pressed before shifting from P (Park) to
any drive position while the ignition
switch is ON.
The shift lever cannot be moved out of P
(Park) and into any of the other gear
positions if the ignition key is turned toLOCK or if the key is removed.
If the battery charge is low, the shift lever
can be moved if the ignition switch is in
the ACC position.
Shifting with automatic transmission
(KA24DE engine)
Pull the selector lever rearward to shift into
P (Park), or R (Reverse) or from D (Drive) to
2or1.
P (Park):
Use this position when the vehicle is parked or
when starting the engine. Always be sure the
vehicle is at a complete stop. For maximum
safety, depress the brake pedal, then move
the selector lever to the P (Park) position.
Apply the parking brake. When parking on a
hill, apply the parking brake first, then shift the
ASD1008
Starting and driving5-9
ZX
Page 142 of 269

D (Drive):
Use this position for all normal forward
driving.
2 (Second gear):
Use this position for hill climbing or engine
braking on downhill grades.
Do not shift into the 2 position at speeds
above 68 MPH (110 km/h). Do not exceed
68 MPH (110 km/h) in the 2 position.
1 (Low gear):
Use this position when climbing steep hills
slowly or slow driving through deep snow,
sand or mud, or for maximum engine brak-
ing on steep downhill grades.
Do not shift into the 1 position at speeds
above 34 MPH (55 km/h). Do not exceed 34
MPH (55 km/h) in the 1 position.Selector lever lock release
If the battery charge is low, the selector
lever may not be moved from the P position
even with the brake pedal depressed and
the selector lever button pushed.
To move the selector lever, push the shift
lock release and selector lever button. The
selector lever can be moved to N (Neutral).
To push the shift lock release, follow the
following procedure:
1. Turn the ignition key to the lock position
and remove the key.
2. Apply the parking brake.
3. Remove the shift lock release cover.
4. Insert a small screwdriver in the shift lock
release slot, and push down.
5. Push the selector lever button and move
the selector lever to N (Neutral) position
while holding down the shift lock release.
6. Start the engine.
If there is any problem moving the selector
lever out of P (Park), take your vehicle to an
authorized NISSAN dealership as soon as
possible.
ASD1021
5-12Starting and driving
ZX
Page 160 of 269
Using the system (2 wheel Rear
ABS)
Depress the brake pedal and hold it down.
With the rear anti-lock brake system, the
front wheels can still lock. If this happens,
release the brake pedal slightly and then
reapply pressure.
WARNING
The anti-lock brake system is a sophis-
ticated device, but it cannot prevent
accidents resulting from careless or
dangerous driving techniques. It can
help maintain vehicle control during
braking on slippery surfaces, but re-
member that the stopping distance on
slippery surfaces will be longer than on
normal surfaces even with the anti-lock
brake system. Stopping distances may
also be longer on rough, gravel, or
snow covered roads, or if you are using
tire chains. Always maintain a safe dis-
tance from the vehicle in front of you.
Ultimately, the responsibility for safety
of self and others rests in the hands of
the driver.Tire type and condition may also affect
braking effectiveness.
IWhen replacing tires, install the
specified size of tires on all four
wheels.
IWhen installing a spare tire, make
sure it is the proper size and type as
specified on the tire placard. For tire
placard location information, refer to
``Tire placard'' in the ``Technical and
consumer information'' section of
this manual.
For additional information, refer to²Wheels
and Tires²in the²Do-it-yourself²section of
this manual.
Freeing a frozen door lock
To prevent a door lock from freezing, apply
de-icer or glycerin through the key hole. If
the lock becomes frozen, heat the key be-
fore inserting it in the key hole.
Anti-freeze
In the winter when it is anticipated that the
temperature will drop below 32ÉF (0ÉC),
check anti-freeze (ethylene glycol base) to
assure proper winter protection. For details,
see ``Engine cooling system'' in the ``Do-it-
yourself'' section of this manual.
Battery
If the battery is not fully charged during
extremely cold weather conditions, the bat-
tery fluid may freeze and damage the bat-
tery. To maintain maximum efficiency, the
battery should be checked regularly. For
details, see ``Battery'' in the ``Do-it-yourself''
section of this manual.
Draining of coolant water
If the vehicle is to be left outside without
anti-freeze, drain the cooling system by
opening the drain valves located under the
radiator and on the engine block. Refill
COLD WEATHER DRIVING
5-30Starting and driving
ZX
Page 170 of 269
To start your engine with a booster battery,
the instructions and precautions below must
be followed.
WARNING
IIf done incorrectly, jump starting can
lead to a battery explosion, resulting
in severe injury or death. It could
also damage your vehicle.
IExplosive hydrogen gas is always
present in the vicinity of the battery.
Keep all sparks and flames away
from the battery.
IDo not allow battery fluid to come
into contact with eyes, skin, clothing
or painted surfaces. Battery fluid is a
corrosive sulphuric acid solution
which can cause severe burns. If the
fluid should come into contact with
anything, immediately flush the con-
tacted area with water.
IKeep battery out of the reach of
children.
IThe booster battery must be rated at
12 volts. Use of an improperly rated
battery can damage your vehicle.IYour vehicle has an automatic en-
gine cooling fan. It could come on at
any time. Keeps hands and other
objects away from it.
IWhenever working on or near a bat-
tery, always wear suitable eye pro-
tectors (e.g., goggles or industrial
safety spectacles) and remove rings,
metal bands, or any other jewelry. Do
not lean over the battery when jump
starting.
IDo not attempt to jump start a frozen
battery. It could explode and causeserious injury.
WARNING
Always follow the instructions below.
Failure to do so could result in damage
to the charging system and cause per-
sonal injury.
1.
If the booster battery is in another vehicle,
position the two vehicles to bring their
batteries into close proximity to each other.
Do not allow the two vehicles to touch.
ACE1018
JUMP STARTING
6-8In case of emergency
ZX
Page 171 of 269
2. Apply the parking brake. Move the shift
selector lever to N (Neutral) (on auto-
matic transmission models, move the
lever to P (Park)). Switch off all unneces-
sary electrical systems (lights, heater, air
conditioner, etc.).
3. Remove vent caps on the battery (if so
equipped). Cover the battery with an old
cloth to reduce explosion hazard.
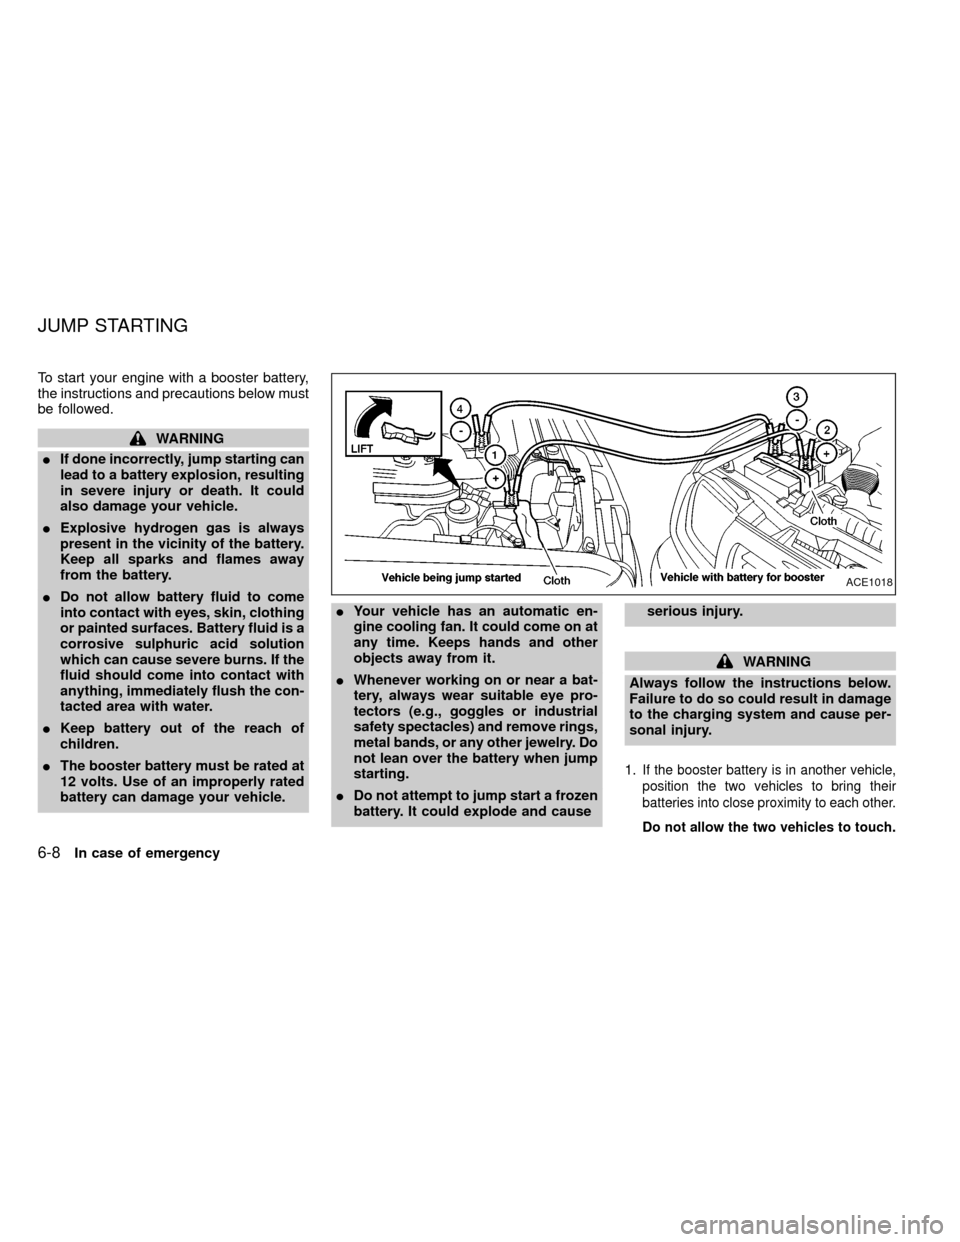
4. Connect jumper cables in the sequence
as illustrated.
CAUTION
IAlways connect positive (+) to posi-
tive (+) and negative (þ) to body
ground (for example, engine lift
bracket, etc.)Ðnot to the battery.
IMake sure the jumper cables do not
touch moving parts in the engine
compartment and that the cable
clamps do not contact any other
metal.
5. Start the engine of the booster vehicle
and let it run for a few minutes.6. Keep the engine speed of the booster
vehicle at about 2,000 r/min, and start the
engine of the vehicle being jump started.
CAUTION
Do not keep the starter motor engaged
for more than 10 seconds. If the engine
does not start right away, turn the key
off and wait 3 to 4 seconds before
trying again.
7. After starting your engine, carefully dis-
connect the negative cable and then the
positive cable.
8. Replace the vent caps (if so equipped).
Be sure to dispose of the cloth used to
cover the vent holes as it may be con-
taminated with corrosive acid.
CAUTION
IAutomatic transmission models can-
not be push started. This may cause
transmission damage.
IThree-way catalyst equipped models
should not be started by pushing.
The three-way catalyst may be dam-
aged.
INever try to start the vehicle by tow-
ing it. When the engine starts, the
forward surge could cause the ve-
hicle to collide with the tow vehicle.
PUSH STARTING
In case of emergency6-9
ZX
Page 183 of 269

8 Do-it-yourself
Maintenance precautions .......................................8-2
Engine compartment check locations ....................8-3
Engine cooling system ...........................................8-5
Checking engine coolant level ...............................8-5
Changing engine coolant .......................................8-6
Engine oil ...............................................................8-9
Checking engine oil level .......................................8-9
Changing engine oil .............................................8-10
Changing engine oil filter .....................................8-12
Automatic transmission fluid (ATF) ......................8-13
Temperature conditions for checking ATF ...........8-13
Power steering fluid..............................................8-14
Brake and clutch fluid ...........................................8-15
Window washer fluid ............................................8-15
Battery ..................................................................8-16
Jump starting ........................................................8-17
Drive belts ............................................................8-18Spark plug replacement .......................................8-19
Air cleaner housing filter ......................................8-21
Wiper blades ........................................................8-22
Parking brake check.............................................8-23
Brake pedal ..........................................................8-23
Brake booster .......................................................8-24
Clutch pedal .........................................................8-25
Fuses ....................................................................8-26
Multi-remote controller battery replacement ........8-27
Light bulbs ............................................................8-29
Headlights ............................................................8-29
Bulb replacement .................................................8-30
Front fog light bulb replacement (if so
equipped) .............................................................8-32
Wheels and tires...................................................8-33
Four-wheel drive models ......................................8-36
ZX