2000 NISSAN FRONTIER key
[x] Cancel search: keyPage 142 of 269

D (Drive):
Use this position for all normal forward
driving.
2 (Second gear):
Use this position for hill climbing or engine
braking on downhill grades.
Do not shift into the 2 position at speeds
above 68 MPH (110 km/h). Do not exceed
68 MPH (110 km/h) in the 2 position.
1 (Low gear):
Use this position when climbing steep hills
slowly or slow driving through deep snow,
sand or mud, or for maximum engine brak-
ing on steep downhill grades.
Do not shift into the 1 position at speeds
above 34 MPH (55 km/h). Do not exceed 34
MPH (55 km/h) in the 1 position.Selector lever lock release
If the battery charge is low, the selector
lever may not be moved from the P position
even with the brake pedal depressed and
the selector lever button pushed.
To move the selector lever, push the shift
lock release and selector lever button. The
selector lever can be moved to N (Neutral).
To push the shift lock release, follow the
following procedure:
1. Turn the ignition key to the lock position
and remove the key.
2. Apply the parking brake.
3. Remove the shift lock release cover.
4. Insert a small screwdriver in the shift lock
release slot, and push down.
5. Push the selector lever button and move
the selector lever to N (Neutral) position
while holding down the shift lock release.
6. Start the engine.
If there is any problem moving the selector
lever out of P (Park), take your vehicle to an
authorized NISSAN dealership as soon as
possible.
ASD1021
5-12Starting and driving
ZX
Page 146 of 269
1. Apply the parking brake.
2.Automatic transmission:
Move the selector lever to P (Park) or N
(Neutral). P (Park) is preferred.
The shift lever cannot be moved out of
P (Park) and into any of the other gear
positions if the ignition key is turned
to OFF or if the key is removed from
the ignition switch.
The starter is designed not to operate
if the selector lever is in one of the
driving positions.
Manual transmission:
Move the gearshift lever to N (Neutral),
and fully depress the clutch pedal to the
floor while starting the engine.
The starter is designed not to operate
unless the clutch pedal is fully de-
pressed.
3.With your foot off the accelerator
pedal,turn the ignition key to START.
Release the key when the engine starts.
If the engine starts, but fails to run, repeat
the above procedure.IIf the engine is very hard to start in
extremely cold or hot weather, depress
the accelerator pedal fully and hold it
to help start the engine.
IIn the summer, when restarting the
engine within 30 minutes after it has
been stopped, keep the accelerator
pedal fully depressed while starting.
CAUTION
Do not operate the starter for more than
15 seconds at a time. If the engine does
not start, turn the key off and wait 10
seconds before cranking again, other-
wise the starter could be damaged.
4.Warm-up
Always allow the engine to idle for at
least 30 seconds after starting. Drive at a
moderate speed for a short distance first,
especially in cold weather.
WARNING
IBe sure the parking brake is fully
released before driving. Failure to do
so can cause brake failure and lead
to an accident.
IDo not release the parking brake
from outside the vehicle.
IDo not use the gear shift in place of
the parking brake. When parking, be
sure the parking brake is fully en-
gaged.
I
Do not leave children unattended in a
vehicle. They could release the park-
ing brake and cause an accident.
STARTING THE ENGINE PARKING BRAKE OPERATION
5-16Starting and driving
ZX
Page 158 of 269
verse) position. When parking on an up-
hill grade, place the gearshift lever in the
1st position.
Automatic transmission models:
Move the gearshift lever to the P (Park)
position.
3. To help prevent the vehicle from rolling
into the street when parked on an incline,
it is a good practice to turn the wheels as
illustrated.
IHEADED DOWNHILL WITH CURB:À
1
Turn the wheels into the curb and move
the vehicle forward until the curb side
wheel gently touches the curb.
IHEADED UPHILL WITH CURB:Á
2
Turn the wheels away from the curb and
move the vehicle back until the curb side
wheel gently touches the curb.
IHEADED UPHILL OR DOWNHILL, NO
CURB:Â
3
Turn the wheels toward the side of the
road so the vehicle will move away from
the center of the road if it moves.
4. Turn the ignition key to the LOCK posi-
tion and remove the key.The power assisted steering is designed to
use a hydraulic pump, driven by the engine,
to assist steering.
If the engine stops or drive belt breaks, you
will still have control of the vehicle. How-
ever, much greater steering effort is needed,
especially in sharp turns and at low speeds.
WARNING
If the engine is not running or is turned
off while driving, the power assist for
the steering will not work. Steering will
be much harder to operate.The brake system has two separate hydrau-
lic circuits. If one circuit develops a problem,
you will still have braking at two wheels.
Vacuum assisted brakes
The brake booster aids braking by using
engine vacuum. If the engine stops, you can
stop the vehicle by depressing the brake
pedal. However, greater foot pressure on
the brake pedal will be required to stop the
vehicle and stopping distance will be longer.
Wet brakes
When the vehicle is washed or driven
through water, the brakes may get wet. As a
result, your braking distance will be longer
and the vehicle may pull to one side during
braking.
To dry the brakes, drive the vehicle at a safe
speed while lightly pressing the brake pedal
to heat the brakes. Do this until the brakes
return to normal. Avoid driving the vehicle at
high speeds until the brakes function cor-
rectly.
POWER STEERING SYSTEM BRAKE SYSTEM
5-28Starting and driving
ZX
Page 160 of 269
Using the system (2 wheel Rear
ABS)
Depress the brake pedal and hold it down.
With the rear anti-lock brake system, the
front wheels can still lock. If this happens,
release the brake pedal slightly and then
reapply pressure.
WARNING
The anti-lock brake system is a sophis-
ticated device, but it cannot prevent
accidents resulting from careless or
dangerous driving techniques. It can
help maintain vehicle control during
braking on slippery surfaces, but re-
member that the stopping distance on
slippery surfaces will be longer than on
normal surfaces even with the anti-lock
brake system. Stopping distances may
also be longer on rough, gravel, or
snow covered roads, or if you are using
tire chains. Always maintain a safe dis-
tance from the vehicle in front of you.
Ultimately, the responsibility for safety
of self and others rests in the hands of
the driver.Tire type and condition may also affect
braking effectiveness.
IWhen replacing tires, install the
specified size of tires on all four
wheels.
IWhen installing a spare tire, make
sure it is the proper size and type as
specified on the tire placard. For tire
placard location information, refer to
``Tire placard'' in the ``Technical and
consumer information'' section of
this manual.
For additional information, refer to²Wheels
and Tires²in the²Do-it-yourself²section of
this manual.
Freeing a frozen door lock
To prevent a door lock from freezing, apply
de-icer or glycerin through the key hole. If
the lock becomes frozen, heat the key be-
fore inserting it in the key hole.
Anti-freeze
In the winter when it is anticipated that the
temperature will drop below 32ÉF (0ÉC),
check anti-freeze (ethylene glycol base) to
assure proper winter protection. For details,
see ``Engine cooling system'' in the ``Do-it-
yourself'' section of this manual.
Battery
If the battery is not fully charged during
extremely cold weather conditions, the bat-
tery fluid may freeze and damage the bat-
tery. To maintain maximum efficiency, the
battery should be checked regularly. For
details, see ``Battery'' in the ``Do-it-yourself''
section of this manual.
Draining of coolant water
If the vehicle is to be left outside without
anti-freeze, drain the cooling system by
opening the drain valves located under the
radiator and on the engine block. Refill
COLD WEATHER DRIVING
5-30Starting and driving
ZX
Page 171 of 269
2. Apply the parking brake. Move the shift
selector lever to N (Neutral) (on auto-
matic transmission models, move the
lever to P (Park)). Switch off all unneces-
sary electrical systems (lights, heater, air
conditioner, etc.).
3. Remove vent caps on the battery (if so
equipped). Cover the battery with an old
cloth to reduce explosion hazard.
4. Connect jumper cables in the sequence
as illustrated.
CAUTION
IAlways connect positive (+) to posi-
tive (+) and negative (þ) to body
ground (for example, engine lift
bracket, etc.)Ðnot to the battery.
IMake sure the jumper cables do not
touch moving parts in the engine
compartment and that the cable
clamps do not contact any other
metal.
5. Start the engine of the booster vehicle
and let it run for a few minutes.6. Keep the engine speed of the booster
vehicle at about 2,000 r/min, and start the
engine of the vehicle being jump started.
CAUTION
Do not keep the starter motor engaged
for more than 10 seconds. If the engine
does not start right away, turn the key
off and wait 3 to 4 seconds before
trying again.
7. After starting your engine, carefully dis-
connect the negative cable and then the
positive cable.
8. Replace the vent caps (if so equipped).
Be sure to dispose of the cloth used to
cover the vent holes as it may be con-
taminated with corrosive acid.
CAUTION
IAutomatic transmission models can-
not be push started. This may cause
transmission damage.
IThree-way catalyst equipped models
should not be started by pushing.
The three-way catalyst may be dam-
aged.
INever try to start the vehicle by tow-
ing it. When the engine starts, the
forward surge could cause the ve-
hicle to collide with the tow vehicle.
PUSH STARTING
In case of emergency6-9
ZX
Page 173 of 269
When towing your vehicle, U.S. States, Ca-
nadian provinces and local regulations for
towing must be followed. Incorrect towing
equipment could damage your vehicle. Tow-
ing instructions are available from an autho-
rized NISSAN dealer. Local service operators
are generally familiar with the applicable laws
and procedures for towing. To assure proper
towing and to prevent accidental damage to
your vehicle, NISSAN recommends having a
service operator tow your vehicle. It is advis-
able to have the service operator carefully
read the following precautions:
WARNING
INever ride in a vehicle that is being
towed.
INever get under your vehicle after it
has been lifted by a tow truck.
CAUTION
IWhen towing, make sure that the
transmission, axles, steering system
and powertrain are in working con-
dition. If any unit is damaged, dollies
must be used.IWhen towing with the front wheels
on the ground or with the rear
wheels on the ground (if you do not
use towing dollies): Move the trans-
fer control shift lever into the 2H
position.
IWhen towing with the front wheels
on the ground: Turn the ignition key
to the OFF position and move the
transmission shift lever to the N
(Neutral) position. To move the se-
lector lever to the N (Neutral) posi-
tion on automatic transmission mod-
els, turn the ignition key to the ACC
position. After moving the sleector
lever to the N (Neutral) position, turn
the ignition key to the OFF position
and secure the steering wheel in the
straight ahead position with a rope
or similiar device. Never place the
ignition key in the LOCK position.
This will result in damage to the
steering lock mechanism.
IWhen towing manual transmission
models with rear wheels on the
ground: Always release the parkingbrake and move the transmission
shift lever to the N (Neutral) position.
IFor four-wheel drive models:
Set the free-running hubs to the free
position. See ``
Auto-lock free-
running hubsº or ``Manual-lock
free-running hubsº as appropriate in
the ``Starting and driving'' section.
Move the transfer case shift lever
into the 2H position and the trans-
mission shift lever into the N (Neu-
tral) position.
IAlways attach safety chains before
towing.
TOW TRUCK TOWING
In case of emergency6-11
ZX
Page 184 of 269
When performing any inspection or mainte-
nance work on your vehicle, always take
care to prevent serious accidental injury to
yourself or damage to the vehicle. The
following are general precautions which
should be closely observed.
WARNING
IPark the vehicle on a level surface,
apply the parking brake securely and
block the wheels to prevent the ve-
hicle from moving. For manual trans-
mission models, move the shift lever
to N (Neutral). For automatic trans-
mission models, move the shift lever
to P (Park).
IBe sure the ignition key is in the OFF
or LOCK position when performing
any parts replacement or repairs.
INever leave the engine or automatic
transmission related component
harnesses disconnected while the
ignition switch is in the ON position.
INever connect or disconnect the bat-
tery or any transistorized compo-
nent while the ignition switch is in
the ON position.IIf you must work with the engine
running, keep your hands, clothing,
hair and tools away from moving
fans, belts, and any other moving
parts.
IIt is advisable to secure or remove
any loose clothing and remove any
jewelry, such as rings, watches, etc.,
before working on your vehicle.
IAlways wear eye protection when-
ever you work on your vehicle.
IIf you must run the engine in an
enclosed space such as a garage, be
sure there is proper ventilation for
exhaust gases to escape.
INever get under the vehicle while it
is supported only by a jack. If it is
necessary to work under the vehicle,
support it with safety stands.
IKeep smoking materials, flame and
sparks away from fuel tank and bat-
tery.
IOn gasoline engine models with the
multiport fuel injection (MFI) system,
the fuel filter or fuel lines should
beserviced by an authorized NISSANdealer because the fuellines are un-
der high pressure even when the
engine is off.
CAUTION
IDo not work under the hood while
the engine is hot. Turn the engine off
and wait until it cools down.
INever connect or disconnect either
the battery or any transistorized
component connector while the igni-
tion is on.
IAvoid contact with used engine oil.
Improperly disposed engine oil and/
or other vehicle fluids can damage
the environment. Always conform to
local regulations for disposal of ve-
hicle fluid.
This ``Do-it-yourself'' section gives instruc-
tions regarding only those items which are
relatively easy for an owner to perform.
You should be aware that incomplete or
improper servicing may result in operating
difficulties or excessive emissions, and
could affect your warranty coverage.If in
doubt about any servicing, have it done
by an authorized NISSAN dealer.
MAINTENANCE
PRECAUTIONS
8-2Do-it-yourself
ZX
Page 200 of 269
WARNING
Be sure the ignition key is OFF or LOCK
position. The engine could rotate unex-
pectedly.
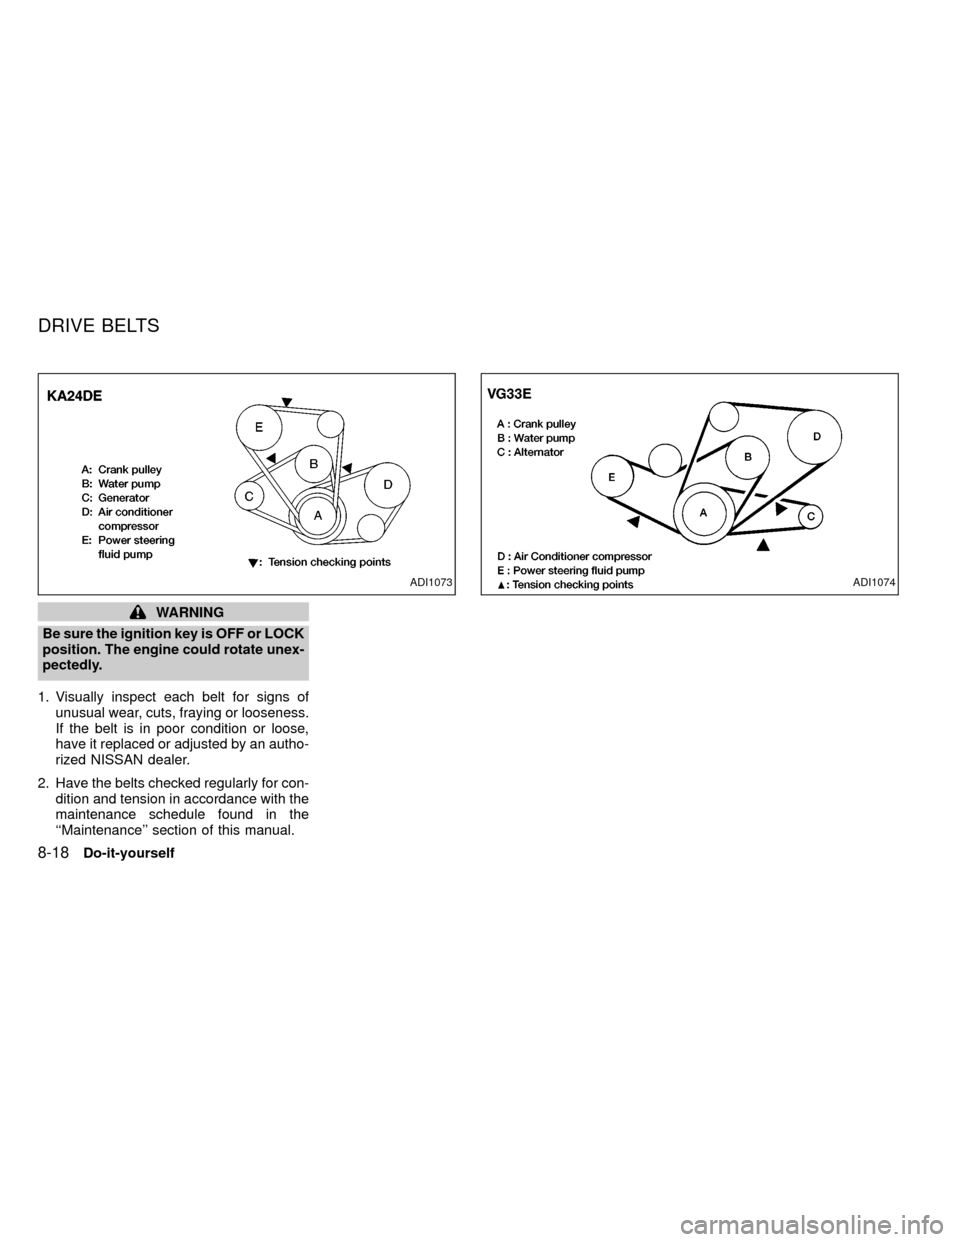
1. Visually inspect each belt for signs of
unusual wear, cuts, fraying or looseness.
If the belt is in poor condition or loose,
have it replaced or adjusted by an autho-
rized NISSAN dealer.
2. Have the belts checked regularly for con-
dition and tension in accordance with the
maintenance schedule found in the
``Maintenance'' section of this manual.
ADI1074ADI1073
DRIVE BELTS
8-18Do-it-yourself
ZX