2000 NISSAN FRONTIER window
[x] Cancel search: windowPage 79 of 269

Rear power windows (Crew cab
models only)
The rear power window switches open or
close the corresponding window. To open
the window, push and hold the switch down.
To close the window, push and hold the
switch up.
AUTOMATIC POWER WINDOW
SWITCH
To fully open the driver window, completely
press the driver window switch down and
release it; it need not be held. To stop the
window, lift the switch up while the window
is opening.Squeeze the handles of the lever, then slide
the window open.
AIC1114AIC1121AIC0745
REAR SLIDING WINDOW
(if so equipped)
Instruments and controls2-25
ZX
Page 86 of 269

CHILD SAFETY REAR DOOR
LOCK
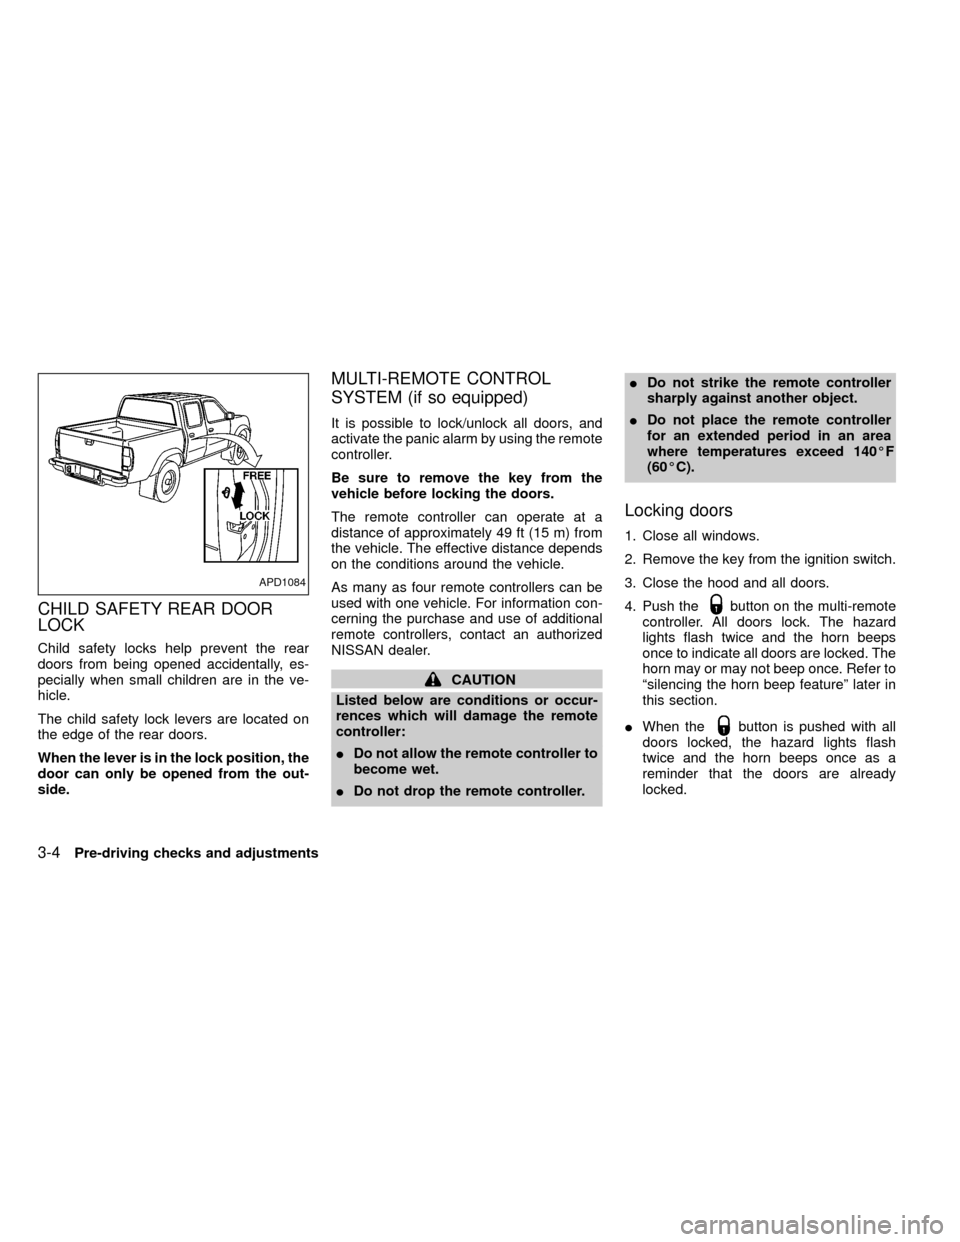
Child safety locks help prevent the rear
doors from being opened accidentally, es-
pecially when small children are in the ve-
hicle.
The child safety lock levers are located on
the edge of the rear doors.
When the lever is in the lock position, the
door can only be opened from the out-
side.
MULTI-REMOTE CONTROL
SYSTEM (if so equipped)
It is possible to lock/unlock all doors, and
activate the panic alarm by using the remote
controller.
Be sure to remove the key from the
vehicle before locking the doors.
The remote controller can operate at a
distance of approximately 49 ft (15 m) from
the vehicle. The effective distance depends
on the conditions around the vehicle.
As many as four remote controllers can be
used with one vehicle. For information con-
cerning the purchase and use of additional
remote controllers, contact an authorized
NISSAN dealer.
CAUTION
Listed below are conditions or occur-
rences which will damage the remote
controller:
IDo not allow the remote controller to
become wet.
IDo not drop the remote controller.IDo not strike the remote controller
sharply against another object.
IDo not place the remote controller
for an extended period in an area
where temperatures exceed 140ÉF
(60ÉC).
Locking doors
1. Close all windows.
2. Remove the key from the ignition switch.
3. Close the hood and all doors.
4. Push the
button on the multi-remote
controller. All doors lock. The hazard
lights flash twice and the horn beeps
once to indicate all doors are locked. The
horn may or may not beep once. Refer to
ªsilencing the horn beep featureº later in
this section.
IWhen the
button is pushed with all
doors locked, the hazard lights flash
twice and the horn beeps once as a
reminder that the doors are already
locked.
APD1084
3-4Pre-driving checks and adjustments
ZX
Page 103 of 269

WARNING
IThe air conditioner cooling function
operates only when the engine is
running.
IDo not leave children, unreliable
adults, or pets alone in your vehicle.
On hot, sunny days, temperatures in
a closed vehicle could quickly be-
come high enough to cause severe
or possibly fatal injuries to people or
animals.
IDo not use the recirculation mode
for long periods as it may cause the
interior air to become stale and the
windows to fog up.
IPositioning of the heater and air con-
ditioner controls should not be done
while driving, in order that full atten-
tion may be given to the driving
operation.
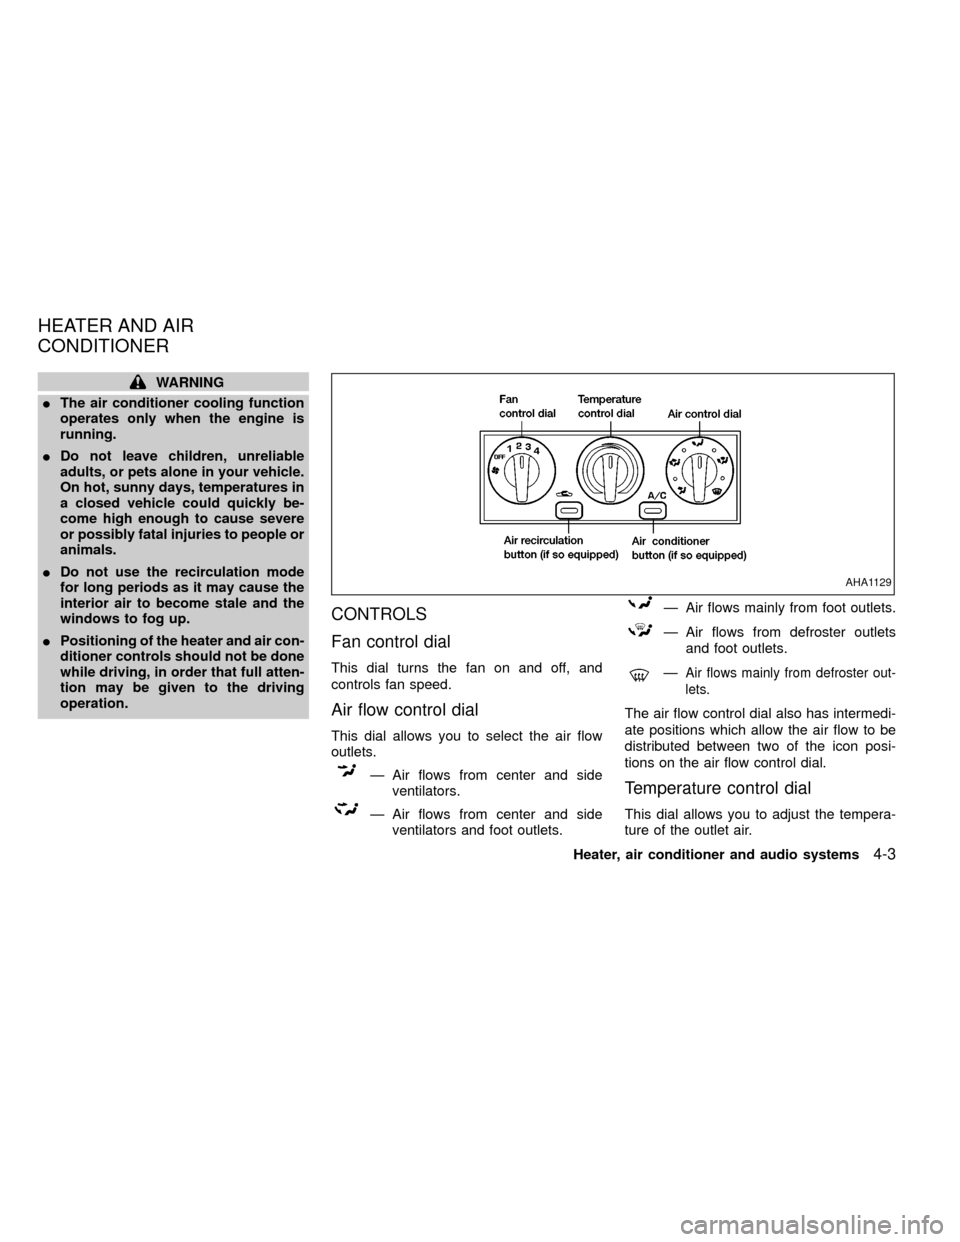
CONTROLS
Fan control dial
This dial turns the fan on and off, and
controls fan speed.
Air flow control dial
This dial allows you to select the air flow
outlets.
Ð Air flows from center and side
ventilators.
Ð Air flows from center and side
ventilators and foot outlets.
Ð Air flows mainly from foot outlets.
Ð Air flows from defroster outlets
and foot outlets.
ÐAir flows mainly from defroster out-
lets.
The air flow control dial also has intermedi-
ate positions which allow the air flow to be
distributed between two of the icon posi-
tions on the air flow control dial.
Temperature control dial
This dial allows you to adjust the tempera-
ture of the outlet air.
AHA1129
HEATER AND AIR
CONDITIONER
Heater, air conditioner and audio systems4-3
ZX
Page 104 of 269

Air recirculation button (if
so equipped)
NOTE:
The air recirculation feature is available
only on those vehicles equipped with air
conditioning.
OFF position (indicator light off):
Outside air is drawn into the passenger
compartment and distributed through the
selected outlets.
Use the OFF position for normal heater or
air conditioner operation.
ON position (indicator light on):
Interior air is recirculated inside the vehicle.
Push the
button to the on position
when:
Idriving on a dusty road.
Ito prevent traffic fumes from entering the
passenger compartment.
Ifor maximum cooling when using the air
conditioner.
Air conditioner button (if so
equipped)
Start the engine, move the fan control dial to
the desired (one to four) position, and push
the air conditioner button to turn on the air
conditioner. The indicator light comes on
when the air conditioner is operating. To turn
off the air conditioner, push the button
again.
The air conditioner cooling function op-
erates only when the engine is running.
HEATER OPERATION
Heating
This mode is used to direct hot air mainly
from the floor outlets. A small amount of air
also flows from the defrost outlets.
1. Push the
button (if so equipped) to
the off position for normal heating.
2. Turn the air control dial to the
po-
sition.
3. Turn the fan control dial to the desired
position.
4. Turn the temperature control dial to thedesired position between the middle and
the hot position.
Ventilation
This mode directs outside air from the side
and center vents.
1. Push the
button (if so equipped) to
the off position.
2. Turn the air control dial to the
po-
sition.
3. Turn the fan control dial to the desired
position.
4. Turn the temperature control dial to the
desired position.
Defrosting/defogging
This mode is used to defrost/defog the
windows.
1. Turn the air control dial to the
po-
sition.
IWhen the
position is selected, the
air conditioner automatically turns on
(however, the indicator light will not illu-
minate) if the outside temperature is
more than 45äF(7äC). This dehumidifies
the air which helps defog the windshield.
4-4Heater, air conditioner and audio systems
ZX
Page 106 of 269

the on position. Be sure to return the air
recirculation button to the off position for
normal cooling.
Dehumidfied heating
This mode is used to heat and dehumidfy
the air.
1. Push the
button to the off position.
2. Turn the air control dial to the
po-
sition.
3. Turn the fan control dial to the desired
position.
4. Turn on the air conditioner button. The
indicator light comes on.
5. Turn the temperature control dial to the
desired position.
Dehumidfied defrosting/defogging
This mode is used to defog the windows
and dehumidify the air.
1. Turn the air control dial to the
po-
sition.
IWhen the
,or positions in
between are selected, the air conditioner
automatically turns on (however, the in-
dicator light will not illuminate) if theoutside temperature is more than 45äF
(7äC). This dehumidifies the air which
helps defog the windshield. The
mode automatically turns off, al-
lowing outside air to be drawn into the
passenger compartment to further im-
prove the defogging performance.
2. Turn the fan control dial to the desired
position.
3. Turn the temperature control dial to the
desired position.
Operating tips
IKeep windows and sunroof closed while
the air conditioner is in operation.
IAfter parking in the sun, drive for two or
three minutes with the windows open to
vent hot air from the passenger compart-
ment. Then, close the windows. This
allows the air conditioner to cool the
interior more quickly.
IThe air conditioning system should be
operated for approximately ten min-
utes at least once a month. This helps
prevent damage to the system due to
lack of lubrication.
IIf the engine coolant temperaturegauge indicates engine coolant tem-
perature over the normal range, turn
the air conditioner off. See²If your
vehicle overheats²in the²In case of
emergency²section of this manual.
AIR FLOW CHARTS
The following charts show the button and
dial positions forMAXIMUM AND QUICK
heating, cooling or defrosting.The air recir-
culation switch should always be in the
OFF position for heating and defrosting.
When the
,or positions in be-
tween are selected, the air conditioner au-
tomatically turns on (however, the indicator
light will not illuminate) if the outside tem-
perature is more than 45äF(7äC). This de-
humidifies the air which helps defog the
windshield. The
mode automatically
turns off, allowing outside air to be drawn
into the passenger compartment to further
improve the defogging performance..
4-6Heater, air conditioner and audio systems
ZX
Page 111 of 269

Clock set
Depressing the CLOCK and thebuttons
together sets hours. Depressing the CLOCK
and
buttons together sets minutes.
Clock priority mode
In this mode the clock is shown in the
display. If any radio or cassette tape func-
tions are activated, the radio (or cassette
tape) display illuminates for 10 seconds
then returns to the clock mode.
NOTE:
After clock adjustment, the radio is in the
clock priority mode.
Radio/Cassette tape priority mode
In this mode, the radio station illuminates in
the display during radio operation. During
cassette tape operation, TAPE illuminates in
the display.
Selecting the desired band
Push thebutton to change from AM
to FM1 or FM2 reception.
The FM stereo indicator, ST, illuminates dur-
ing FM stereo reception. When the stereo
broadcast signal is weak, the radio automati-cally changes from stereo to monaural re-
ception.
Radio reception is affected by station signal
strength, distance from radio transmitter,
buildings, bridges, mountains and other ex-
ternal influences. Intermittent changes in
reception quality normally are caused by
these external influences.
Using a cellular phone in or near the
vehicle may influence radio reception
quality.
TUNE buttons
WARNING
The radio should not be tuned while
driving in order that full attention may
be given to the driving operation.
Use the
andbuttons for
manual tuning. To move quickly through the
channels, hold either of the tune buttons
down for more than 1.5 seconds.
SEEK tuning
Push thetuning buttonfor less
than 1.5 seconds. SEEK tuning begins from
low to high frequencies and stops at the next
broadcasting station. Pushing the buttonagain continues the SEEK function. Once the
highest broadcasting station is reached, the
radio continues in the SEEK mode at the
lowest broadcast station.
SCAN tuning
Push and hold thetuning buttonfor more than 1.5 seconds. SCAN illu-
minates in the display window. SCAN tuning
begins from low to high frequencies and
stops at each broadcasting station for five
seconds. Pushing the button again during this
five second period stops SCAN tuning and
the radio remains tuned to that station.
Heater, air conditioner and audio systems4-11
ZX
Page 113 of 269

adjusts the sound level between the right
and left speakers.
After 10 seconds, the radio or cassette tape
display reappears. Once the sound quality
is set to the desired level, the AUDIO button
can be pressed repeatedly until the radio or
cassette tape display appears.
CASSETTE TAPE OPERATION
Turn the ignition key to ACC or ON and
carefully insert a cassette tape into the tape
door. The cassette tape automatically pulls
into the player.
The word TAPE and moving digital squares
illuminate on the right side of the display
window. If the radio is already operating it
automatically turns off and the cassette tape
begins to play.
CAUTION
Do not force the cassette tape into the
tape door. This could cause player
damage.
The cassette tape automatically changes
directions to play the other side when the
first side is complete. At this time, the mov-
ing digital squares illuminate on the left sideof the display window.
Precautions on cassette player op-
erations
ITo maintain good quality sound, NIS-
SAN recommends using cassette tapes
of 60 minutes or shorter in length.
ICassette tapes should be removed
from the player when not in use. Store
cassettes in their protective cases
and away from direct sunlight, heat,
dust, moisture and magnetic sources.
IDirect sunlight can cause the cassette
to become deformed. The use of de-
formed cassettes may cause the cas-
sette to jam in the player.
IDo not use cassettes with labels
which are peeling and loose. If used,
the label could jam in the player.
IIf a cassette has loose tape, insert a
pencil through one of the cassette
hubs and rewind the tape firmly
around the hubs. Loose tape may
cause tape jamming and wavering
sound quality.
IOver a period of time, the playback
head, capstan and pinch roller maycollect a tape coating residue as the
tape is played. This residue accumu-
lation can cause weak or wavering
sound, and should be removed peri-
odically with a head cleaning tape. If
the residue is not removed periodi-
cally, the player may need to be disas-
sembled for cleaning.Fast forwarding or rewinding the
tape
Push either theorbutton for
the desired direction.
The FF or REW symbol illuminates in the
display.
To stop the FF or REW function, press the
oragain, or thebutton.
Automatic Program Search (APS)
fast forwarding or APS rewinding
the tape
Push either theorbutton
while the cassette tape is playing. The tape
runs quickly, stops, then plays the next
selection from the beginning. Either the FF
or REW symbol flashes in the display while
searching for the selection.
Heater, air conditioner and audio systems
4-13
ZX
Page 114 of 269

This system searches for the blank intervals
between selections. If there is a blank inter-
val within one selection or there is no inter-
val between selections, the system may not
stop in the desired or expected location.
Changing the direction of tape play
Push the(program) select button.
The moving digital squares illuminate on
either the right or left side of the display
window to indicate the side of program play.
Playing and stopping the cassette
tape
Push thebutton while the cassette
tape is playing to stop the tape. Push the
button again to play the tape.
Dolby NR (noise reduction)
Push thebutton for Dolby NR en-
coded tapes to reduce high frequency tape
noise. The
symbol illuminates in the
display.
If the display is in the clock priority mode
when the
button is pressed,and TAPE illuminate in the display
window for about 10 seconds. The clock
mode then returns to the display window.Dolby NR is manufactured under license
from Dolby Laboratories Licensing Corpora-
tion. DOLBY NR and the double-D symbol
are trademarks of Dolby Laboratories Li-
censing Corporation.
Metal or chrome tape usage
The cassette player is automatically set to
high performance play when playing a metal
or chrome cassette tape.
Ejecting the cassette tape
Push thebutton to eject an inserted
cassette tape.
4-14Heater, air conditioner and audio systems
ZX