2000 NISSAN FRONTIER tow
[x] Cancel search: towPage 137 of 269
AUTOMATIC TRANSMISSION
On automatic transmission models, the ig-
nition lock is designed so the key cannot be
turned to LOCK and removed until the shift
selector lever is moved to the P (Park)
position.
When removing the key from the ignition,
make sure the shift selector lever is in the P
(Park) position.
If the key cannot be turned to the LOCK
position, proceed as follows to remove the key:
1) Move the shift selector lever into the P
(Park) position.2) Turn the ignition key slightly in the ON
direction.
3) Turn the key toward the LOCK position.
4) Remove the key.
The shift lever is designed so it cannot be
moved out of P (Park) and into any of the
other gear positions if the ignition key is
turned to OFF or if the key is removed from
the switch.
The shift lever can be moved if the igni-
tion switch is in the ACC position. This
allows the vehicle to be moved if the
battery is discharged. The shift lever can
also be moved if the ignition switch is in
the ON position and the foot brake pedal
is depressed.
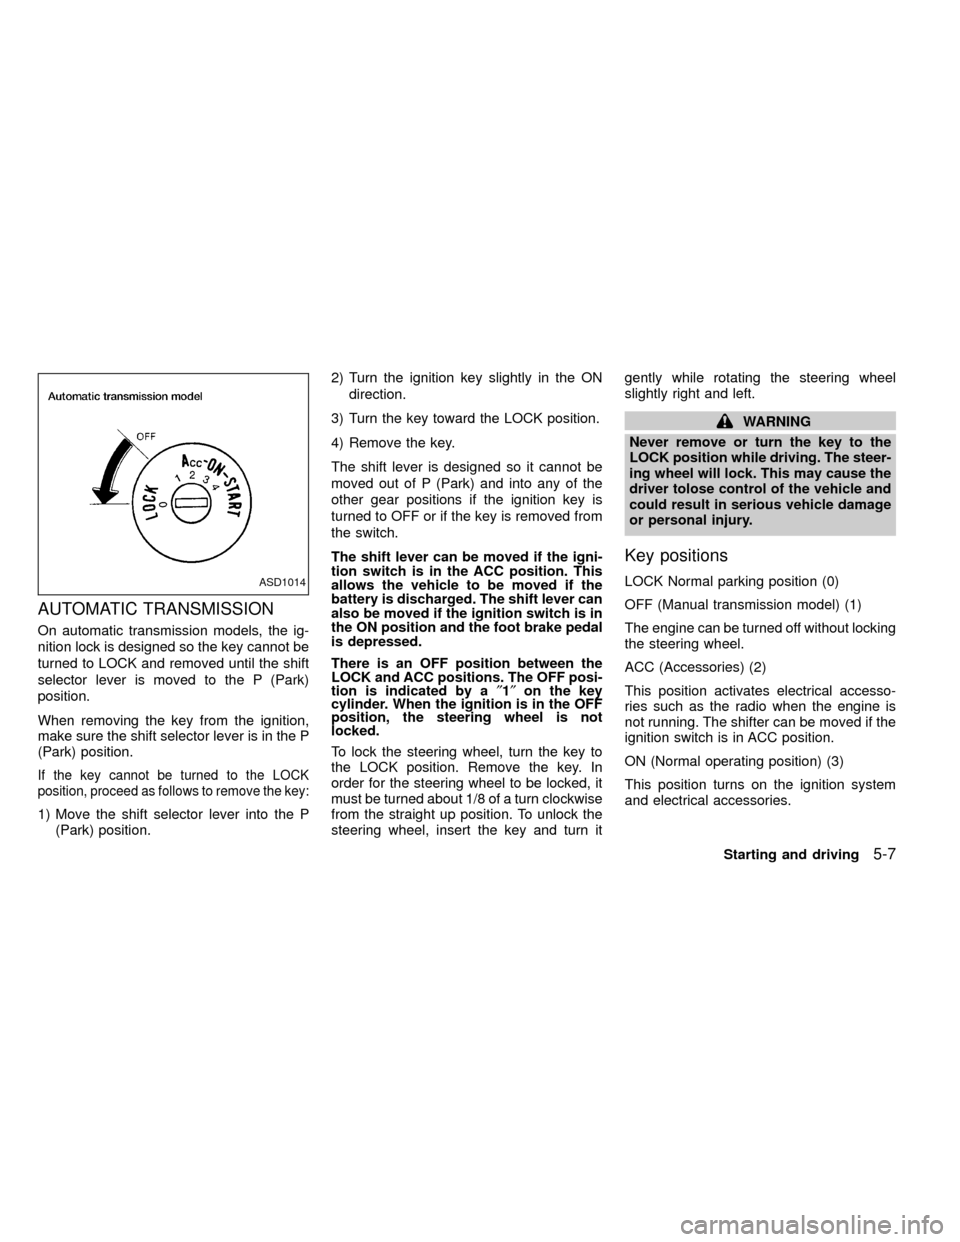
There is an OFF position between the
LOCK and ACC positions. The OFF posi-
tion is indicated by a²1²on the key
cylinder. When the ignition is in the OFF
position, the steering wheel is not
locked.
To lock the steering wheel, turn the key to
the LOCK position. Remove the key. In
order for the steering wheel to be locked, it
must be turned about 1/8 of a turn clockwise
from the straight up position. To unlock the
steering wheel, insert the key and turn itgently while rotating the steering wheel
slightly right and left.
WARNING
Never remove or turn the key to the
LOCK position while driving. The steer-
ing wheel will lock. This may cause the
driver tolose control of the vehicle and
could result in serious vehicle damage
or personal injury.
Key positions
LOCK Normal parking position (0)
OFF (Manual transmission model) (1)
The engine can be turned off without locking
the steering wheel.
ACC (Accessories) (2)
This position activates electrical accesso-
ries such as the radio when the engine is
not running. The shifter can be moved if the
ignition switch is in ACC position.
ON (Normal operating position) (3)
This position turns on the ignition system
and electrical accessories.ASD1014
Starting and driving5-7
ZX
Page 150 of 269

During the first 1,000 miles (1,609 km),
follow these recommendations for the future
reliability and economy of your new vehicle.
Failure to follow these recommendations
may result in vehicle damage or shortened
engine life.
IDo not run the engine over 4,000 rpm.
IDo not drive over the following speed
limits:
two-wheel drive models:
55 MPH (88 km/h)
four-wheel drive models
(2H or 4H position):
55 MPH (88 km/h)
four-wheel drive models
(4L position):
30 MPH (48 km/h)
IDo not accelerate at full throttle in any
gear.
IAvoid quick starts.
IAvoid hard braking as much as possible.
IDo not tow a trailer for the first 500 miles
(805 km).IAccelerate slowly and smoothly. Maintain
cruising speeds with a constant accelera-
tor position.
IDrive at moderate speeds on the high-
way. Driving at high speeds lowers fuel
economy.
IAvoid unnecessary stopping and brak-
ing. Maintain a safe distance behind
other vehicles.
IUse a proper gear range which suits road
conditions. On level roads, shift into high
gear as soon as possible.
IAvoid unnecessary engine idling.IKeep your engine tuned up.
IFollow the recommended periodic main-
tenance schedule.
IKeep the tires inflated to the correct
pressure. Low tire pressure increases
tire wear and wastes fuel.
IKeep the front wheels in correct align-
ment. Improper alignment increases tire
wear and lowers fuel economy.
IAir conditioner operation lowers fuel
economy. Use the air conditioner only
when necessary.
IWhen cruising at highway speeds, it is
more economical to use the air condi-
tioner and leave the windows closed to
reduce drag.
I
Use 4H or 4L position only when neces-
sary. Four-wheel drive operation lowers
fuel economy.
SD0001
BREAK-IN SCHEDULE INCREASING FUEL
ECONOMY
5-20Starting and driving
ZX
Page 158 of 269
verse) position. When parking on an up-
hill grade, place the gearshift lever in the
1st position.
Automatic transmission models:
Move the gearshift lever to the P (Park)
position.
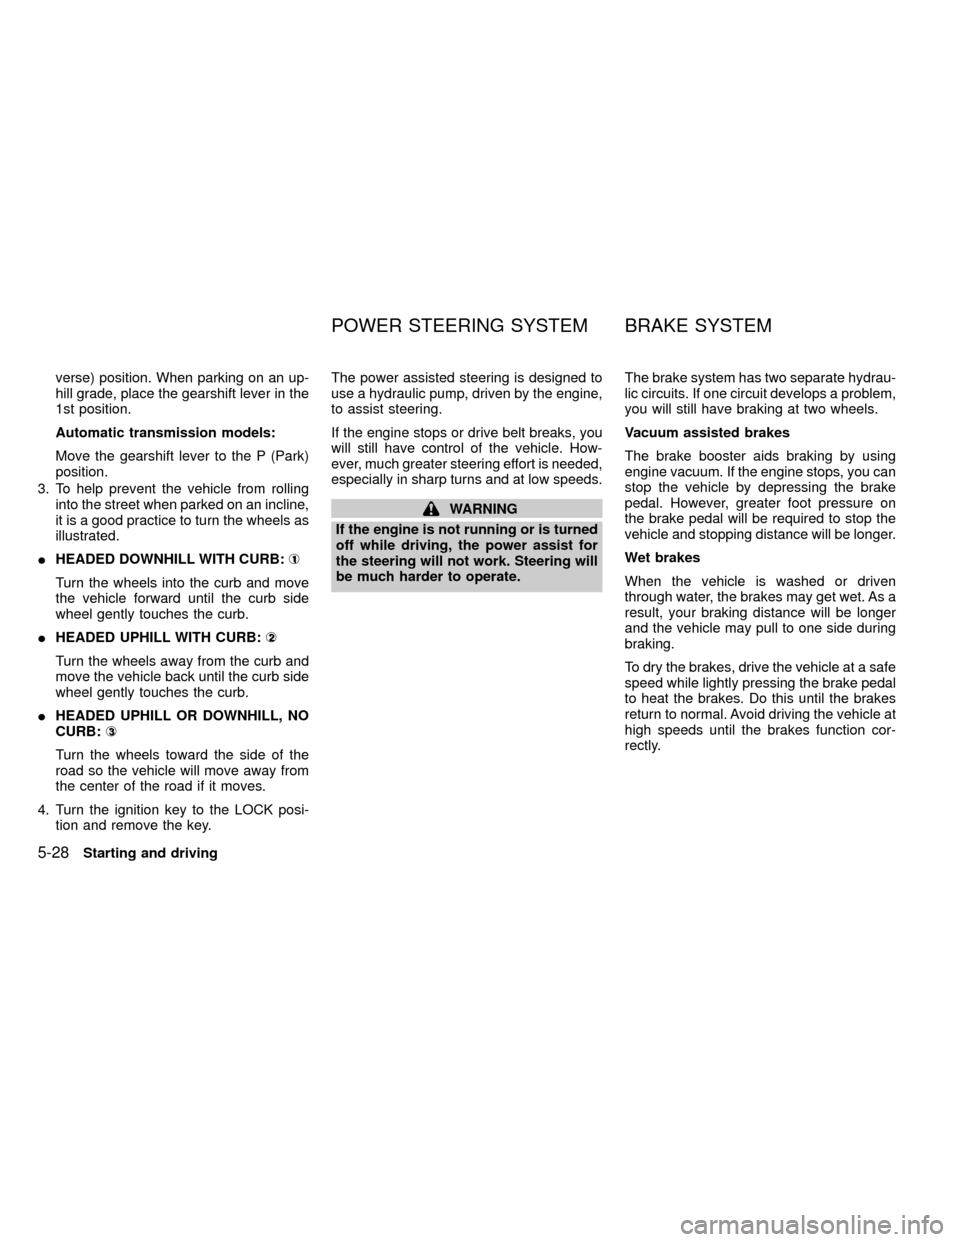
3. To help prevent the vehicle from rolling
into the street when parked on an incline,
it is a good practice to turn the wheels as
illustrated.
IHEADED DOWNHILL WITH CURB:À
1
Turn the wheels into the curb and move
the vehicle forward until the curb side
wheel gently touches the curb.
IHEADED UPHILL WITH CURB:Á
2
Turn the wheels away from the curb and
move the vehicle back until the curb side
wheel gently touches the curb.
IHEADED UPHILL OR DOWNHILL, NO
CURB:Â
3
Turn the wheels toward the side of the
road so the vehicle will move away from
the center of the road if it moves.
4. Turn the ignition key to the LOCK posi-
tion and remove the key.The power assisted steering is designed to
use a hydraulic pump, driven by the engine,
to assist steering.
If the engine stops or drive belt breaks, you
will still have control of the vehicle. How-
ever, much greater steering effort is needed,
especially in sharp turns and at low speeds.
WARNING
If the engine is not running or is turned
off while driving, the power assist for
the steering will not work. Steering will
be much harder to operate.The brake system has two separate hydrau-
lic circuits. If one circuit develops a problem,
you will still have braking at two wheels.
Vacuum assisted brakes
The brake booster aids braking by using
engine vacuum. If the engine stops, you can
stop the vehicle by depressing the brake
pedal. However, greater foot pressure on
the brake pedal will be required to stop the
vehicle and stopping distance will be longer.
Wet brakes
When the vehicle is washed or driven
through water, the brakes may get wet. As a
result, your braking distance will be longer
and the vehicle may pull to one side during
braking.
To dry the brakes, drive the vehicle at a safe
speed while lightly pressing the brake pedal
to heat the brakes. Do this until the brakes
return to normal. Avoid driving the vehicle at
high speeds until the brakes function cor-
rectly.
POWER STEERING SYSTEM BRAKE SYSTEM
5-28Starting and driving
ZX
Page 163 of 269

6 In case of emergency
Flat tire ...................................................................6-2
Pantograph type jack .............................................6-5
Jump starting ..........................................................6-8
Push starting...........................................................6-9
If your vehicle overheats ......................................6-10Tow truck towing .................................................. 6-11
Two-wheel drive models ......................................6-12
Four-wheel drive models ......................................6-12
Vehicle recovery (freeing a stuck vehicle) ...........6-13
ZX
Page 165 of 269

Getting the spare tire and tools
1.For Standard cab models:
a. Move the bench seat back fully for-
ward.
b. Remove the jack, jack rod, and wheel
nut wrench from behind the driver's
side of the bench seat.For King cab models:
a. Move the driver's seat back fully forward.
b. Remove the jack and wheel nut wrench
from the tool case from behind the driv-
er's seat.
c. Remove the jack rod from behind the
driver's seat.For Crew cab models:
a. Tilt the rear bench seat forward
b. Remove the jack, jack rod, and tool case
from behind the rear bench seat.
2. Fit the square end of the jack rod into the
square hole of the wheel nut wrench to
form a handle.
3. Find the oval shaped opening under the
middle of the tailgate. Pass the T-shaped
end of the jack rod through the opening
and direct it towards the spare tire winch,
located directly above the spare tire.
ACE1010ACE1017ACE1039
In case of emergency6-3
ZX
Page 171 of 269
2. Apply the parking brake. Move the shift
selector lever to N (Neutral) (on auto-
matic transmission models, move the
lever to P (Park)). Switch off all unneces-
sary electrical systems (lights, heater, air
conditioner, etc.).
3. Remove vent caps on the battery (if so
equipped). Cover the battery with an old
cloth to reduce explosion hazard.
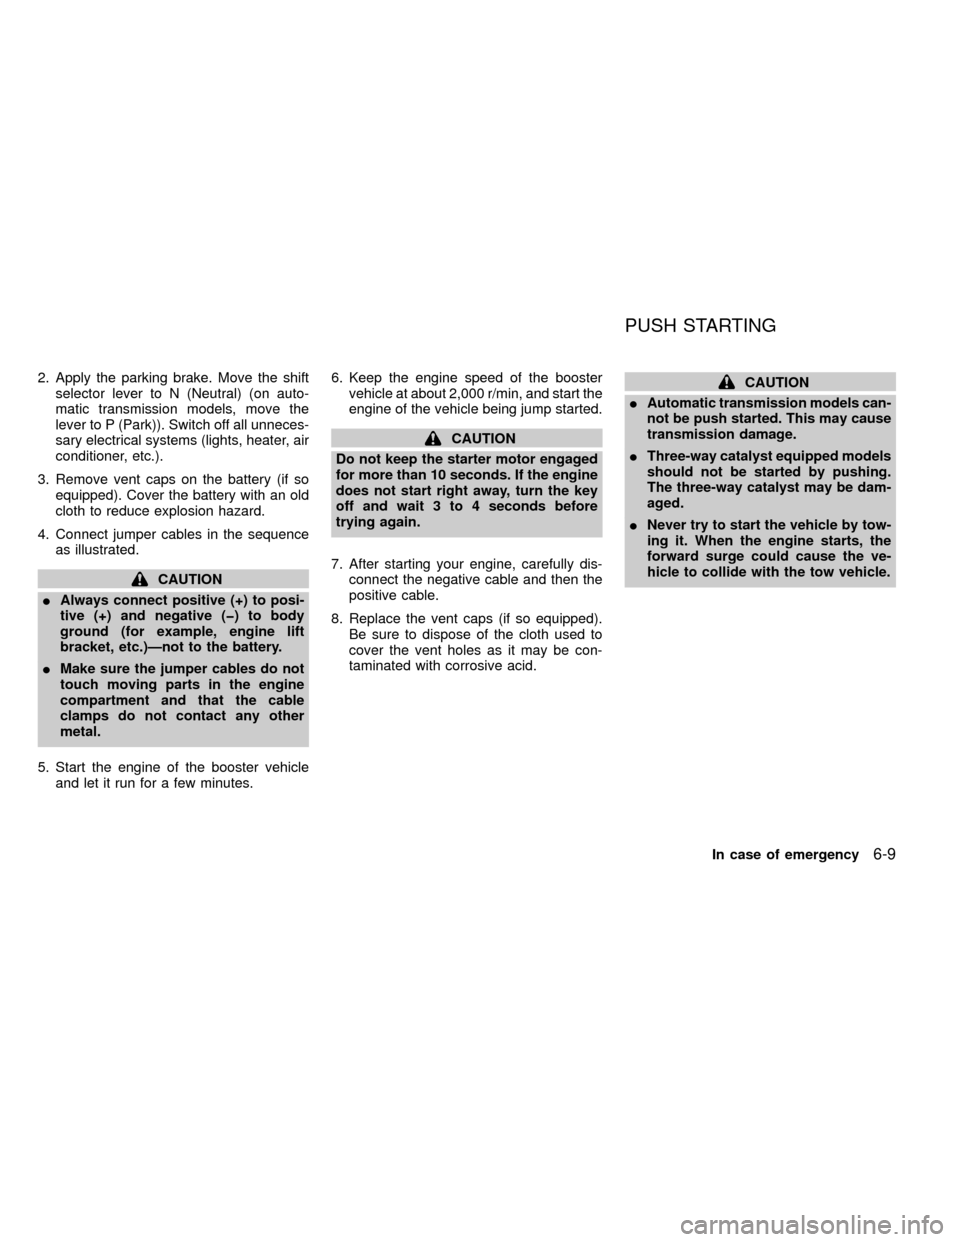
4. Connect jumper cables in the sequence
as illustrated.
CAUTION
IAlways connect positive (+) to posi-
tive (+) and negative (þ) to body
ground (for example, engine lift
bracket, etc.)Ðnot to the battery.
IMake sure the jumper cables do not
touch moving parts in the engine
compartment and that the cable
clamps do not contact any other
metal.
5. Start the engine of the booster vehicle
and let it run for a few minutes.6. Keep the engine speed of the booster
vehicle at about 2,000 r/min, and start the
engine of the vehicle being jump started.
CAUTION
Do not keep the starter motor engaged
for more than 10 seconds. If the engine
does not start right away, turn the key
off and wait 3 to 4 seconds before
trying again.
7. After starting your engine, carefully dis-
connect the negative cable and then the
positive cable.
8. Replace the vent caps (if so equipped).
Be sure to dispose of the cloth used to
cover the vent holes as it may be con-
taminated with corrosive acid.
CAUTION
IAutomatic transmission models can-
not be push started. This may cause
transmission damage.
IThree-way catalyst equipped models
should not be started by pushing.
The three-way catalyst may be dam-
aged.
INever try to start the vehicle by tow-
ing it. When the engine starts, the
forward surge could cause the ve-
hicle to collide with the tow vehicle.
PUSH STARTING
In case of emergency6-9
ZX
Page 173 of 269
When towing your vehicle, U.S. States, Ca-
nadian provinces and local regulations for
towing must be followed. Incorrect towing
equipment could damage your vehicle. Tow-
ing instructions are available from an autho-
rized NISSAN dealer. Local service operators
are generally familiar with the applicable laws
and procedures for towing. To assure proper
towing and to prevent accidental damage to
your vehicle, NISSAN recommends having a
service operator tow your vehicle. It is advis-
able to have the service operator carefully
read the following precautions:
WARNING
INever ride in a vehicle that is being
towed.
INever get under your vehicle after it
has been lifted by a tow truck.
CAUTION
IWhen towing, make sure that the
transmission, axles, steering system
and powertrain are in working con-
dition. If any unit is damaged, dollies
must be used.IWhen towing with the front wheels
on the ground or with the rear
wheels on the ground (if you do not
use towing dollies): Move the trans-
fer control shift lever into the 2H
position.
IWhen towing with the front wheels
on the ground: Turn the ignition key
to the OFF position and move the
transmission shift lever to the N
(Neutral) position. To move the se-
lector lever to the N (Neutral) posi-
tion on automatic transmission mod-
els, turn the ignition key to the ACC
position. After moving the sleector
lever to the N (Neutral) position, turn
the ignition key to the OFF position
and secure the steering wheel in the
straight ahead position with a rope
or similiar device. Never place the
ignition key in the LOCK position.
This will result in damage to the
steering lock mechanism.
IWhen towing manual transmission
models with rear wheels on the
ground: Always release the parkingbrake and move the transmission
shift lever to the N (Neutral) position.
IFor four-wheel drive models:
Set the free-running hubs to the free
position. See ``
Auto-lock free-
running hubsº or ``Manual-lock
free-running hubsº as appropriate in
the ``Starting and driving'' section.
Move the transfer case shift lever
into the 2H position and the trans-
mission shift lever into the N (Neu-
tral) position.
IAlways attach safety chains before
towing.
TOW TRUCK TOWING
In case of emergency6-11
ZX
Page 174 of 269
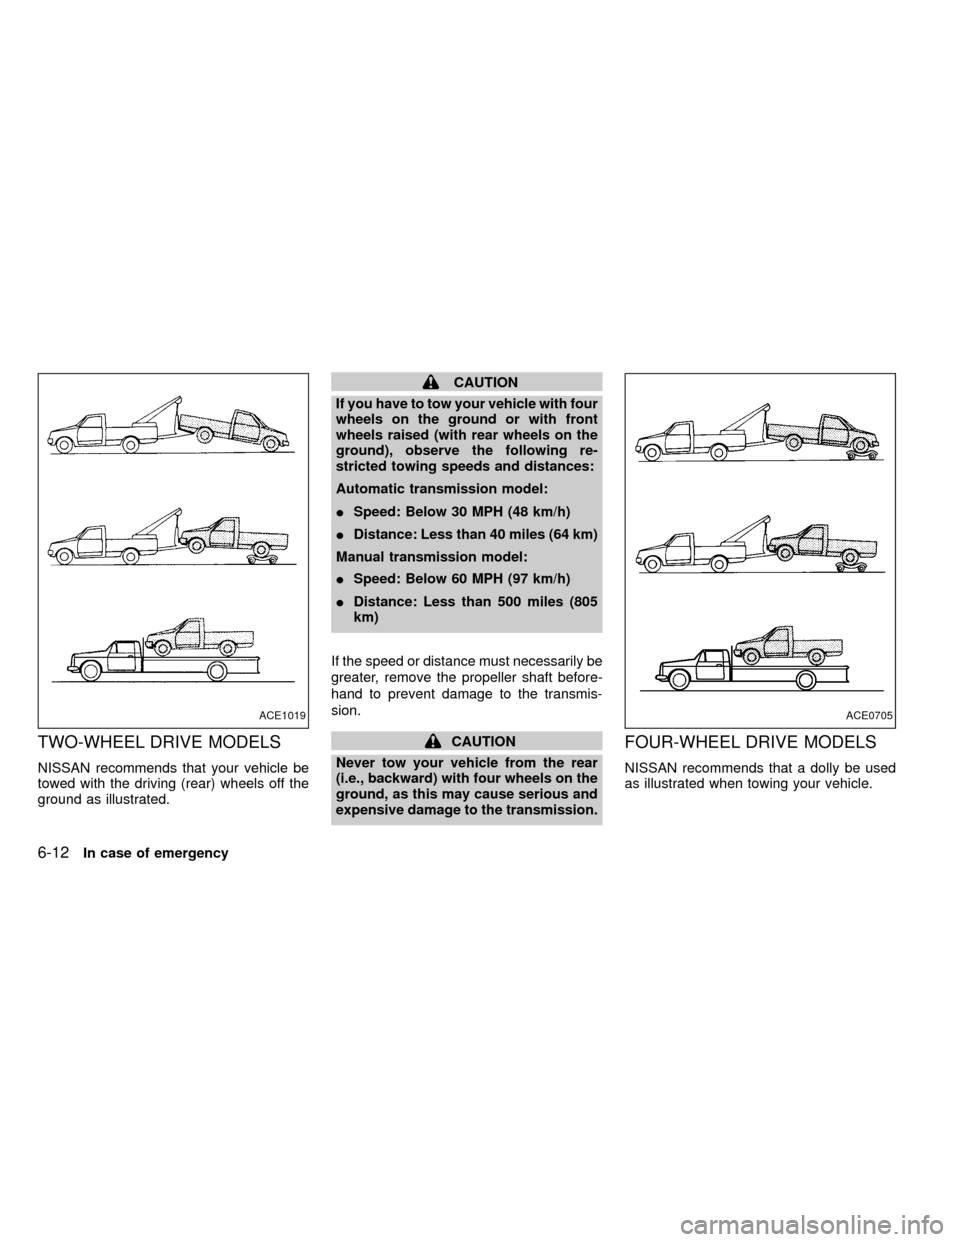
TWO-WHEEL DRIVE MODELS
NISSAN recommends that your vehicle be
towed with the driving (rear) wheels off the
ground as illustrated.
CAUTION
If you have to tow your vehicle with four
wheels on the ground or with front
wheels raised (with rear wheels on the
ground), observe the following re-
stricted towing speeds and distances:
Automatic transmission model:
ISpeed: Below 30 MPH (48 km/h)
IDistance: Less than 40 miles (64 km)
Manual transmission model:
ISpeed: Below 60 MPH (97 km/h)
IDistance: Less than 500 miles (805
km)
If the speed or distance must necessarily be
greater, remove the propeller shaft before-
hand to prevent damage to the transmis-
sion.
CAUTION
Never tow your vehicle from the rear
(i.e., backward) with four wheels on the
ground, as this may cause serious and
expensive damage to the transmission.FOUR-WHEEL DRIVE MODELS
NISSAN recommends that a dolly be used
as illustrated when towing your vehicle.
ACE1019ACE0705
6-12In case of emergency
ZX