2000 NISSAN FRONTIER spare tire
[x] Cancel search: spare tirePage 216 of 269

the tire sidewall. Snow tires have better
snow traction than All Season tires and may
be more appropriate in some areas.
Summer tires
NISSAN specifies summer tires on some
models to provide superior performance on
dry roads. Summer tire performance in
snow and ice will be substantially reduced.
Summer tires do not have the tire traction
rating ``M&S'' on the tire sidewall.
If you plan to operate your vehicle in snowy
or icy conditions, NISSAN recommends the
use of ``SNOW'' or ``ALL SEASON'' tires on
all four wheels.
Snow tires
If snow tires are needed, it is necessary to
select tires equivalent in size and load rating
to the original equipment tires. If you do not,
it can adversely affect the safety and han-
dling of your vehicle.
If you install snow tires, they must be the
same size, brand, construction and tread
pattern on all four wheels.
Generally, snow tires will have lower speed
ratings than factory equipped tires and may
not match the potential maximum vehiclespeed. Never exceed the maximum speed
rating of the tire.
For additional traction on icy roads, studded
tires may be used. However, some U.S.
States and Canadian provinces prohibit
their use. Check local, state and provincial
laws before installing studded tires. Skid
and traction capabilities of studded snow
tires on wet or dry surfaces may be poorer
than that of non-studded snow tires.
Tire chains
Use of tire chains may be prohibited accord-
ing to location. Check the local laws before
installing tire chains. When installing tire
chains, make sure they are the proper size
for the tires on your vehicle and are installed
according to the chain manufacturer's sug-
gestions.Use only SAE class ``S'' chains.
Other types may damage your vehicle. Use
chain tensioners when recommended by
the tire chain manufacturer to ensure a tight
fit. Loose end links of the tire chain must be
secured or removed to prevent the possibil-
ity of whipping action damage to the fenders
or undercarriage. If possible, avoid fully
loading your vehicle when using tire chains.
In addition, drive at a reduced speed. Oth-
erwise, your vehicle may be damagedand/or vehicle handling and performance
may be adversely affected.
Never install tire chains on a TEMPORARY
USE ONLY spare tire.
Tire chains must be installed only on the
rear wheels and not on the front wheels.
Do not use tire chains on dry roads. Driving
with chains in such conditions can cause
damage to the various mechanisms of the
vehicle due to some overstress. When driv-
ing on clear paved roads, be sure to change
to 2WD.
8-34Do-it-yourself
ZX
Page 217 of 269
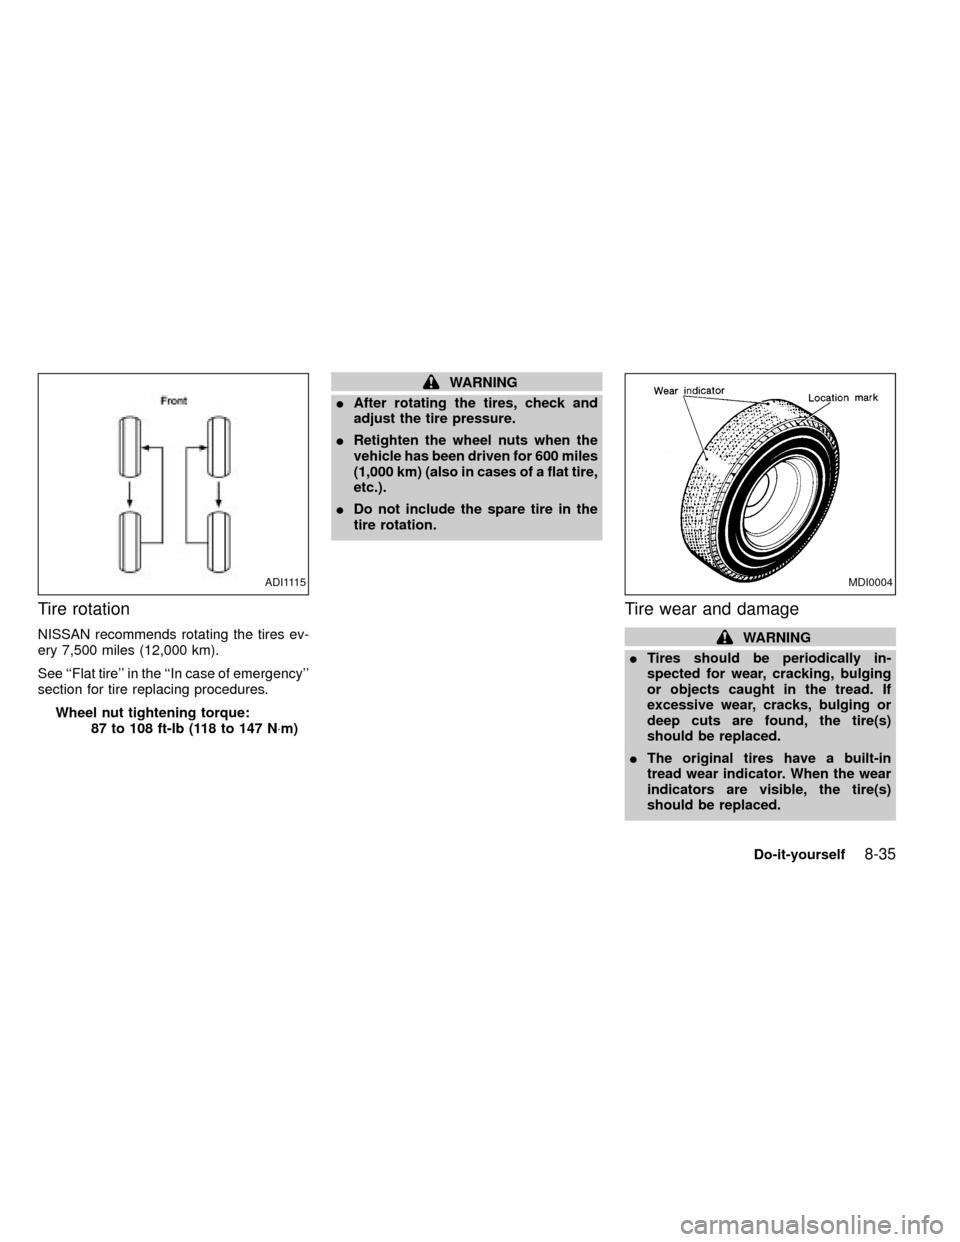
Tire rotation
NISSAN recommends rotating the tires ev-
ery 7,500 miles (12,000 km).
See ``Flat tire'' in the ``In case of emergency''
section for tire replacing procedures.
Wheel nut tightening torque:
87 to 108 ft-lb (118 to 147 N×m)
WARNING
IAfter rotating the tires, check and
adjust the tire pressure.
IRetighten the wheel nuts when the
vehicle has been driven for 600 miles
(1,000 km) (also in cases of a flat tire,
etc.).
IDo not include the spare tire in the
tire rotation.
Tire wear and damage
WARNING
ITires should be periodically in-
spected for wear, cracking, bulging
or objects caught in the tread. If
excessive wear, cracks, bulging or
deep cuts are found, the tire(s)
should be replaced.
IThe original tires have a built-in
tread wear indicator. When the wear
indicators are visible, the tire(s)
should be replaced.
ADI1115MDI0004
Do-it-yourself8-35
ZX
Page 218 of 269
IImproper service of the spare tire
may result in serious personal in-
jury. If it is necessary to repair the
spare tire, contact an authorized
NISSAN dealer.
Changing tires and wheels
When replacing a tire, use the same size,
tread design, speed rating and load carrying
capacity as originally equipped. Recom-
mended types and sizes are shown in
``Wheel/tire size'' in the ``Technical and con-
sumer information'' section of this manual.
WARNING
I
The use of tires other than those
recommended or the mixed use of
tires of different brands, construction
(bias, bias-belted or radial), or tread
patterns can adversely affect the ride,
braking, handling, ground clearance,
body-to-tire clearance, tire chain
clearance, speedometer calibration,
headlight aim and bumper height.
Some of these effects may lead to
accidents and could result in serious
personal injury.IIf the wheels are changed for any
reason, always replace with wheels
which have the same offset dimen-
sion. Wheels of a different offset
could cause pre-mature tire wear, de-
grade vehicle handling characteris-
tics and/or interference with the
brake discs/drums. Such interference
can lead to decreased braking effi-
ciency and/or early brake pad/shoe
wear. Refer to²Wheel/tire size²in the
²Technical and consumer informa-
tion²section of this manual for wheel
off-set dimensions.
IDo not install a deformed wheel or
tire even if it has been repaired. Such
wheels or tires could have unknown
structural damage and could fail
without warning.
IThe use of retread tires is not recom-
mended.
FOUR-WHEEL DRIVE
MODELS
CAUTION
Always use tires of the same size,
brand, construction (bias, bias-belted
or radial), and tread pattern on all four
wheels. Failure to do so may result in a
circumference difference between tires
on the front and rear axles which will
cause excessive tire wear and may
damage the transmission, transfer
case and differential gears.
If excessive tire wear is found, it is recom-
mended that all four tires be replaced with
tires of the same size, brand, construction
and tread pattern. The tire pressure and
wheel alignment should also be checked
and corrected as necessary. Contact an
authorized NISSAN dealer.
Wheel balance
Unbalanced wheels may affect vehicle han-
dling and tire life. Even with regular use,
wheels can get out of balance. Therefore,
they should be balanced as required.
Wheel balance service should be performed
8-36Do-it-yourself
ZX
Page 219 of 269
with the wheels off the vehicle. Spin balanc-
ing the front wheels on the vehicle could
lead to transmission damage.
Care of wheels
IWash the wheels when washing the ve-
hicle to maintain their appearance.
IClean the inner side of the wheels when
the wheel is changed or the underside of
the vehicle is washed.
IDo not use abrasive cleaners when
washing the wheels.
IInspect wheel rims regularly for dents or
corrosion. This may cause loss of pres-
sure or damage the tire bead.
INISSAN recommends waxing the road
wheels to protect against road salt in
areas where it is used during winter.
Spare tire
Your vehicle may be equipped with a TEM-
PORARY USE ONLY spare tire.
To avoid property damage or personal injury
when using the TEMPORARY USE ONLY
spare tire, observe the following cautions:
WARNING
IThe spare tire should be used for
emergency use only. It should be
replaced with the standard tire at the
first opportunity to avoid possible
tire or differential damage.
IDrive carefully while the TEMPO-
RARY USE ONLY spare tire is in-
stalled. Avoid sharp turns and
abrupt braking while driving.
IPeriodically check spare tire infla-
tion pressure. Always keep the pres-
sure of the TEMPORARY USE ONLY
spare tire at 60 psi (420 kPa, 4.2 bar).
Always keep the pressure of the full
size spare tire (if so equipped) at the
recommended pressure for standard
tires, as indicated on the tire placard.
For tire placard location, see²Tire
placard²in the index of this manual .
IWith the TEMPORARY USE ONLY
spare tire installed do not drive the
vehicle at speeds faster than 50 MPH
(80 km/h).
I
When driving on roads covered with
snow or ice, the TEMPORARY USE
ONLY spare tire should be used onthe front wheels and the original tire
used on the rear wheels (drive
wheels). Use tire chains only on the
two rear original tires.
ITire tread of the TEMPORARY USE
ONLY spare tire will wear at a faster
rate than the standard tire. Replace
the spare tire as soon as the tread
wear indicators appear.
IDo not use the spare tire on other
vehicles.
IDo not use more than one spare tire
at the same time.
IDo not tow a trailer when the TEM-
PORARY USE ONLY spare tire is
installed.
CAUTION
I
With the spare tire installed the
transfer control lever must be in the
2H position to prevent the transfer
case and differential gears from be-
ing damaged.
IDo not use tire chains on a TEMPO-
RARY USE ONLY spare tire. Tire
Do-it-yourself
8-37
ZX
Page 220 of 269
chains will not fit properly and may
cause damage to the vehicle.
I
Because the TEMPORARY USE ONLY
spare tire is smaller than the original
tire, ground clearance is reduced. To
avoid damage to the vehicle, do not
drive over obstacles. Also, do not
drive the vehicle through an automatic
car wash since it might get caught.
8-38Do-it-yourself
ZX
Page 222 of 269

Your new NISSAN has been designed to
have minimum maintenance requirements
with longer service intervals to save you
both time and money. However, some day-
to-day and regular maintenance is essential
to maintain your NISSAN's good mechani-
cal condition, as well as its emission and
engine performance.
It is the owner's responsibility to make sure
that the specified maintenance, as well as
general maintenance, is performed.
As the vehicle owner, you are the only one
who can ensure that your vehicle receives
proper maintenance. You are a vital link in
the maintenance chain.
General maintenance
General maintenance includes those items
which should be checked during normal
day-to-day operation of the vehicle. They
are essential if your vehicle is to continue to
operate properly. It is your responsibility to
perform these maintenance procedures
regularly as prescribed.
These checks or inspections can be done
by yourself, a qualified technician or, if you
prefer, an authorized NISSAN dealer.
Periodic maintenance
The maintenance items listed under peri-
odic maintenance in this section are re-
quired to be serviced at regular intervals.
However, under severe driving conditions,
additional or more frequent maintenance
will be required.
Where to go for service
If maintenance service is required or your
vehicle appears to malfunction, have the
systems checked and tuned by an autho-
rized NISSAN dealer.
NISSAN technicians are well-trained spe-
cialists who and are kept up to date with the
latest service information through technical
bulletins, service tips, and in-dealership
training programs. They are completely
qualified to work on NISSAN vehicles
beforethey work on your vehicle, rather
than after they have worked on it.
You can be confident that an authorized
NISSAN dealer's service department per-
forms the best job to meet the maintenance
requirements on your vehicle Ð in a reliable
and economic way.During the normal day-to-day operation of
the vehicle, general maintenance should be
performed regularly as prescribed in this
section. If you detect any unusual sounds,
vibrations or smells, be sure to check for the
cause or have an authorized NISSAN
dealer do it promptly. In addition, you should
notify an authorized NISSAN dealer if you
think that repairs are required.
When performing any checks or mainte-
nance work, closely observe the precau-
tions in the ``Do-it-yourself'' section of this
manual.
OUTSIDE THE VEHICLE
The maintenance items listed here should
be performed from time to time, unless
otherwise specified.
Additional information on the following
items with ``*'' is found in the ``Do-it-
yourself'' section of this manual.
Tires*Check the pressure with a gauge
periodically when at a service station, in-
cluding the spare, and adjust to the speci-
fied pressure if necessary. Check carefully
for damage, cuts or excessive wear.
Wheel nuts*When checking the tires, make
GENERAL MAINTENANCE
9-2Maintenance
ZX
Page 242 of 269

Road wheel/offset in (mm) Tire Spare tire size
4X2 Regular cab: XE 15X6JJ/1.18 (30) Steel
15X6JJ/1.38 (35) AlloyP215/65R15
P215/65R15T135/70R16
T135/70R16
King cab: XE 15X6JJ/1.18 (30) Steel
15X6JJ/1.38 (35) Alloy
15X7JJ/1.57 (40) Steel*
15X7JJ/1.57 (40) Alloy*P215/65R15
P215/65R15
P235/70R15*
P265/70R15*T135/70R16
T135/70R16
P235/70R15*
P265/70R15*
SE 16X7JJ/1.57 (40) Alloy P255/65R16 P255/65R16
Crew Cab XE 15X7JJ/1.57 (40) Steel
15X7JJ/1.57 (40) AlloyP235/70R15
P265/70R15P235/70R15
P265/70R15
SE 16X7JJ/1.57 (40) Alloy P255/65R16 P255/65R16
4X4 King cab: XE 15X7J/1.57 (40) Steel
15X7JJ/1.57 (40) Alloy
15X7JJ/1.57 (40) AlloyP235/70R15
P235/70R15
P265/70R15*P235/70R15
P235/70R15
P265/70R15*
SE 16X7JJ/1.57 (40) Alloy P255/65R16 P255/65R16
Crew cab: XE 15X7J/1.57 (40) Steel
15X7JJ/1.57 (40) AlloyP235/70R15
P265/70R15P235/70R15
P265/70R15
SE 16X7JJ/1.57 (40) Alloy P255/65R16 P255/65R16
* Not available with KA24DE engine.
WHEEL/TIRE SIZE
10-10Technical and consumer information
ZX
Page 247 of 269
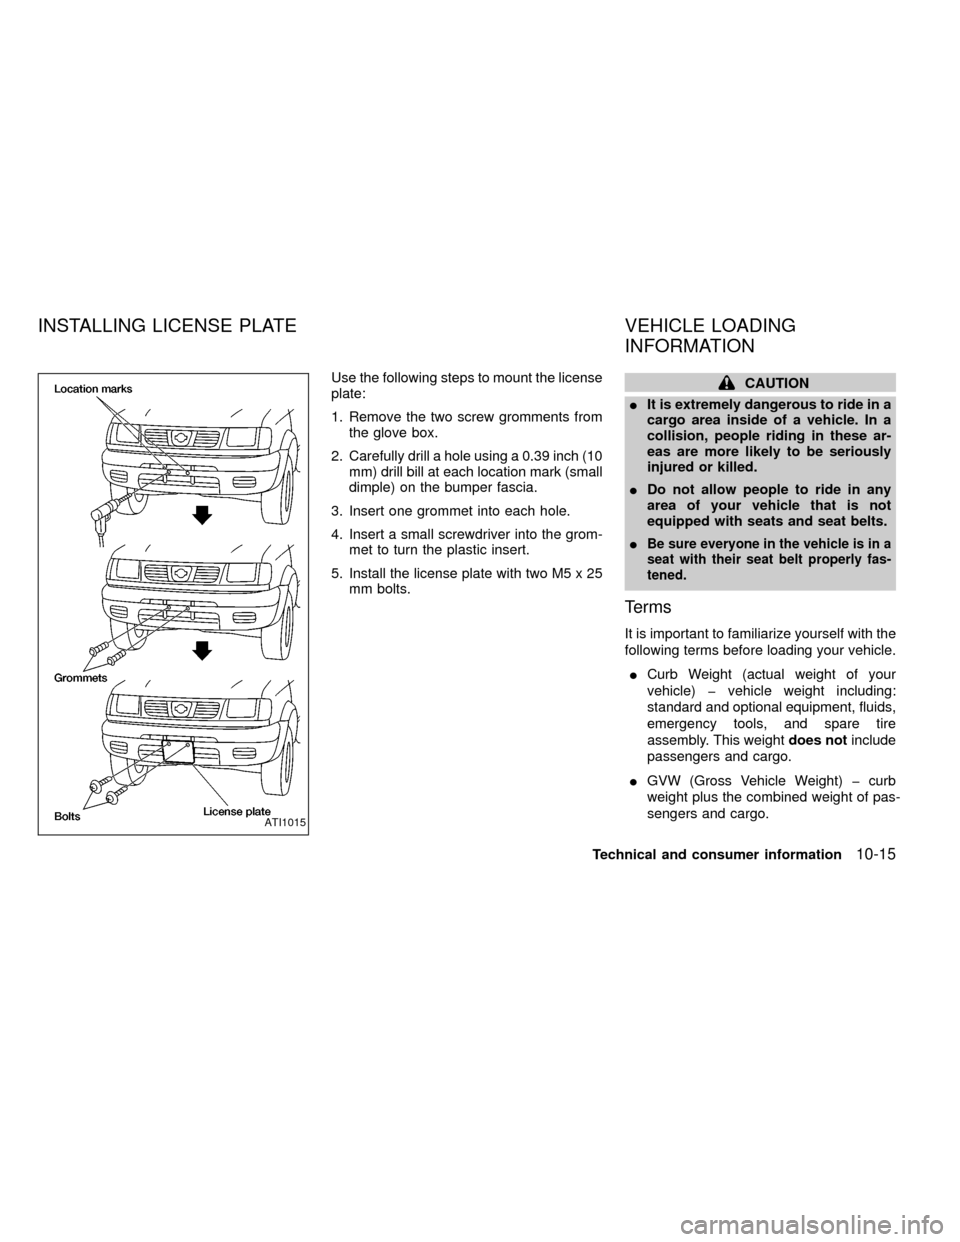
Use the following steps to mount the license
plate:
1. Remove the two screw gromments from
the glove box.
2. Carefully drill a hole using a 0.39 inch (10
mm) drill bill at each location mark (small
dimple) on the bumper fascia.
3. Insert one grommet into each hole.
4. Insert a small screwdriver into the grom-
met to turn the plastic insert.
5. Install the license plate with two M5 x 25
mm bolts.CAUTION
IIt is extremely dangerous to ride in a
cargo area inside of a vehicle. In a
collision, people riding in these ar-
eas are more likely to be seriously
injured or killed.
IDo not allow people to ride in any
area of your vehicle that is not
equipped with seats and seat belts.
I
Be sure everyone in the vehicle is in a
seat with their seat belt properly fas-
tened.
Terms
It is important to familiarize yourself with the
following terms before loading your vehicle.
ICurb Weight (actual weight of your
vehicle) þ vehicle weight including:
standard and optional equipment, fluids,
emergency tools, and spare tire
assembly. This weightdoes notinclude
passengers and cargo.
IGVW (Gross Vehicle Weight) þ curb
weight plus the combined weight of pas-
sengers and cargo.
ATI1015
INSTALLING LICENSE PLATE VEHICLE LOADING
INFORMATION
Technical and consumer information10-15
ZX