2000 NISSAN FRONTIER open hood
[x] Cancel search: open hoodPage 68 of 269

The theft warning system provides visual
and audio alarm signals if parts of the
vehicle are disturbed.
How to activate the theft warning
system
1. Close all windows.
2. Remove the key from the ignition switch.
3. Close the hood and all doors.
4. Push the
button on the multi-
remote controller. All doors lock. The
hazard lights flash twice and the hornbeeps once to indicate all doors are
locked.
I
When thebutton is pushed with all
doors locked, the hazard lights flash twice
and the horn beeps once as a reminder that
the doors are already locked. The horn may
or may not beep once. Refer to ``silencing
the horn beep feature'' later in this section.
The system can be activated even if the
windows are open.
5.
Confirm that the SECURITY indicator
light comes on. The SECURITY light
glows for about 30 seconds and then
begins to flash once every three seconds.
The system is now activated. If, during
this 30 second time period, a door is
unlocked by the key or the multi-remote
controller, or the ignition key is turned to
ACC or ON, the system will not activate.
IIf the key is turned slowly when lock-
ing the door, the system may not acti-
vate. Furthermore, if the key is turned
excessively to the unlock position, the
system may be deactivated when the
key is removed. If the indicator light
fails to glow for 30 seconds, unlock
the door once and lock it again.
IEven when the driver and/or passen-
gers are in the vehicle, the system will
activate with doors, and hood locked
and with the ignition key in the OFF
position. Turn the ignition key to ACC
or ON to turn the system off.
The theft warning system is NOT activated if
one of the following occurs:
IA door is unlocked or the ignition key is
turned to the ACC or ON position during
the 30 seconds in which the SECURITY
light stays on.
IThe SECURITY light blinks at a steady
1/2 second on - 1/2 second off rate (a
door, or the hood is open and the key is
not in the ACC or ON position). When the
ignition key is turned to the ACC or ON
position, the SECURITY light turns off.
Theft warning system operation
The theft warning system emits the follow-
ing alarm:
IThe headlights blink and the horn sounds
intermittently. In addition, the starter mo-
tor does not operate.
I
The alarm automatically turns off after 2 to
3 minutes. However, the alarm reactivates
IC0005
THEFT WARNING
(if so equipped)
2-14Instruments and controls
ZX
Page 69 of 269

if the vehicle is tampered with again. The
alarm can be shut off by unlocking a door
with the key or by pressing the
but-
tonon the multi-remote controller.
The alarm is activated by:
Iopening a door without using the key
(even if the door is unlocked by releasing
the inside lock knob).
Iopening the hood.
How to stop the alarm
The alarm stops only by unlocking a door
with the key or by pressing thebutton
on the multi-remote controller.The alarm
does not stop if the ignition switch is turned
to ACC or ON position.
Silencing the horn beep feature
If desired, the horn beep feature can be
deactivated using the multi-remote controller.
To deactivate:Press and hold theandbuttonsfor at least two
seconds.
The hazard lights will quickly flash three
times to confirm that the horn beep feature
has been deactivated.
To activate:Press and hold the
andbuttonsfor at least two seconds
once more.The hazard lights will quickly flash three
times to confirm that the horn beep feature
has been reactivated.
Deactivating the horn beep feature does not
silence the horn if the alarm is triggered.
If the system does not operate as de-
scribed above, have it checked by an
authorized NISSAN dealer.
AIC1037
Instruments and controls2-15
ZX
Page 86 of 269
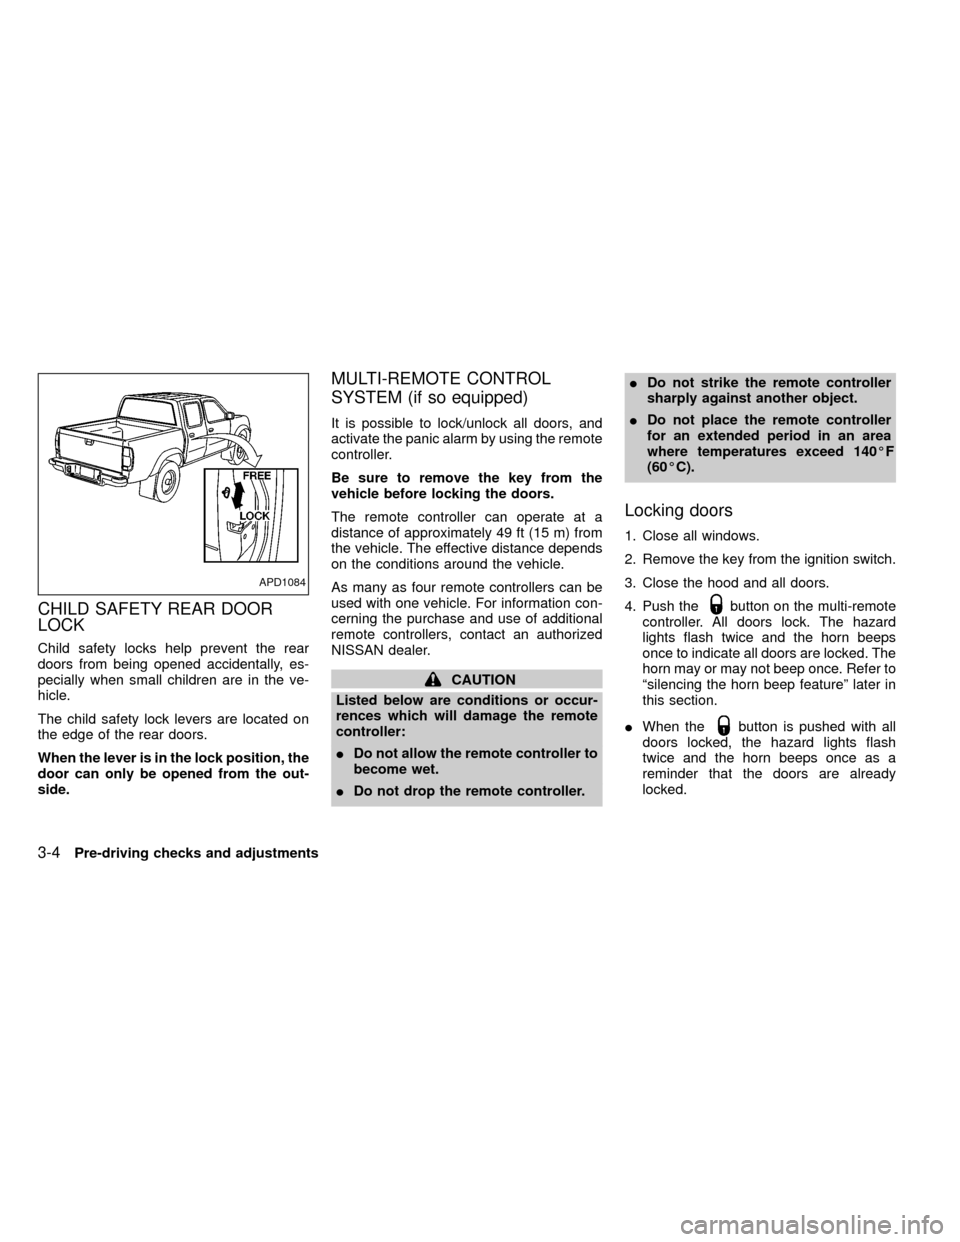
CHILD SAFETY REAR DOOR
LOCK
Child safety locks help prevent the rear
doors from being opened accidentally, es-
pecially when small children are in the ve-
hicle.
The child safety lock levers are located on
the edge of the rear doors.
When the lever is in the lock position, the
door can only be opened from the out-
side.
MULTI-REMOTE CONTROL
SYSTEM (if so equipped)
It is possible to lock/unlock all doors, and
activate the panic alarm by using the remote
controller.
Be sure to remove the key from the
vehicle before locking the doors.
The remote controller can operate at a
distance of approximately 49 ft (15 m) from
the vehicle. The effective distance depends
on the conditions around the vehicle.
As many as four remote controllers can be
used with one vehicle. For information con-
cerning the purchase and use of additional
remote controllers, contact an authorized
NISSAN dealer.
CAUTION
Listed below are conditions or occur-
rences which will damage the remote
controller:
IDo not allow the remote controller to
become wet.
IDo not drop the remote controller.IDo not strike the remote controller
sharply against another object.
IDo not place the remote controller
for an extended period in an area
where temperatures exceed 140ÉF
(60ÉC).
Locking doors
1. Close all windows.
2. Remove the key from the ignition switch.
3. Close the hood and all doors.
4. Push the
button on the multi-remote
controller. All doors lock. The hazard
lights flash twice and the horn beeps
once to indicate all doors are locked. The
horn may or may not beep once. Refer to
ªsilencing the horn beep featureº later in
this section.
IWhen the
button is pushed with all
doors locked, the hazard lights flash
twice and the horn beeps once as a
reminder that the doors are already
locked.
APD1084
3-4Pre-driving checks and adjustments
ZX
Page 90 of 269
device must accept any interference re-
ceived including interference that may
cause undesired operation of the device.
WARNING
IMake sure the hood is completely
closed and latched before driving.
Failure to do so could cause the
hood to fly open and result in an
accident.
IIf you see steam or smoke coming
from the engine compartment, to
avoid injury do not open the hood.
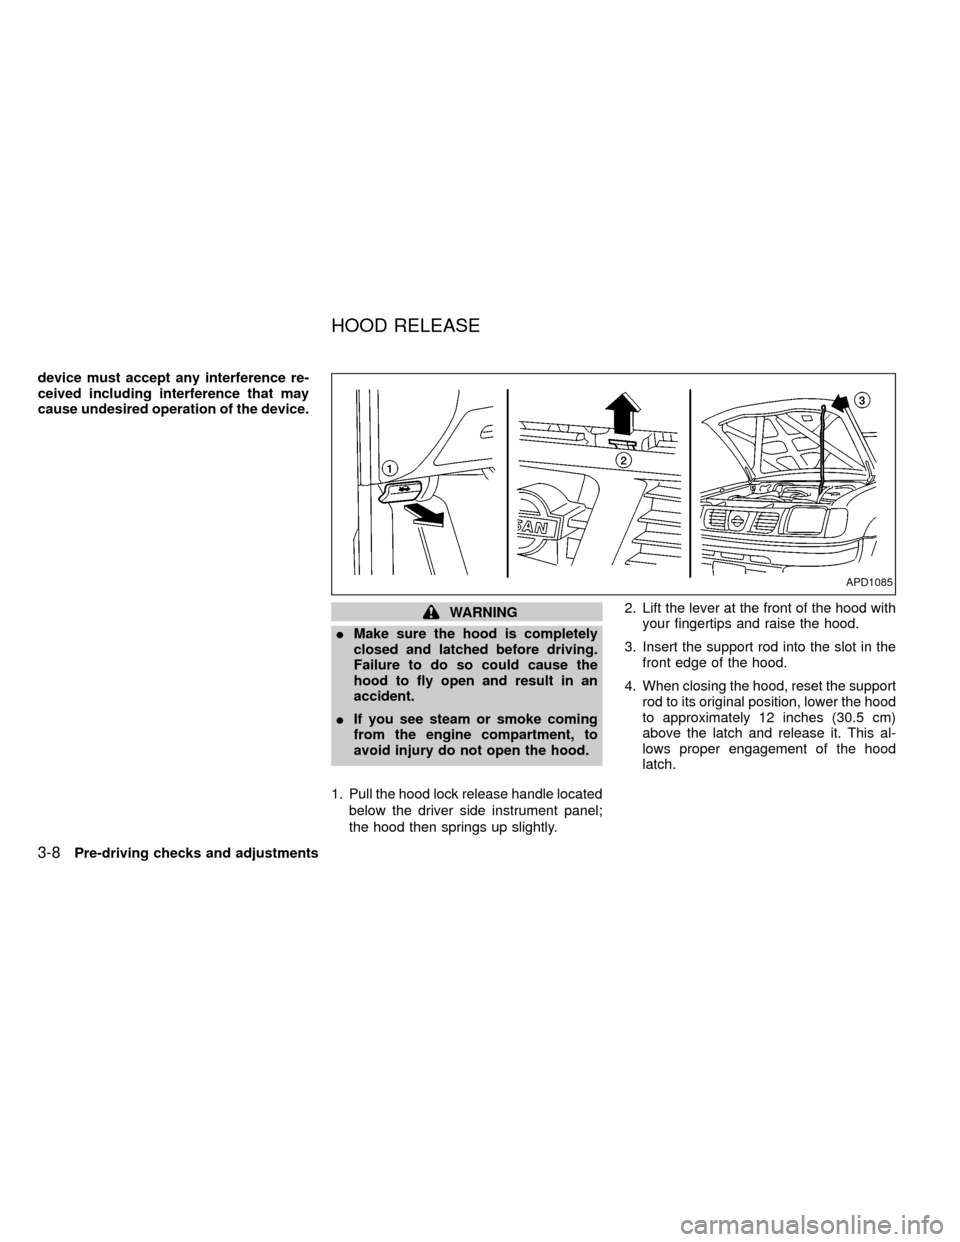
1. Pull the hood lock release handle located
below the driver side instrument panel;
the hood then springs up slightly.2. Lift the lever at the front of the hood with
your fingertips and raise the hood.
3. Insert the support rod into the slot in the
front edge of the hood.
4. When closing the hood, reset the support
rod to its original position, lower the hood
to approximately 12 inches (30.5 cm)
above the latch and release it. This al-
lows proper engagement of the hood
latch.
APD1085
HOOD RELEASE
3-8Pre-driving checks and adjustments
ZX
Page 172 of 269
If your vehicle is overheating (indicated by
an extremely high temperature gauge read-
ing), or if you feel a lack of engine power, or
detect abnormal noise, etc., take the follow-
ing steps:
WARNING
IDo not continue to drive if your ve-
hicle overheats. Doing so could
cause a vehicle fire.
ITo avoid the danger of being
scalded, never remove the radiator
cap while the engine is still hot.
When the radiator cap is removed,
pressurized hot water will spurt out,
possibly causing serious injury.
IDo not open the hood if steam is
coming out.
1. Move the vehicle safely off the road,
apply the parking brake and move the
gearshift lever to N (Neutral), or the au-
tomatic transmission into P (Park).
Do not stop the engine.
2.
Turn off the air conditioner (if so
equipped). Open all of the windows,
move the heater or air conditioner tem-perature control to maximum hot and fan
control to high speed.
3. If engine overheating is caused by climb-
ing a long hill on a hot day, run the engine
at a fast idle (approximately 1,500 r/min)
until the temperature gauge indicator re-
turns to normal.
4. Get out of the vehicle. Look and listen for
steam or coolant escaping from the ra-
diator before opening the hood. Wait until
no steam or coolant can be seen before
proceeding.
5. Open the hood.
WARNING
If steam or water is coming from the
engine, stand clear to prevent getting
burned.
6. Visually check drive belts for damage or
looseness. Also check if the cooling fan is
running. The radiator hoses and radiator
should not leak water. If coolant is leak-
ing, or the water pump belt is missing or
loose, or the cooling fan does not run,
stop the engine.
WARNING
Be careful not to allow your hands, hair,
jewelry or clothing to come into contact
with, or to get caught in, engine belts or
the engine cooling fan. The engine
cooling fan can start at any time when
the coolant temperature is high.
7. After the engine cools down, check the
coolant level in the reservoir tank with the
engine running. Add coolant to the reser-
voir tank if necessary. Have your vehicle
repaired at an authorized NISSAN
dealer.
IF YOUR VEHICLE
OVERHEATS
6-10In case of emergency
ZX
Page 178 of 269
In order to maintain the appearance of your
vehicle, it is important to take proper care of
it.
In the following cases, please wash your
vehicle as soon as possible to protect the
paint surface:
Iafter a rainfall to prevent possible dam-
age from acid rain.
Iafter driving on coastal roads.
Iwhen contaminants such as soot, bird
droppings, tree sap, metal particles or
bugs get on the paint surface.Iwhen dust or mud builds up on the
surface.
Whenever possible, store or park your ve-
hicle inside a garage or in a covered area.
When it is necessary to park outside, park in
a shady area or protect the vehicle with a
body cover.
Be careful not to scratch the paint sur-
face when putting on or removing the
body cover.
Washing
Wash dirt off with a wet sponge and plenty
of water. Clean the vehicle thoroughly using
a mild soap, a special vehicle soap or
general purpose dishwashing liquid mixed
with clean, lukewarm (never hot) water.
CAUTION
IDo not wash the vehicle with strong
household soap, strong chemical
detergents, gasoline or solvents.
IDo not wash the vehicle in direct
sunlight or while the vehicle body is
hot, as the surface may become
water-spotted.IAvoid using tight-napped or rough
cloths, such as washing mitts. Care
must be taken when removing
caked-on dirt or other foreign sub-
stances so the paint surface is not
scratched or damaged.
Rinse the vehicle thoroughly with plenty of
clean water.
Inside flanges, seams and folds on the
doors, hatches and hood are particularly
vulnerable to the effects of road salt. There-
fore, these areas must be regularly cleaned.
Take care that the drain holes in the lower
edge of the door are open. Spray water
under the body and in the wheel wells to
loosen the dirt and wash away road salt.
A damp chamois can be used to dry the
vehicle to avoid water spots.
Waxing
Regular waxing protects the paint surface
and helps retain new vehicle appearance.
After waxing, polishing is recommended to
remove built-up residue and to avoid a
``weathered'' appearance.
An authorized NISSAN dealer can assist
MAI0001
CLEANING EXTERIOR AND
INTERIOR
7-2Appearance and care
ZX
Page 204 of 269
CAUTION
I
After wiper blade replacement, return
the wiper arm to its original position;
otherwise it may be damaged when
the engine hood is opened.
IMake sure the wiper blades contact
the glass; otherwise the arms may
be damaged from wind pressure.
If your windshield is not clear after using the
windshield washer or if a wiper blade chat-
ters when running, wax or another material
may be on the blade or windshield.Clean the outside of the windshield with a
washer solution or a mild detergent. Your
windshield is clean if beads do not form
when rinsing with clear water.
Clean the blade by wiping it with a cloth
soaked in a washer solution or a mild deter-
gent. Then rinse the blade with clear water.
If your windshield is still not clear after
cleaning the blades and using the wiper,
replace the blades.
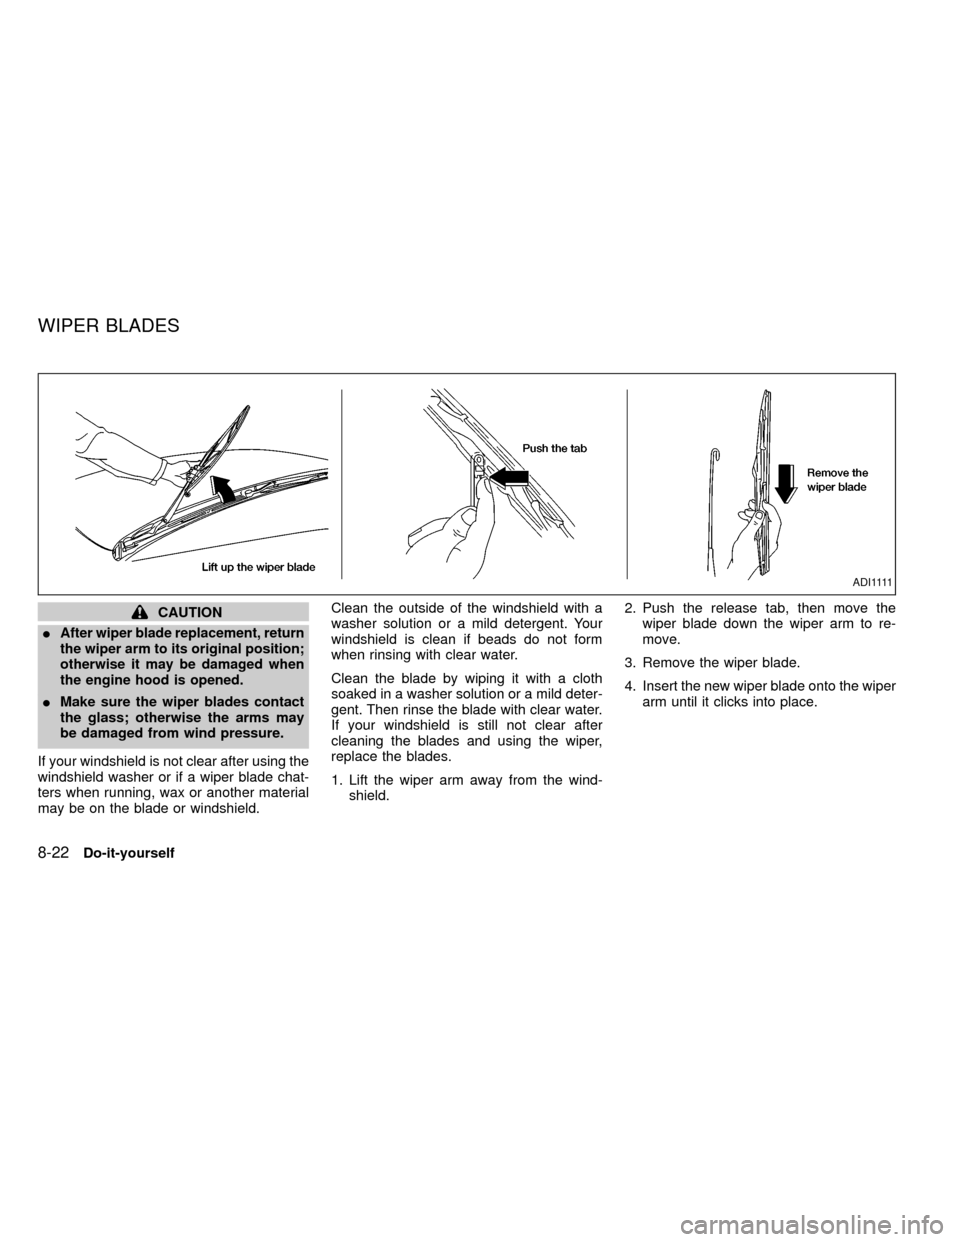
1. Lift the wiper arm away from the wind-
shield.2. Push the release tab, then move the
wiper blade down the wiper arm to re-
move.
3. Remove the wiper blade.
4. Insert the new wiper blade onto the wiper
arm until it clicks into place.
A D I 1111
WIPER BLADES
8-22Do-it-yourself
ZX
Page 211 of 269
HEADLIGHTS
The headlight is a semi-sealed beam type
which uses a replaceable headlight (halo-
gen) bulb.
CAUTION
IHigh pressure halogen gas is sealed
inside the halogen bulb. The bulb
may break if the glass envelope is
scratched or the bulb is dropped.
IWhen handling the bulb, do not
touch the glass envelope.
Replacing the headlight bulb
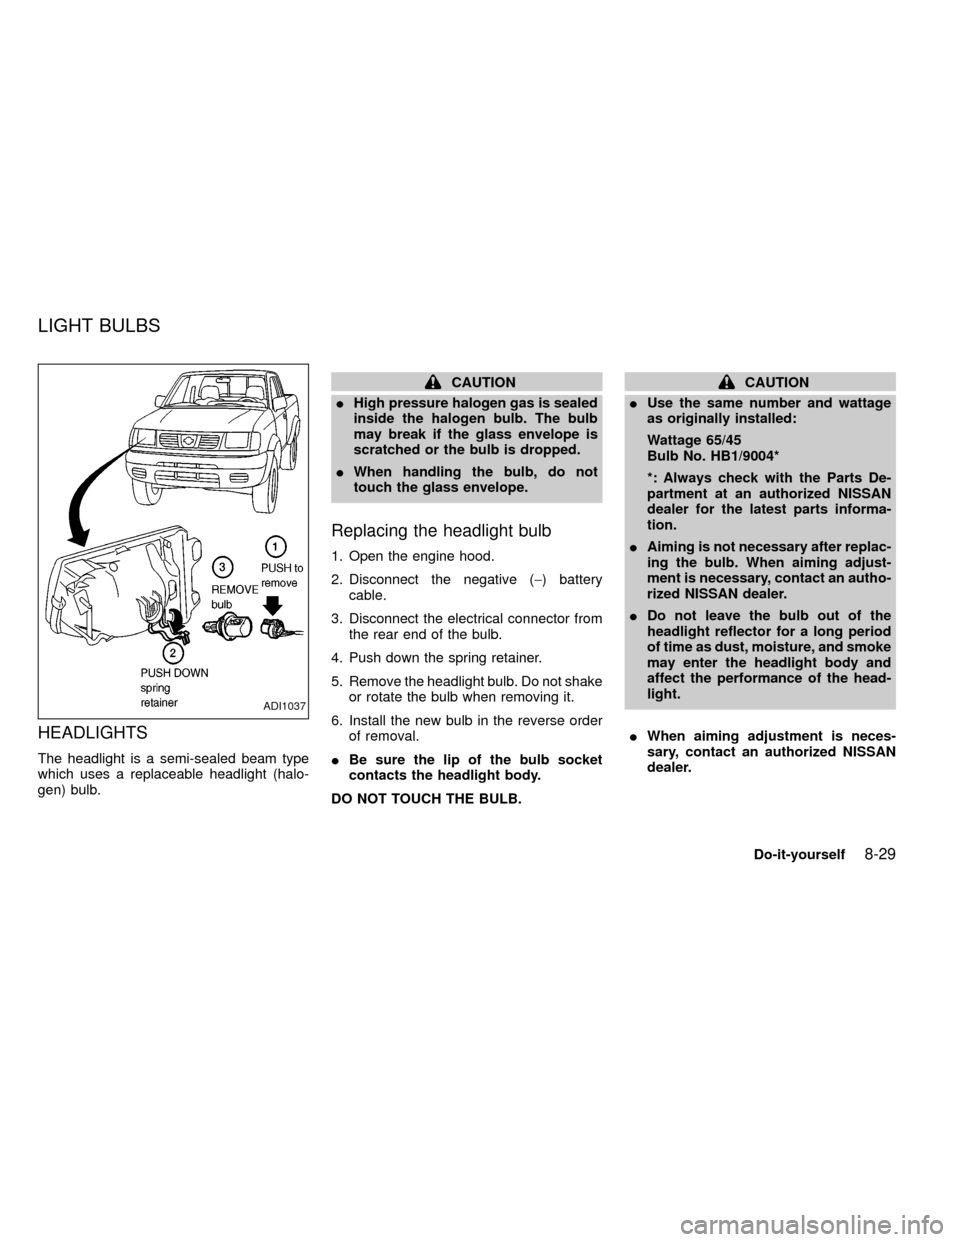
1. Open the engine hood.
2. Disconnect the negative (-) battery
cable.
3. Disconnect the electrical connector from
the rear end of the bulb.
4. Push down the spring retainer.
5. Remove the headlight bulb. Do not shake
or rotate the bulb when removing it.
6. Install the new bulb in the reverse order
of removal.
IBe sure the lip of the bulb socket
contacts the headlight body.
DO NOT TOUCH THE BULB.
CAUTION
IUse the same number and wattage
as originally installed:
Wattage 65/45
Bulb No. HB1/9004*
*: Always check with the Parts De-
partment at an authorized NISSAN
dealer for the latest parts informa-
tion.
IAiming is not necessary after replac-
ing the bulb. When aiming adjust-
ment is necessary, contact an autho-
rized NISSAN dealer.
IDo not leave the bulb out of the
headlight reflector for a long period
of time as dust, moisture, and smoke
may enter the headlight body and
affect the performance of the head-
light.
IWhen aiming adjustment is neces-
sary, contact an authorized NISSAN
dealer.
ADI1037
LIGHT BULBS
Do-it-yourself8-29
ZX