2000 NISSAN ALTIMA window
[x] Cancel search: windowPage 47 of 242

2 Instruments and controls
Meters and gauges ................................................2-2
Speedometer and odometer ..................................2-3
Tachometer ............................................................2-4
Engine coolant temperature gauge........................2-4
Fuel gauge .............................................................2-5
Warning/indicator lights and chimes ......................2-6
Checking bulbs .......................................................2-6
Warning lights.........................................................2-6
Indicator lights ........................................................2-8
Chimes ...................................................................2-9
Security systems ..................................................2-10
Nissan vehicle immobilizer system (NVIS) ..........2-10
Enhanced immobilizer security system
(if so equipped) ....................................................2-12
Windshield wiper and washer switch ...................2-14
Switch operation ...................................................2-14
Rear window defogger switch ..............................2-15
Headlight and turn signal switch ..........................2-16
Headlight switch ...................................................2-16
Turn signal switch ................................................2-17
Cornering light ......................................................2-18
Fog light switch (if so equipped) ..........................2-18Hazard warning flasher switch .............................2-18
Horn ......................................................................2-19
Power socket ......................................................2-19
Cigarette lighter (accessory) and ash tray ...........2-20
Storage .................................................................2-21
Map pocket ...........................................................2-21
Glasses case ........................................................2-21
Cup holders ..........................................................2-22
Glove box .............................................................2-23
Console box .........................................................2-23
Cargo net (if so equipped) ...................................2-25
Trunk side net ......................................................2-26
Windows ...............................................................2-26
Power windows ....................................................2-26
Sunroof (if so equipped).......................................2-27
Interior light...........................................................2-29
Map lights (if so equipped)...................................2-29
Trunk light.............................................................2-30
Integrated HomeLinkTuniversal transceiver
(if so equipped) ....................................................2-30
Programming HomeLinkT.....................................2-31
ZX
Page 60 of 242

How to arm the enhanced immobi-
lizer security system
1. Close all windows.(The system can be
armed even if the windows are open).
2. Remove the key from the ignition switch.
3. Close the hood, trunk lid and all doors.
Lock all doors. The doors can be locked
with the key or with the multi-remote
controller.
Multi-remote controller operation:
cPush the
button on the multi-
remote controller. All doors lock. The
hazard lights flash twice and the horn
beeps once to indicate all doors are
locked.
cWhen the
button is pushed with all
doors locked, the hazard lights flash
twice and the horn beeps once as a
reminder that the doors are already
locked.
The horn may or may not beep once.
Refer to ``Silencing the horn beep fea-
ture'' later in this section for details.
4.
Confirm that the SECURITY indicator light
comes on. The SECURITY light stays on
for about 30 seconds. The enhanced im-mobilizer security system is now pre-
armed. After about 30 seconds the en-
hanced immobilizer security system
automatically shifts into the armed phase.
The SECURITY light begins to flash once
every three seconds. If, during the 30-
second pre-arm time period, the door is
unlocked by the key or the multi-remote
controller, or the ignition key is turned to
ACC or ON, the system will not arm.
cIf the key is turned slowly when lock-
ing the door, the system may not arm.
Furthermore, if the key is turned ex-
cessively to the unlock position, the
system may be disarmed when the key
is removed. If the indicator light fails to
glow for 30 seconds, unlock the door
once and lock it again.
cEven when the driver and/or passen-
gers are in the vehicle, the system will
arm with all doors, hood and trunk lid
closed and locked with the ignition
key in the OFF position.
Enhanced immobilizer security sys-
tem activation
The enhanced immobilizer security system
will give the following alarm:cThe headlights blink and the horn sounds
intermittently.
cThe alarm automatically turns off after 2
to 3 minutes. However, the alarm reacti-
vates if the vehicle is tampered with
again. The alarm can be shut off by
unlocking a door or trunk lid with the key,
or by pressing the
button on the
multi-remote controller.
The alarm is activated by:
copening the door or trunk lid without
using the key or multi-remote controller
(even if the door is unlocked by releasing
the door inside lock switch) or opening
the trunk lid by operating the opener
lever.
copening the hood.
How to stop an activated alarm
The alarm stops only by unlocking a door or
the trunk lid with the key, or by pressing
the
button on the multi-remote control-
ler.
The alarm does not stop if the ignition
switch is turned to ACC or ON.
Instruments and controls
2-13
ZX
Page 62 of 242
2 to approximately 20 seconds by turning
the knob (Type B only).
The wipers automatically cycle twice when
the washer is activated.
CAUTION
cDo not operate the washer continu-
ously for more than 30 seconds.
cDo not operate the washer if the
reservoir tank is empty.
WARNING
In freezing temperatures the washer
solution may freeze on the windshield
and obscure your vision which may
lead to an accident. Warm the wind-
shield with the defroster before you
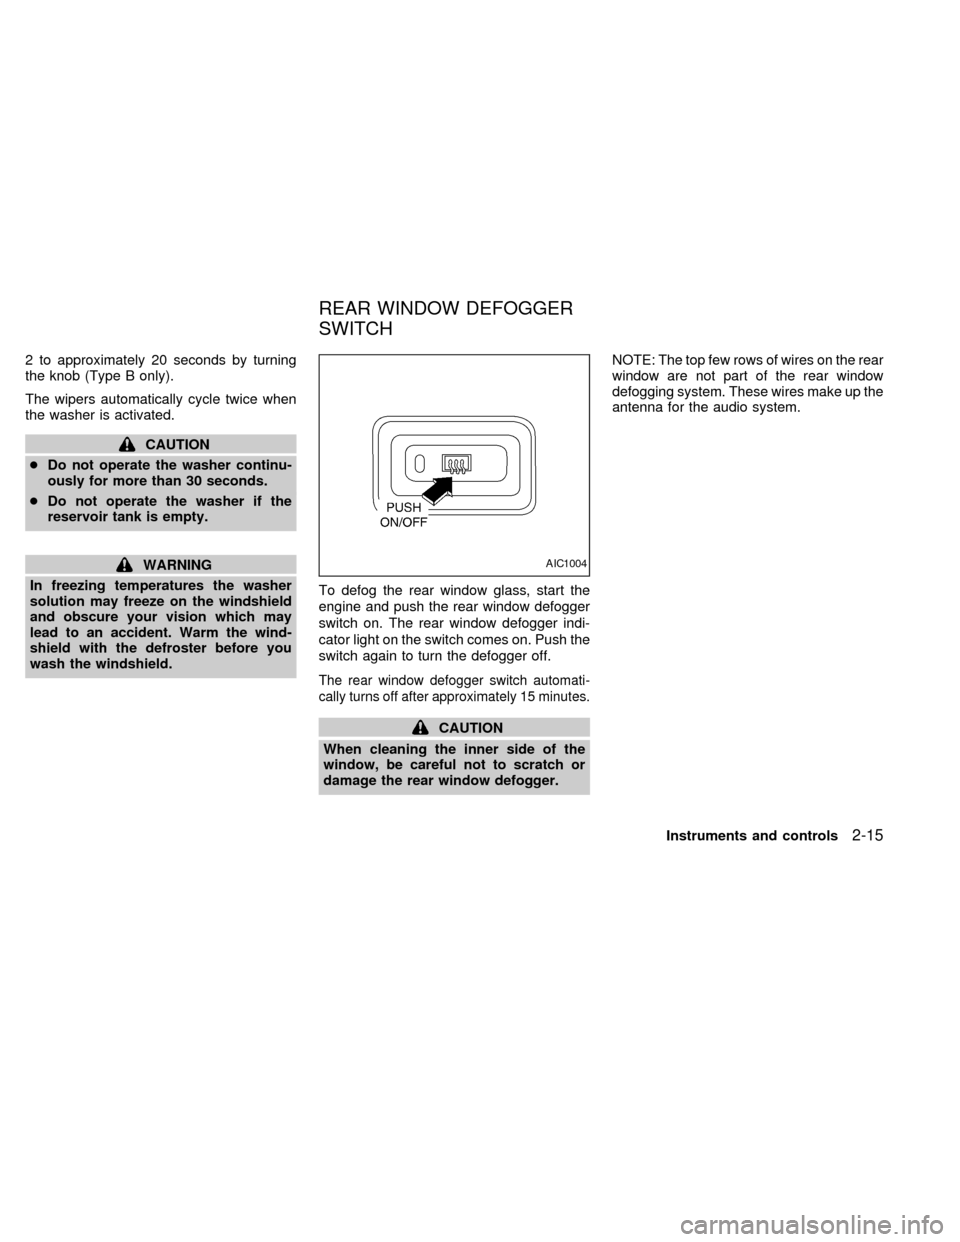
wash the windshield.To defog the rear window glass, start the
engine and push the rear window defogger
switch on. The rear window defogger indi-
cator light on the switch comes on. Push the
switch again to turn the defogger off.
The rear window defogger switch automati-
cally turns off after approximately 15 minutes.
CAUTION
When cleaning the inner side of the
window, be careful not to scratch or
damage the rear window defogger.NOTE: The top few rows of wires on the rear
window are not part of the rear window
defogging system. These wires make up the
antenna for the audio system.
AIC1004
REAR WINDOW DEFOGGER
SWITCH
Instruments and controls2-15
ZX
Page 67 of 242
cUse this power socket with the en-
gine running. (If the engine is
stopped, this could result in a dis-
charged battery.)
cAvoid using when the air condi-
tioner, headlights or rear window de-
fogger is on.
cBefore inserting or disconnecting a
plug, be sure to turn off the power
switch of electrical accessory being
used or the ACC power of the ve-
hicle.
cPush the plug in as far as it will go. If
good contact is not made, the plug
may overheat or the internal tem-
perature fuse may blow.
cWhen not in use, be sure to close the
cap. Do not allow water to contact
the socket.
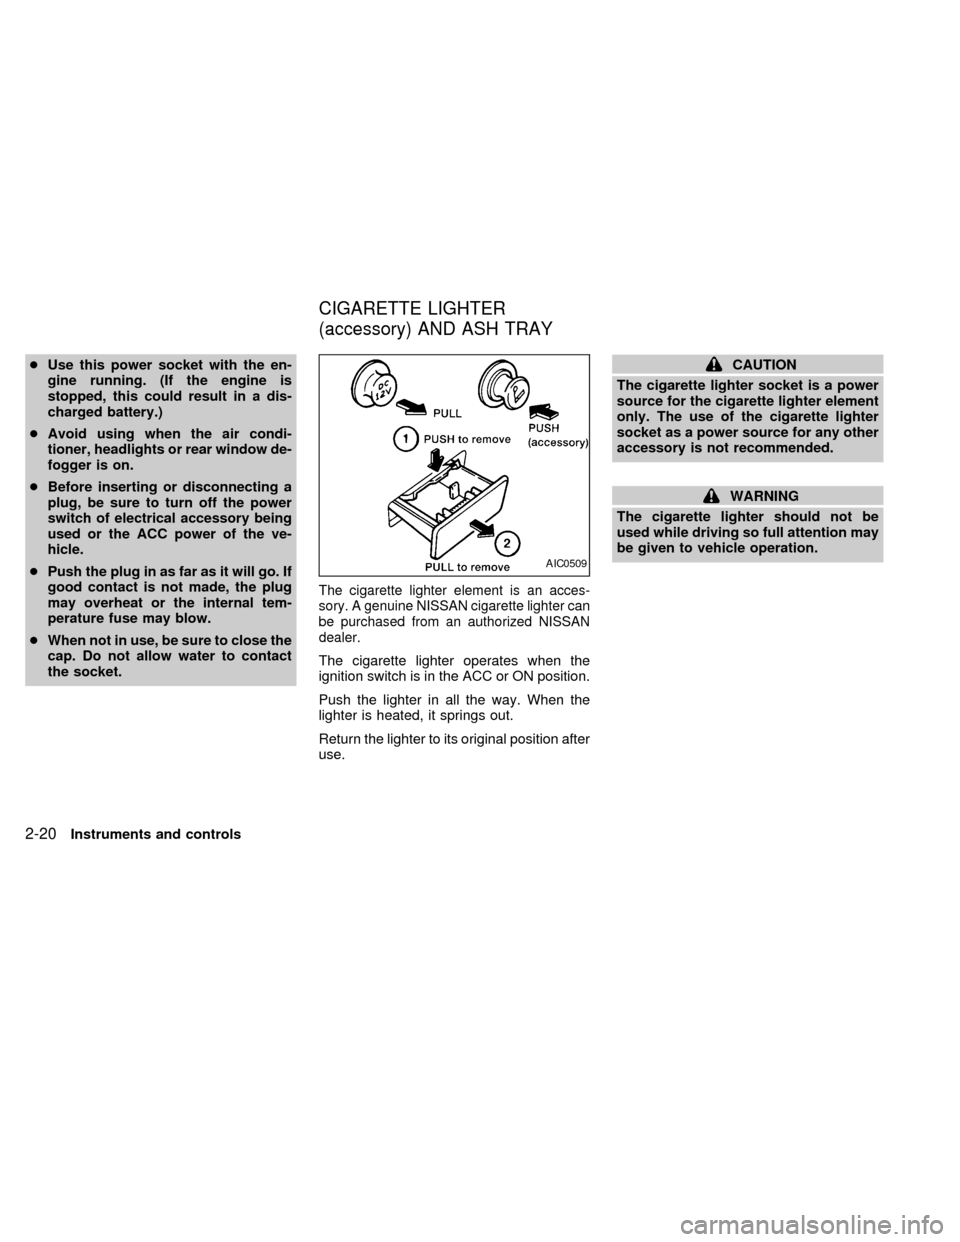
The cigarette lighter element is an acces-
sory. A genuine NISSAN cigarette lighter can
be purchased from an authorized NISSAN
dealer.
The cigarette lighter operates when the
ignition switch is in the ACC or ON position.
Push the lighter in all the way. When the
lighter is heated, it springs out.
Return the lighter to its original position after
use.
CAUTION
The cigarette lighter socket is a power
source for the cigarette lighter element
only. The use of the cigarette lighter
socket as a power source for any other
accessory is not recommended.
WARNING
The cigarette lighter should not be
used while driving so full attention may
be given to vehicle operation.
AIC0509
CIGARETTE LIGHTER
(accessory) AND ASH TRAY
2-20Instruments and controls
ZX
Page 73 of 242
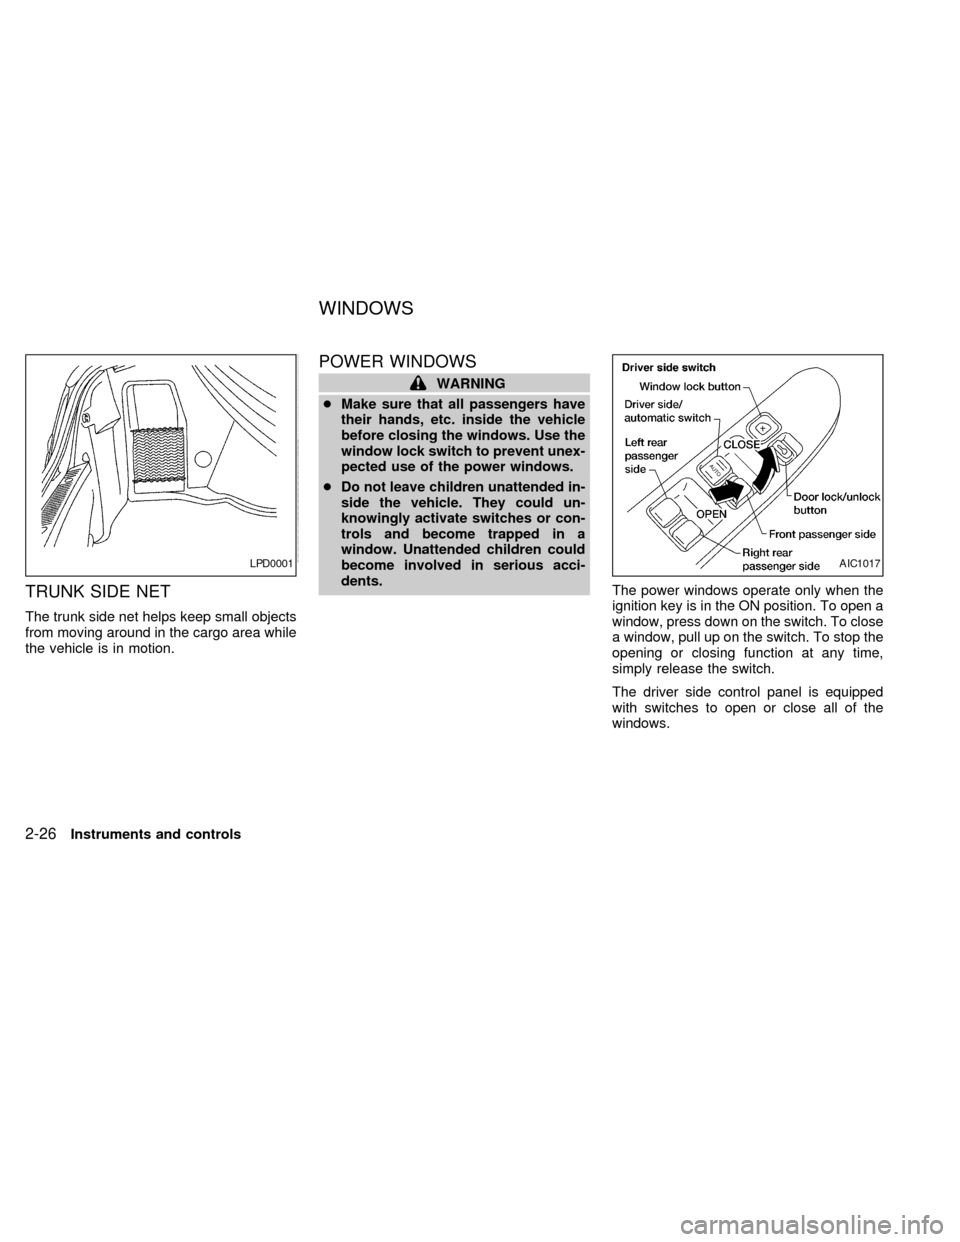
TRUNK SIDE NET
The trunk side net helps keep small objects
from moving around in the cargo area while
the vehicle is in motion.
POWER WINDOWS
WARNING
cMake sure that all passengers have
their hands, etc. inside the vehicle
before closing the windows. Use the
window lock switch to prevent unex-
pected use of the power windows.
cDo not leave children unattended in-
side the vehicle. They could un-
knowingly activate switches or con-
trols and become trapped in a
window. Unattended children could
become involved in serious acci-
dents.
The power windows operate only when the
ignition key is in the ON position. To open a
window, press down on the switch. To close
a window, pull up on the switch. To stop the
opening or closing function at any time,
simply release the switch.
The driver side control panel is equipped
with switches to open or close all of the
windows.
LPD0001AIC1017
WINDOWS
2-26Instruments and controls
ZX
Page 74 of 242

The front and rear passenger window
switches operate only the corresponding
passenger window. To open the window,
press down on the switch. To close the
window, pull up on the switch.
Locking passenger windows
When the power window lock switch on the
driver side control panel is pushed in, only
the driver side window can be opened or
closed. Push it in again to cancel this func-
tion.
Automatic operation
To fully open the driver's side window, press
the driver's side window switch down to the
second detent and release it; it need not be
held. The window automatically opens all
the way. To stop the window, lift the switch
up while the window is opening.The sunroof operates only when the ignition
key is in the ON position.
Sliding the sunroof
To open the roof, press and hold the switch
to the DOWN/OPEN side.
To close the roof, press and hold the switch
to the UP/CLOSE side.
Tilting the sunroof
To tilt up, first close the sunroof, then push
and hold the UP/CLOSE side of the tilt switch.
To close the sunroof, push and hold the
DOWN/CLOSE side.
WIC0012AIC1018WIC0013
SUNROOF
(if so equipped)
Instruments and controls2-27
ZX
Page 86 of 242
CHILD SAFETY REAR DOOR
LOCK
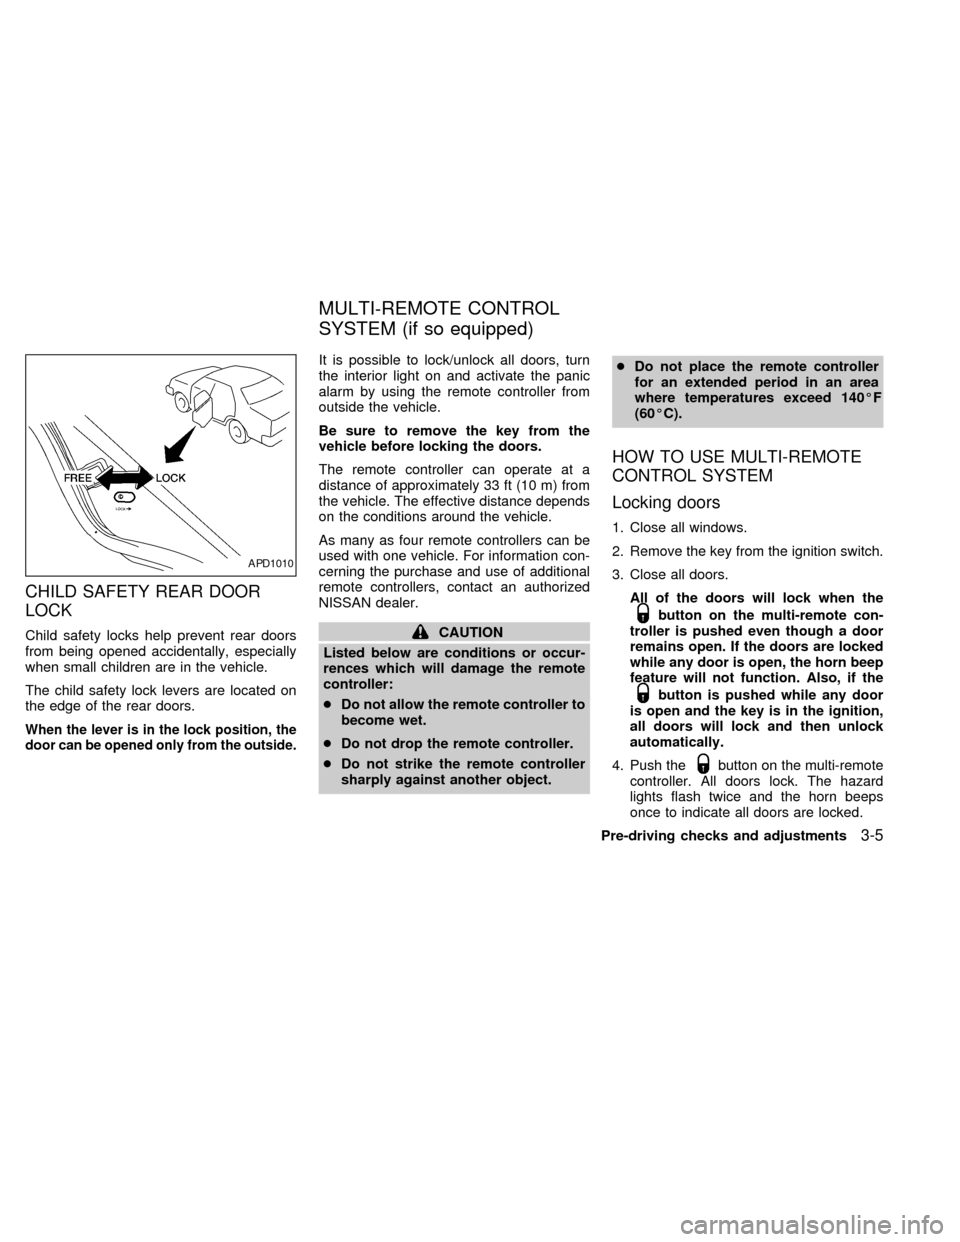
Child safety locks help prevent rear doors
from being opened accidentally, especially
when small children are in the vehicle.
The child safety lock levers are located on
the edge of the rear doors.
When the lever is in the lock position, the
door can be opened only from the outside.
It is possible to lock/unlock all doors, turn
the interior light on and activate the panic
alarm by using the remote controller from
outside the vehicle.
Be sure to remove the key from the
vehicle before locking the doors.
The remote controller can operate at a
distance of approximately 33 ft (10 m) from
the vehicle. The effective distance depends
on the conditions around the vehicle.
As many as four remote controllers can be
used with one vehicle. For information con-
cerning the purchase and use of additional
remote controllers, contact an authorized
NISSAN dealer.
CAUTION
Listed below are conditions or occur-
rences which will damage the remote
controller:
cDo not allow the remote controller to
become wet.
cDo not drop the remote controller.
cDo not strike the remote controller
sharply against another object.cDo not place the remote controller
for an extended period in an area
where temperatures exceed 140ÉF
(60ÉC).
HOW TO USE MULTI-REMOTE
CONTROL SYSTEM
Locking doors
1. Close all windows.
2. Remove the key from the ignition switch.
3. Close all doors.
All of the doors will lock when the
button on the multi-remote con-
troller is pushed even though a door
remains open. If the doors are locked
while any door is open, the horn beep
feature will not function. Also, if the
button is pushed while any door
is open and the key is in the ignition,
all doors will lock and then unlock
automatically.
4. Push the
button on the multi-remote
controller. All doors lock. The hazard
lights flash twice and the horn beeps
once to indicate all doors are locked.
APD1010
MULTI-REMOTE CONTROL
SYSTEM (if so equipped)
Pre-driving checks and adjustments3-5
ZX
Page 98 of 242
WARNING
cThe air conditioner cooling function
operates only when the engine is
running.
c
Do not leave children, impaired adults,
or pets alone in your vehicle. On hot
sunny days, temperatures in a closed
vehicle could quickly become high
enough to cause severe or possibly
fatal injuries to people or animals.
cDo not use the recirculation mode
for long periods as it may cause the
interior air to become stale and the
windows to fog up.
cPositioning of the heating or air con-
ditioning controls should not be
done while driving so full attention
may be given to vehicle operation.
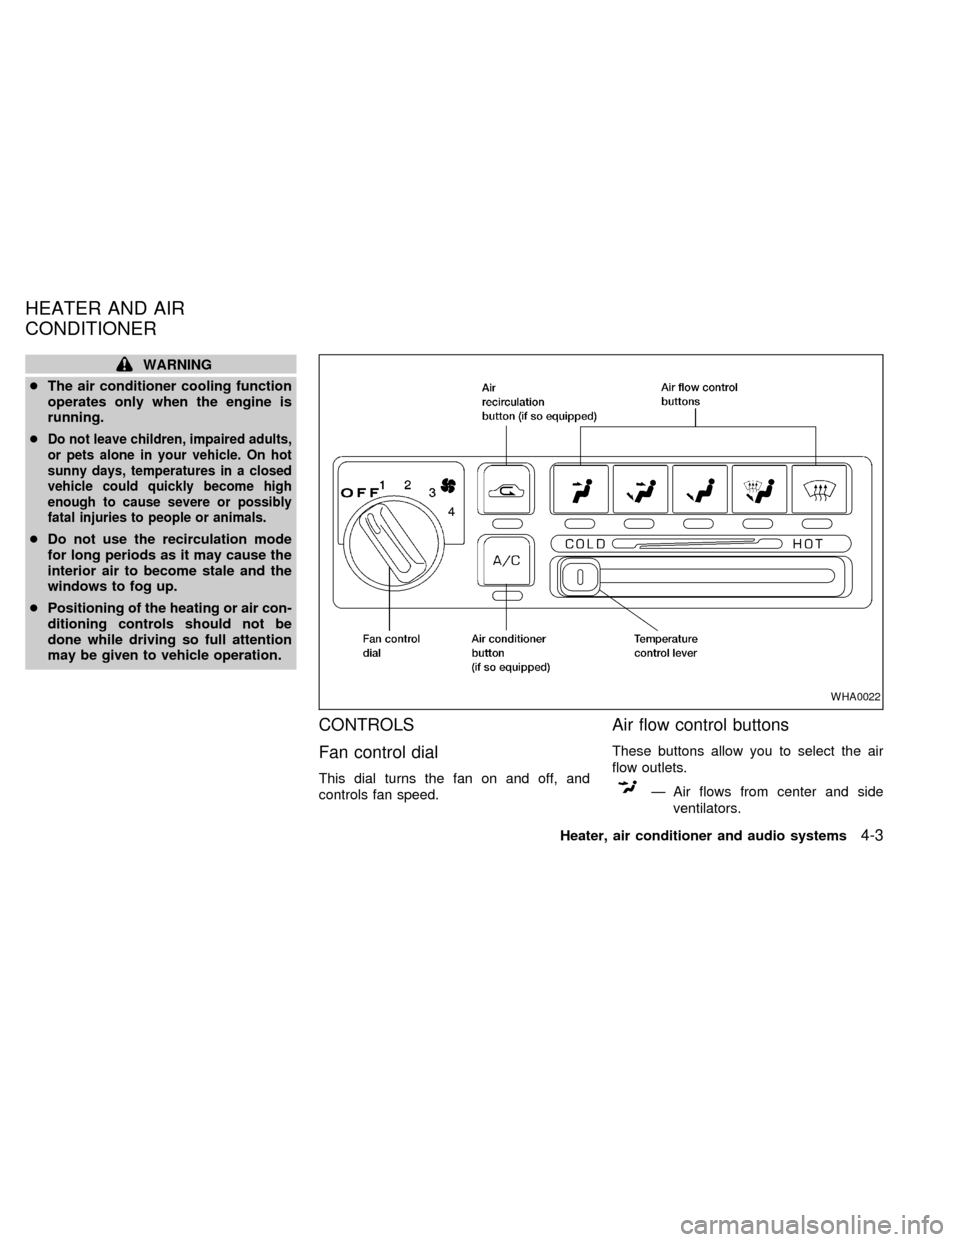
CONTROLS
Fan control dial
This dial turns the fan on and off, and
controls fan speed.
Air flow control buttons
These buttons allow you to select the air
flow outlets.
Ð Air flows from center and side
ventilators.
WHA0022
HEATER AND AIR
CONDITIONER
Heater, air conditioner and audio systems4-3
ZX