2000 NISSAN ALTIMA torque
[x] Cancel search: torquePage 146 of 242

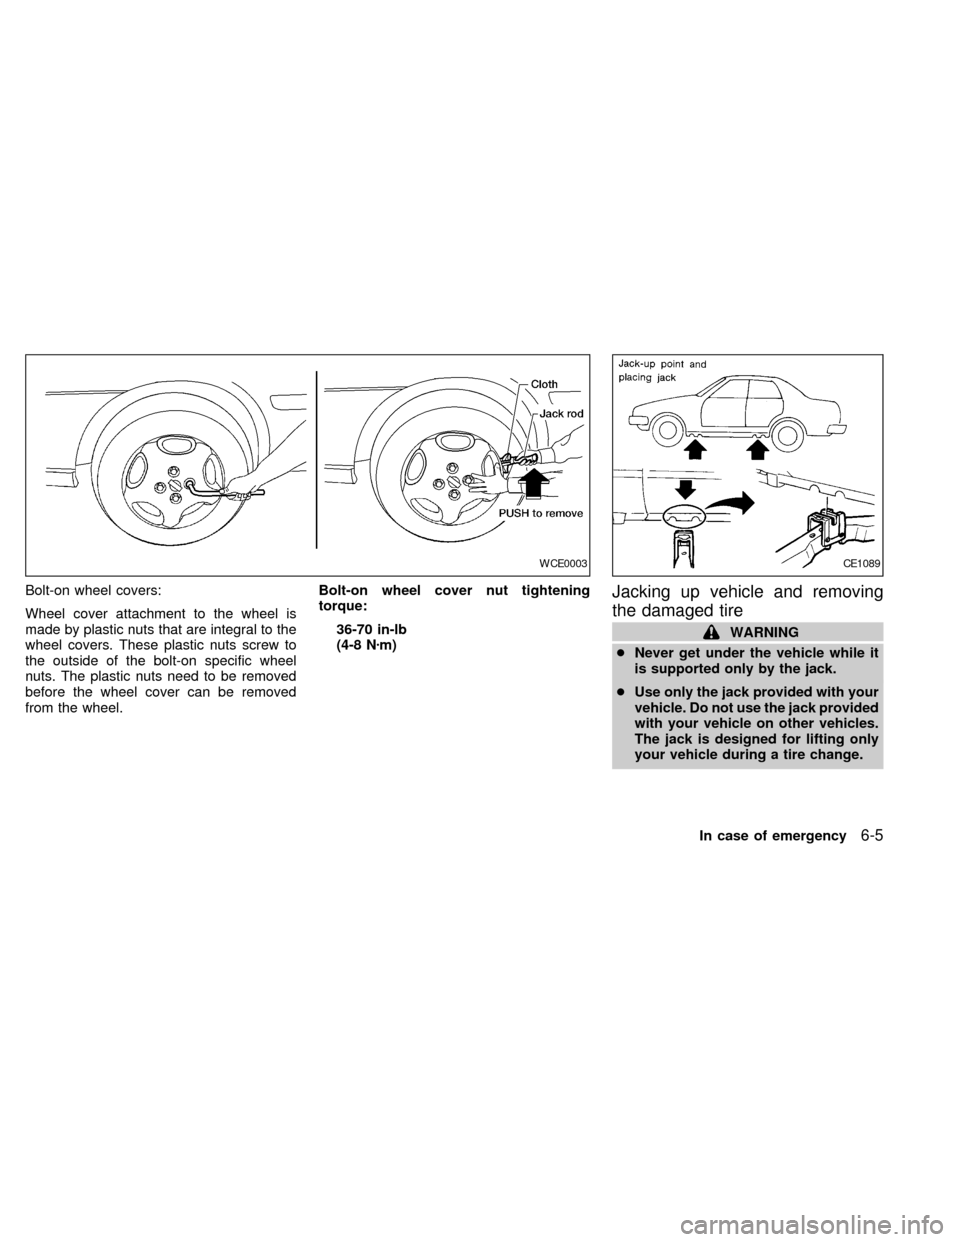
Bolt-on wheel covers:
Wheel cover attachment to the wheel is
made by plastic nuts that are integral to the
wheel covers. These plastic nuts screw to
the outside of the bolt-on specific wheel
nuts. The plastic nuts need to be removed
before the wheel cover can be removed
from the wheel.Bolt-on wheel cover nut tightening
torque:
36-70 in-lb
(4-8 Nzm)Jacking up vehicle and removing
the damaged tire
WARNING
cNever get under the vehicle while it
is supported only by the jack.
cUse only the jack provided with your
vehicle. Do not use the jack provided
with your vehicle on other vehicles.
The jack is designed for lifting only
your vehicle during a tire change.
WCE0003CE1089
In case of emergency6-5
ZX
Page 148 of 242

Installing the spare tire
The spare tire is designed for emergency
use. See specific instructions under the
heading ``Wheels and tires'' in the ``Do-
it-yourself'' section.
1. Clean any mud or dirt from the surface
between the wheel and hub.
2. Carefully put the spare tire on and install
the wheel nuts finger-tight.
3. With the wheel nut wrench, tighten wheel
nuts alternately and evenly until they are
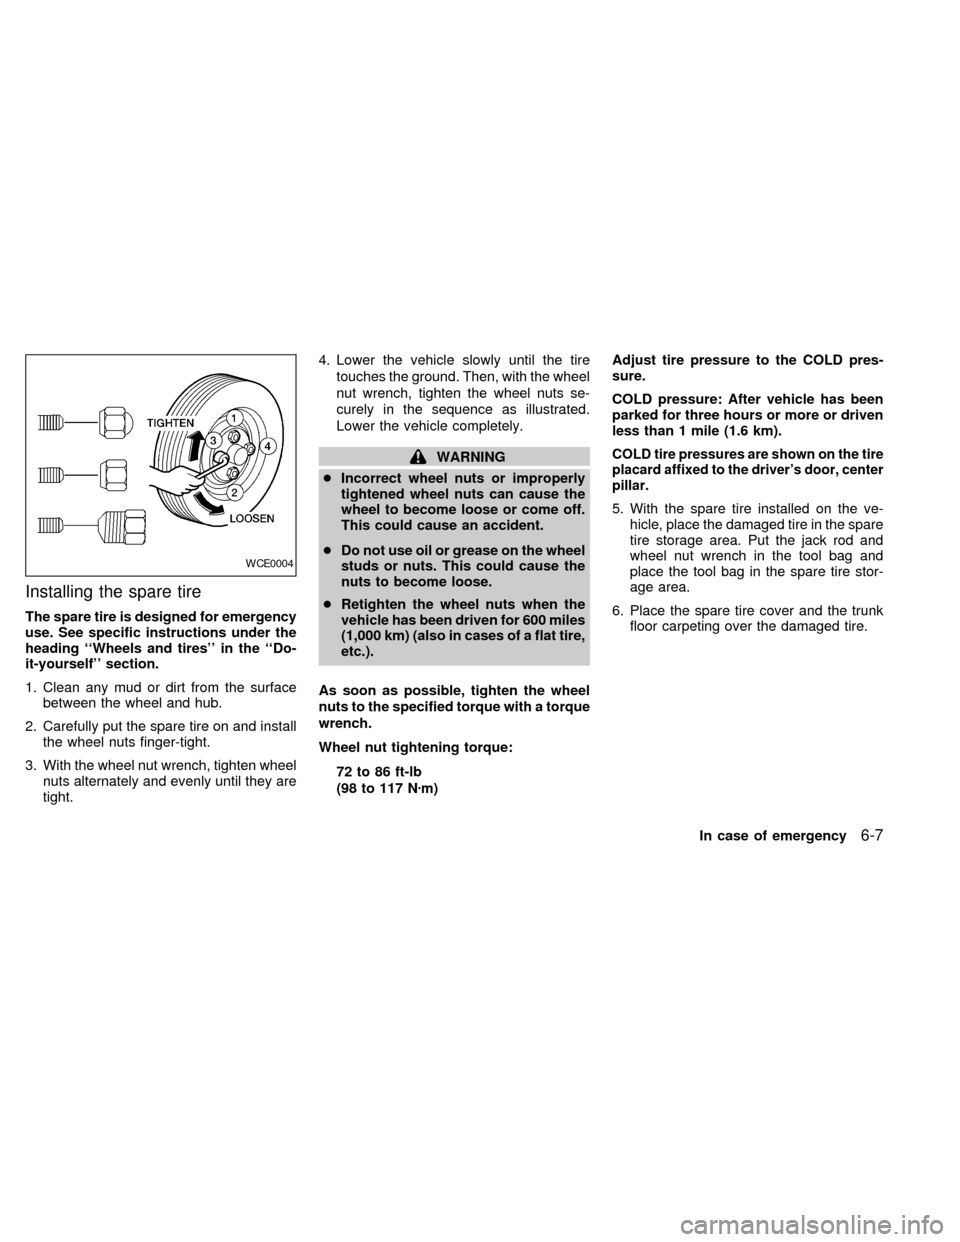
tight.4. Lower the vehicle slowly until the tire
touches the ground. Then, with the wheel
nut wrench, tighten the wheel nuts se-
curely in the sequence as illustrated.
Lower the vehicle completely.
WARNING
cIncorrect wheel nuts or improperly
tightened wheel nuts can cause the
wheel to become loose or come off.
This could cause an accident.
cDo not use oil or grease on the wheel
studs or nuts. This could cause the
nuts to become loose.
cRetighten the wheel nuts when the
vehicle has been driven for 600 miles
(1,000 km) (also in cases of a flat tire,
etc.).
As soon as possible, tighten the wheel
nuts to the specified torque with a torque
wrench.
Wheel nut tightening torque:
72 to 86 ft-lb
(98 to 117 Nzm)Adjust tire pressure to the COLD pres-
sure.
COLD pressure: After vehicle has been
parked for three hours or more or driven
less than 1 mile (1.6 km).COLD tire pressures are shown on the tire
placard affixed to the driver's door, center
pillar.
5. With the spare tire installed on the ve-
hicle, place the damaged tire in the spare
tire storage area. Put the jack rod and
wheel nut wrench in the tool bag and
place the tool bag in the spare tire stor-
age area.
6. Place the spare tire cover and the trunk
floor carpeting over the damaged tire.
WCE0004
In case of emergency6-7
ZX
Page 172 of 242

CHANGING ENGINE OIL
1. Park the vehicle on a level surface and
apply the parking brake.
2. Start the engine and let it idle until it
reaches operating temperature, then turn
it off.
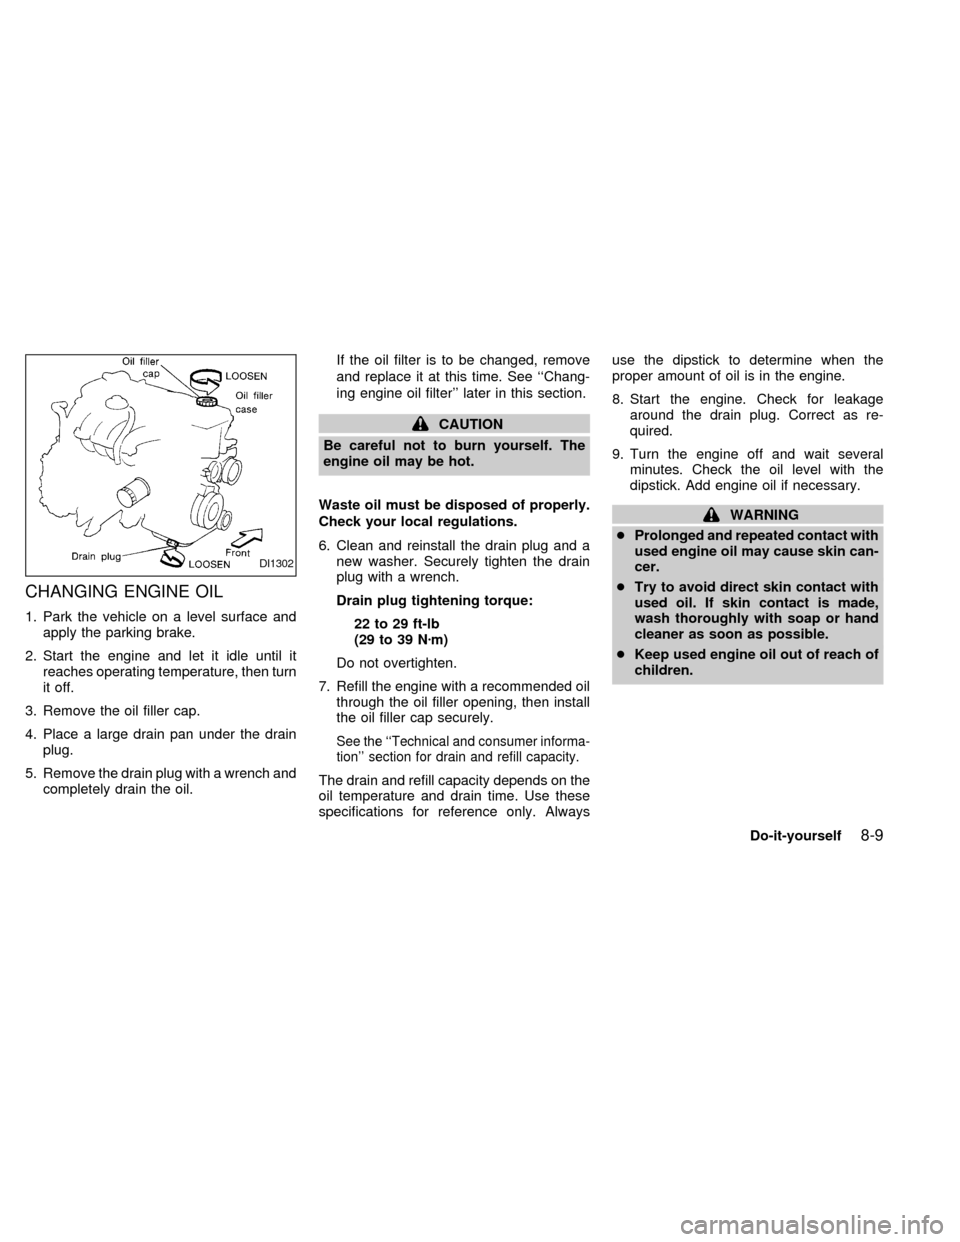
3. Remove the oil filler cap.
4. Place a large drain pan under the drain
plug.
5. Remove the drain plug with a wrench and
completely drain the oil.If the oil filter is to be changed, remove
and replace it at this time. See ``Chang-
ing engine oil filter'' later in this section.
CAUTION
Be careful not to burn yourself. The
engine oil may be hot.
Waste oil must be disposed of properly.
Check your local regulations.
6. Clean and reinstall the drain plug and a
new washer. Securely tighten the drain
plug with a wrench.
Drain plug tightening torque:
22 to 29 ft-lb
(29 to 39 Nzm)
Do not overtighten.
7. Refill the engine with a recommended oil
through the oil filler opening, then install
the oil filler cap securely.
See the ``Technical and consumer informa-
tion'' section for drain and refill capacity.
The drain and refill capacity depends on the
oil temperature and drain time. Use these
specifications for reference only. Alwaysuse the dipstick to determine when the
proper amount of oil is in the engine.
8. Start the engine. Check for leakage
around the drain plug. Correct as re-
quired.
9. Turn the engine off and wait several
minutes. Check the oil level with the
dipstick. Add engine oil if necessary.
WARNING
cProlonged and repeated contact with
used engine oil may cause skin can-
cer.
cTry to avoid direct skin contact with
used oil. If skin contact is made,
wash thoroughly with soap or hand
cleaner as soon as possible.
cKeep used engine oil out of reach of
children.
DI1302
Do-it-yourself8-9
ZX
Page 179 of 242

Platinum-tipped spark plugs
It is not necessary to replace platinum-
tipped spark plugs as frequently as conven-
tional type spark plugs because they last
much longer. Follow the maintenance
schedule, but do not reuse the spark plugs
by cleaning or regapping.
cAlways replace spark plugs with rec-
ommended or equivalent ones.
1. Remove brackets as necessary to give
access to the high tension spark plug
cables and spark plugs.2. Disconnect the spark plug cables from
the spark plugs.
When disconnecting, always hold the
boots, not the cables. Mark all cables to
identify their original locations.
3. Remove the spark plugs with a spark
plug socket.
The plug socket has a rubber seal that
holds the spark plug so it does not fall
when it is pulled out. Make sure each
spark plug is snugly fitted into the spark
plug socket.
4. Fit the new plugs, one at a time, into the
spark plug socket and install them.Use
only the specified spark plugs.Turn
each plug several full turns by hand, then
tighten with the spark plug socket to the
correct torque. Do not overtighten.
Spark plug tightening torque:
14 to 22 ft-lb
(20 to 29 Nzm)
5. Holding the boot, reconnect each high
tension cable to its proper spark plug by
pushing it on until you feel a snap.
6. Reinstall all brackets as necessary.The air cleaner filter should not be cleaned
and reused. Replace it according to the
maintenance intervals shown in the ``Main-
tenance'' section of this manual. When re-
placing the filter, wipe the inside of the air
cleaner filter housing and the cover with a
damp cloth.
WDI0005DI1312
AIR CLEANER
8-16Do-it-yourself
ZX
Page 188 of 242

3. Remove the three nuts and one bolt
mounting the headlamp assembly (see
above illustration).
4. Pull the headlamp assembly evenly away
from the front of the vehicle to access the
bulb sockets.5. Disconnect the harness connector from
the back side of the bulb socket (see
above illustration).
6. Turn the bulb retaining ring counter-
clockwise until it is free from the head-
lamp assembly and then remove it.
7. Remove the bulb by pulling it straight out
of the lamp assembly. Do not shake the
bulb when removing it.
8. Follow the instructions in reverse order to
install new bulb.
Headlamp mounting nuts and bolt
torque: 36 to 47 in-lb (4.1 to 5.3 Nzm)
Adjusting the headlight aim
Before performing aiming adjustment, make
sure of the following:
a. Use an aiming wall screen.
b. Keep all of the tires inflated to the correct
pressure.
c. Place the vehicle and screen on level
ground.
d. See that the vehicle is unloaded (except
for full levels of coolant, engine oil and
fuel, and that the spare tire, jack, and
tools are stored). Have the driver or an
equivalent weight placed in the driver's
seat.
Low beam
1. Open the hood. Turn headlamp low
beam on.
2. Adjust the vertical aim by turning the
adjusting screw.
cCover the opposite lamp and ensure the
fog lamps (if so equipped) are turned off.
cAdjust beam pattern until cutoff line is
positioned at the same height off ground
as bulb center (on H-line).
LDI0010LDI0011
Do-it-yourself8-25
ZX
Page 191 of 242

3. Remove the three nuts and one bolt
mounting the headlamp assembly (see
above illustration).
4. Pull the headlamp assembly evenly away
from the front of the vehicle to access the
bulb sockets.
5. Rotate the socket counter-clockwise and
pull it out of the headlamp assembly. Do
not shake the bulb socket when remov-
ing it.
6. Pull the bulb out of the socket.
7. Follow the instructions in reverse order to
install new bulb.Headlamp mounting nuts and bolt
torque: 36 to 47 in-lb (4.1 to 5.3 Nzm)
FRONT SIDEMARKER LAMP
Replacing the front sidemarker lamp
bulb
1. Disconnect the negative (-) battery cable.
2. Remove the four screws from the bottom
of the front fender protector (see above
illustration) and position the fender pro-
tector aside to allow access to the head-
lamp mounting fasteners.
LDI0010LDI0009
8-28Do-it-yourself
ZX
Page 192 of 242

3. Remove the three nuts and one bolt
mounting the headlamp assembly (see
above illustration).
4. Pull the headlamp assembly evenly away
from the front of the vehicle to access the
bulb sockets.
5. Rotate the socket counter-clockwise and
pull it out of the headlamp assembly. Do
not shake the bulb socket when remov-
ing it.
6. Pull the bulb out of the socket.
7. Follow the instructions in reverse order to
install new bulb.Headlamp mounting nuts and bolt
torque: 36 to 47 in-lb (4.1 to 5.3 Nzm)
FOG LIGHTS
Replacing the fog light bulb
LDI0010
WDI0003
Do-it-yourself8-29
ZX
Page 199 of 242

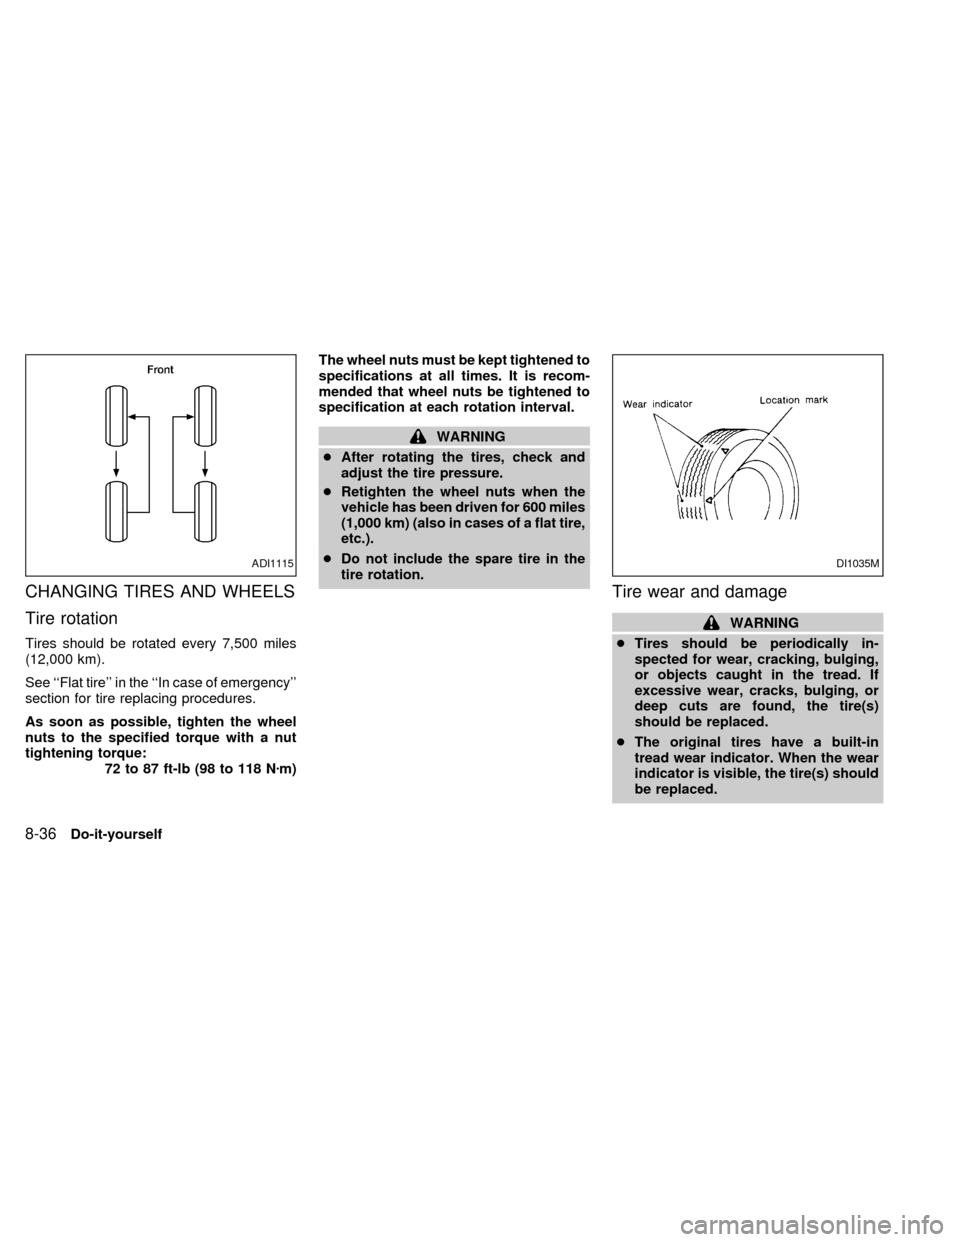
CHANGING TIRES AND WHEELS
Tire rotation
Tires should be rotated every 7,500 miles
(12,000 km).
See ``Flat tire'' in the ``In case of emergency''
section for tire replacing procedures.
As soon as possible, tighten the wheel
nuts to the specified torque with a nut
tightening torque:
72 to 87 ft-lb (98 to 118 Nzm)The wheel nuts must be kept tightened to
specifications at all times. It is recom-
mended that wheel nuts be tightened to
specification at each rotation interval.
WARNING
cAfter rotating the tires, check and
adjust the tire pressure.
cRetighten the wheel nuts when the
vehicle has been driven for 600 miles
(1,000 km) (also in cases of a flat tire,
etc.).
cDo not include the spare tire in the
tire rotation.
Tire wear and damage
WARNING
cTires should be periodically in-
spected for wear, cracking, bulging,
or objects caught in the tread. If
excessive wear, cracks, bulging, or
deep cuts are found, the tire(s)
should be replaced.
cThe original tires have a built-in
tread wear indicator. When the wear
indicator is visible, the tire(s) should
be replaced.
ADI1115DI1035M
8-36Do-it-yourself
ZX