2000 NISSAN ALTIMA warning
[x] Cancel search: warningPage 36 of 242
children are safer when properly re-
strained in the rear seat than in the
front seat.
cAn improperly installed child re-
straint could lead to serious injury or
death in an accident.
cIn general, child restraints are de-
signed to be installed with a lap belt
or the lap portion of a three-point
type seat belt.
Child restraints for infants and children of
various sizes are offered by several manu-
facturers. When selecting any child restraint,
keep the following points in mind:
1) Choose only a restraint with a label cer-
tifying that it complies with Federal Motor
Vehicle Safety Standard 213 or Cana-
dian Motor Vehicle Safety Standard 213.
2) Check the child restraint in your vehicle
to be sure it is compatible with the vehi-
cle's seat and seat belt system. Choose
a child restraint that meets the guidelines
of the Society of Automotive Engineers
recommended practice J1819 for child
restraint installation.
3) If the child restraint is compatible with
your vehicle, place your child in the childrestraint and check the various adjust-
ments to be sure the child restraint is
compatible with your child. Always follow
all recommended procedures.
All U.S. states and provinces of Canada
require that infants and small children be
restrained in approved child restraints at
all times while the vehicle is being
operated.
WARNING
cImproper use of a child restraint can
result in increased injuries for both
the infant or child and other occu-
pants in the vehicle.
cFollow all of the child restraint manu-
facturer's instructions for installa-
tion and use. When purchasing a
child restraint, be sure to select one
which will fit your child and vehicle.
It may not be possible to properly
install some types of child restraints
in your vehicle.
cIf the child restraint is not anchored
properly, the risk of a child being
injured in a collision or a sudden
stop greatly increases.cAdjustable seatbacks should be po-
sitioned to fit the child restraint, but
as upright as possible.
c
After attaching the child restraint,
test it before you place the child in it.
Tilt it from side to side. Try to tug it
forward and check to see if the belt
holds the restraint in place. If the
restraint is not secure, tighten the
belt as necessary, or put the restraint
in another seat and test it again.
cFor a front-facing child restraint, if
the seat position where it is installed
has a three-point type lap/shoulder
belt, check to make sure the shoulder
belt does not go in front of the child's
face or neck. If it does, put the shoul-
der belt behind the child restraint. If
you must install a front-facing child
restraint in the front seat, see ``Instal-
lation on front passenger seat'' later
in this section for details.
cWhen your child restraint is not in
use, keep it secured with a seat belt
to prevent it from being thrown
around in case of a sudden stop or
accident.
Seats, restraints and supplemental air bag systems1-29
ZX
Page 37 of 242
CAUTION
Remember that a child restraint left in a
closed vehicle can become very hot.
Check the seating surface and buckles
before placing your child in the child
restraint.
INSTALLATION ON REAR SEAT
CENTER OR OUTBOARD POSI-
TIONS
WARNING
cThe three-point belt in your vehicle
is equipped with a locking mode re-
tractor which must be used when
installing a child restraint.
cFailure to use the retractor's locking
mode will result in the child restraint
not being properly secured. The re-
straint could tip over or otherwise be
unsecured and cause injury to the
child in a sudden stop or collision.
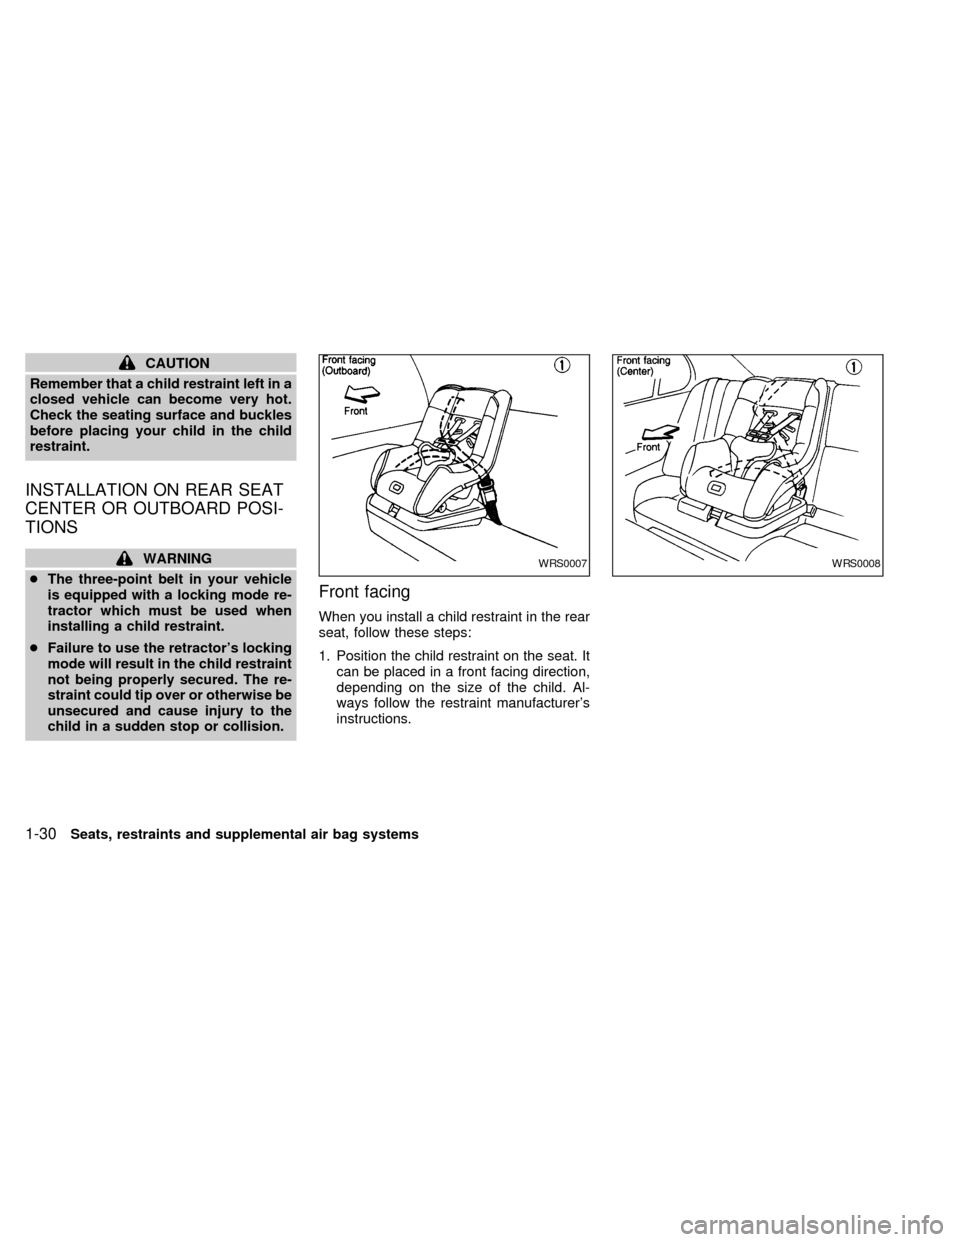
Front facing
When you install a child restraint in the rear
seat, follow these steps:
1. Position the child restraint on the seat. It
can be placed in a front facing direction,
depending on the size of the child. Al-
ways follow the restraint manufacturer's
instructions.
WRS0007WRS0008
1-30Seats, restraints and supplemental air bag systems
ZX
Page 42 of 242
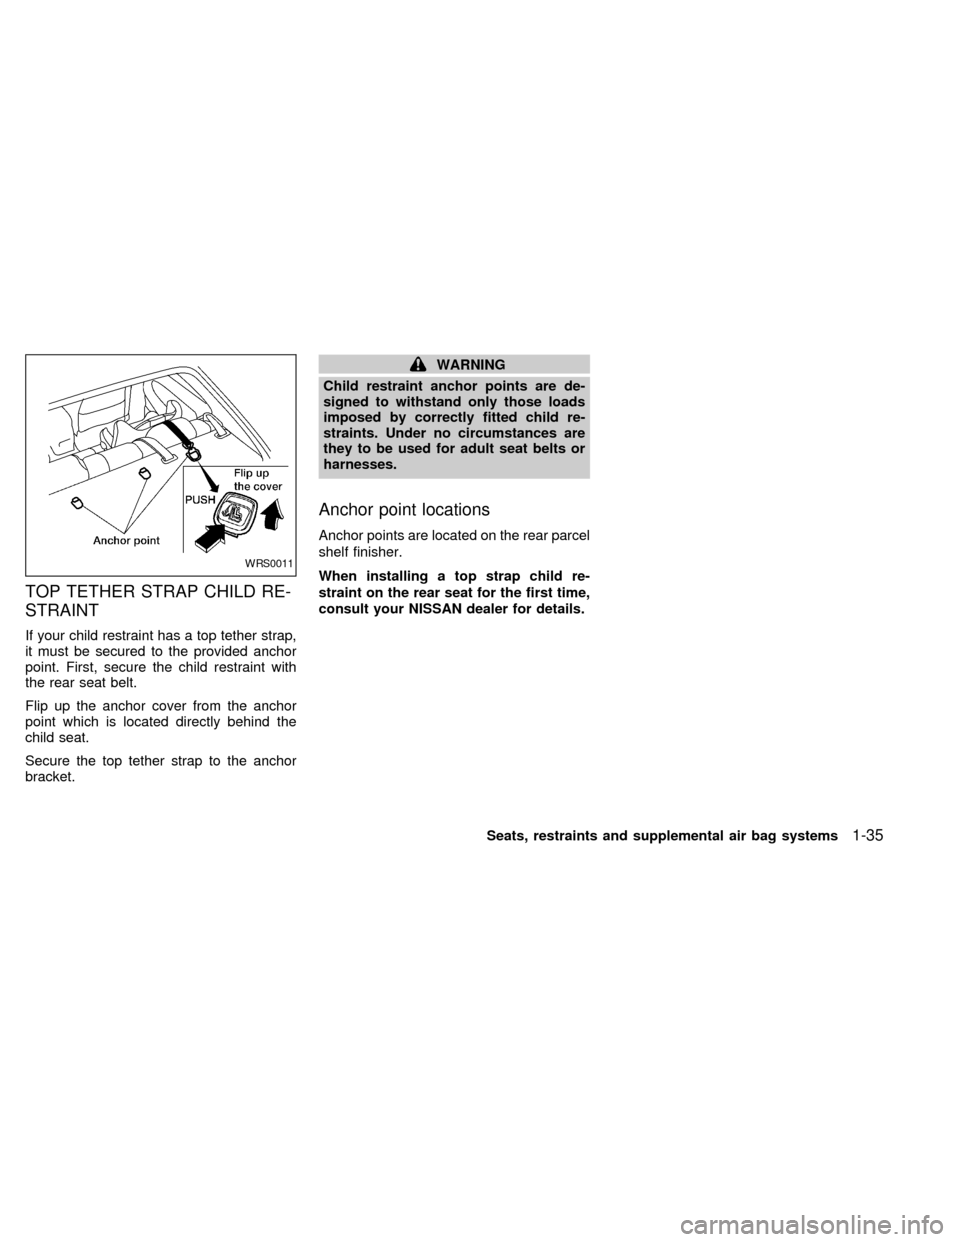
TOP TETHER STRAP CHILD RE-
STRAINT
If your child restraint has a top tether strap,
it must be secured to the provided anchor
point. First, secure the child restraint with
the rear seat belt.
Flip up the anchor cover from the anchor
point which is located directly behind the
child seat.
Secure the top tether strap to the anchor
bracket.
WARNING
Child restraint anchor points are de-
signed to withstand only those loads
imposed by correctly fitted child re-
straints. Under no circumstances are
they to be used for adult seat belts or
harnesses.
Anchor point locations
Anchor points are located on the rear parcel
shelf finisher.
When installing a top strap child re-
straint on the rear seat for the first time,
consult your NISSAN dealer for details.
WRS0011
Seats, restraints and supplemental air bag systems1-35
ZX
Page 43 of 242
INSTALLATION ON FRONT PAS-
SENGER SEAT
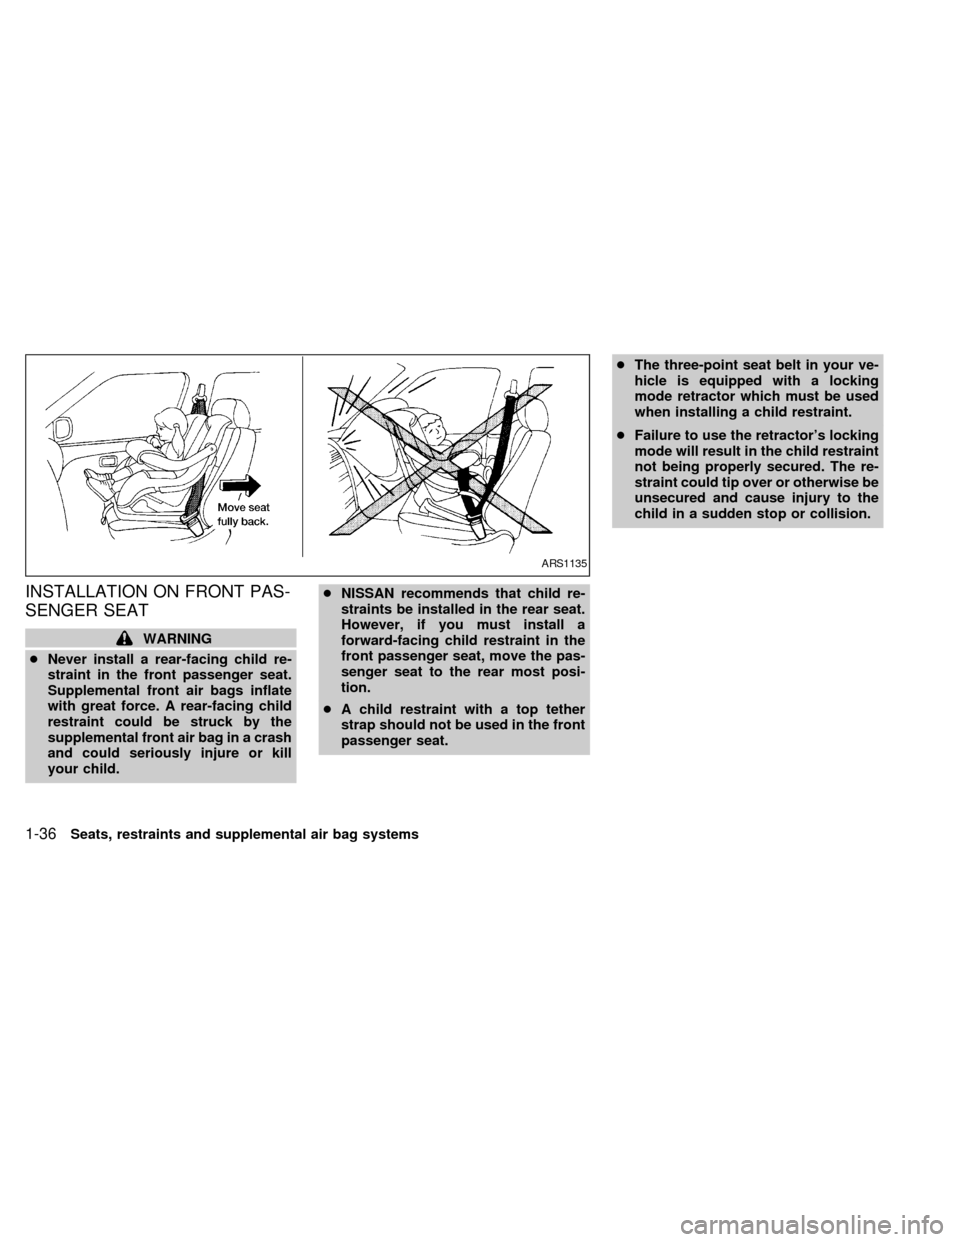
WARNING
cNever install a rear-facing child re-
straint in the front passenger seat.
Supplemental front air bags inflate
with great force. A rear-facing child
restraint could be struck by the
supplemental front air bag in a crash
and could seriously injure or kill
your child.cNISSAN recommends that child re-
straints be installed in the rear seat.
However, if you must install a
forward-facing child restraint in the
front passenger seat, move the pas-
senger seat to the rear most posi-
tion.
cA child restraint with a top tether
strap should not be used in the front
passenger seat.cThe three-point seat belt in your ve-
hicle is equipped with a locking
mode retractor which must be used
when installing a child restraint.
cFailure to use the retractor's locking
mode will result in the child restraint
not being properly secured. The re-
straint could tip over or otherwise be
unsecured and cause injury to the
child in a sudden stop or collision.
ARS1135
1-36Seats, restraints and supplemental air bag systems
ZX
Page 47 of 242

2 Instruments and controls
Meters and gauges ................................................2-2
Speedometer and odometer ..................................2-3
Tachometer ............................................................2-4
Engine coolant temperature gauge........................2-4
Fuel gauge .............................................................2-5
Warning/indicator lights and chimes ......................2-6
Checking bulbs .......................................................2-6
Warning lights.........................................................2-6
Indicator lights ........................................................2-8
Chimes ...................................................................2-9
Security systems ..................................................2-10
Nissan vehicle immobilizer system (NVIS) ..........2-10
Enhanced immobilizer security system
(if so equipped) ....................................................2-12
Windshield wiper and washer switch ...................2-14
Switch operation ...................................................2-14
Rear window defogger switch ..............................2-15
Headlight and turn signal switch ..........................2-16
Headlight switch ...................................................2-16
Turn signal switch ................................................2-17
Cornering light ......................................................2-18
Fog light switch (if so equipped) ..........................2-18Hazard warning flasher switch .............................2-18
Horn ......................................................................2-19
Power socket ......................................................2-19
Cigarette lighter (accessory) and ash tray ...........2-20
Storage .................................................................2-21
Map pocket ...........................................................2-21
Glasses case ........................................................2-21
Cup holders ..........................................................2-22
Glove box .............................................................2-23
Console box .........................................................2-23
Cargo net (if so equipped) ...................................2-25
Trunk side net ......................................................2-26
Windows ...............................................................2-26
Power windows ....................................................2-26
Sunroof (if so equipped).......................................2-27
Interior light...........................................................2-29
Map lights (if so equipped)...................................2-29
Trunk light.............................................................2-30
Integrated HomeLinkTuniversal transceiver
(if so equipped) ....................................................2-30
Programming HomeLinkT.....................................2-31
ZX
Page 52 of 242
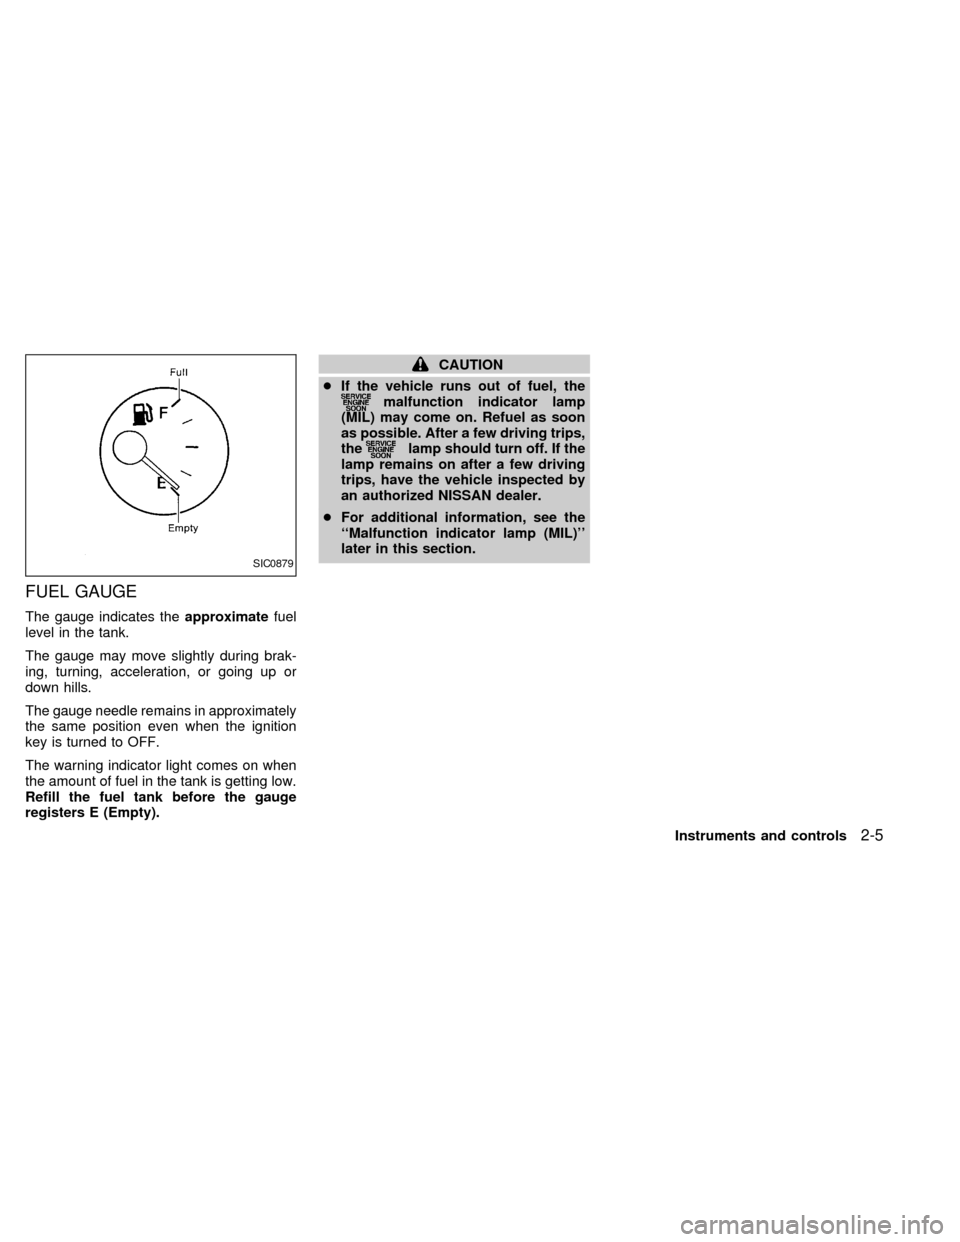
FUEL GAUGE
The gauge indicates theapproximatefuel
level in the tank.
The gauge may move slightly during brak-
ing, turning, acceleration, or going up or
down hills.
The gauge needle remains in approximately
the same position even when the ignition
key is turned to OFF.
The warning indicator light comes on when
the amount of fuel in the tank is getting low.
Refill the fuel tank before the gauge
registers E (Empty).
CAUTION
cIf the vehicle runs out of fuel, the
malfunction indicator lamp
(MIL) may come on. Refuel as soon
as possible. After a few driving trips,
the
lamp should turn off. If the
lamp remains on after a few driving
trips, have the vehicle inspected by
an authorized NISSAN dealer.
cFor additional information, see the
``Malfunction indicator lamp (MIL)''
later in this section.
SIC0879
Instruments and controls2-5
ZX
Page 53 of 242
CHECKING BULBS
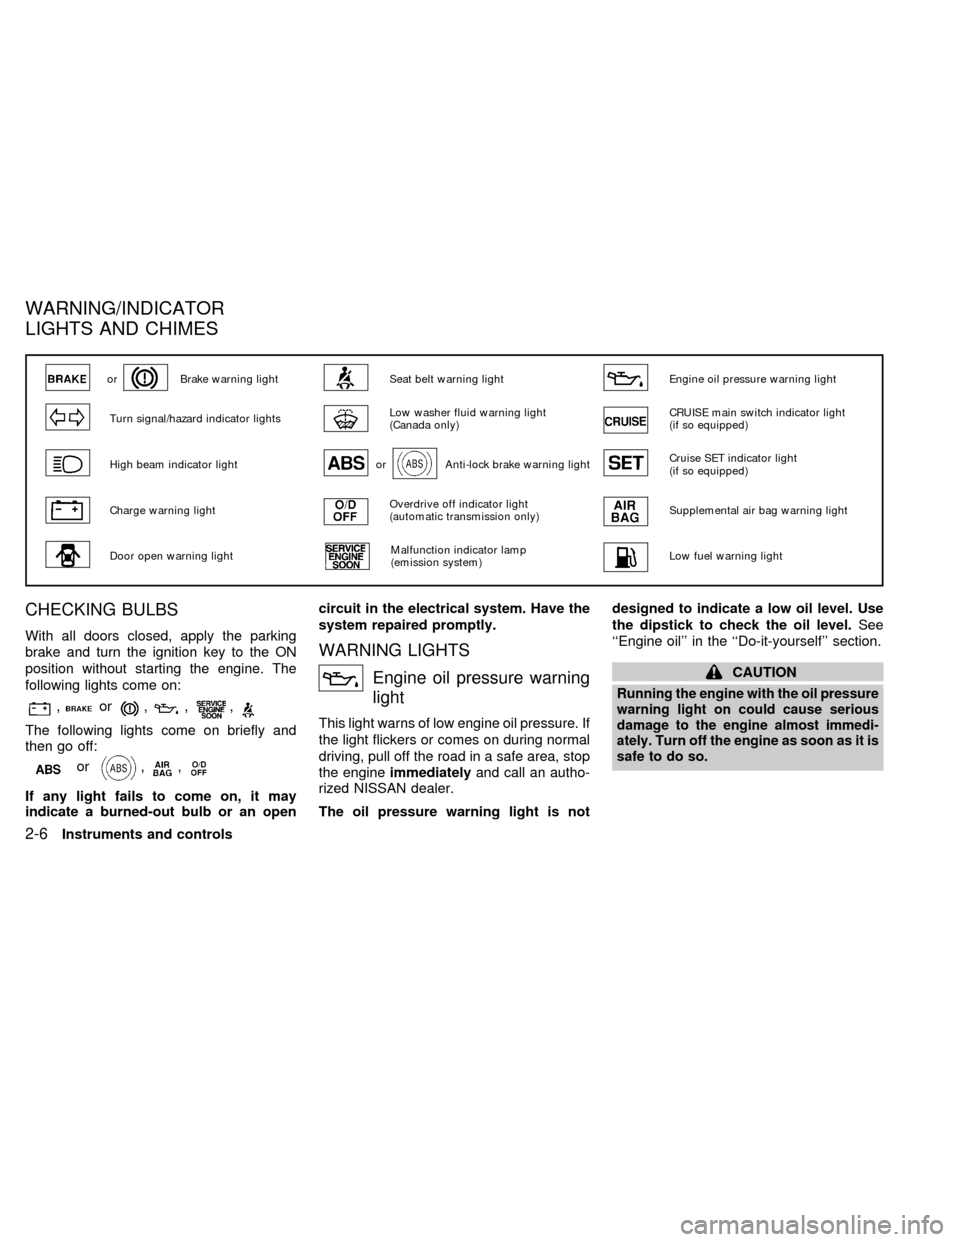
With all doors closed, apply the parking
brake and turn the ignition key to the ON
position without starting the engine. The
following lights come on:
,or,,,
The following lights come on briefly and
then go off:
or,,
If any light fails to come on, it may
indicate a burned-out bulb or an opencircuit in the electrical system. Have the
system repaired promptly.
WARNING LIGHTS
Engine oil pressure warning
light
This light warns of low engine oil pressure. If
the light flickers or comes on during normal
driving, pull off the road in a safe area, stop
the engineimmediatelyand call an autho-
rized NISSAN dealer.
The oil pressure warning light is notdesigned to indicate a low oil level. Use
the dipstick to check the oil level.See
``Engine oil'' in the ``Do-it-yourself'' section.
CAUTION
Running the engine with the oil pressure
warning light on could cause serious
damage to the engine almost immedi-
ately. Turn off the engine as soon as it is
safe to do so.
orBrake warning lightSeat belt warning lightEngine oil pressure warning light
Turn signal/hazard indicator lightsLow washer fluid warning light
(Canada only)CRUISE main switch indicator light
(if so equipped)
High beam indicator lightorAnti-lock brake warning lightCruise SET indicator light
(if so equipped)
Charge warning lightOverdrive off indicator light
(automatic transmission only)Supplemental air bag warning light
Door open warning lightMalfunction indicator lamp
(emission system)Low fuel warning light
WARNING/INDICATOR
LIGHTS AND CHIMES
2-6Instruments and controls
ZX
Page 54 of 242
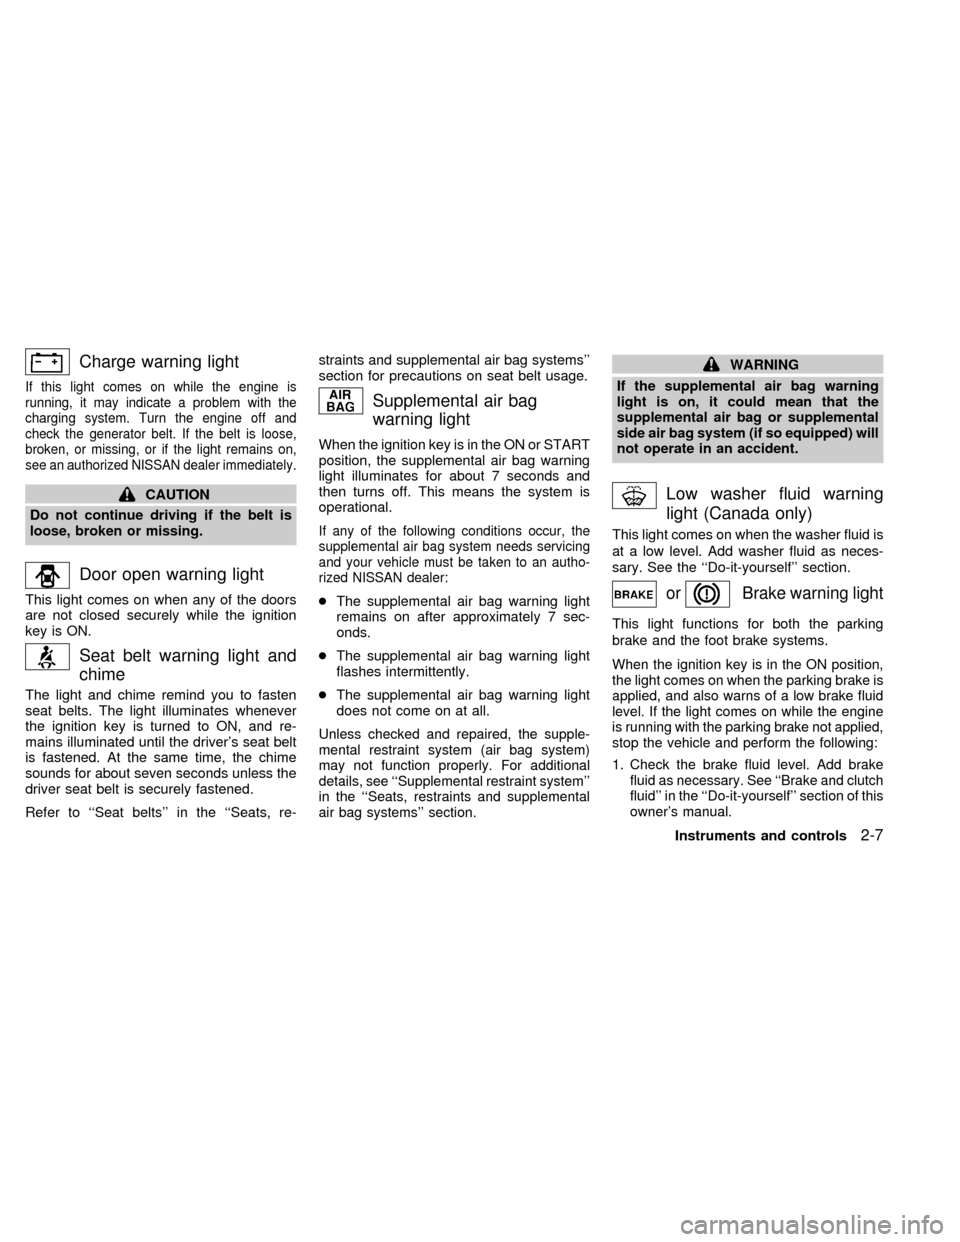
Charge warning light
If this light comes on while the engine is
running, it may indicate a problem with the
charging system. Turn the engine off and
check the generator belt. If the belt is loose,
broken, or missing, or if the light remains on,
see an authorized NISSAN dealer immediately.
CAUTION
Do not continue driving if the belt is
loose, broken or missing.
Door open warning light
This light comes on when any of the doors
are not closed securely while the ignition
key is ON.
Seat belt warning light and
chime
The light and chime remind you to fasten
seat belts. The light illuminates whenever
the ignition key is turned to ON, and re-
mains illuminated until the driver's seat belt
is fastened. At the same time, the chime
sounds for about seven seconds unless the
driver seat belt is securely fastened.
Refer to ``Seat belts'' in the ``Seats, re-straints and supplemental air bag systems''
section for precautions on seat belt usage.
Supplemental air bag
warning light
When the ignition key is in the ON or START
position, the supplemental air bag warning
light illuminates for about 7 seconds and
then turns off. This means the system is
operational.
If any of the following conditions occur, the
supplemental air bag system needs servicing
and your vehicle must be taken to an autho-
rized NISSAN dealer:
cThe supplemental air bag warning light
remains on after approximately 7 sec-
onds.
cThe supplemental air bag warning light
flashes intermittently.
cThe supplemental air bag warning light
does not come on at all.
Unless checked and repaired, the supple-
mental restraint system (air bag system)
may not function properly. For additional
details, see ``Supplemental restraint system''
in the ``Seats, restraints and supplemental
air bag systems'' section.
WARNING
If the supplemental air bag warning
light is on, it could mean that the
supplemental air bag or supplemental
side air bag system (if so equipped) will
not operate in an accident.
Low washer fluid warning
light (Canada only)
This light comes on when the washer fluid is
at a low level. Add washer fluid as neces-
sary. See the ``Do-it-yourself'' section.
orBrake warning light
This light functions for both the parking
brake and the foot brake systems.
When the ignition key is in the ON position,
the light comes on when the parking brake is
applied, and also warns of a low brake fluid
level. If the light comes on while the engine
is running with the parking brake not applied,
stop the vehicle and perform the following:
1.Check the brake fluid level. Add brake
fluid as necessary. See ``Brake and clutch
fluid'' in the ``Do-it-yourself'' section of this
owner's manual.
Instruments and controls2-7
ZX