Page 143 of 242
CHANGING A FLAT TIRE
If you have a flat tire, follow the instructions
below:
Stopping the vehicle
1. Safely move the vehicle off of the road
and away from traffic.
2. Turn on the hazard warning flashers.
3. Park on a level surface and apply the
parking brake. Shift the manual transmis-
sion into R (Reverse), or the automatic
transmission into P (Park).
4. Turn off the engine.
5. Raise the hood to warn other traffic, and
to signal professional road assistance
personnel that you need assistance.
6. Have all passengers get out of the ve-
hicle and stand in a safe place, away
from traffic and clear of the vehicle.
WARNING
cMake sure the parking brake is se-
curely applied and the manual trans-
mission is shifted into R (Reverse),
or the automatic transmission into P
(Park).
cNever change tires when the vehicle
is on a slope, ice or slippery areas.
This is hazardous.
cNever change tires if oncoming traf-
fic is close to your vehicle. Wait for
professional road assistance.
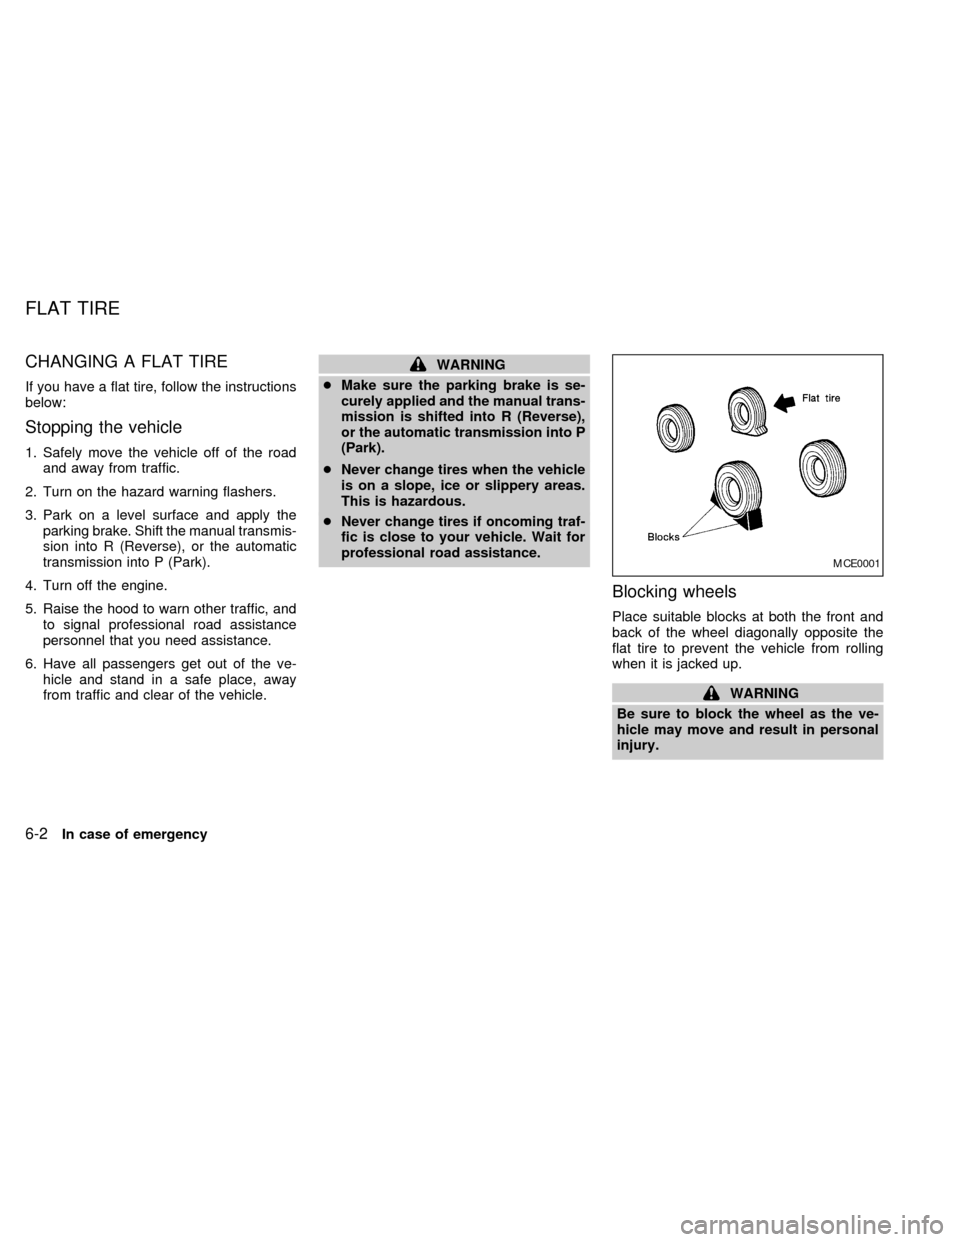
Blocking wheels
Place suitable blocks at both the front and
back of the wheel diagonally opposite the
flat tire to prevent the vehicle from rolling
when it is jacked up.
WARNING
Be sure to block the wheel as the ve-
hicle may move and result in personal
injury.
MCE0001
FLAT TIRE
6-2In case of emergency
ZX
Page 144 of 242
Getting the spare tire and tools
1. Open the trunk. Lift the trunk floor carpet-
ing and spare tire cover. Remove the tool
bag (which contains the jack rod and
wheel nut wrench) and the spare tire. If
necessary, use the flat end of the jack
rod as shown to loosen the spare tire
hold-down bolt.
2. Push the release clip on the jack access
door to open. To remove the jack, turn
the jack screw counterclockwise. Use
either end of the jack rod to loosen the
jack from its storage position.
ACE1002
WCE0001
In case of emergency6-3
ZX
Page 145 of 242
Removing wheel cover
Remove the wheel covers as shown.
CAUTION
Do not use your hands to pry off wheel
caps or wheel covers. Doing so could
result in personal injury.
WCE0002
6-4In case of emergency
ZX
Page 146 of 242
Bolt-on wheel covers:
Wheel cover attachment to the wheel is
made by plastic nuts that are integral to the
wheel covers. These plastic nuts screw to
the outside of the bolt-on specific wheel
nuts. The plastic nuts need to be removed
before the wheel cover can be removed
from the wheel.Bolt-on wheel cover nut tightening
torque:
36-70 in-lb
(4-8 Nzm)Jacking up vehicle and removing
the damaged tire
WARNING
cNever get under the vehicle while it
is supported only by the jack.
cUse only the jack provided with your
vehicle. Do not use the jack provided
with your vehicle on other vehicles.
The jack is designed for lifting only
your vehicle during a tire change.
WCE0003CE1089
In case of emergency6-5
ZX
Page 147 of 242
cUse the correct jack-up points.
Never use any other part of the ve-
hicle for jack support.
cNever jack up the vehicle more than
necessary.
cNever use blocks on or under the
jack.
cDo not start or run engine while
vehicle is on the jack. It may cause
the vehicle to move. This is espe-
cially true for vehicles with limited
slip differential carriers.
cDo not allow passengers to stay in
the vehicle while it is on the jack.
cNever run the engine with the wheels
off the ground. It may cause the
vehicle to move.
Carefully read the caution label attached
to the jack body and the following in-
structions:
1. Loosen each wheel nut one or two turns
by turning them counterclockwise with
the wheel nut wrench.Do not remove
the wheel nuts until the tire is off the
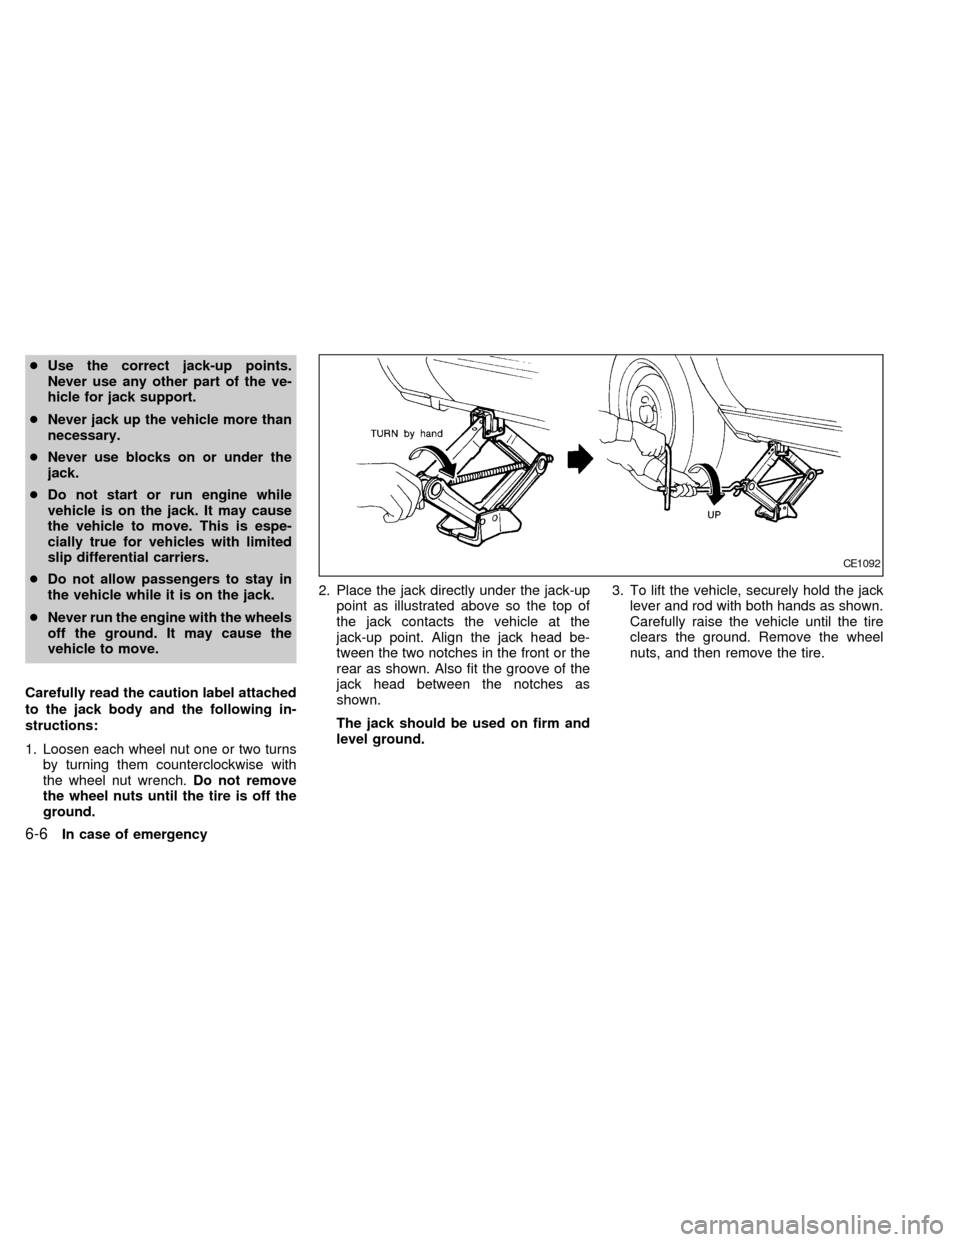
ground.2. Place the jack directly under the jack-up
point as illustrated above so the top of
the jack contacts the vehicle at the
jack-up point. Align the jack head be-
tween the two notches in the front or the
rear as shown. Also fit the groove of the
jack head between the notches as
shown.
The jack should be used on firm and
level ground.3. To lift the vehicle, securely hold the jack
lever and rod with both hands as shown.
Carefully raise the vehicle until the tire
clears the ground. Remove the wheel
nuts, and then remove the tire.
CE1092
6-6In case of emergency
ZX
Page 148 of 242
Installing the spare tire
The spare tire is designed for emergency
use. See specific instructions under the
heading ``Wheels and tires'' in the ``Do-
it-yourself'' section.
1. Clean any mud or dirt from the surface
between the wheel and hub.
2. Carefully put the spare tire on and install
the wheel nuts finger-tight.
3. With the wheel nut wrench, tighten wheel
nuts alternately and evenly until they are
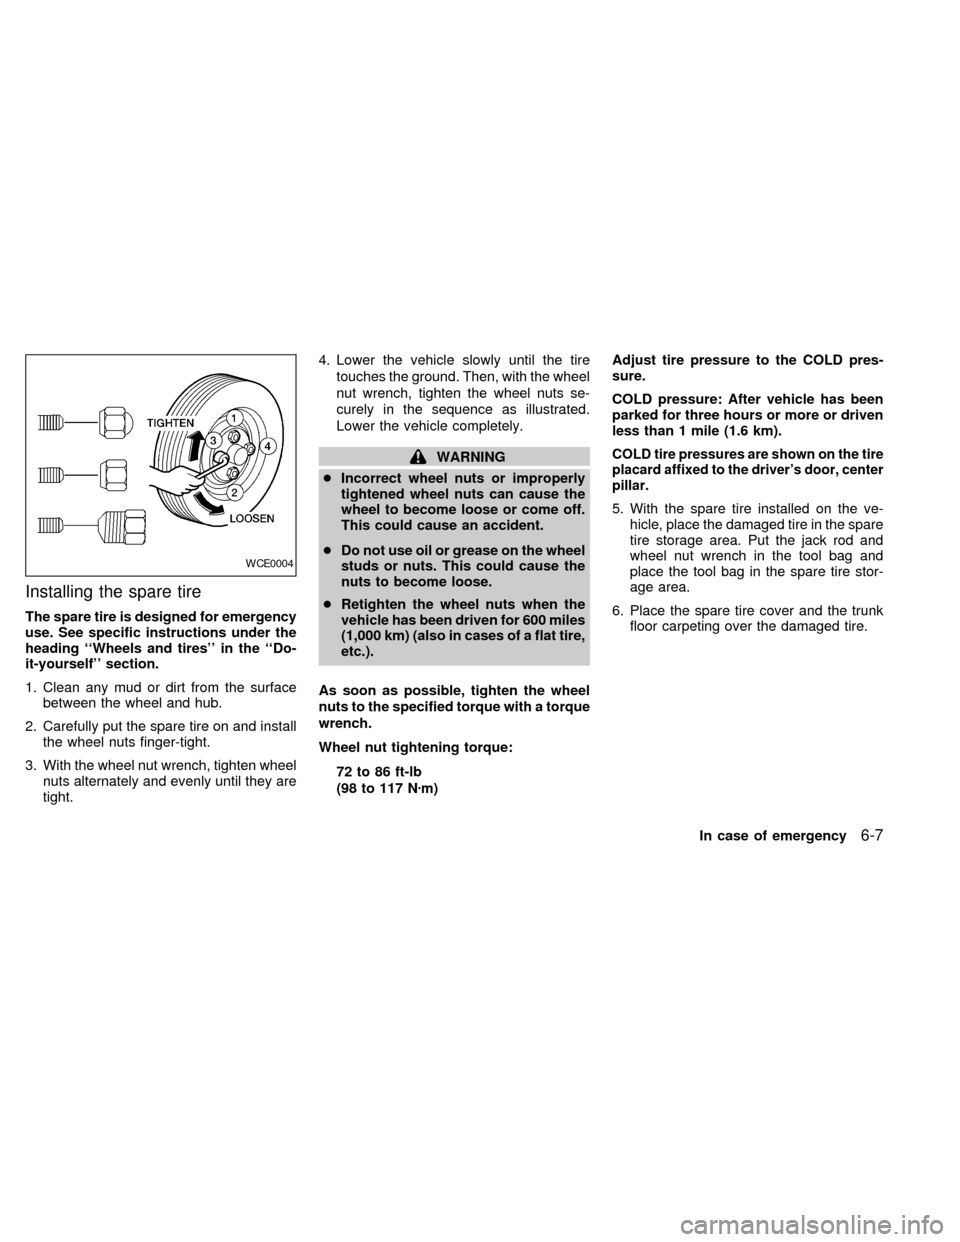
tight.4. Lower the vehicle slowly until the tire
touches the ground. Then, with the wheel
nut wrench, tighten the wheel nuts se-
curely in the sequence as illustrated.
Lower the vehicle completely.
WARNING
cIncorrect wheel nuts or improperly
tightened wheel nuts can cause the
wheel to become loose or come off.
This could cause an accident.
cDo not use oil or grease on the wheel
studs or nuts. This could cause the
nuts to become loose.
cRetighten the wheel nuts when the
vehicle has been driven for 600 miles
(1,000 km) (also in cases of a flat tire,
etc.).
As soon as possible, tighten the wheel
nuts to the specified torque with a torque
wrench.
Wheel nut tightening torque:
72 to 86 ft-lb
(98 to 117 Nzm)Adjust tire pressure to the COLD pres-
sure.
COLD pressure: After vehicle has been
parked for three hours or more or driven
less than 1 mile (1.6 km).COLD tire pressures are shown on the tire
placard affixed to the driver's door, center
pillar.
5. With the spare tire installed on the ve-
hicle, place the damaged tire in the spare
tire storage area. Put the jack rod and
wheel nut wrench in the tool bag and
place the tool bag in the spare tire stor-
age area.
6. Place the spare tire cover and the trunk
floor carpeting over the damaged tire.
WCE0004
In case of emergency6-7
ZX
Page 149 of 242
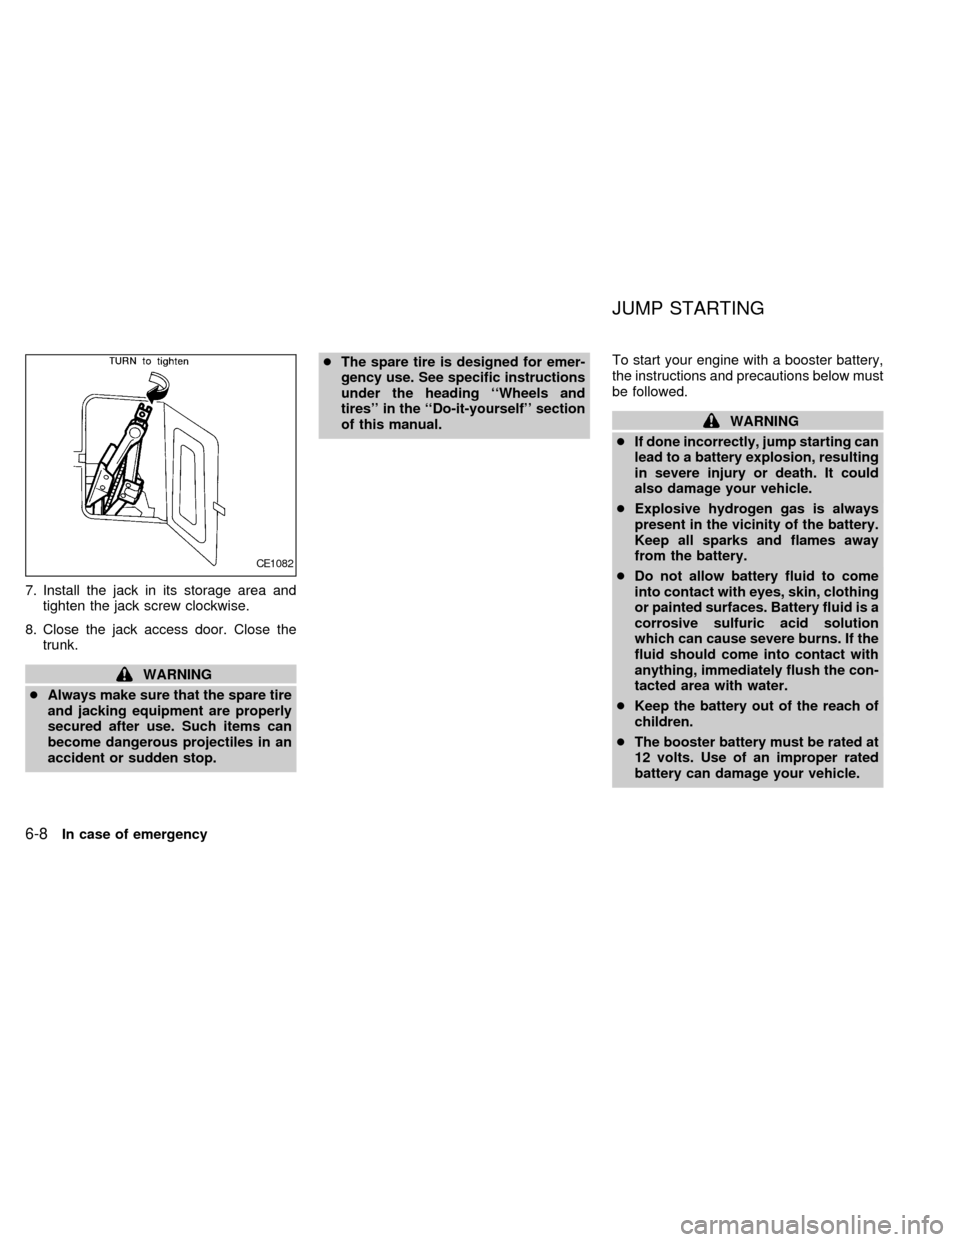
7. Install the jack in its storage area and
tighten the jack screw clockwise.
8. Close the jack access door. Close the
trunk.
WARNING
cAlways make sure that the spare tire
and jacking equipment are properly
secured after use. Such items can
become dangerous projectiles in an
accident or sudden stop.cThe spare tire is designed for emer-
gency use. See specific instructions
under the heading ``Wheels and
tires'' in the ``Do-it-yourself'' section
of this manual.To start your engine with a booster battery,
the instructions and precautions below must
be followed.
WARNING
cIf done incorrectly, jump starting can
lead to a battery explosion, resulting
in severe injury or death. It could
also damage your vehicle.
cExplosive hydrogen gas is always
present in the vicinity of the battery.
Keep all sparks and flames away
from the battery.
cDo not allow battery fluid to come
into contact with eyes, skin, clothing
or painted surfaces. Battery fluid is a
corrosive sulfuric acid solution
which can cause severe burns. If the
fluid should come into contact with
anything, immediately flush the con-
tacted area with water.
cKeep the battery out of the reach of
children.
cThe booster battery must be rated at
12 volts. Use of an improper rated
battery can damage your vehicle.
CE1082
JUMP STARTING
6-8In case of emergency
ZX
Page 153 of 242
cWhen towing front wheel drive,
manual transmission models with
the front wheels on the ground (If
you do not use a towing dolly):
Turn the ignition key to the OFF
position, and secure the steering
wheel in a straight-ahead position
with a rope or similar device. Never
place the ignition key in the LOCK
position. This will result in damage
to the steering lock mechanism.
Move the gearshift lever to the N
(Neutral) position.
c
When towing front wheel drive, auto-
matic transmission models with the
rear wheels on the ground (if you do
not use towing dollies), release the
parking brake.
cAlways attach safety chains before
towing.
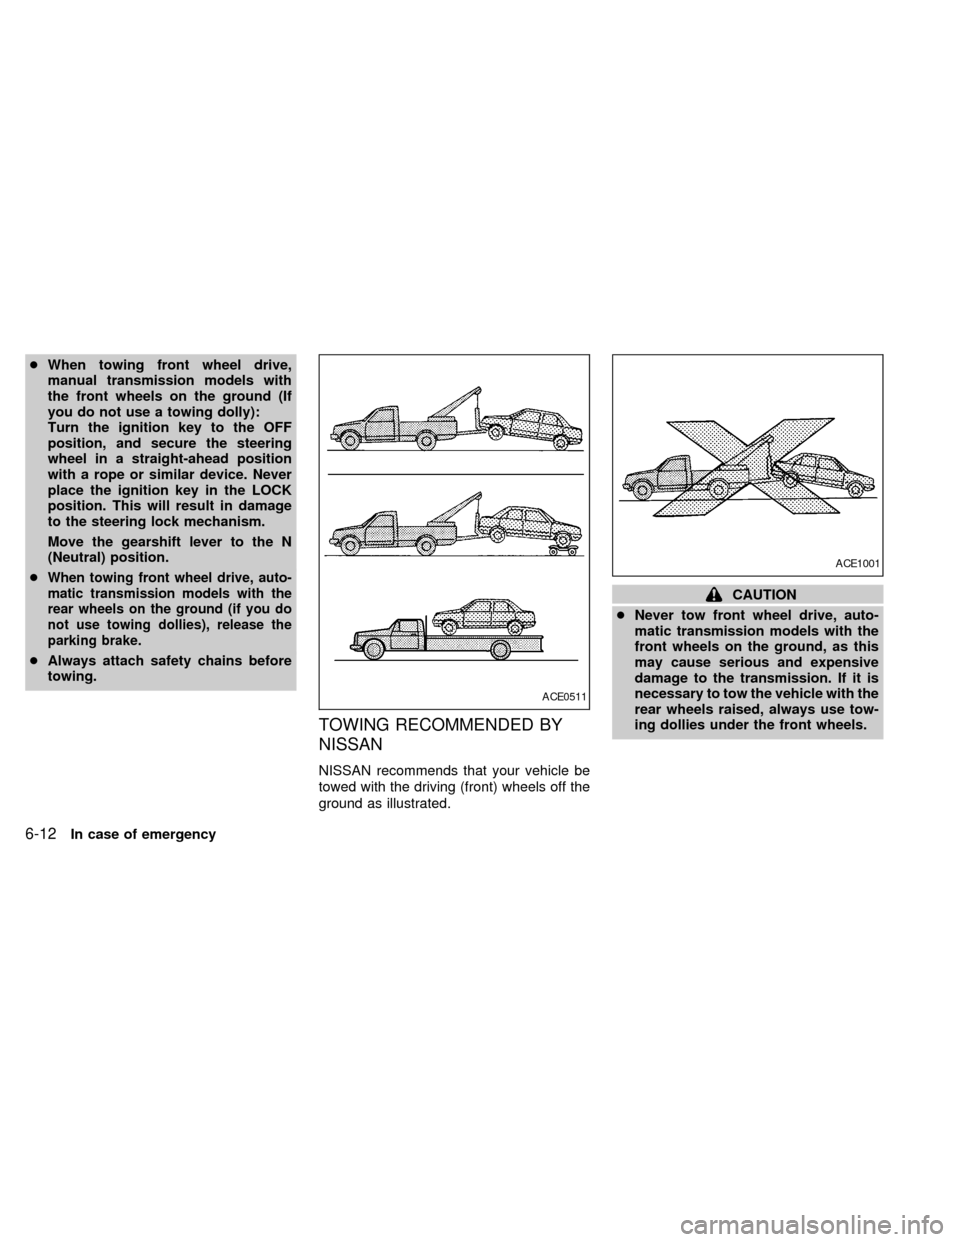
TOWING RECOMMENDED BY
NISSAN
NISSAN recommends that your vehicle be
towed with the driving (front) wheels off the
ground as illustrated.
CAUTION
cNever tow front wheel drive, auto-
matic transmission models with the
front wheels on the ground, as this
may cause serious and expensive
damage to the transmission. If it is
necessary to tow the vehicle with the
rear wheels raised, always use tow-
ing dollies under the front wheels.
ACE0511
ACE1001
6-12In case of emergency
ZX