Page 52 of 323

Seats
Te ch n ica l
data Instruments
and controlsOperationDrivingInstrument
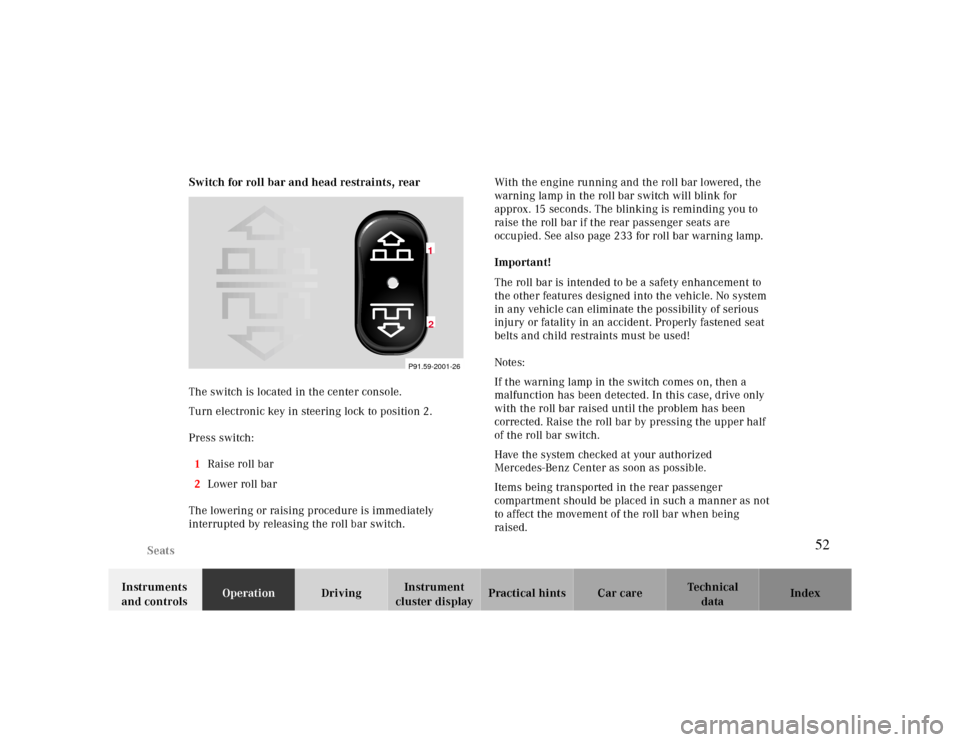
cluster displayPractical hints Car care Index Switch for roll bar and head restraints, rear
The switch is located in the center console.
Turn electronic key in steering lock to position 2.
Press switch:
1Raise roll bar
2Lower roll bar
The lowering or raising procedure is immediately
interrupted by releasing the roll bar switch. With the engine running and the roll bar lowered, the
warning lamp in the roll bar switch will blink for
approx. 15 seconds. The blinking is reminding you to
raise the roll bar if the rear passenger seats are
occupied. See also page 233 for roll bar warning lamp.
Important!
The roll bar is intended to be a safety enhancement to
the other features designed into the vehicle. No system
in any vehicle can eliminate the possibility of serious
injury or fatality in an accident. Properly fastened seat
belts and child restraints must be used!
Notes:
If the warning lamp in the switch comes on, then a
malfunction has been detected. In this case, drive only
with the roll bar raised until the problem has been
corrected. Raise the roll bar by pressing the upper half
of the roll bar switch.
Have the system checked at your authorized
Mercedes-Benz Center as soon as possible.
Items being transported in the rear passenger
compartment should be placed in such a manner as not
to affect the movement of the roll bar when being
raised.
P91.59-2001-26
12
52
Page 54 of 323

Seats
Te ch n ica l
data Instruments
and controlsOperationDrivingInstrument
cluster displayPractical hints Car care Index Multicontour seat (optional)
Some models may be equipped with multicontour seats.
These seats have movable seat cushions, and inflatable
air cushions built into the backrest to provide additional
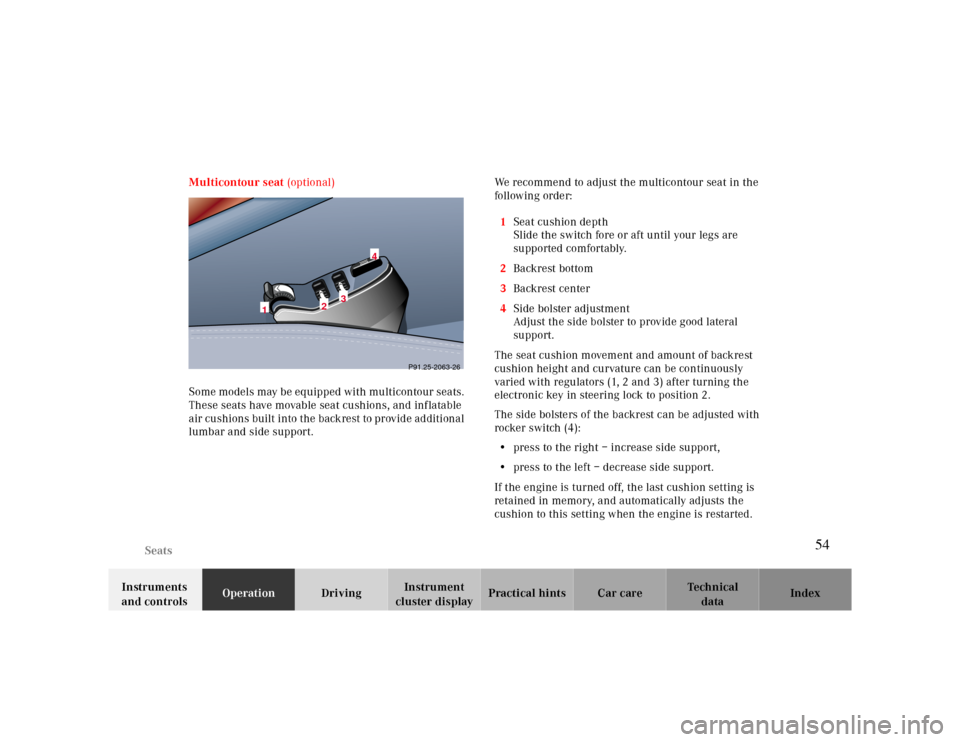
lumbar and side support.We recommend to adjust the multicontour seat in the
follow ing orde r:
1Seat cushion depth
Slide the switch fore or aft until your legs are
supported comfortably.
2Backrest bottom
3Backrest center
4Side bolster adjustment
Adjust the side bolster to provide good lateral
support.
The seat cushion movement and amount of backrest
cushion height and curvature can be continuously
varied with regulators (1, 2 and 3) after turning the
electronic key in steering lock to position 2.
The side bolsters of the backrest can be adjusted with
rocker switch (4):
•press to the right – increase side support,
•press to the left – decrease side support.
If the engine is turned off, the last cushion setting is
retained in memory, and automatically adjusts the
cushion to this setting when the engine is restarted.
1
2
3
4
P91.25-2063-26
54
Page 74 of 323

Adjusting telescoping steering column
Te ch n ica l
data Instruments
and controlsOperationDrivingInstrument
cluster displayPractical hints Car care Index
Adjusting telescoping steering columnUnlocking :
Pull handle (1) out to its stop. The indicator lamp,
located in the instrument cluster, comes on.
Ad justing:
To lengthen or shorten the steering column, pull out or
push in steering wheel.
Locking:
Push handle (1) in until it engages. The indicator lamp,
located in the instrument cluster, goes out.
Important!
With the electronic key in steering lock position 2, the
indicator lamp in the instrument cluster comes on.
It should go out when the engine is running.
If the indicator lamp does not go out after starting the
engine, the adjustable steering column is not locked
properly.
Do not drive the vehicle until you have properly locked
the steering column.
Warning!
Do not adjust the steering wheel while driving.
The telescoping adjustment must be locked while
driving. Adjusting the steering wheel while
driving, or driving without the telescoping
adjustment locked could cause the driver to lose
control of the vehicle.
1
P46.10-2020-26
74
Page 82 of 323

Instrument cluster
Te ch n ica l
data Instruments
and controlsOperationDrivingInstrument
cluster displayPractical hints Car care Index
Indicator lamps in the instrument cluster
High beam
ABS malfunction, see page 219
Brake fluid low (except Canada),
Parking brake engaged, see page 226
Brake fluid low (Canada only),
Parking brake engaged, see page 226
BAS malfunction, see page 204
ESP malfunction, see page 208
ESP. Adjust driving to road condition,
see page208
Fasten seat belts, see page58Telescoping steering column not locked,
see page220
SRS malfunction, see page 218
If the “CHECK ENGINE” malfunction
indicator lamp comes on when the engine is
running, it indicates a malfunction of the
fuel management system, emission control
system, systems which impact emissions, or
the fuel cap is not closed tight. In all cases,
we recommend that you have the
malfunction checked as soon as possible,
see page 218.
Function indicator lamp on the center console
Front passenger airbag automatically
switched off, see page 63.
ABSBRAKEBAS
ESP
SRSCHECK
ENGINE
82
Page 84 of 323

Instrument cluster
Te ch n ica l
data Instruments
and controlsOperationDrivingInstrument
cluster displayPractical hints Car care Index
Coolant temperature gauge (3)
During severe operating conditions and stop-and-go city
traffic, the coolant temperature may rise close to the red
marking.
The engine should not be operated with the coolant
temperature in the red zone. Doing so may cause
serious engine damage which is not covered by the
Mercedes-Benz Limited Warranty.Outside temperature indicator (5)
The temperature sensor is located in the front bumper
area. Due to its location, the sensor can be affected by
road or engine heat during idling or slow driving. This
means that the accuracy of the displayed temperature
can only be verified by comparison to a thermometer
placed next to the sensor, not by comparison to external
displays (e.g. bank signs etc.).
Adaptation to ambient temperature takes place in steps
and depends on the prevailing driving conditions (stop-
and-go or moderate, constant driving) and amount of
temperature change.
Warning!
• Driving when your engine is badly overheated
can cause some fluids which may have leaked
into the engine compartment to catch fire. You
could be seriously burned.• Steam from an overheated engine can cause
serious burns and can occur just by opening
the engine hood. Stay away from the engine if
you see or hear steam coming from it.Turn off the engine, get out of the vehicle and do
not stand near the vehicle until it cools down.
Wa r n i n g !
The outside temperature indicator is not designed
to serve as an Ice-Warning Device and is therefore
unsuitable for that purpose. Indicated
temperatures just above the freezing point do not
guarantee that the road surface is free of ice.
84
Page 85 of 323
Instrument cluster
Te ch n ica l
data Instruments
and controlsOperationDrivingInstrument
cluster displayPractical hints Car care Index Trip odometer (9)
To reset to “0” miles/km:
Activate the instrument cluster if it is not already
activated by pressing the J button on the instrument
cluster.
Press button è or ÿ on the multifunction
steering wheel repeatedly until the trip odometer
appears if it is not displayed. See page 92.
Press button J on the instrument cluster to reset trip
odometer.Tachometer (13)
The red marking on tachometer denotes excessive
engine speed.
Avoid this engine speed, as it may result in serious
engine damage that is not covered by the
Mercedes-Benz Limited Warranty.
To help protect the engine, the fuel supply is interrupted
if the engine is operated within the red marking.
85
Page 87 of 323

Multifunction steering wheel, multifunction display
Te ch n ica l
data Instruments
and controlsOperationDrivingInstrument
cluster displayPractical hints Car care Index Depending on your vehicle’s equipment, you may use
the buttons on the multifunction steering wheel to call
up, control and set the following systems in the
multifunction display:
1Trip odometer and main odometer, see page90
Flexible service system (FSS), see page107
Engine oil level indicator, see page110
2Audio systems, see page91
Radio, see page 91
CD player (optional), see page 92
Cassette player, see page 93
3Navigation system (optional), see page 99
4Malfunction message memory, see page 102
5Individual settings, see page 104
6Trip computer, see page 100
After start
After reset
Fuel tank content
7Telephone (if so equipped), see page 94Press the è or ÿ button repeatedly until the
required system is displayed.
Pressing the è button advances the display to the
ne xt system.
Pressing the ÿ button returns the display to the
previous system.
You may call up additional displays within some of these
categories by pressing the j or k button.
Wa r n i n g !
A driver’s attention to the road must always be his /
her primary focus when driving. For your safety and the safety of others,
programming and selecting
features through the
multifunction steering wheel should only be done
by the driver when traffic and road conditions
permit it to be done safely, including pulling over to a
safe location where that is required for safe operation.
87
Page 90 of 323
Multifunction steering wheel, multifunction display
Te ch n ica l
data Instruments
and controlsOperationDrivingInstrument
cluster displayPractical hints Car care Index
Trip and main odometer, vehicle speed, FSS and
engine oil level indicator1Trip odometer and main odometer
See page 85for instructions on resetting the trip
odometer.
2
3FSS (Flexible service system), see page 107.
Engine oil level indicator, see page 110.
Press è or ÿ button repeatedly until the trip
odometer and main odometer display (1) appears.
Press the j or k button repeatedly until the
required display (2, 3, 1) appears.
Pressing the è or ÿ button displays the next or
previous system.
90