2000 MERCEDES-BENZ CLK CABRIOLET stop start
[x] Cancel search: stop startPage 74 of 323

Adjusting telescoping steering column
Te ch n ica l
data Instruments
and controlsOperationDrivingInstrument
cluster displayPractical hints Car care Index
Adjusting telescoping steering columnUnlocking :
Pull handle (1) out to its stop. The indicator lamp,
located in the instrument cluster, comes on.
Ad justing:
To lengthen or shorten the steering column, pull out or
push in steering wheel.
Locking:
Push handle (1) in until it engages. The indicator lamp,
located in the instrument cluster, goes out.
Important!
With the electronic key in steering lock position 2, the
indicator lamp in the instrument cluster comes on.
It should go out when the engine is running.
If the indicator lamp does not go out after starting the
engine, the adjustable steering column is not locked
properly.
Do not drive the vehicle until you have properly locked
the steering column.
Warning!
Do not adjust the steering wheel while driving.
The telescoping adjustment must be locked while
driving. Adjusting the steering wheel while
driving, or driving without the telescoping
adjustment locked could cause the driver to lose
control of the vehicle.
1
P46.10-2020-26
74
Page 135 of 323

Audio system
Te ch n ica l
data Instruments
and controlsOperationDrivingInstrument
cluster displayPractical hints Car care Index Fast forward/reverse
Press the button.
“FORWARD” will appear on
the display and fast forward
will start.
Press the button.
“REWIND” will appear on the
display and fast reverse will
start.
Fast forward/reverse is stopped by pressing the same
button again, or it will stop automatically at the
beginning or the end of the tape. The track will
automatically change at the end or beginning of the tape
and play will begin.
Scanning
Press the “SC” key. Each track
on the cassette will be played
for 8 seconds in ascending
order.
Note:
The beginning of a track can only be located if there is a
break of at least 4 seconds between tracks.
Scan will be interrupted if the , , ,
buttons or the “SC” key is pressed.
Dolby NR
1 (noise reduction system)
To enable optimum
reproduction of cassettes
recorded using the Dolby B
system, press the “AUD” key
followed by the NR key so the
“NR” in the display is not highlighted. To turn off
Dolby B noise reduction, press the “NR” key so the “NR”
in the display is highlighted.
1 Dolby and the double-D symbol
Ù
are trademarks of Dolby
Laboratories Licensing Corporation. The Dolby noise reduction
system is manufactured under licence from Dolby Laboratories
Licensing Corporation.
135
Page 137 of 323

Audio system
Te ch n ica l
data Instruments
and controlsOperationDrivingInstrument
cluster displayPractical hints Car care Index
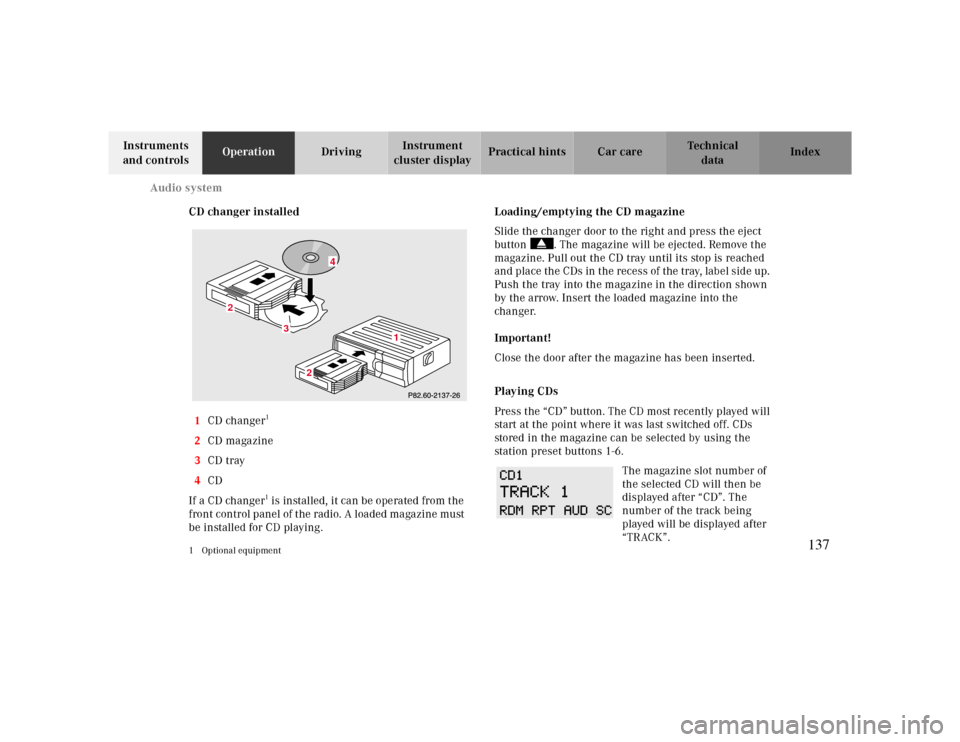
CD changer installed
1CD changer
1
2CD magazine
3CD tray
4CD
If a CD changer1 is installed, it can be operated from the
front control panel of the radio. A loaded magazine must
be installed for CD playing.
1 Optional equipment
Loading/emptying the CD magazine
Slide the changer door to the right and press the eject
button . The magazine will be ejected. Remove the
magazine. Pull out the CD tray until its stop is reached
and place the CDs in the recess of the tray, label side up.
Push the tray into the magazine in the direction shown
by the arrow. Insert the loaded magazine into the
changer.
Important!
Close the door after the magazine has been inserted.
Playing CDs
Press the “CD” button. The CD most recently played will
start at the point where it was last switched off. CDs
stored in the magazine can be selected by using the
station preset buttons 1-6.
The magazine slot number of
the selected CD will then be
displayed after “CD”. The
number of the track being
played will be displayed after
“TRACK”.
3
2
2
1
4
137
Page 138 of 323

Audio system
Te ch n ica l
data Instruments
and controlsOperationDrivingInstrument
cluster displayPractical hints Car care Index If there is no CD in the
selected magazine slot,
“NO CD” and the
corresponding slot number
will be displayed
(e.g.“NO CD3”). After the last track on a CD has been
played, the next CD will automatically be selected and
played.
Skipping tracks forwards/backwards
Press the button. The next track on the CD will be
played.
Press the button. If the track has been playing for
more than 10 seconds, it will revert to the start of that
track. If it has been playing for less than ten seconds it
will revert to the preceding track. To skip several tracks,
the respective button must be pressed until the desired
track is reached. If the beginning or end of the CD is
reached during the search, the first or last track will be
played.Fast forward/reverse
Press the button and hold it down for audible fast
forward.
Press the button and hold it down for audible
reverse.
The search will stop when the
button is released. The
relative time of the track will
be displayed during the
search. The search mode will
cancel if the beginning or end of the CD is reached.
Scanning
Press the SC key. Each tra ck w ill be played for 8 second s
in ascending order. The search will stop at the track in
question if the , , , buttons or the
“SC” key is pressed.
138
Page 164 of 323

Soft top
Te ch n ica l
data Instruments
and controlsOperationDrivingInstrument
cluster displayPractical hints Car care Index
Note:
For safety reasons, the soft top cannot be raised while
driving.
Warning!
The soft top is not fully closed and locked:
• if the indicator lamp in the soft top switch does
not got out (electronic key in steering lock
position 2). • if the indicator lamp blinks, and a signal
sounds for 10 seconds when starting to drive. Stop the vehicle and before continuing to drive,
close and lock the soft top. If the soft top is not locked, it may fold back or
forward when driving. During soft top operation, do not place your hands
near the roll bar, soft top frame, upper windshield
area or soft top storage compartment. Serious
personal injury may occur. To prevent possible accidents, drive the vehicle
only with the soft top either completely closed and
locked, or fully lowered into its storage
compartment. If the indicator lamp in the soft top switch blinks slowly
while activating the switch,
•the battery voltage may be insufficient – start
engine and let it run while activating switch,
•the system may be overheated (for example after
lowering or raising the soft top approx. 5
consecutive times) – after approx. 10 minutes the
soft top switch may be activated again.
If indicator lamp in the soft top switch blinks rapidly
while activating the switch,
•the trunk lid and/or the luggage cover may be open,
and need to be closed,
•the soft top is still locked during the opening
procedure and needs to be unlocked,
•the opening/closing procedure is interrupted.
If the indicator lamp continues to blink, raise the soft
top manually, see page280.
Have the system checked at your authorized
Mercedes-Benz Center as soon as possible.
164
Page 182 of 323

Starting and turning off the engine
Te ch n ica l
data Instruments
and controlsOperationDrivingInstrument
cluster displayPractical hints Car care Index
Starting and turning off the engine
Before starting
Ensure that parking brake is engaged and that selector
lever is in position “P” or “N”. Turn electronic key in
steering lock to position 2.
Starting
Do not depress accelerator.
Briefly turn electronic key in steering lock clockwise to
the stop and release. The starter will engage until the
engine is running.
If engine will not run, and the starting procedure stops,
turn electronic key completely to the left and repeat
starting the engine.
After several unsuccessful attempts, have the system
checked at the nearest authorized Mercedes-Benz
Center.Important!
Due to the installed starter non-repeat feature, the
electronic key must be turned completely to the left
before attempting to start the engine again.
In areas where temperatures frequently drop below -4°F
(-20°C) we recommend that an engine block heater be
installed. Your authorized Mercedes-Benz Center will
advise you on this subject.
Turning off
Turn the electronic key in the steering lock to position 0
to stop the engine.
The electronic key can only be removed with the
selector lever in position “P”.
182
Page 185 of 323

Automatic transmission
Te ch n ica l
data Instruments
and controlsOperationDrivingInstrument
cluster displayPractical hints Car care Index Stopping
For brief stops, e.g. at traffic lights, leave the
transmission in gear and hold vehicle with the service
brake.
For longer stops with the engine idling, shift into “N”
or “P” and hold the vehicle with the service brake.
When stopping the vehicle on an uphill gradient, do not
hold it with the accelerator, use the brake. This avoids
unnecessary transmission heat build up.
Maneuvering
To maneuver in tight areas, e.g. when pulling into a
parking space, control the vehicle speed by gradually
releasing the brakes. Accelerate gently and never
abruptly step on the accelerator.
To rock a vehicle out of soft ground (mud or snow),
alternately shift from forward to reverse, while applying
slight partial throttle.Rocking a vehicle free in this manner may cause the
ABS or traction system malfunction indicator lamp to
come on. Turn off and restart the engine to clear the
malfunction indication.
Wa r n i n g !
Getting out of your vehicle with the selector lever
not fully engaged in position “P” is dangerous.
Also, when parked on an incline, position “P” alone
may not prevent your vehicle from moving,
possibly hitting people or objects.Always set the parking brake in addition to shifting
to position “P”, see page 204 for parking brake. When parked on an incline, also turn front wheel
against curb.
185
Page 191 of 323

Automatic transmission
Te ch n ica l
data Instruments
and controlsOperationDrivingInstrument
cluster displayPractical hints Car care Index Caution!
Never change the program mode when the selector lever
is out of position “P”. It could result in a change of
driving characteristics for which you may not be
prepared.
Important!
Always be certain of the program mode selected since
the vehicle driving characteristics change with the
selection of the program mode.
Dependent on the program mode selector switch
position “S” or “W” and the gear selector lever in
position “R”, the ratio of power transmission changes.
Emergency operation (Limp home mode)
If vehicle acceleration worsens or the transmission no
longer shifts, the transmission is most likely operating
in Limp home mode which engages when there is a
malfunction of the transmission. This condition may be
accompanied by the “CHECK ENGINE” malfunction
indicator lamp in the instrument cluster coming on.In this mode only the 2nd gear or reverse gear can be
activated.
To engage 2nd gear or reverse:
1. Stop the vehicle.
2. Move selector lever to position “P”.
3. Turn off the engine.
4. Wait approx. 10 seconds.
5. Restart the engine.
6. Move selector lever to position “D” (for 2nd gear), or
move selector lever to position “R” (for reverse gear).
Have the transmission checked at your authorized
Mercedes-Benz Center as soon as possible.
191