Page 161 of 272
Automatic shift mode
When in the automatic shift mode
(D5 position), the 5±speed
automatic transmission operates like
a typical automatic transmission.
Pull the gearshift lever towards you
and downward to move the
automatic gearshift.
Refer toDriving with a 5±speed
automatic transmissionin this
chapter for Park, Reverse, Neutral,
D5 and D4 information.
Manual shift mode
With the gearshift lever in D5
(Overdrive), the gearshift lever can
be moved to the right and into the
manual shift mode. The transmission
will remain in the manual shift mode
until the gearshift lever is moved
back to D5 (Overdrive).
Driving
161
Page 162 of 272

+ and - position operation
These positions allow the driver to
manually select the appropriate
upshift (+) or downshift (-) and
gear range.
²Can only be entered from the D5
(Overdrive) shift position.
²Gear ranges 1±5 provide the same
function and ratio as found in the
D5 or D4 automatic mode
positions.
²The transmission will not upshift
or downshift unless the gearshift
lever is moved forward or
rearward.
²One tap forward (+) will
commandthe transmission to upshift one gear range.
²One tap rearward (-) willcommandthe transmission to downshift one
gear range.
²Upshifts are allowed at any vehicle speed.
²2 (Second) gear is normally used for start-up. A 3 (Third) gear
start-up will be allowed only if selected. All other selection(s) will
revert to 2 (Second) gear.
²If the driver starts in 2 (Second) gear and does not pass a throttle
angle of 60%, the transmission will remain in 2 (Second) gear. No
automatic upshift will occur.
²If the driver passes the 60% throttle angle, a 2±1 kickdown will occur.
Once the 2±1 kickdown has occurred, the transmission will remain in
1 (First) gear until 2 (Second) gear is manually selected by moving
the gearshift lever. No automatic upshift will occur.
²Once a 2±1 kickdown has occurred, manually shifting in and out of 1
(First ) gear is allowed until the vehicle comes to a complete stop.
²A shift to 1 (First) with the vehicle at a stop is never allowed.
²When downshifting at normal road speeds, the transmission will only
allow a downshift into thenext lowergear.
Driving
162
Page 163 of 272
²If the gearshift lever is moved into the downshift (-) position more
than once in rapid succession, the transmission will only allow a
downshift into thenext lowergear to prevent possible engine and/or
transmission damage. Once the vehicle reaches below a specified entry
speed for the next lower gear, the transmission will allow another
downshift to occur if selected by the driver.
MANUAL TRANSMISSION OPERATION (IF EQUIPPED)
Using the clutch
Vehicles equipped with a manual transmission have a starter interlock
that prevents cranking the engine unless the clutch pedal is fully
depressed.
When starting a vehicle with a manual transmission, you must:
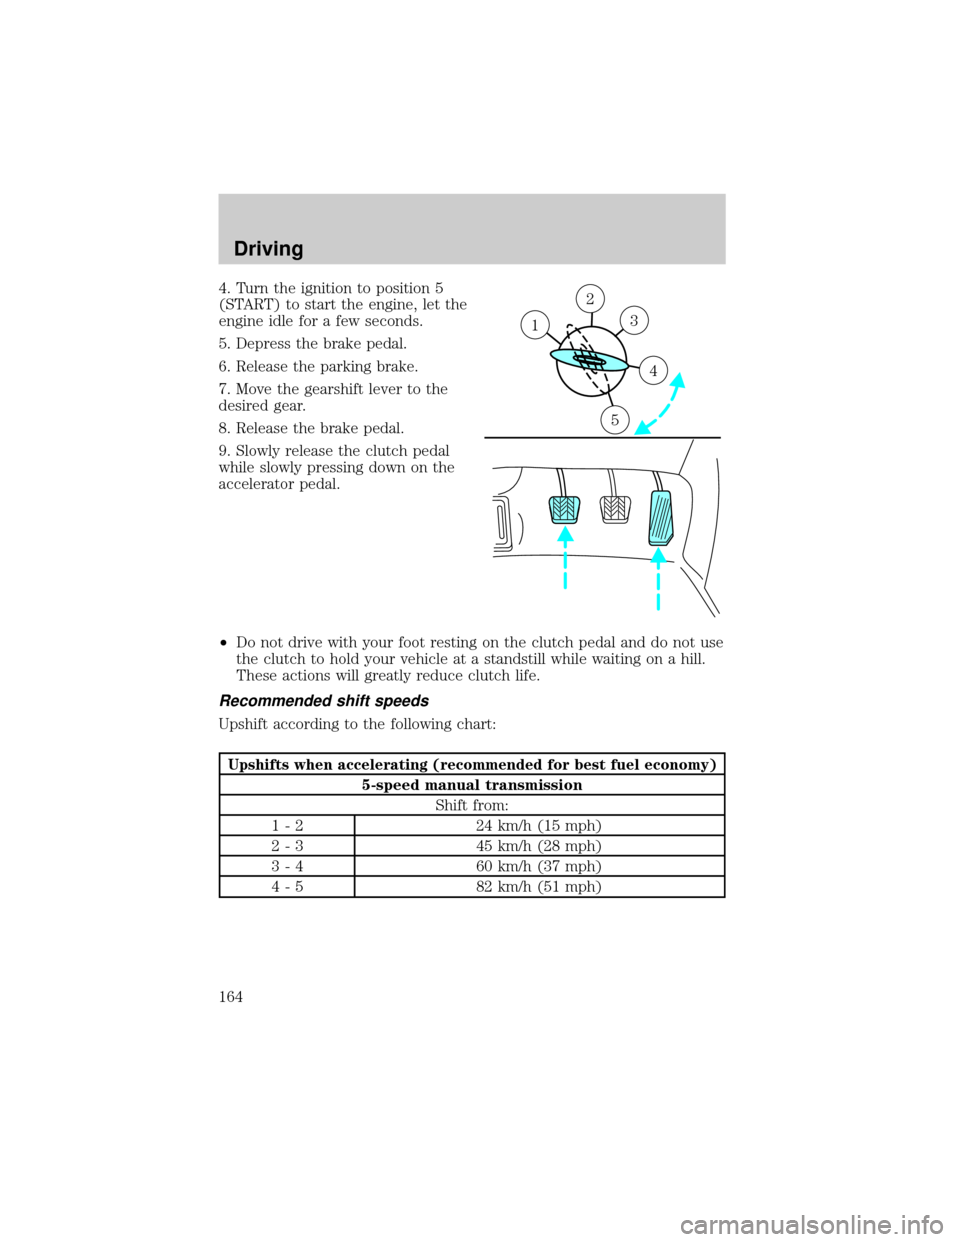
1. Make sure the parking brake is
fully set.
2. Depress the clutch pedal fully.
3. Put the gearshift lever in N
(Neutral).
1
2
45
R3
Driving
163
Page 164 of 272
4. Turn the ignition to position 5
(START) to start the engine, let the
engine idle for a few seconds.
5. Depress the brake pedal.
6. Release the parking brake.
7. Move the gearshift lever to the
desired gear.
8. Release the brake pedal.
9. Slowly release the clutch pedal
while slowly pressing down on the
accelerator pedal.
²Do not drive with your foot resting on the clutch pedal and do not use
the clutch to hold your vehicle at a standstill while waiting on a hill.
These actions will greatly reduce clutch life.
Recommended shift speeds
Upshift according to the following chart:
Upshifts when accelerating (recommended for best fuel economy)
5-speed manual transmission
Shift from:
1 - 2 24 km/h (15 mph)
2 - 3 45 km/h (28 mph)
3 - 4 60 km/h (37 mph)
4 - 5 82 km/h (51 mph)
2
3
4
5
1
Driving
164
Page 165 of 272
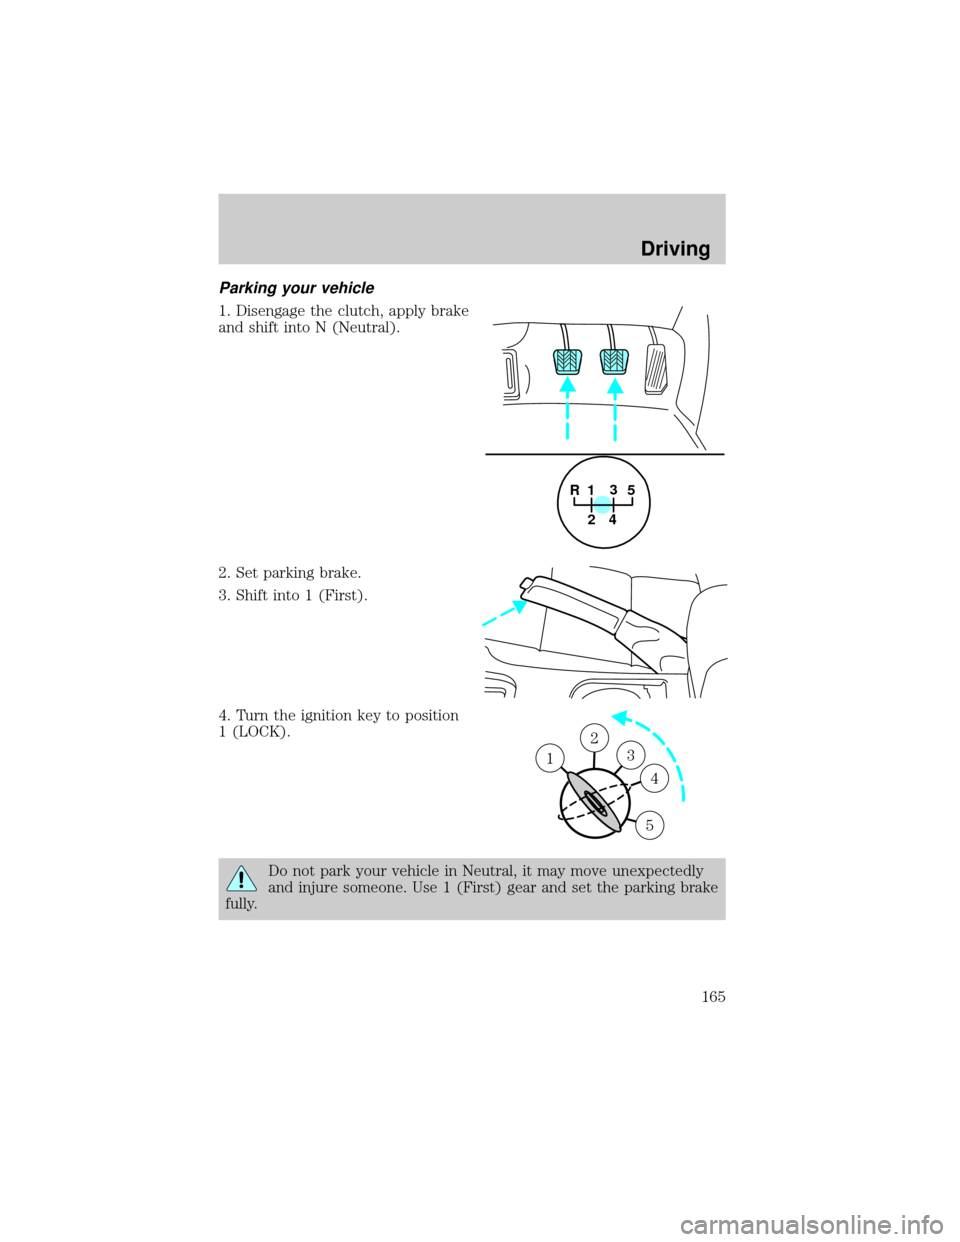
Parking your vehicle
1. Disengage the clutch, apply brake
and shift into N (Neutral).
2. Set parking brake.
3. Shift into 1 (First).
4. Turn the ignition key to position
1 (LOCK).
Do not park your vehicle in Neutral, it may move unexpectedly
and injure someone. Use 1 (First) gear and set the parking brake
fully.
1
2
45
R3
1
2
3
4
5
1
Driving
165
Page 166 of 272

Reverse
Make sure that your vehicle is at a complete stop before you shift into R
(Reverse). Failure to do so may damage the transmission.
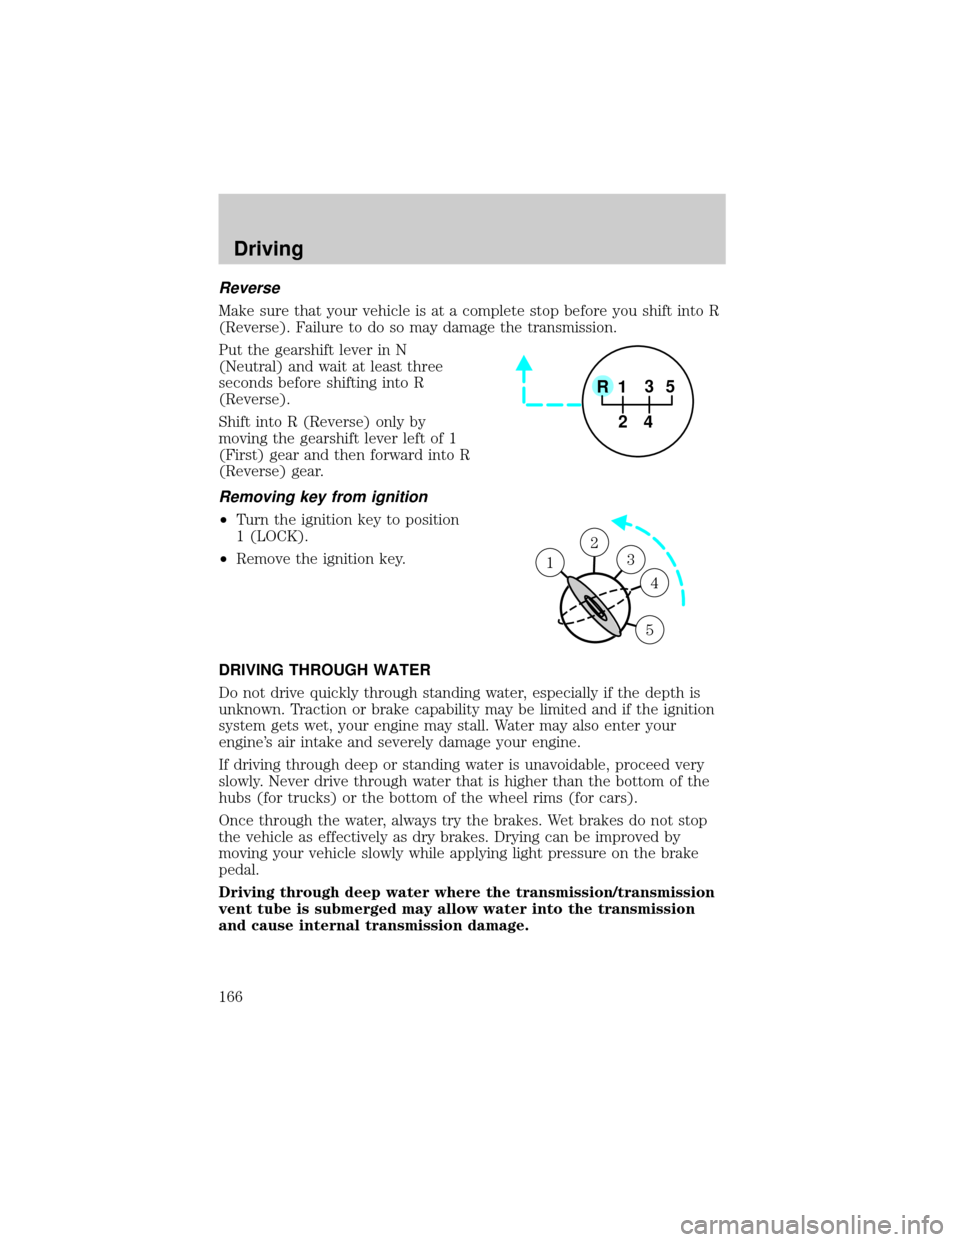
Put the gearshift lever in N
(Neutral) and wait at least three
seconds before shifting into R
(Reverse).
Shift into R (Reverse) only by
moving the gearshift lever left of 1
(First) gear and then forward into R
(Reverse) gear.
Removing key from ignition
²Turn the ignition key to position
1 (LOCK).
²Remove the ignition key.
DRIVING THROUGH WATER
Do not drive quickly through standing water, especially if the depth is
unknown. Traction or brake capability may be limited and if the ignition
system gets wet, your engine may stall. Water may also enter your
engine's air intake and severely damage your engine.
If driving through deep or standing water is unavoidable, proceed very
slowly. Never drive through water that is higher than the bottom of the
hubs (for trucks) or the bottom of the wheel rims (for cars).
Once through the water, always try the brakes. Wet brakes do not stop
the vehicle as effectively as dry brakes. Drying can be improved by
moving your vehicle slowly while applying light pressure on the brake
pedal.
Driving through deep water where the transmission/transmission
vent tube is submerged may allow water into the transmission
and cause internal transmission damage.
1
2
45
R3
1
2
3
4
5
1
Driving
166
Page 167 of 272

VEHICLE LOADING
Before loading a vehicle, familiarize yourself with the following terms:
²Base Curb Weight:Weight of the vehicle including any standard
equipment, fluids, lubricants, etc. It does not include passengers or
aftermarket equipment.
²Payload:Combined maximum allowable weight of cargo, passengers
and optional equipment. The payload equals the gross vehicle weight
rating minus base curb weight.
²GVW (Gross Vehicle Weight):Base curb weight plus payload
weight. The GVW is not a limit or a specification.
²GVWR (Gross Vehicle Weight Rating):Maximum total weight of
the base vehicle, passengers, optional equipment and cargo. The
GVWR is specific to each vehicle and is listed on the Safety
Compliance Label on the driver's door pillar.
²GAWR (Gross Axle Weight Rating):Carrying capacity for each axle
system. The GAWR is specific to each vehicle and is listed on the
Safety Compliance Label on the driver's door pillar.
²GCW (Gross Combined Weight):The combined weight of the
towing vehicle (including passengers and cargo) and the trailer.
²GCWR (Gross Combined Weight Rating):Maximum combined
weight of towing vehicle (including passengers and cargo) and the
trailer. The GCWR indicates the maximum loaded weight that the
vehicle is designed to tow.
²Maximum Trailer Weight Rating:Maximum weight of a trailer the
vehicle is permitted to tow. The maximum trailer weight rating is
determined by subtracting the vehicle curb weight for each
engine/transmission combination, any required option weight for trailer
towing and the weight of the driver from the GCWR for the towing
vehicle.
²Maximum Trailer Weight:Maximum weight of a trailer the loaded
vehicle (including passengers and cargo) is permitted to tow. It is
determined by subtracting the weight of the loaded trailer towing
vehicle from the GCWR for the towing vehicle.
²Trailer Weight Range:Specified weight range that the trailer must
fall within that ranges from zero to the maximum trailer weight rating.
Remember to figure in the tongue load of your loaded trailer when
figuring the total weight.
Driving
167
Page 168 of 272

Do not exceed the GVWR or the GAWR specified on the
certification label.
Do not use replacement tires with lower load carrying capacities than the
originals because they may lower the vehicle's GVWR and GAWR
limitations. Replacement tires with a higher limit than the originals do
not increase the GVWR and GAWR limitations.
The Certification Label, found on the inside pillar of the driver's door,
lists several important vehicle weight rating limitations. Before adding
any additional equipment, refer to these limitations. If you are adding
weight to the front of your vehicle, (potentially including weight added
to the cab), the weight added should not exceed the front axle reserve
capacity (FARC). Additional frontal weight may be added to the front
axle reserve capacity provided you limit your payload in other ways (i.e.
restrict the number of passengers or amount of cargo carried).
You may add equipment throughout your vehicle if the total weight
added is equal to or less than the total axle reserve capacity (TARC)
weight. You should NEVER exceed the total axle reserve capacity.
Always ensure that the weight of passengers, cargo and equipment being
carried is within the weight limitations that have been established for
your vehicle including both gross vehicle weight and Front and rear
gross axle weight rating limits. Under no circumstance should these
limitations be exceeded. Exceeding any vehicle weight rating limitation
could result in serious damage to the vehicle and/or personal injury.
TRAILER TOWING
Trailer towing with your vehicle may require the use of a trailer tow
option package.
Trailer towing puts additional loads on your vehicle's engine,
transmission, axle, brakes, tires, and suspension. For your safety and to
maximize vehicle performance, be sure to use the proper equipment
while towing.
Follow these guidelines to ensure safe towing procedure:
²Stay within your vehicle's load limits. If exceeded, cargo should be
removed from the trailer and/or the vehicle until all weights are within
specified limits.
²Thoroughly prepare your vehicle for towing. Refer toPreparing to
towin this chapter.
Driving
168