Page 363 of 1111
BE0HH±07
I01359
Brake Master Cylinder
� Brake Fluid Level
Warning Switch
Combination Meter
and Telltale Light
Assembly
Airbag Sensor Assembly Parking Brake Switch
Driver Side
Junction Block
� GAUGE Fuse
� SRS±B FuseIgnition Switch
ECM
Washer Tank
� Washer Level
Warning Switch Engine Room No.1
Junction Block
� MPX±B Fuse
Seat Belt Buckle Switch
Rheostat Light Control
ABS, TRAC and VSC ECU
Clock Assembly
� Passenger Seat Belt
Waning Light
BE±80
± BODY ELECTRICALCOMBINATION METER
2381 Author�: Date�:
2000 LEXUS GS300/GS400 (RM718U)
COMBINATION METER
LOCATION
�The vehicle shown in this illustration is ºGS400º.
�All components of ºGS300º other than the ones used for engine are same as ºGS400º.
Page 371 of 1111

I04253
� Meter Circuit Plate ± 2
Combination Meter ECU
SLIP Indicator
TRAC OFF Indicator
Window Washer Level Warning
ABS Warning
VSC Warning
Brake Fluid Level Warning
ECT SNOW Indicator
Low Oil Pressure Warning
ECT PWR Indicator
Discharge Warning
CRUISE MAIN Indicator
Seat Belt Warning
Rear Light Indicator
Headlight Leveling Indicator
SRS Warning
Open Door Warning
Fog Light IndicatorA/T 2 Indicaor
Engine Oil Level Indicator
Malfunction Indicator
Fuel Level Indicator
Headlight Indicator (USA)
Taillight Indicator (CANADA) ODO/
TRIP
Display
PanelIG+
SLIP
TRC OFF
WASHER
ABS
VSC
BRAKE
ECT SNOW
OIL P
ECT PWR
CHARGE
CRUISE
SEAT BELT
Rr LIGHT
HEAD LVL
AIRBAG
SRS +B
DOOR
FR FOG
COM1
SEG30
TEST1
TEST2
TEST3
GroundCHECK
ENG
IG+
FUEL
IG+
BEAM±
BEAM+ SRS +BTAIL A/T R
A/T L
A/T N
A/T D
OIL LVLDIM+
A/T 2
A/T 3
A/T 4F12
A/T PF11
F10
F9
F8
F5
F4
F2
F1
C7
C5
C3
D12
D8 E11
E10
E9
E8
E7
E6
J1
J33
D6
D4Hi±Beam Indicator
D2 E20
E19
E18
E17
E16
E15
E14
E13
E12
E3
E1 E5
E4A/T 3 Indicaor
A/T 4 Indicaor
A/T P Indicaor
A/T R Indicaor
A/T L Indicaor
A/T N Indicaor
A/T D Indicaor
T1
T2
T3
T4
~~
D10 BE±88
± BODY ELECTRICALCOMBINATION METER
2389 Author�: Date�:
2000 LEXUS GS300/GS400 (RM718U)
Page 382 of 1111

I01278
I01279
Battery Ignition
SwitchWarning Light
I04095
OFF
ON
I04096
± BODY ELECTRICALCOMBINATION METER
BE±99
2400 Author�: Date�:
2000 LEXUS GS300/GS400 (RM718U)
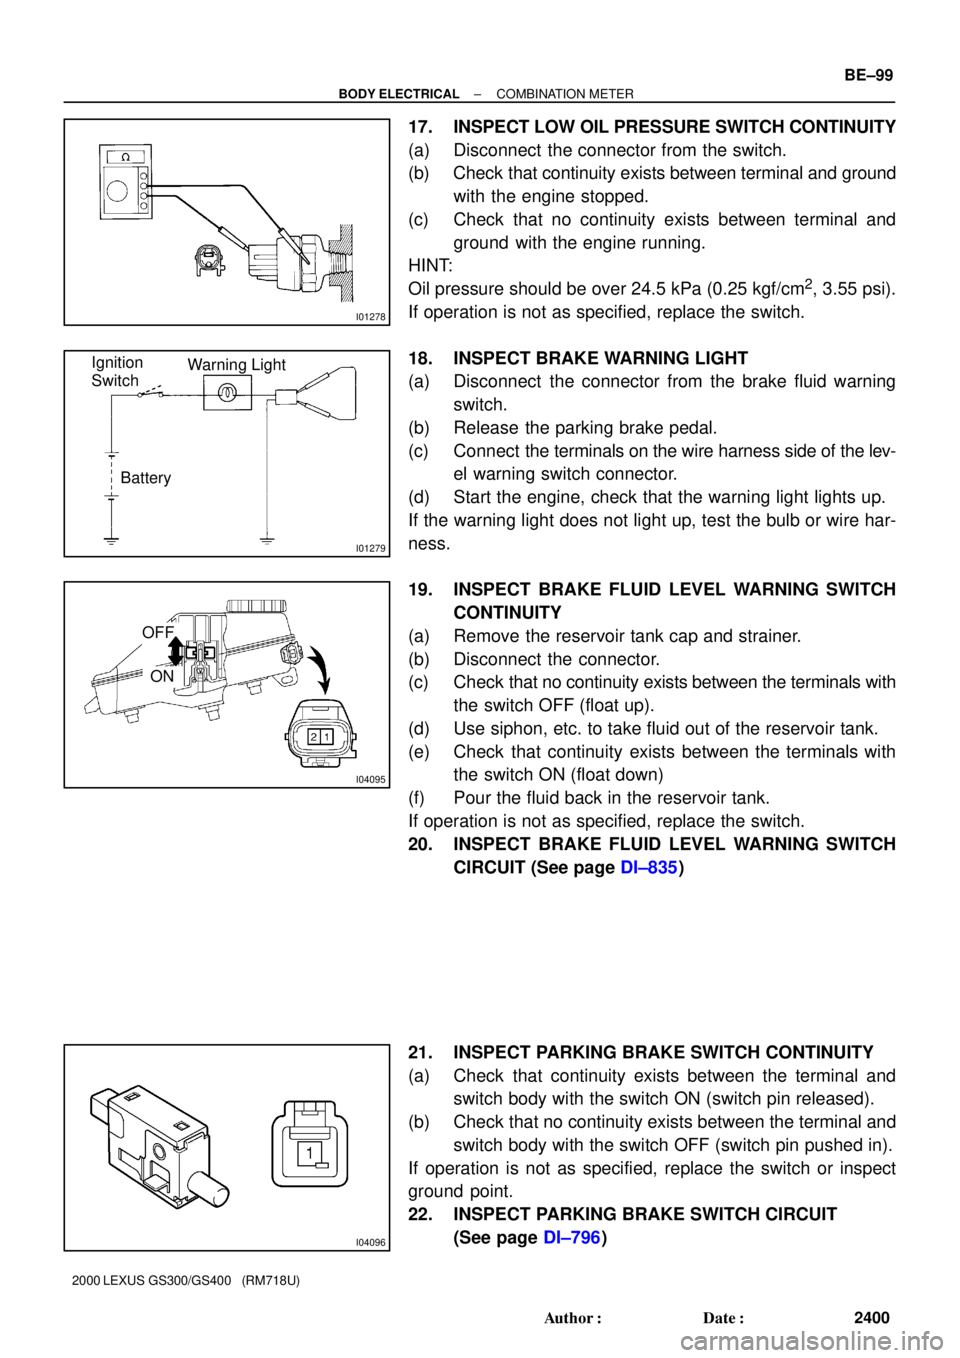
17. INSPECT LOW OIL PRESSURE SWITCH CONTINUITY
(a) Disconnect the connector from the switch.
(b) Check that continuity exists between terminal and ground
with the engine stopped.
(c) Check that no continuity exists between terminal and
ground with the engine running.
HINT:
Oil pressure should be over 24.5 kPa (0.25 kgf/cm
2, 3.55 psi).
If operation is not as specified, replace the switch.
18. INSPECT BRAKE WARNING LIGHT
(a) Disconnect the connector from the brake fluid warning
switch.
(b) Release the parking brake pedal.
(c) Connect the terminals on the wire harness side of the lev-
el warning switch connector.
(d) Start the engine, check that the warning light lights up.
If the warning light does not light up, test the bulb or wire har-
ness.
19. INSPECT BRAKE FLUID LEVEL WARNING SWITCH
CONTINUITY
(a) Remove the reservoir tank cap and strainer.
(b) Disconnect the connector.
(c) Check that no continuity exists between the terminals with
the switch OFF (float up).
(d) Use siphon, etc. to take fluid out of the reservoir tank.
(e) Check that continuity exists between the terminals with
the switch ON (float down)
(f) Pour the fluid back in the reservoir tank.
If operation is not as specified, replace the switch.
20. INSPECT BRAKE FLUID LEVEL WARNING SWITCH
CIRCUIT (See page DI±835)
21. INSPECT PARKING BRAKE SWITCH CONTINUITY
(a) Check that continuity exists between the terminal and
switch body with the switch ON (switch pin released).
(b) Check that no continuity exists between the terminal and
switch body with the switch OFF (switch pin pushed in).
If operation is not as specified, replace the switch or inspect
ground point.
22. INSPECT PARKING BRAKE SWITCH CIRCUIT
(See page DI±796)
Page 394 of 1111
W00744
± BRAKEFRONT BRAKE PAD
BR±17
2125 Author�: Date�:
2000 LEXUS GS300/GS400 (RM718U)
10. INSTALL CALIPER
(a) Draw out a small amount of brake fluid from the reservoir.
(b) Press in the pistons with a hammer handle or similar im-
plement.
HINT:
If the pistons are difficult to push in, loosen the bleeder plug and
push in the pistons while letting some brake fluid escape.
(c) Install the caliper.
(d) Hold the sliding pin and torque the installation bolt.
Torque: 34 N´m (350 kgf´cm, 25 ft´lbf)
11. INSTALL FRONT WHEEL
Torque: 103 N´m (1,050 kgf´cm, 76 ft´lbf)
12. DEPRESS BRAKE PEDAL SEVERAL TIMES
13. CHECK THAT FLUID LEVEL IS AT MAX LINE
Page 396 of 1111
BR0JK±03
F01624
± BRAKEFRONT BRAKE CALIPER
BR±19
2127 Author�: Date�:
2000 LEXUS GS300/GS400 (RM718U)
REMOVAL
1. DISCONNECT FLEXIBLE HOSE
Remove the union bolt and 2 gaskets from the caliper, then dis-
connect the flexible hose from the caliper. Use a container to
catch brake fluid as it drains out.
Torque: 30 N´m (310 kgf´cm, 22 ft´lbf)
HINT:
At the time of installation, install the flexible hose lock securely
in the lock hole in the caliper.
2. REMOVE CALIPER
(a) Hold the sliding pin and loosen the 2 installation bolts.
Torque: 34 N´m (350 kgf´cm, 25 ft´lbf)
(b) Remove the 2 installation bolts.
(c) Remove the caliper from the torque plate.
3. REMOVE 2 ANTI±SQUEAL SPRINGS
4. REMOVE 2 BRAKE PADS WITH 4 ANTI±SQUEAL
SHIMS
5. REMOVE 4 PAD SUPPORT PLATES
Page 397 of 1111

BR0JA±09
BR±2
± BRAKETROUBLESHOOTING
2110 Author�: Date�:
2000 LEXUS GS300/GS400 (RM718U)
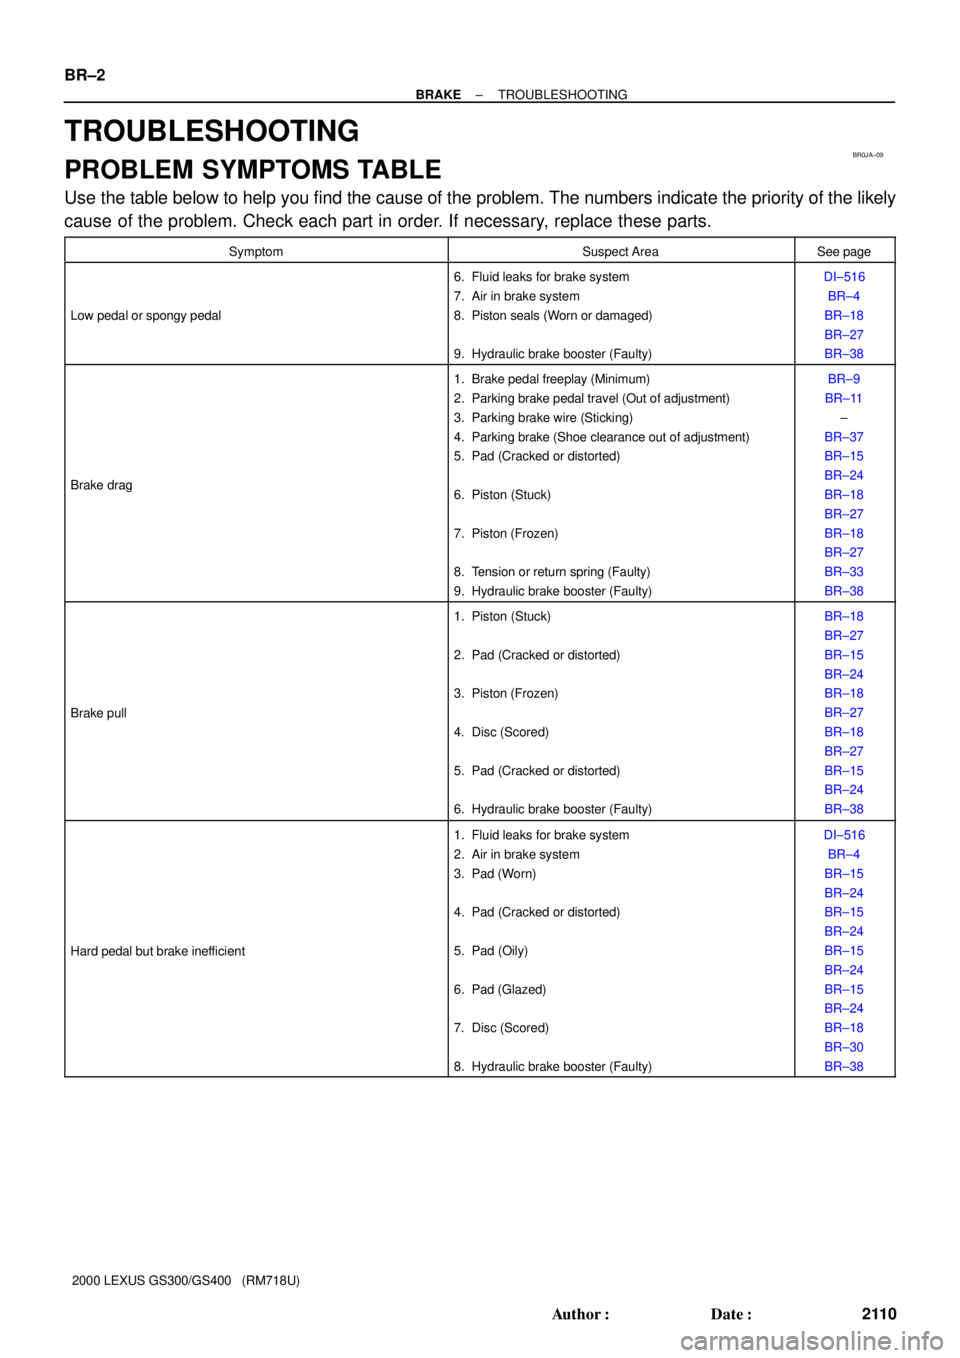
TROUBLESHOOTING
PROBLEM SYMPTOMS TABLE
Use the table below to help you find the cause of the problem. The numbers indicate the priority of the likely
cause of the problem. Check each part in order. If necessary, replace these parts.
SymptomSuspect AreaSee page
Low pedal or spongy pedal
6. Fluid leaks for brake system
7. Air in brake system
8. Piston seals (Worn or damaged)
9. Hydraulic brake booster (Faulty)DI±516
BR±4
BR±18
BR±27
BR±38
Brake drag
1. Brake pedal freeplay (Minimum)
2. Parking brake pedal travel (Out of adjustment)
3. Parking brake wire (Sticking)
4. Parking brake (Shoe clearance out of adjustment)
5. Pad (Cracked or distorted)
6. Piston (Stuck)
7. Piston (Frozen)
8. Tension or return spring (Faulty)
9. Hydraulic brake booster (Faulty)BR±9
BR±11
±
BR±37
BR±15
BR±24
BR±18
BR±27
BR±18
BR±27
BR±33
BR±38
Brake pull
1. Piston (Stuck)
2. Pad (Cracked or distorted)
3. Piston (Frozen)
4. Disc (Scored)
5. Pad (Cracked or distorted)
6. Hydraulic brake booster (Faulty)BR±18
BR±27
BR±15
BR±24
BR±18
BR±27
BR±18
BR±27
BR±15
BR±24
BR±38
Hard pedal but brake inefficient
1. Fluid leaks for brake system
2. Air in brake system
3. Pad (Worn)
4. Pad (Cracked or distorted)
5. Pad (Oily)
6. Pad (Glazed)
7. Disc (Scored)
8. Hydraulic brake booster (Faulty)DI±516
BR±4
BR±15
BR±24
BR±15
BR±24
BR±15
BR±24
BR±15
BR±24
BR±18
BR±30
BR±38
Page 398 of 1111

± BRAKETROUBLESHOOTING
BR±3
2111 Author�: Date�:
2000 LEXUS GS300/GS400 (RM718U) Noise from brakes
1. Pad (Cracked or distorted)
2. Installation bolt (Loose)
3. Disc (Scored)
4. Pad support plate (Loose)
5. Sliding pin (Worn)
6. Pad (Dirty)
7. Pad (Glazed)
8. Tension or return spring (Faulty)
9. Anti±squeal shim (Damaged)
10.Shoe hold±down spring (Damaged)BR±15
BR±24
BR±15
BR±24
BR±18
BR±27
BR±18
BR±18
BR±15
BR±24
BR±15
BR±24
BR±33
BR±18
BR±27
BR±33
Noise from hydraulic brake booster
(Abnormal pump motor operation noise)Accumulator bracket clearance (Out or adjustment)BR±56
Brake warning light lights up*1
(Parking brake pedal released)
1. Brake fluid level
2. Hydraulic brake booster power supply system (Faulty)BR±38
Brake warning light lights up and brake warning buzzer sounds*2Hydraulic brake booster power supply system (Faulty)BR±38
ABS warning light lights up*31. Anti±lock brake system (Faulty)
2. Hydraulic brake booster power supply system (Faulty)
BR±38
*1, *3: The light may stay on for about 60 seconds after the engine has been started. It is normal if it goes
out after a while.
*
2, *3: Depressing the brake pedal repeatedly may turn on the warning light and buzzer. It is normal if the
light goes out and the buzzer stops sounding after a few seconds.
*
3: While ABS warning light is ON, both VSC warning light and VSC OFF indicator light come on.
Page 401 of 1111
BR0JO±07
± BRAKEFRONT BRAKE CALIPER
BR±23
2131 Author�: Date�:
2000 LEXUS GS300/GS400 (RM718U)
INSTALLATION
Installation is in the reverse order of removal (See page BR±19).
HINT:
�After installation, fill the brake reservoir with brake fluid and bleed brake system (See page BR±4).
�Check for leaks.