Page 118 of 1111

1978 Author�: Date�:
2000 LEXUS GS300/GS400 (RM718U)
12. REMOVE TORQUE CONVERTER CLUTCH MOUNT-
ING B")
D01047
Q03721
D01048
Q06925
AT±30
± AUTOMATIC TRANSMISSIONAUTOMATIC TRANSMISSION UNIT (2JZ±GE)
1978 Author�: Date�:
2000 LEXUS GS300/GS400 (RM718U)
12. REMOVE TORQUE CONVERTER CLUTCH MOUNT-
ING BOLT
(a) Remove the hole plug.
(b) Turn the crankshaft to gain access to each bolt.
(c) Hold the crankshaft pulley nut with a wrench and remove
the 6 bolts.
Torque: 48 N´m (490 kgf´cm, 35 ft´lbf)
HINT:
At the time of installation, please refer to the following item.
First install black colored bolt and then the 5 other bolts.
13. SUPPORT TRANSMISSION WITH JACK
14. REMOVE 4 ENGINE REAR MOUNTING SET BOLTS
Torque: 26 N´m (270 kgf´cm, 20 ft´lbf)
15. DISCONNECT CONNECTORS AND WIRE HARNESS
(a) Tilt down the transmission.
NOTICE:
Take care so that the cooling fan does not come in contact
with the fan shroud.
(b) Disconnect the following connectors:
(1) O/D direct clutch speed sensor connector
(2) Vehicle speed sensor connector
(3) Park/neutral position switch connector
(4) Solenoid connector
(c) Disconnect the wire harness from the clamp on the trans-
mission.
Page 119 of 1111
D01926
17 mm Head
Starter Set Bolt
14 mm Head 17 mm Head
Q06924
± AUTOMATIC TRANSMISSIONAUTOMATIC TRANSMISSION UNIT (2JZ±GE)
AT±31
1979 Author�: Date�:
2000 LEXUS GS300/GS400 (RM718U)
16. REMOVE STARTER
(a) Disconnect the connector and wire from the starter.
(b) Remove the 2 bolts and starter.
Torque: 37 N´m (380 kgf´cm, 27 ft´lbf)
17. REMOVE TRANSMISSION
Remove the 9 bolts and transmission.
Torque:
17 mm head: 72 N´m (730 kgf´cm, 53 ft´lbf)
14 mm head: 37 N´m (380 kgf´cm, 27 ft´lbf)
HINT:
At the time of installation, please refer to the following item.
Lift the front side of the engine.
Page 120 of 1111
AT05X±01
D01008
D01009
D01010
D01011
SST
± AUTOMATIC TRANSMISSIONEXTENSION HOUSING OIL SEAL
AT±3
1951 Author�: Date�:
2000 LEXUS GS300/GS400 (RM718U)
EXTENSION HOUSING OIL SEAL
ON±VEHICLE REPAIR
1. DRAIN ATF
2. REMOVE FRONT EXHAUST PIPE AND HEAT INSULA-
TOR
1UZ±FE Engine: (See page EM±120)
2JZ±GE Engine: (See page EM±97)
3. REMOVE PROPELLER SHAFT
(See page PR±4)
4. REMOVE TRANSMISSION OUTPUT FLANGE
(a) Using a chisel and hammer, loosen the staked part of the
nut.
HINT:
Shift the shift lever to the P position.
(b) Using a 30 mm deeper socket wrench, remove the nut.
(c) Tap the output flange with a plastic hammer to remove it.
(d) Using a screwdriver, remove the oil seal from the output
flange.
5. REMOVE EXTENSION HOUSING REAR OIL SEAL
Using SST, remove the oil seal.
SST 09308±00010
Page 121 of 1111
D01012
SST
Q08511
SST
D01009
D01008
AT±4
± AUTOMATIC TRANSMISSIONEXTENSION HOUSING OIL SEAL
1952 Author�: Date�:
2000 LEXUS GS300/GS400 (RM718U)
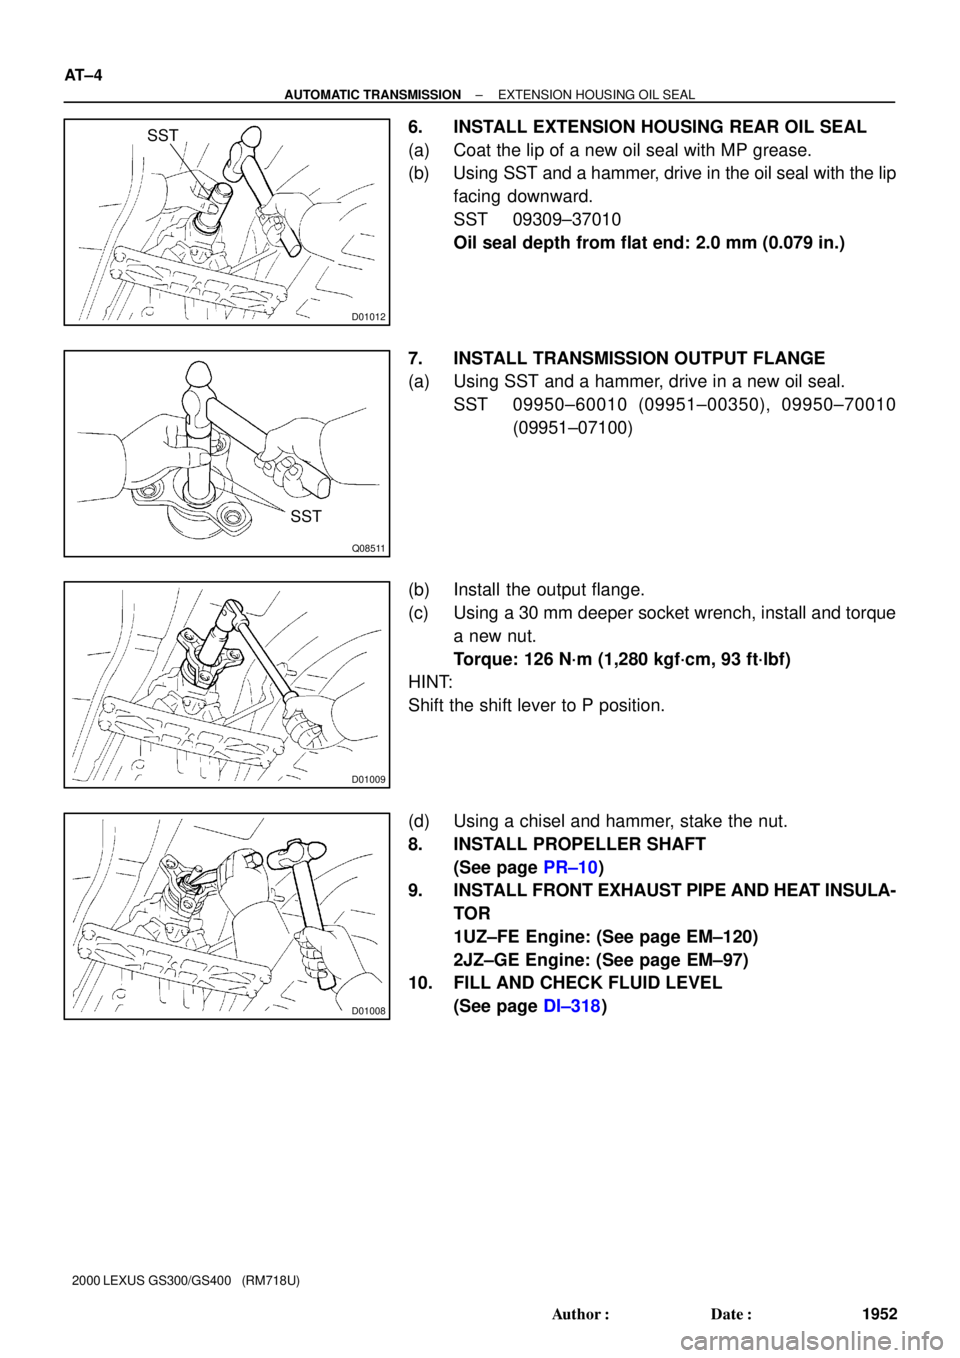
6. INSTALL EXTENSION HOUSING REAR OIL SEAL
(a) Coat the lip of a new oil seal with MP grease.
(b) Using SST and a hammer, drive in the oil seal with the lip
facing downward.
SST 09309±37010
Oil seal depth from flat end: 2.0 mm (0.079 in.)
7. INSTALL TRANSMISSION OUTPUT FLANGE
(a) Using SST and a hammer, drive in a new oil seal.
SST 09950±60010 (09951±00350), 09950±70010
(09951±07100)
(b) Install the output flange.
(c) Using a 30 mm deeper socket wrench, install and torque
a new nut.
Torque: 126 N´m (1,280 kgf´cm, 93 ft´lbf)
HINT:
Shift the shift lever to P position.
(d) Using a chisel and hammer, stake the nut.
8. INSTALL PROPELLER SHAFT
(See page PR±10)
9. INSTALL FRONT EXHAUST PIPE AND HEAT INSULA-
TOR
1UZ±FE Engine: (See page EM±120)
2JZ±GE Engine: (See page EM±97)
10. FILL AND CHECK FLUID LEVEL
(See page DI±318)
Page 123 of 1111

AT06A±01
D01049
Oil Cooler Pipe
Connector and Wire Harness
Level Gauge
Torque Converter Clutch
Flywheel Housing
Under CoverPlug for Line
Pressure Test
Front and Center Exhaust PipePropeller Shaft Assembly
Heated Oxygen Sensor
Pipe Support BracketRH Front TWC
Engine Under CoverHeat Insulator
Ground CableHeat Insulator � GasketO±Ring x6Adjusting Washer
Filler Pipe
44 (450, 33)
79 (805, 58)
37 (375, 27)
79 (805, 58)
13 (130, 9)
37 (380, 27)
18 (185, 13)
44 (450, 33)
44 (450, 33)
62 (630, 46)
62 (630, 46)
72 (730, 53)
37 (380, 27)
48 (490, 35)
44 (450, 33)44 (450, 33)
5.4 (55, 48 in.´lbf)
5.4 (55, 48 in.´lbf)
Heat Insulator
26 (270, 20)
� Gasket
LH Front TWC
44 (450, 33)
� Gasket
� Gasket
�
�� �
�
�
�
���
�
N´m (kgf´cm, ft´lbf) : Specified torque
Non±reusable part �Heat Insulator
5.4 (55, 48 in.´lbf)
44 (450, 33)
44 (450, 33)
� O±Ring
Heated Oxygen
SensorFront Floor
Center Brace
7.4 (75, 65 in.´lbf)
x6
± AUTOMATIC TRANSMISSIONAUTOMATIC TRANSMISSION UNIT (1UZ±FE)
AT±33
1981 Author�: Date�:
2000 LEXUS GS300/GS400 (RM718U)
AUTOMATIC TRANSMISSION UNIT (1UZ±FE)
COMPONENTS
Page 124 of 1111

1982 Author�: Date�:
2000 LEXUS GS300/GS400 (RM718U)
REMOVAL
1. REMOVE LEVEL GAUGE
2. RAISE VEHIC")
AT06B±01
D01050
D01051
D00999
AT±34
± AUTOMATIC TRANSMISSIONAUTOMATIC TRANSMISSION UNIT (1UZ±FE)
1982 Author�: Date�:
2000 LEXUS GS300/GS400 (RM718U)
REMOVAL
1. REMOVE LEVEL GAUGE
2. RAISE VEHICLE
NOTICE:
Make sure that the vehicle is securely supported.
3. REMOVE ENGINE UNDER COVER
4. REMOVE FRONT AND CENTER EXHAUST PIPES
(a) Disconnect he 2 heated oxygen sensor.
Torque: 44 N´m (450 kgf´cm, 33 ft´lbf)
HINT:
At the time of installation, please refer to the following items.
�Before installing the heated oxygen sensor, twist the sen-
sor wire counterclockwise 3 and 1/2 turns.
�After installing the heated oxygen sensor wire should not
twist. If it is twisted, remove the heated oxygen sensor
and reinstall it.
(b) Remove the 2 bolts and front floor center brace.
Torque: 7.4 N´m (75 kgf´cm, 65 in.´lbf)
(c) Remove the 4 bolts, nuts and 2 gaskets from the LH and
RH front TWC.
Torque: 44 N´m (450 kgf´cm, 33 ft´lbf)
HINT:
At the time of installation, please refer to the following item.
Replace the used nuts and gaskets with new ones.
(d) Remove the 2 bolts and support bracket.
Torque: 44 N´m (450 kgf´cm, 33 ft´lbf)
(e) Remove the 4 bolts and 2 gaskets from the tail pipe.
Torque: 44 N´m (450 kgf´cm, 33 ft´lbf)
HINT:
At the time of installation, please refer to the following item.
Replace the used gaskets with new ones.
(f) Disconnect the front and center exhaust pipes from the 2
O±rings and remove them.
5. REMOVE LH AND RH FRONT TWC
Remove the 6 nuts, 2 gaskets, LH and RH front TWC.
Torque: 62 N´m (630 kgf´cm, 46 ft´lbf)
HINT:
At the time of installation, please refer to the following item.
Replace the used nuts and gaskets with new ones.
Page 126 of 1111

1984 Author�: Date�:
2000 LEXUS GS300/GS400 (RM718U)
(b) Turn the crankshaft to gain access to each")
D01005
Q03721
D01048
Q06925
AT±36
± AUTOMATIC TRANSMISSIONAUTOMATIC TRANSMISSION UNIT (1UZ±FE)
1984 Author�: Date�:
2000 LEXUS GS300/GS400 (RM718U)
(b) Turn the crankshaft to gain access to each bolt.
(c) Hold the crankshaft pulley nut with a wrench and remove
the 6 bolts.
Torque: 48 N´m (490 kgf´cm, 35 ft´lbf)
HINT:
At the time of installation, please refer to the following item.
First install the black colored bolt and then the 5 other bolts.
12. SUPPORT TRANSMISSION WITH JACK
13. REMOVE 4 ENGINE REAR MOUNTING SET BOLTS
Torque: 26 N´m (270 kgf´cm, 20 ft´lbf)
14. DISCONNECT CONNECTORS AND WIRE HARNESS
(a) Tilt down the transmission.
NOTICE:
Take care so that the cooling fan does not come in contact
with the fan shroud.
(b) Disconnect the following connectors:
(1) O/D direct clutch speed sensor connector
(2) Vehicle speed sensor connector
(3) Park/neutral position switch connector
(4) Solenoid connector
(c) Disconnect the wire harness from the clamp on the trans-
mission.
Page 127 of 1111
Q03099
17 mm
Head
14 mm Head17 mm Head
Q06924
± AUTOMATIC TRANSMISSIONAUTOMATIC TRANSMISSION UNIT (1UZ±FE)
AT±37
1985 Author�: Date�:
2000 LEXUS GS300/GS400 (RM718U)
15. REMOVE TRANSMISSION
Remove the 10 bolts and transmission.
Torque:
17 mm head: 72 N´m (730 kgf´cm, 53 ft´lbf)
14 mm head: 37 N´m (380 kgf´cm, 27 ft´lbf)
HINT:
At the time of installation, please refer to the following item.
Lift the front side of the engine.