Page 58 of 267
Indicator
s an d Gauge s
TUR N SIGNA L INDICATO R LIGH T
SR S INDICATO R LIGH T
CHEC K ENGIN E
INDICATO R LIGH T
LO W OI L PRESSUR E
INDICATO R LIGH T
ENGIN E COOLAN T
TEMPERATUR E GAUG E
CHARGIN G SYSTE M
INDICATO R LIGH T TUR
N SIGNA L INDICATO R LIGH T
SPEEDOMETE R
POWE R DRIV E
INDICATO R LIGH T
SEA T BEL T
REMINDE R
LIGH T
ANTI-LOCK BRAK E
SYSTE M INDICATO R CRUIS
E SE T
INDICATO R LIGH T
FUE L GAUG E
TRI P ODOMETE R
RESE T KNO B
TACHOMETE R 4-WHEEL DRIV E (4WD )
INDICATO R LIGH T
Instrument s an d Control s
HIG
H BEA M INDICATO R LIGH T
BRAK E SYSTE M INDICATO R LIGH T
TRIP ODOMETE R
WINTE R DRIV E
INDICATO R LIGH T
LO W FUE L
INDICATO R LIGH T
REDUCE
D POWE R
INDICATO R LIGH T
CHECKTRAN S
INDICATO R LIGH T
(A/ T only )
A/
T OI L TEM P
INDICATO R LIGH T
(A/ T only )
ODOMETER
Page 68 of 267

as indicated by the "U/S" (upshift)
light on the instrument panel.
If vehicle speed drops below
20 mph (30 km/h), or if the
engine is not running smoothly,
you should downshift to the next lower gear. You may need to
downshift two or more gears to
keep the engine running smoothly or for satisfactory performance.
This indicator comes on for a fewseconds when you turn the
ignition switch to the "ON"
position. 4-Whee
l Driv e
(4WD ) Indicato r
4WD models only
This indicator lights when the 4-Wheel Drive system is engaged.
With the 4WD-2WD switch in the "OFF" or 2WD position, this light
will come on to provide a "bulb
check" when the key is turned to the "ON" position, but should go
out after the engine is started.
If the 4WD-2WD switch is in the "ON" or 4WD position, this light
will come on when the key is
turned to the "ON" position and
remain on after the engine is
started.
Anti-Loc
k Indicato r
This light will come on and go out when the ignition switch is turned
to the "ON" position. (If the light
does not come on, see your Honda
dealer to have the system
repaired.)
If the light remains on after
engine start-up or comes on
during operation of the vehicle, stop as soon as possible and turn
the key off. Then start the engine
to reset the system. If the light stays on, or it comes on again
while you're driving, the anti-lock
brake system should be checked at your Honda dealer.
Until you get it fixed, you'll have
normal brakes, but you won't
have anti-lock.
Instrument s an d Control s
AB
S
Page 73 of 267

Do not use engine antifreeze or
a vinegar/water solution in the
windshield washer reservoir.
Antifreeze can damage your vehicle's paint, while a
vinegar/water solution can
damage the windshield washer
pump. Use only commercially available windshield washer fluid.
In cold weather, warm the
windshield with the defrosters
before using the washers. This
will help prevent icing of the
windshield that may block your
vision.
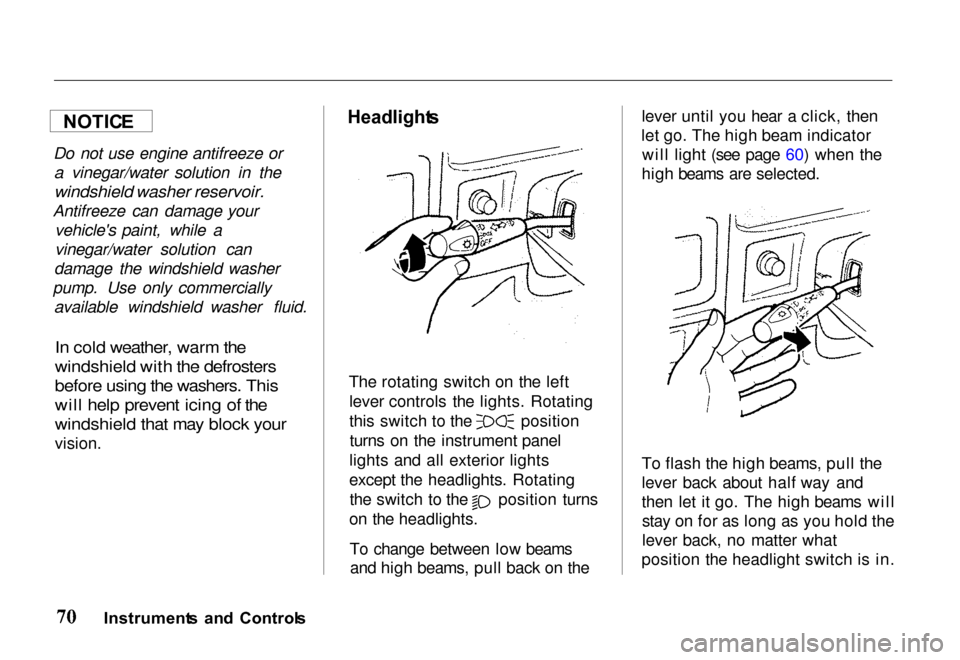
Headlight
s
The rotating switch on the left lever controls the lights. Rotating this switch to the position
turns on the instrument panel
lights and all exterior lights
except the headlights. Rotating the switch to the position turns
on the headlights.
To change between low beamsand high beams, pull back on the lever until you hear a click, then
let go. The high beam indicator will light (see page 60) when the
high beams are selected.
To flash the high beams, pull the
lever back about half way and
then let it go. The high beams will stay on for as long as you hold the
lever back, no matter what
position the headlight switch is in.
Instrument s an d Control s
NOTIC
E
Page 74 of 267
Headlights-On Reminder
You will hear a continuous tone
when the key is out of the ignitionswitch and the driver's door is
opened with the headlight switch in the "ON" position. This will
remind you to turn the headlights off. Never leave the headlights onwhen the engine is not running.
They can rapidly discharge the
battery.
Fo
g Light s
EX model only
When fog or heavy mist reducesyour forward vision, push thisswitch to turn the fog lights on.
The indicator light in the switch
turns on. Push the switch again to turn off the fog lights.
The fog lights operate only when the headlight low beams are in
use.
Illuminatio
n Contro l
The instrument panel lights turn on when the light switch is on.
Brightness of the instrument panel
lights is controlled by turning the illumination control knob
clockwise for brighter or counterclockwise for dimmer.
Instrument s an d Control s
DIMMER BRIGHTE
R
Page 75 of 267

Rea
r Windo w an d Mirro r
Defogger s
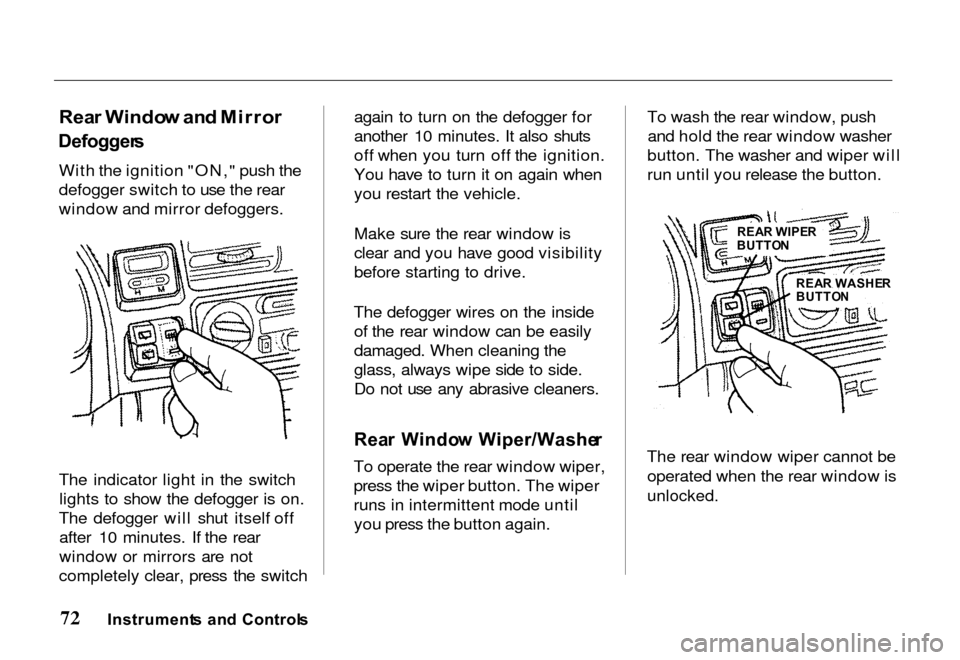
With the ignition "ON," push the
defogger switch to use the rear
window and mirror defoggers.
The indicator light in the switch lights to show the defogger is on.
The defogger will shut itself off after 10 minutes. If the rear
window or mirrors are not
completely clear, press the switch again to turn on the defogger for
another 10 minutes. It also shuts
off when you turn off the ignition.
You have to turn it on again when
you restart the vehicle.
Make sure the rear window is
clear and you have good visibility
before starting to drive.
The defogger wires on the inside of the rear window can be easily
damaged. When cleaning the
glass, always wipe side to side.
Do not use any abrasive cleaners.
Rea r Windo w Wiper/Washe r
To operate the rear window wiper,
press the wiper button. The wiper
runs in intermittent mode until you press the button again. To wash the rear window, push
and hold the rear window washer
button. The washer and wiper will
run until you release the button.
The rear window wiper cannot be operated when the rear window is
unlocked.
Instrument s an d Control s
REAR WIPE R
BUTTO N
REA R WASHE R
BUTTO N
Page 78 of 267

and the forward driving ranges.
The shift lever can be shifted freely into any position indicated by the arrow The lever
cannot be shifted into any position
indicated by the arrow
without pushing the button located on the end of the shift
lever. In this 4-speed automatic
transmission, the following three
modes can be selected by pressing the "POWER" or "WINTER"switch on the floor console, with
the key switch in the "ON"
position: NORMAL mode
POWER mode
WINTER mode
P (Park ) — Used to lock the
transmission when the vehicle is
parked or while starting the engine. Never move the shift lever
to Park until your vehicle is fullystopped. Use this position
together with the parking brake.
The shift lever can be moved from
PARK position if the regular brake is applied.
Refer to "Starting" in this section.R (Reverse ) — Used for backing
the vehicle. Bring your vehicle to a complete stop before shifting to
Reverse.
N (Neutral ) — The out-of-gear
position. You may restart a stalled
engine while the vehicle is still moving with the selector in
Neutral. Refer to "Starting" in thissection. This position is also used
when towing the vehicle. See "In
Case of Emergency" for towing information.
D (Drive ) (Firs t t o Fourt h
Gear ) — This position is for all
normal forward driving. For
normal driving, we recommend that you put the shift lever in the
"D" range. This will reduce
vehicle noise and improve fuel
economy.
Instrument s an d Control s
PAR
K
RE V
NEU T
DRIV E
3R D
2N D
1S T
Page 92 of 267

Fore/Af
t Sea t Adjustmen t
See pages 10-11 for important
safety information and warnings
about how to properly position
seats and seat-backs.
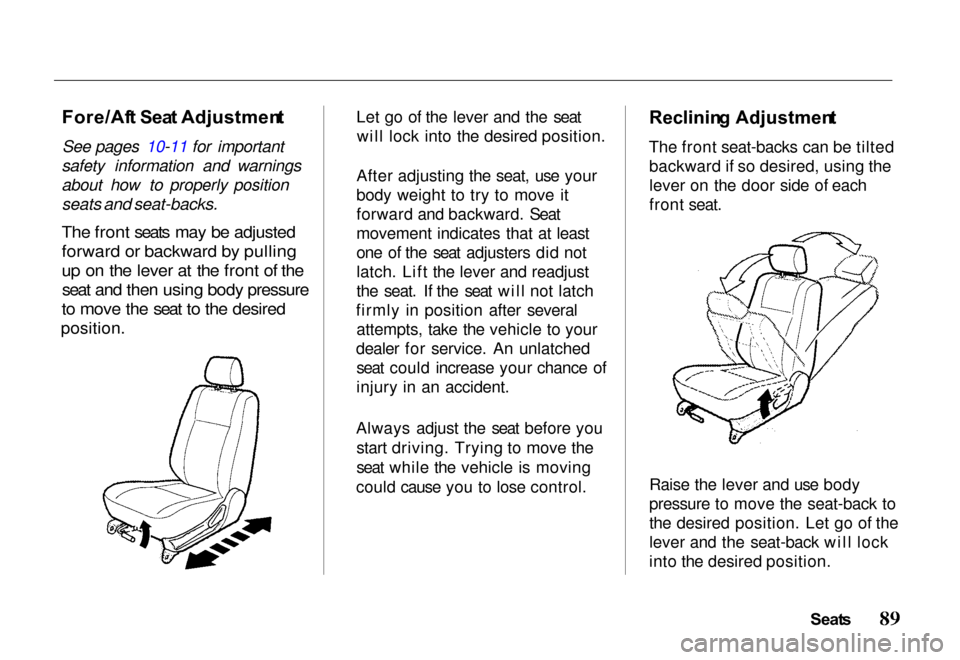
The front seats may be adjusted
forward or backward by pulling
up on the lever at the front of the seat and then using body pressure
to move the seat to the desired
position.
Let go of the lever and the seat
will lock into the desired position.
After adjusting the seat, use your
body weight to try to move it
forward and backward. Seat
movement indicates that at least
one of the seat adjusters did not
latch. Lift the lever and readjust
the seat. If the seat will not latch
firmly in position after several attempts, take the vehicle to your
dealer for service. An unlatched seat could increase your chance of
injury in an accident.
Always adjust the seat before you start driving. Trying to move the
seat while the vehicle is moving
could cause you to lose control.
Reclinin
g Adjustmen t
The front seat-backs can be tilted backward if so desired, using the
lever on the door side of each
front seat.
Raise the lever and use body
pressure to move the seat-back to
the desired position. Let go of the
lever and the seat-back will lock
into the desired position.
Seats
Page 93 of 267

Keep the seat belt's webbing and
latch clear of the seat parts when
you tilt the folding seats forward
or backward. This helps to
prevent damage to the seat belt
system.
Adjust the seat-back before you
start driving. Trying to adjust the
seat-back with the vehicle in
motion could cause you to lose
control.
Hea d Restraint s
See page 12 for important safety information and warnings about
how to properly position the head
restraints.
Head restraints are designed to
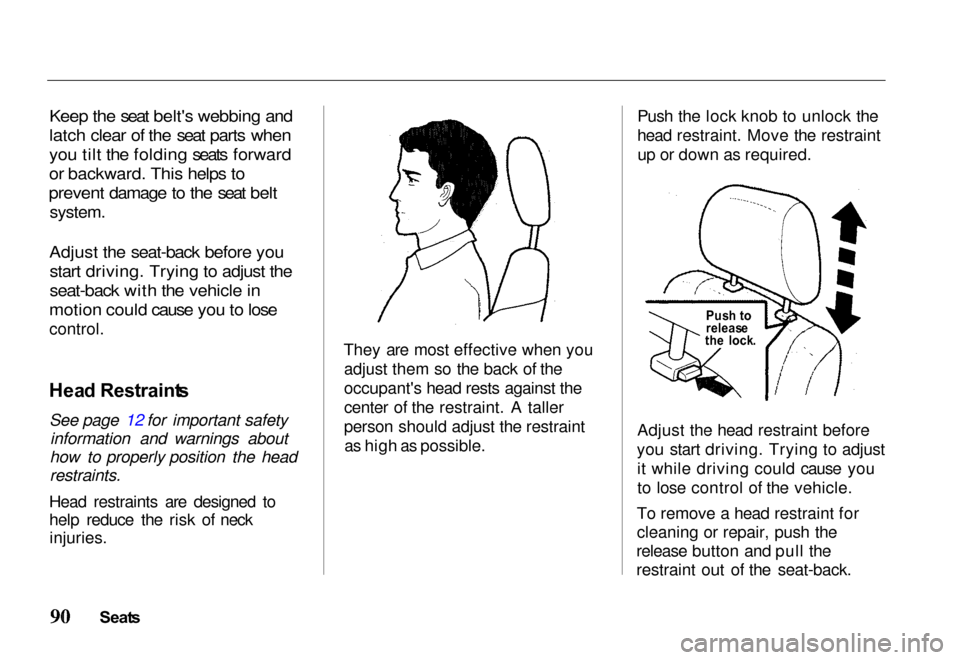
help reduce the risk of neck injuries. They are most effective when you
adjust them so the back of the
occupant's head rests against the
center of the restraint. A taller
person should adjust the restraintas high as possible. Push the lock knob to unlock the
head restraint. Move the restraint
up or down as required.
Adjust the head restraint before
you start driving. Trying to adjust it while driving could cause you
to lose control of the vehicle.
To remove a head restraint for
cleaning or repair, push the
release button and pull the
restraint out of the seat-back.
Seat s
Pus
h t o
releas e
th e lock .