2000 HONDA ODYSSEY fog light
[x] Cancel search: fog lightPage 6 of 352
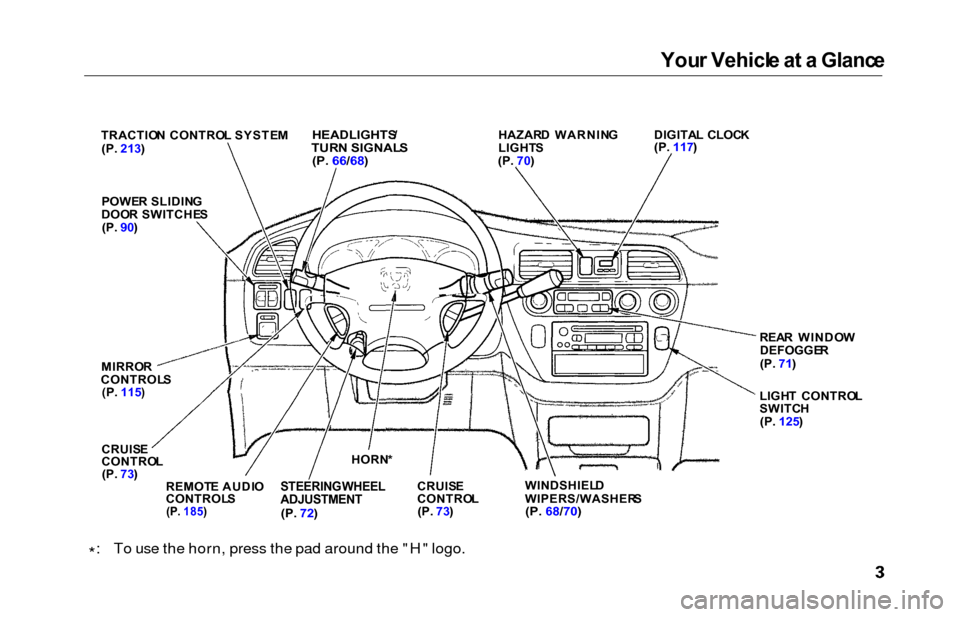
Your Vehicl e a t a Glanc e
*: To use the horn, press the pad around the "H" logo.
TRACTIO N CONTRO L SYSTE M
(P. 213 )HEADLIGHTS /TURN SIGNAL S
(P. 66/68 )HAZAR D WARNIN G
LIGHT S
(P. 70) DIGITA
L CLOC K
(P. 117 )
POWE R SLIDIN G
DOO R SWITCHE S
(P. 90)
MIRRO R
CONTROL S
(P. 115 )
CRUIS E
CONTRO L
(P. 73)
REMOT E AUDI O
CONTROL S
(P. 185 )
STEERING WHEELADJUSTMENT(P. 72)
HORN *
CRUIS E
CONTRO L
(P. 73) WINDSHIEL
D
WIPERS/WASHER S
(P. 68/70 )
LIGH T CONTRO L
SWITC H
(P. 125 )
REA
R WINDO W
DEFOGGE R
(P. 71)
Page 58 of 352

Instrument
s an d Control s
This section gives information about
the controls and displays that
contribute to the daily operation of
your Honda. All the essential
controls are within easy reach.
Control Locations............................
56
Indicator Lights...............................
. 57
Gauges.............................................. 62
Controls Near the Steering
Wheel........................................ 65
Headlights.................................... 66
Automatic Lighting Off
Feature......................................
67
Daytime Runnin
g Lights.............
67
Instrument
Pane
l Brightness.....
67
Turn
Signals................................
.
68
Windshield
Wipers.....................
. 68
Windshield Washers................... 70
Rear Window Wiper and Washer...................................... 70
Hazard Warning........................ 70
Rear Windo
w Defogger.............. 71
Steering Wheel Adjustment....... 72
Steering Wheel Controls................ 73
Cruise Control.............................. 73
Remote Audio Controls .............. 76
Keys and Locks................................ 76
Keys............................................... 76
Immobilizer System..................... 77
Ignition Switch............................. 78
Power Door Locks....................... 79
Remote Transmitter.................... 81
Childproof Door Locks............... 85
Tailgate......................................... 85
Glove Box..................................... 87
Manual Sliding Doors...................... 88
Power Sliding Doors........................ 89
HomeLink Universal Transmitter.................................. 95
Seats.................................................. 99
Passenger Seating....................... 99
Seat Adjustments....................... 100
Driver's Seat Power
Adjustments........................... 102
Armrests..................................... 103
Head Restraints......................... 104
Third Seat Access...................... 105 Moving the Second Row Bucket Seat............................ 106
Removing the Bucket Seats in the Second Row................. 108
Folding the Third Seat.............. 109
Power Windows............................. 112
Mirrors............................................ 115
Parking Brake................................ 116
Digital Clock................................... 117 Center Table................................... 117
Beverage Holder............................ 118
Sunglasses Holder......................... 120
Sun Visor......................................... 121
Vanity Mirror................................. 121 Rear Compartment........................ 122
Center Pocket................................ 122Coin Holder.................................... 122
Storage Box.................................... 123
Coat Hook....................................... 123
Accessory Power Sockets............. 124 Interior Lights................................ 125
Instrument s an d Control s
Page 68 of 352
Controls Nea r th e Steerin g Whee l
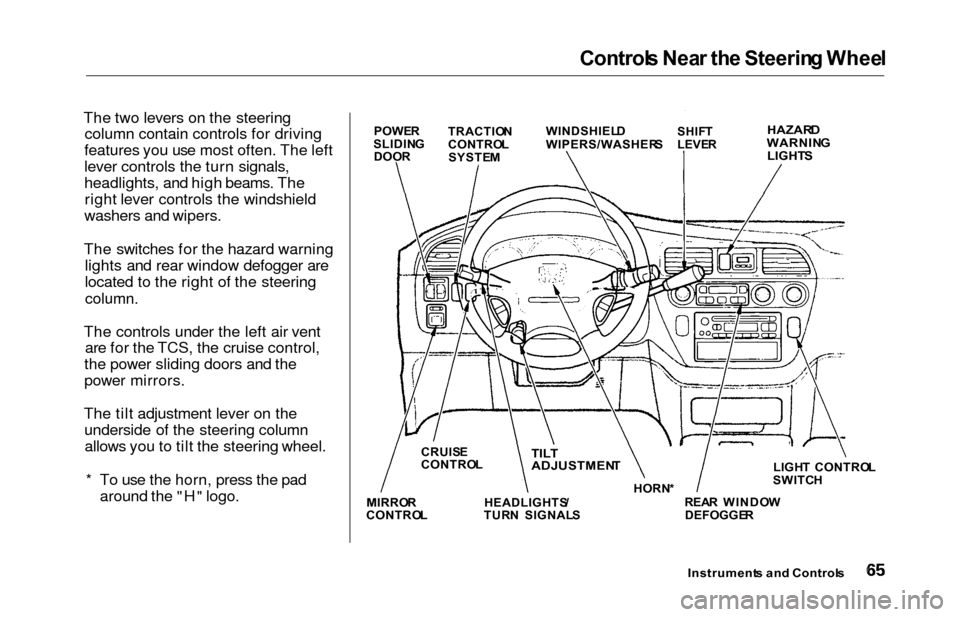
The two levers on the steering
column contain controls for driving
features you use most often. The left
lever controls the turn signals,
headlights, and high beams. The right lever controls the windshield
washers and wipers.
The switches for the hazard warning lights and rear window defogger are
located to the right of the steering
column.
The controls under the left air vent are for the TCS, the cruise control,
the power sliding doors and the
power mirrors.
The tilt adjustment lever on the underside of the steering columnallows you to tilt the steering wheel.
* To use the horn, press the pad around the "H" logo.
Instrument s an d Control s
POWER
SLIDIN G
DOO R TRACTIO
N
CONTRO L
SYSTE M WINDSHIEL
D
WIPERS/WASHER SSHIFT
LEVE RHAZAR DWARNIN G
LIGHT S
LIGHT CONTRO L
SWITC H
REA R WINDO W
DEFOGGE R
HORN
*TILT
ADJUSTMEN T
HEADLIGHTS /
TUR N SIGNAL S
CRUIS
E
CONTRO L
MIRRO R
CONTRO L
Page 74 of 352
Controls Nea r th e Steerin g Whee l
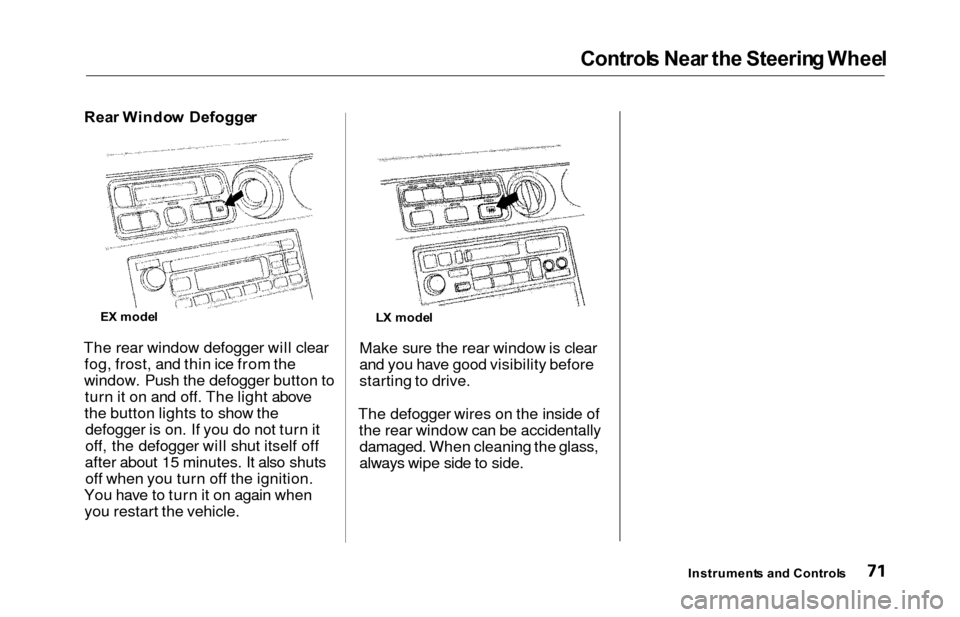
Rear Windo w Defogge r
The rear window defogger will clear fog, frost, and thin ice from the
window. Push the defogger button to turn it on and off. The light above
the button lights to show the defogger is on. If you do not turn it
off, the defogger will shut itself off
after about 15 minutes. It also shuts off when you turn off the ignition.
You have to turn it on again when you restart the vehicle. Make sure the rear window is clear
and you have good visibility before
starting to drive.
The defogger wires on the inside of the rear window can be accidentallydamaged. When cleaning the glass,
always wipe side to side.
Instrument s an d Control s
E
X mode l
LX mode l
Page 119 of 352
Mirrors, Parkin g Brak e
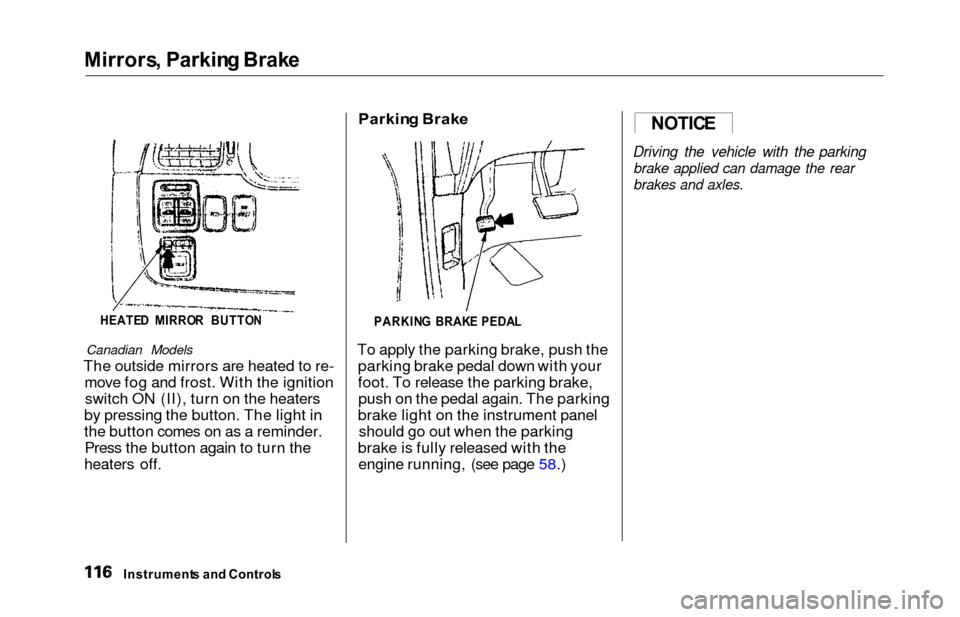
HEATE D MIRRO R BUTTO N
Canadian Models
The outside mirrors are heated to re-
move fog and frost. With the ignitionswitch ON (II), turn on the heaters
by pressing the button. The light in
the button comes on as a reminder. Press the button again to turn the
heaters off.
Parkin g Brak e
PARKIN G BRAK E PEDA L
To apply the parking brake, push the
parking brake pedal down with your
foot. To release the parking brake,push on the pedal again. The parking
brake light on the instrument panel should go out when the parking
brake is fully released with the engine running, (see page 58.)
Driving the vehicle with the parking
brake applied can damage the rear
brakes and axles.
Instrument s an d Control s
NOTICE
Page 133 of 352
Heating an d Coolin g
On LX model
Proper use of the Heating and
Cooling system can make the
interior dry and comfortable, and
keep the windows clear for best
visibility.
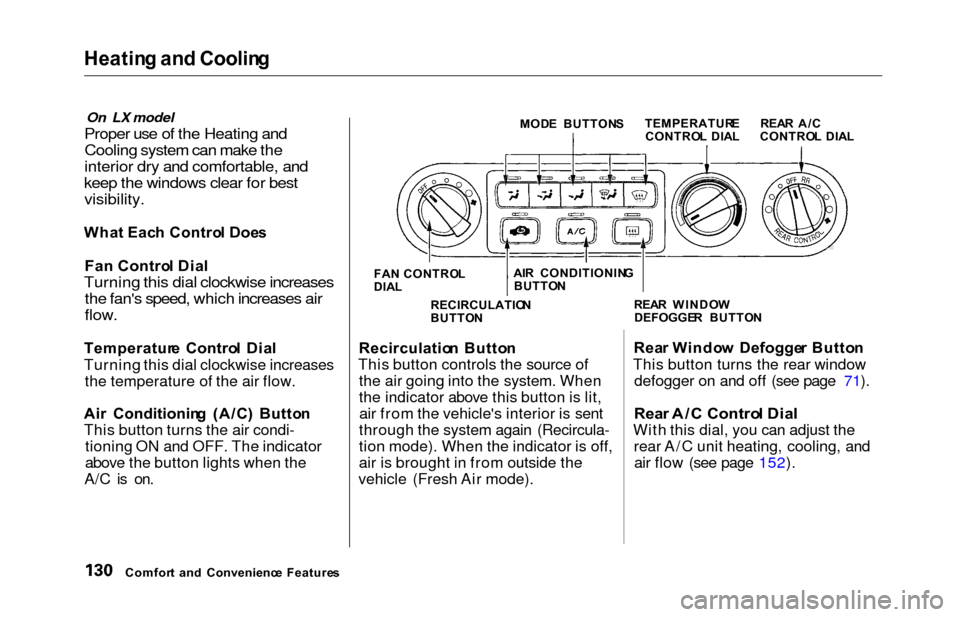
Wha t Eac h Contro l Doe s
Fa n Contro l Dia l
Turning this dial clockwise increases
the fan's speed, which increases air
flow.
Temperatur e Contro l Dia l
Turning this dial clockwise increases the temperature of the air flow.
Ai r Conditionin g (A/C ) Butto n
This button turns the air condi- tioning ON and OFF. The indicator
above the button lights when the
A/C is on.
MOD E BUTTON S
FA N CONTRO L
DIA L
Recirculatio n Butto n
This button controls the source of the air going into the system. When
the indicator above this button is lit,air from the vehicle's interior is sent
through the system again (Recircula-
tion mode). When the indicator is off,
air is brought in from outside the
vehicle (Fresh Air mode). Rea
r Windo w Defogge r Butto n
This button turns the rear window defogger on and off (see page 71).
Rea r A/ C Contro l Dia l
With this dial, you can adjust the
rear A/C unit heating, cooling, andair flow (see page 152).
Comfor t an d Convenienc e Feature s RECIRCULATIO
N
BUTTO N REA
R WINDO W
DEFOGGE R BUTTO N
TEMPERATUR
E
CONTRO L DIA L REA
R A/ C
CONTRO L DIA L
AI R CONDITIONIN G
BUTTO N
Page 219 of 352
Driving in Ba d Weathe r
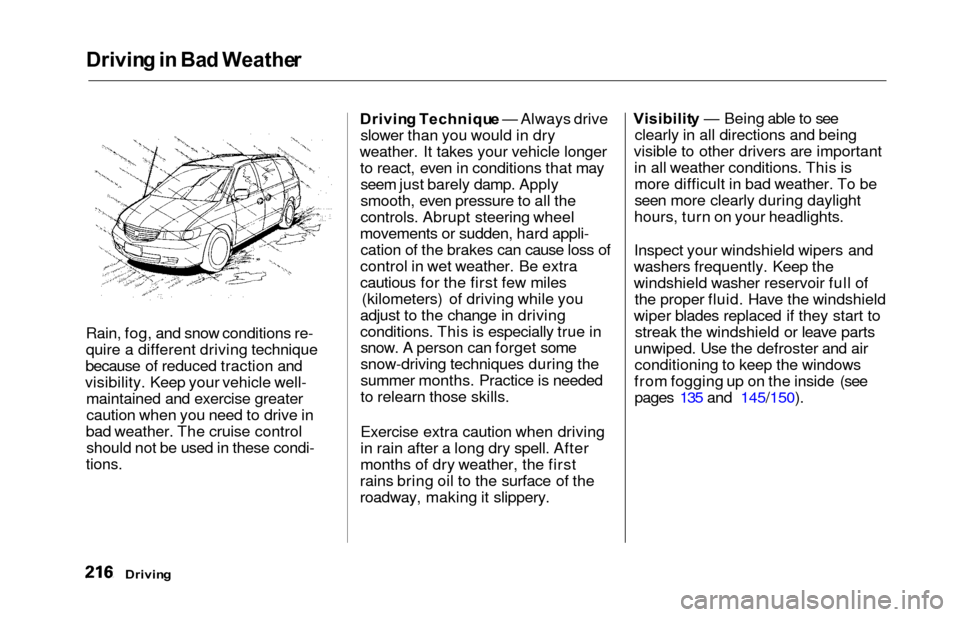
Rain, fog, and snow conditions re-
quire a different driving technique
because of reduced traction and
visibility. Keep your vehicle well- maintained and exercise greater
caution when you need to drive in
bad weather. The cruise control should not be used in these condi-
tions.
Drivin g Techniqu e — Always drive
slower than you would in dry
weather. It takes your vehicle longer to react, even in conditions that mayseem just barely damp. Apply
smooth, even pressure to all the
controls. Abrupt steering wheel
movements or sudden, hard appli- cation of the brakes can cause loss of
control in wet weather. Be extra
cautious for the first few miles (kilometers) of driving while you
adjust to the change in driving
conditions. This is especially true in snow. A person can forget some
snow-driving techniques during the
summer months. Practice is needed
to relearn those skills.
Exercise extra caution when driving
in rain after a long dry spell. After
months of dry weather, the first
rains bring oil to the surface of the
roadway, making it slippery. Visibilit
y — Being able to see
clearly in all directions and being
visible to other drivers are important in all weather conditions. This ismore difficult in bad weather. To be
seen more clearly during daylight
hours, turn on your headlights.
Inspect your windshield wipers and
washers frequently. Keep the
windshield washer reservoir full of the proper fluid. Have the windshield
wiper blades replaced if they start to streak the windshield or leave parts
unwiped. Use the defroster and air conditioning to keep the windows
from fogging up on the inside (see pages 135 and 145/150).
Drivin g
Page 344 of 352

Index
Checklist, Before Driving............. 202
Childproof Door Locks.................. . 85
Child Safety..................................... . 22
Cleaner Element, Air..................... 252
Cleaning
Aluminum Wheels.................... 285
Carpeting................................... . 286
Exterior....................................... 284
Fabric.......................................... 286
Interior........................................ 286
Seat Belts.................................... 286
Vinyl........................................... . 286
Windows.................................... . 287
Climate Control System................ 138
Clock, Setting the.......................... 117 Coat Hook....................................... 123
Code, Audio System ..................... 186
CO in the Exhaust ........................ 328
Coin Holder................................... . 122
Cold Weather, Starting in............. 203
Compact Spare............................... 292
Consumer Information*................ 332
Controls, Instruments and.............. 55
Coolant
Adding ........................................ 243
Checking ....................................
193
Proper Solution.......................... 243
Replacing.................................... 245
Temperature Gauge.................... 63
Corrosion Protection..................... 288
Crankcase Emissions Control
System......................................... 328
Cruise Control Operation .............. 73
Customer Relations Office........... 332
DANGER, Explanation of................. ii
Dashboard.................................... 2, 56
Daytime Running Lights................. 67
Dead Battery, What to Do............ 303
Defects, Reporting Safety............. 336
Defogger, Rear Window................. 71 Defrosting the Windows...... 135, 145
DEXRON
® III Automatic
Transmission Fluid.................... 249
Dimensions..................................... 322
Dimming the Headlights................ 66
Dipstick Automatic Transmission........... 249
Engine Oil................................... 192
Directional Signals........................... 68
Disabled, Towing Your
Vehicle If..................................... 317
Disc Brake Wear Indicators ........ 210
Disposal of Used Oil ................... 242
Doors
Locking and Unlocking ............. 79
Lockout Prevention ................... 80
Manual Sliding Doors.................. 88
Monitor Light .............................. 60
Power Door Locks....................... 79
Power Sliding Doors .................. 90
DOT Tire Quality Grading........... 324
Drive Belts..................................... 262
Driver and Passenger Safety .......... 5
Driving............................................ 201
Economy.................................... 194
In Bad Weather ....................... 216
In Foreign Countries ............... 327
Economy, Fuel............................... 194
Emergencies on the Road............. 291
Battery, Jump Starting.............. 303
CONTINUED